
1. Introduction
This manual provides instructions for the proper installation and maintenance of your Goodsby Replacement Dust Bin Lower Lid Cover. This product is designed to replace the lower lid cover of the dust bin on compatible LG CordZero A9 series cordless stick vacuum cleaners, restoring full functionality to your vacuum's dust collection system.
Please read this manual thoroughly before installation to ensure correct usage and to prevent damage to the product or your vacuum cleaner.
2. Safety Information
- Always ensure the vacuum cleaner is powered off and unplugged from its charging station before attempting any installation or maintenance.
- Handle the replacement part with care to avoid damage.
- Keep small parts away from children.
- If you encounter any difficulties, refer to the troubleshooting section or consult a qualified technician.
3. Package Contents
- 1 x Goodsby Replacement Dust Bin Lower Lid Cover
4. Setup and Installation
Follow these steps to replace the dust bin lower lid cover on your LG CordZero A9 series vacuum cleaner.
4.1. Removing the Old Lid Cover
Step 1: Detach the Dust Bin. Ensure your LG CordZero A9 vacuum is turned off and the dust bin is removed from the main unit. Empty any debris from the dust bin.
Step 2: Locate the Retaining Screw. Identify the small screw located on the side of the dust bin assembly, near the hinge of the lower lid. This screw secures the lid mechanism.
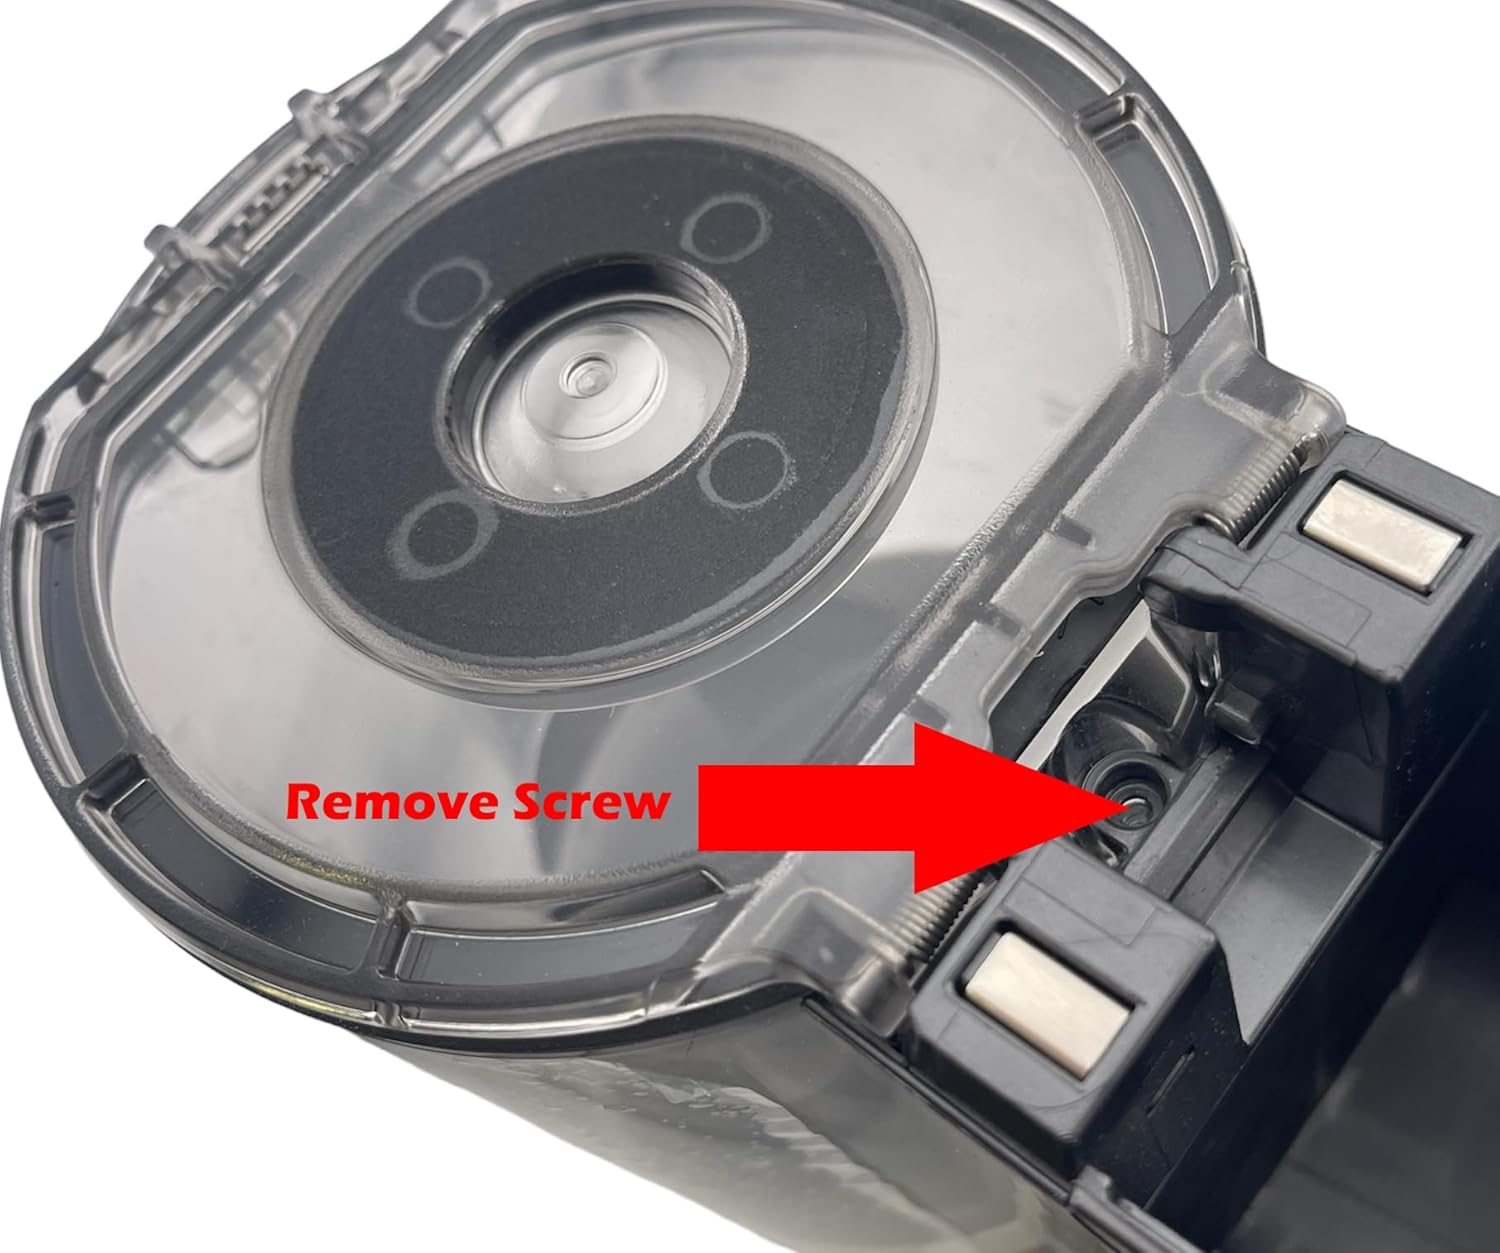
Figure 1: Location of the retaining screw on the dust bin. Use a small Phillips head screwdriver to remove this screw.
Step 3: Remove the Screw. Using a suitable screwdriver (typically a small Phillips head), carefully remove the retaining screw. Keep the screw in a safe place as it will be reused.
Step 4: Release the Lid. With the screw removed, gently press the release buttons (if present) on the sides of the dust bin and pull the lower lid assembly upwards to detach it from the main dust bin body.
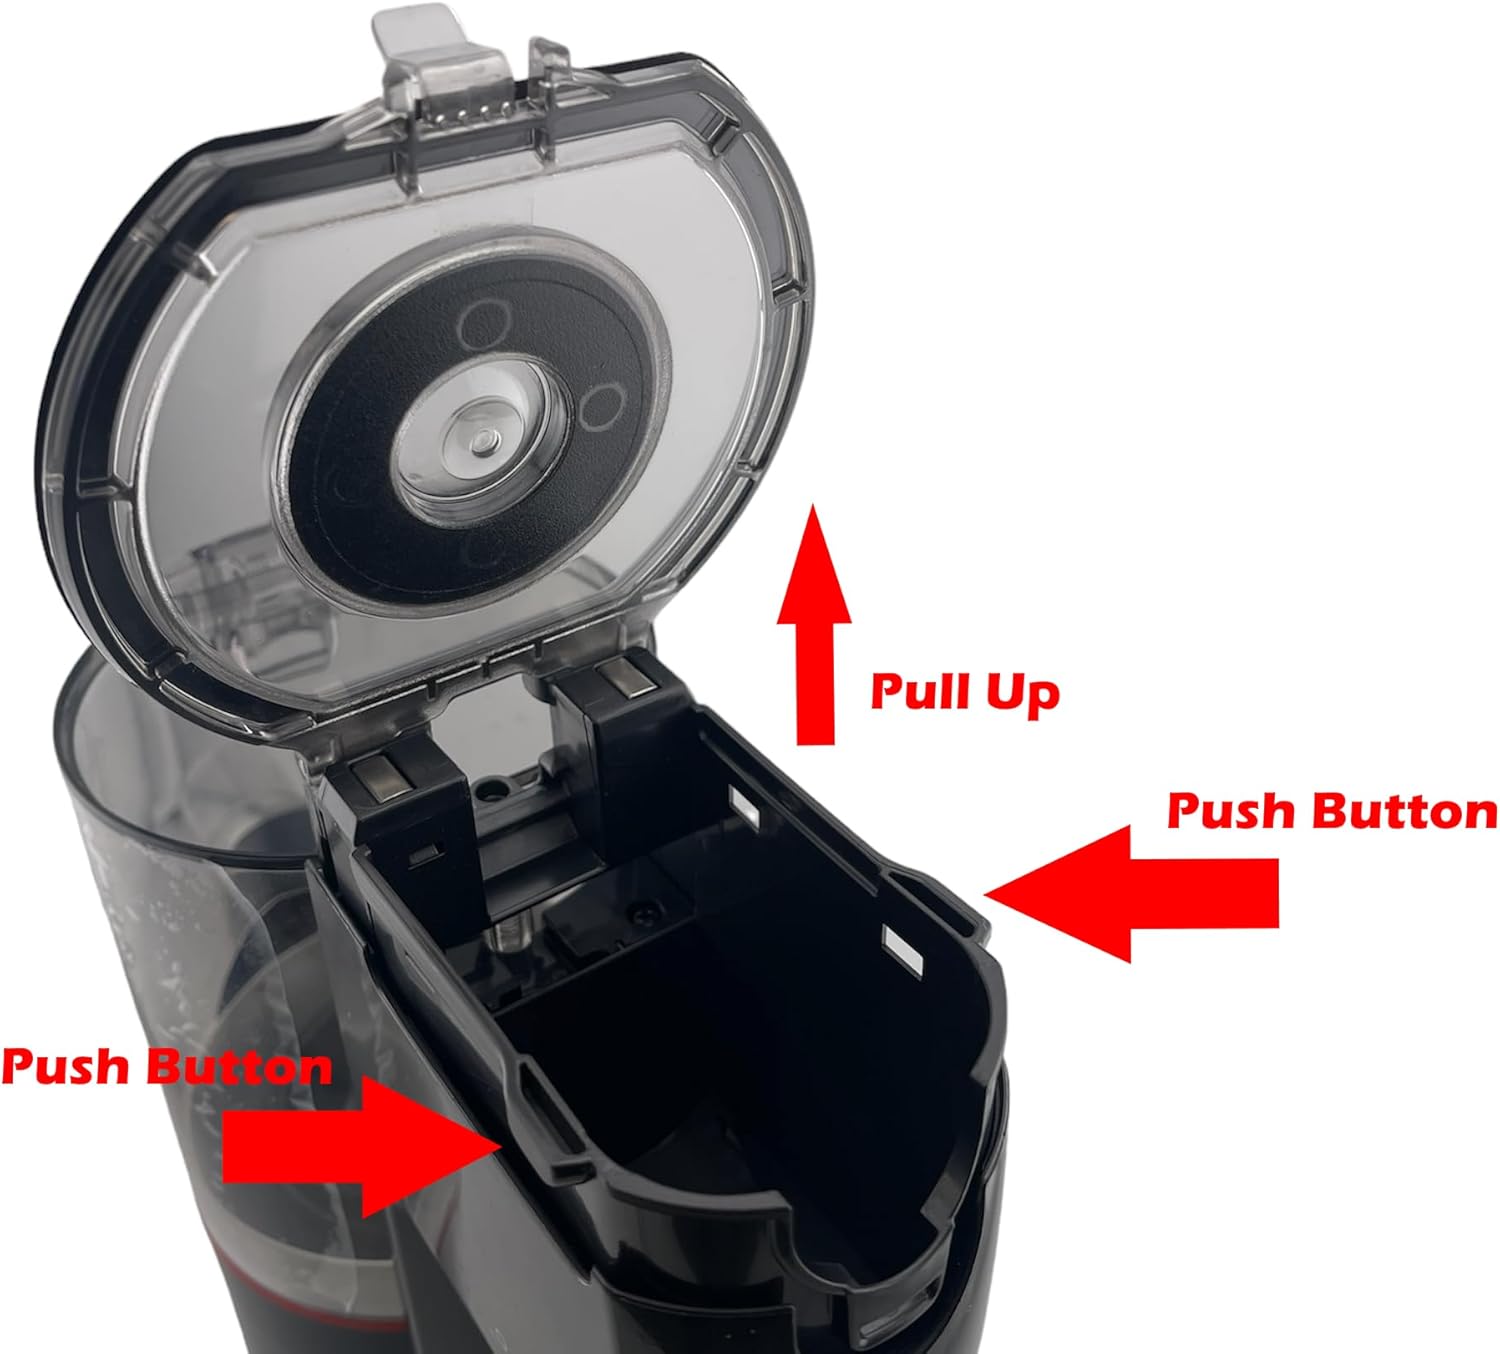
Figure 2: Detaching the lower lid assembly by pressing side buttons and pulling up.
Step 5: Separate the Lid from the Frame. The old lower lid cover might be attached to a frame. Carefully separate the damaged lid from its frame, noting how it was connected (e.g., clips, hinges).
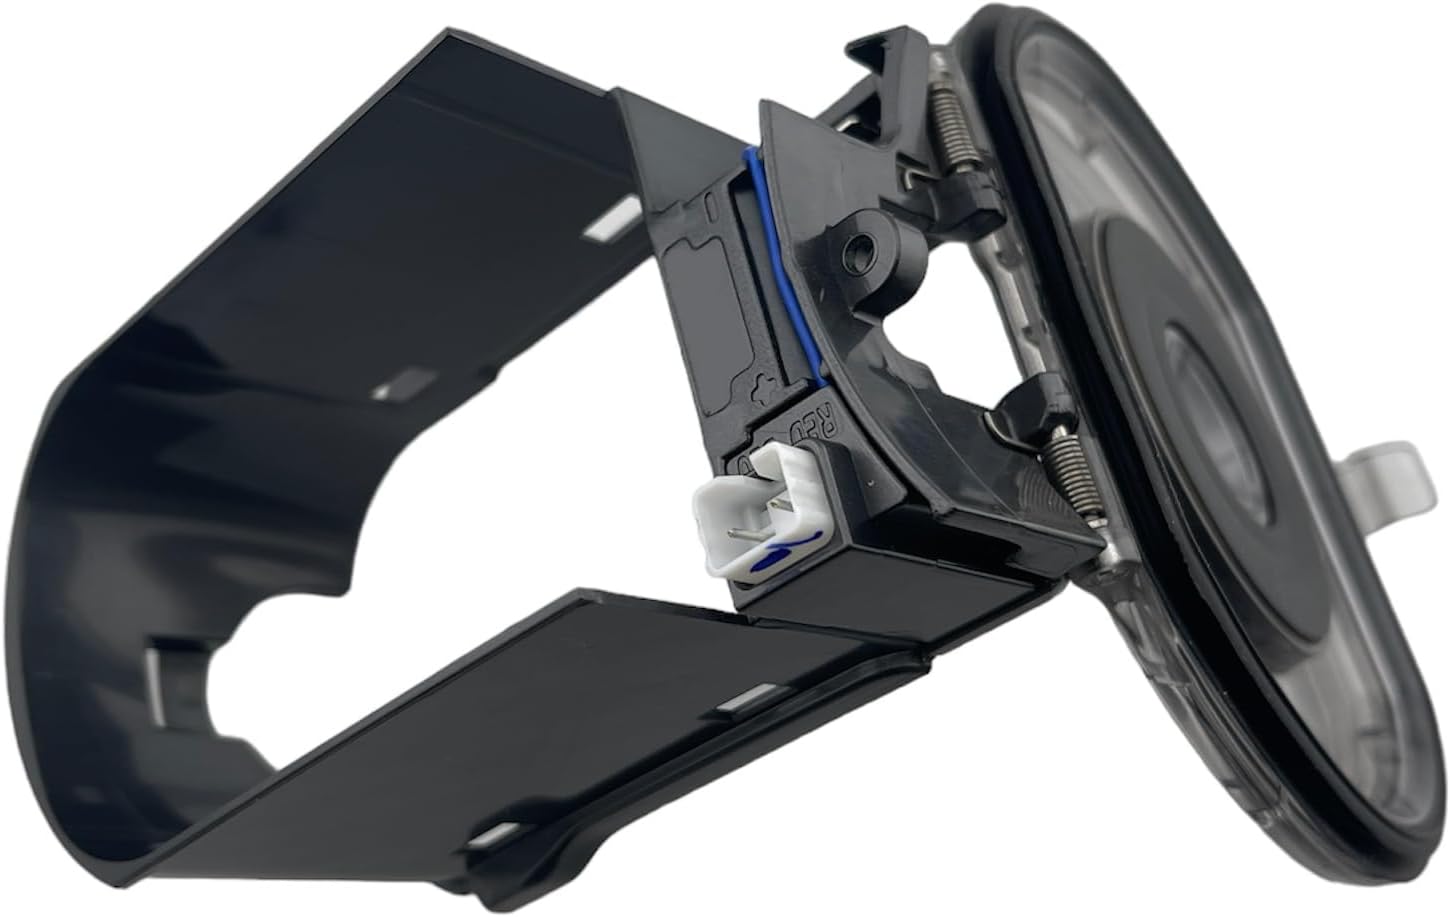
Figure 3: The lower lid cover detached from its frame, ready for replacement.
4.2. Installing the New Lid Cover
Step 6: Attach New Lid to Frame. Take your new Goodsby Replacement Dust Bin Lower Lid Cover and carefully attach it to the existing frame (or the new frame if your replacement includes one). Ensure all clips or hinge points align correctly.

Figure 4: The new lower lid cover assembled with its frame.
Step 7: Reattach Assembly to Dust Bin. Align the new lower lid assembly with the dust bin body and push it firmly into place until it clicks securely. Ensure the hinge mechanism is properly seated.
Step 8: Reinsert Retaining Screw. Reinsert the screw removed in Step 3 and tighten it gently to secure the lid assembly. Do not overtighten.
Step 9: Test Functionality. Open and close the new lower lid several times to ensure it operates smoothly and latches securely. Reattach the dust bin to your vacuum cleaner.
5. Operating Instructions
Once installed, the Goodsby Replacement Dust Bin Lower Lid Cover functions identically to the original part. To empty the dust bin, simply press the release button to open the lower lid, allowing collected debris to fall out. Ensure the lid is securely closed after emptying to maintain vacuum suction.
6. Maintenance
To ensure optimal performance and longevity of your replacement lid cover:
- Cleaning: Periodically wipe the lid cover with a damp cloth to remove dust and grime. Avoid using harsh chemicals or abrasive cleaners.
- Inspection: Regularly inspect the lid and its hinges for any signs of wear or damage. Ensure the latch mechanism operates freely.
- Avoid Force: Do not force the lid open or closed if it feels stiff. Check for any obstructions.
7. Troubleshooting
Lid does not close securely:
- Check for any debris trapped in the hinge or latch mechanism.
- Ensure the lid assembly is correctly seated and the retaining screw is tightened.
Lid feels loose after installation:
- Verify that the retaining screw is fully tightened.
- Confirm that the lid assembly is properly clipped into the dust bin body.
Difficulty removing or installing the lid:
- Ensure the correct screwdriver size is used for the retaining screw.
- Apply gentle, even pressure. Do not use excessive force.
8. Specifications
| Product Name | Goodsby Replacement Dust Bin Lower Lid Cover |
| Model Number | GFL - A9 Lid Cover |
| Compatibility | LG CordZero A9, A905, A906, A907, A908, A912, A913, A916, A926, A927, A929 Cordless Stick Vacuum Cleaners |
| Package Dimensions | 11.85 x 5.24 x 4.41 inches |
| Item Weight | 3.34 ounces |