1. Introduction
Thank you for choosing the Gochanmi Master8 8-Channel Professional Audio Mixer. This mixer is designed for professional audio applications, offering a comprehensive set of features including 8 microphone/line inputs, 199 DSP effects, Bluetooth connectivity, USB audio interface functionality, and 48V phantom power. This manual provides detailed instructions for setup, operation, and maintenance to ensure optimal performance and longevity of your device.
2. Safety Instructions
WARNING: To reduce the risk of electric shock, do not expose this appliance to rain or moisture.
- Read all instructions carefully before operating the mixer.
- Keep this manual for future reference.
- Do not use this apparatus near water.
- Clean only with a dry cloth.
- Do not block any ventilation openings. Install in accordance with the manufacturer's instructions.
- Do not install near any heat sources such as radiators, heat registers, stoves, or other apparatus (including amplifiers) that produce heat.
- Protect the power cord from being walked on or pinched, particularly at plugs, convenience receptacles, and the point where they exit from the apparatus.
- Only use attachments/accessories specified by the manufacturer.
- Unplug this apparatus during lightning storms or when unused for long periods of time.
- Refer all servicing to qualified service personnel. Servicing is required when the apparatus has been damaged in any way, such as power-supply cord or plug is damaged, liquid has been spilled or objects have fallen into the apparatus, the apparatus has been exposed to rain or moisture, does not operate normally, or has been dropped.

3. Product Overview and Features
The Gochanmi Master8 is an advanced 8-channel audio mixer designed for versatility and high-quality sound. It integrates a range of features suitable for live performances, studio recording, and DJ applications.
Key Features:
- 8 Microphone/Line Inputs: Equipped with 8 XLR dual-purpose interfaces and 16 single-plug mono line inputs.
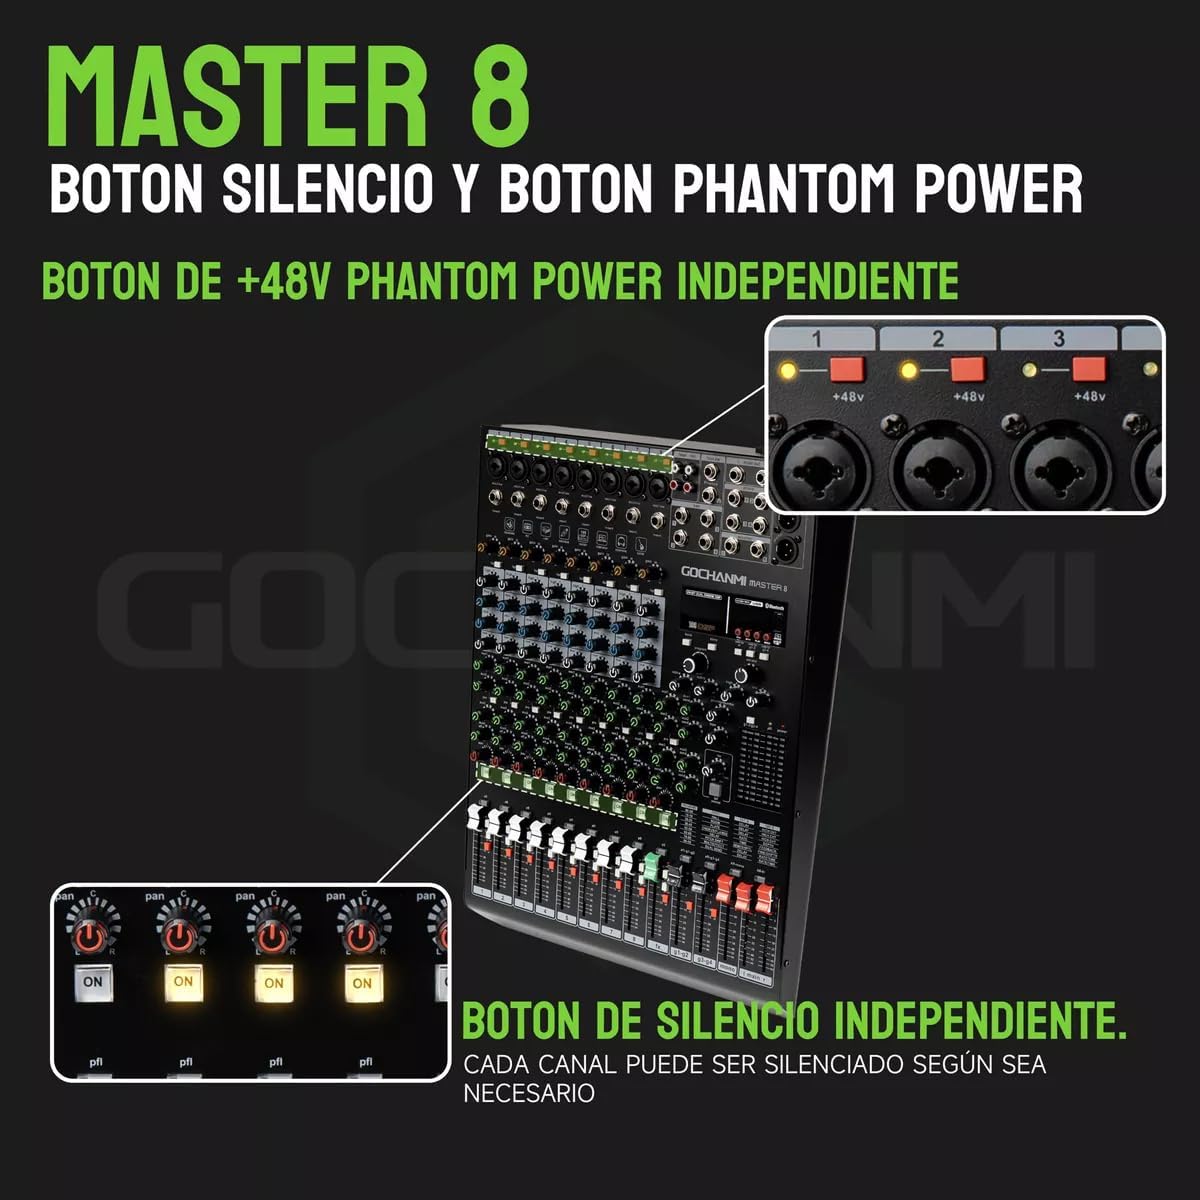
- +48V Phantom Power: Independent phantom power for each microphone input channel.
- 199 DSP Effects: Integrated 199-bit DSP effects device for versatile sound processing.
- 4-Segment Equalizer: Each mono input channel features a 4-segment equalizer (three-segment stereo).
- Pressure Limit Control: Channel bypass is equipped with pressure limit control and peak indicator light.
- Bluetooth Connectivity: Wireless connection for audio streaming from mobile devices.
- USB Functionality: Acts as a sound card for computer recording and playback, and supports direct recording/playback from a U-disk or external hard drive.
- Multiple Outputs: Includes 2 sets of auxiliary output, 2 groups of output, 1 set of stereo monitor output, 1 set of headphone monitor output, and 1 set of subwoofer output.

4. Setup
Proper setup is crucial for optimal performance. Follow these steps to connect your Master8 mixer.
4.1 Power Connection
- Ensure the mixer's power switch is in the OFF position.
- Connect the provided power cable to the mixer's power input on the rear panel.
- Plug the other end of the power cable into a suitable electrical outlet (110-220V).
4.2 Input Connections
The Master8 mixer supports various input sources:
- Microphones: Connect XLR microphones to the XLR inputs (channels 1-8). For condenser microphones requiring power, activate the +48V Phantom Power button for the respective channel.
- Line-Level Instruments/Devices: Connect instruments (guitars, keyboards) or other line-level devices to the 6.35mm (1/4 inch) line inputs.

4.3 Output Connections
- Main Output: Connect your main speakers or amplifier to the main stereo outputs.
- Monitor Output: Connect studio monitors or stage monitors to the monitor outputs.
- Headphones: Plug your headphones into the dedicated headphone jack for monitoring.
- Subwoofer Output: Connect a subwoofer for extended bass response.
4.4 USB Connection
The mixer offers versatile USB connectivity:
- Computer Connection (Sound Card): Use a USB cable to connect the mixer to your computer. This allows the mixer to function as an audio interface for recording and playback.
- External Storage: Connect a U-disk or external hard drive to the USB port for direct audio recording or playback of stored music.

5. Operating Instructions
This section details the operation of the Master8 mixer's various controls and features.
5.1 Channel Controls
- Gain Control: Adjust the input sensitivity for each channel (MIC: 0 to 48dB, LINE: -33 to +15dB).
- Equalizer (EQ): Each mono channel has a 4-segment EQ (High, Mid, Low, and a sweepable Mid-Frequency control). Adjust these knobs to shape the tone of each input.
- +48V Phantom Power: Press the +48V button for the respective channel to supply power to condenser microphones.
- Mute Button: Each channel has an independent mute button to quickly silence an input.

5.2 DSP Effects
The Master8 features 199 built-in DSP effects to enhance your audio.
- Use the 'PROGRAMS' knob to select the desired effect type (00-99).
- The display will show the selected effect number.
- Adjust 'EDIT A' and 'EDIT B' parameters to fine-tune the effect characteristics (e.g., Delay Time, Reverb Decay).
- Use the 'EFF' control on each channel to send the desired amount of signal to the effects processor.

5.3 Bluetooth Connection
Connect your mobile device wirelessly via Bluetooth for audio playback.
- After powering on the mixer, the display will show 'NO'. Press the 'MODE' button to switch to Bluetooth mode.
- The display will change from 'NO' to 'BLUE', indicating Bluetooth mode is active.
- On your mobile phone, search for Bluetooth devices and connect to 'MASTER'.

6. Specifications
| Parameter | Value |
|---|---|
| Microphone Input | 8 channels (8 XLR dual-purpose interfaces) |
| Line Input | 16 channels single-plug mono |
| Output Channels | 2 AUX, 2 Group, 1 Stereo Monitor, 1 Headphone Monitor, 1 Subwoofer |
| Effects Device | 199-bit DSP effects |
| Phantom Power | +48V for each microphone input |
| Frequency Response | 20Hz-20kHz, ±3dB |
| Distortion | <0.003% (A-weighted) |
| Microphone Input Noise | -119dB (A-weighted) |
| Common Mode Rejection Ratio | 60dB |
| Single Channel Input Gain (MIC) | 0 to 48dB |
| Single Channel Input Gain (LINE) | -33 to +15dB |
| Stereo Channel Input Gain (LINE) | -8 to +6dB |
| Main Mix Crossover | -87dBu (A-weighted) |
| Channel Crosstalk | -85dBu (A-weighted) |
| Maximum Output Level | +20dBu |
| MIC Input High-Pass Filter | 75 Hz, 18 dB/oct. |
| Single Channel EQ (High) | ±15dB@12KHz |
| Single Channel EQ (Mid) | ±12dB@2.5KHz |
| Single Channel EQ (Low) | ±15dB@80Hz |
| Power Supply | Built-in switching power adapter 110-220V, 30W |
| Power Consumption | <=23W |
| Product Weight | 6.35 Kilograms |
| Package Dimensions | 59 x 45 x 17 cm |
| Model Number | MASTER 8 |
| Connectivity Technology | 6.35mm, Bluetooth, USB, XLR |
7. Troubleshooting
If you encounter issues with your Master8 mixer, refer to the following common problems and solutions.
7.1 No Sound Output
- Check Power: Ensure the mixer is powered on and the power indicator light is active.
- Volume Levels: Verify that all channel faders, main mix faders, and master volume controls are set to an audible level.
- Input Connections: Confirm that all input sources (microphones, instruments) are correctly connected to the appropriate input jacks.
- Output Connections: Ensure speakers or headphones are properly connected to the main or monitor outputs.
- Mute Buttons: Check that no channel or master mute buttons are engaged.
- Phantom Power: For condenser microphones, ensure +48V phantom power is activated for the specific channel.
7.2 Hum or Noise in Audio
- Ground Loop: Try connecting all audio equipment to the same power strip to avoid ground loops.
- Cables: Use high-quality, shielded cables. Replace any damaged cables.
- Gain Staging: Ensure input gain levels are not set too high, which can introduce noise. Adjust gain until the peak indicator light flashes only occasionally.
- Interference: Keep the mixer away from sources of electromagnetic interference (e.g., power transformers, mobile phones).
7.3 Bluetooth Connection Issues
- Bluetooth Mode: Ensure the mixer is in Bluetooth mode (display shows 'BLUE').
- Device Visibility: Make sure your mobile device's Bluetooth is enabled and discoverable.
- Distance: Keep the mobile device within the effective range of the mixer's Bluetooth.
- Pairing: If previously paired, try unpairing and re-pairing the device.
8. Maintenance
Regular maintenance will help preserve the condition and functionality of your mixer.
- Cleaning: Use a soft, dry cloth to clean the exterior of the mixer. Avoid using abrasive cleaners, solvents, or waxes.
- Ventilation: Ensure ventilation openings are clear of dust and debris to prevent overheating.
- Storage: When not in use, store the mixer in a cool, dry place, away from direct sunlight and extreme temperatures.
- Cable Care: Avoid bending or crimping cables excessively. Disconnect cables by pulling the plug, not the cable itself.
9. Warranty and Support
This product comes with a seller warranty of 30 days from the date of purchase. For any issues or technical support, please contact your retailer or the manufacturer directly. Keep your purchase receipt as proof of purchase for warranty claims.