
1. Introduction

Figure 1.1: DMSIDN 52cc-2 Stroke Gas Powered Earth Digger
This manual provides essential information for the safe and efficient operation, maintenance, and troubleshooting of your DMSIDN 52cc-2 Stroke Gas Powered Earth Digger. Please read this manual thoroughly before initial use and keep it for future reference. This powerful tool is designed to simplify digging tasks for fence posts, planting, and other garden or farm applications, reducing manual labor and increasing efficiency.
2. Safety Information
Operating gas-powered equipment requires adherence to strict safety guidelines to prevent injury or damage. Always wear appropriate personal protective equipment (PPE) including safety glasses, hearing protection, gloves, and sturdy footwear. Ensure the work area is clear of bystanders, especially children and pets. Never operate the auger under the influence of alcohol or drugs. Always turn off the engine and allow it to cool before refueling or performing maintenance.
Fuel Handling:
- Mix fuel in a well-ventilated area away from ignition sources.
- Use a 1:25 ratio of two-stroke engine oil to gasoline.
- Store fuel in approved containers.
- Do not smoke while handling fuel.
3. Package Contents
Verify that all items listed below are included in your package:
- 1x Digging machine (main unit)
- 3x Drill Bits: 4", 6", and 8"
- 1x 12" Extension Bar
- 1x Fuel Mixing Bottle
- 1x Funnel
- 1x Starting Handle
- Tool Kit for Assembly
Note: You may receive two parcels separately.
4. Assembly and Setup
Follow these steps to assemble your earth digger:
- Connect the Drive Shaft: Insert the drive shaft of the auger bit into the gearbox output shaft.
- Insert the Bolt: Align the holes and insert the securing bolt through the shaft and bit.
- Secure with Pin: Insert the R-pin or cotter pin to lock the bolt in place, ensuring the auger bit is firmly attached.
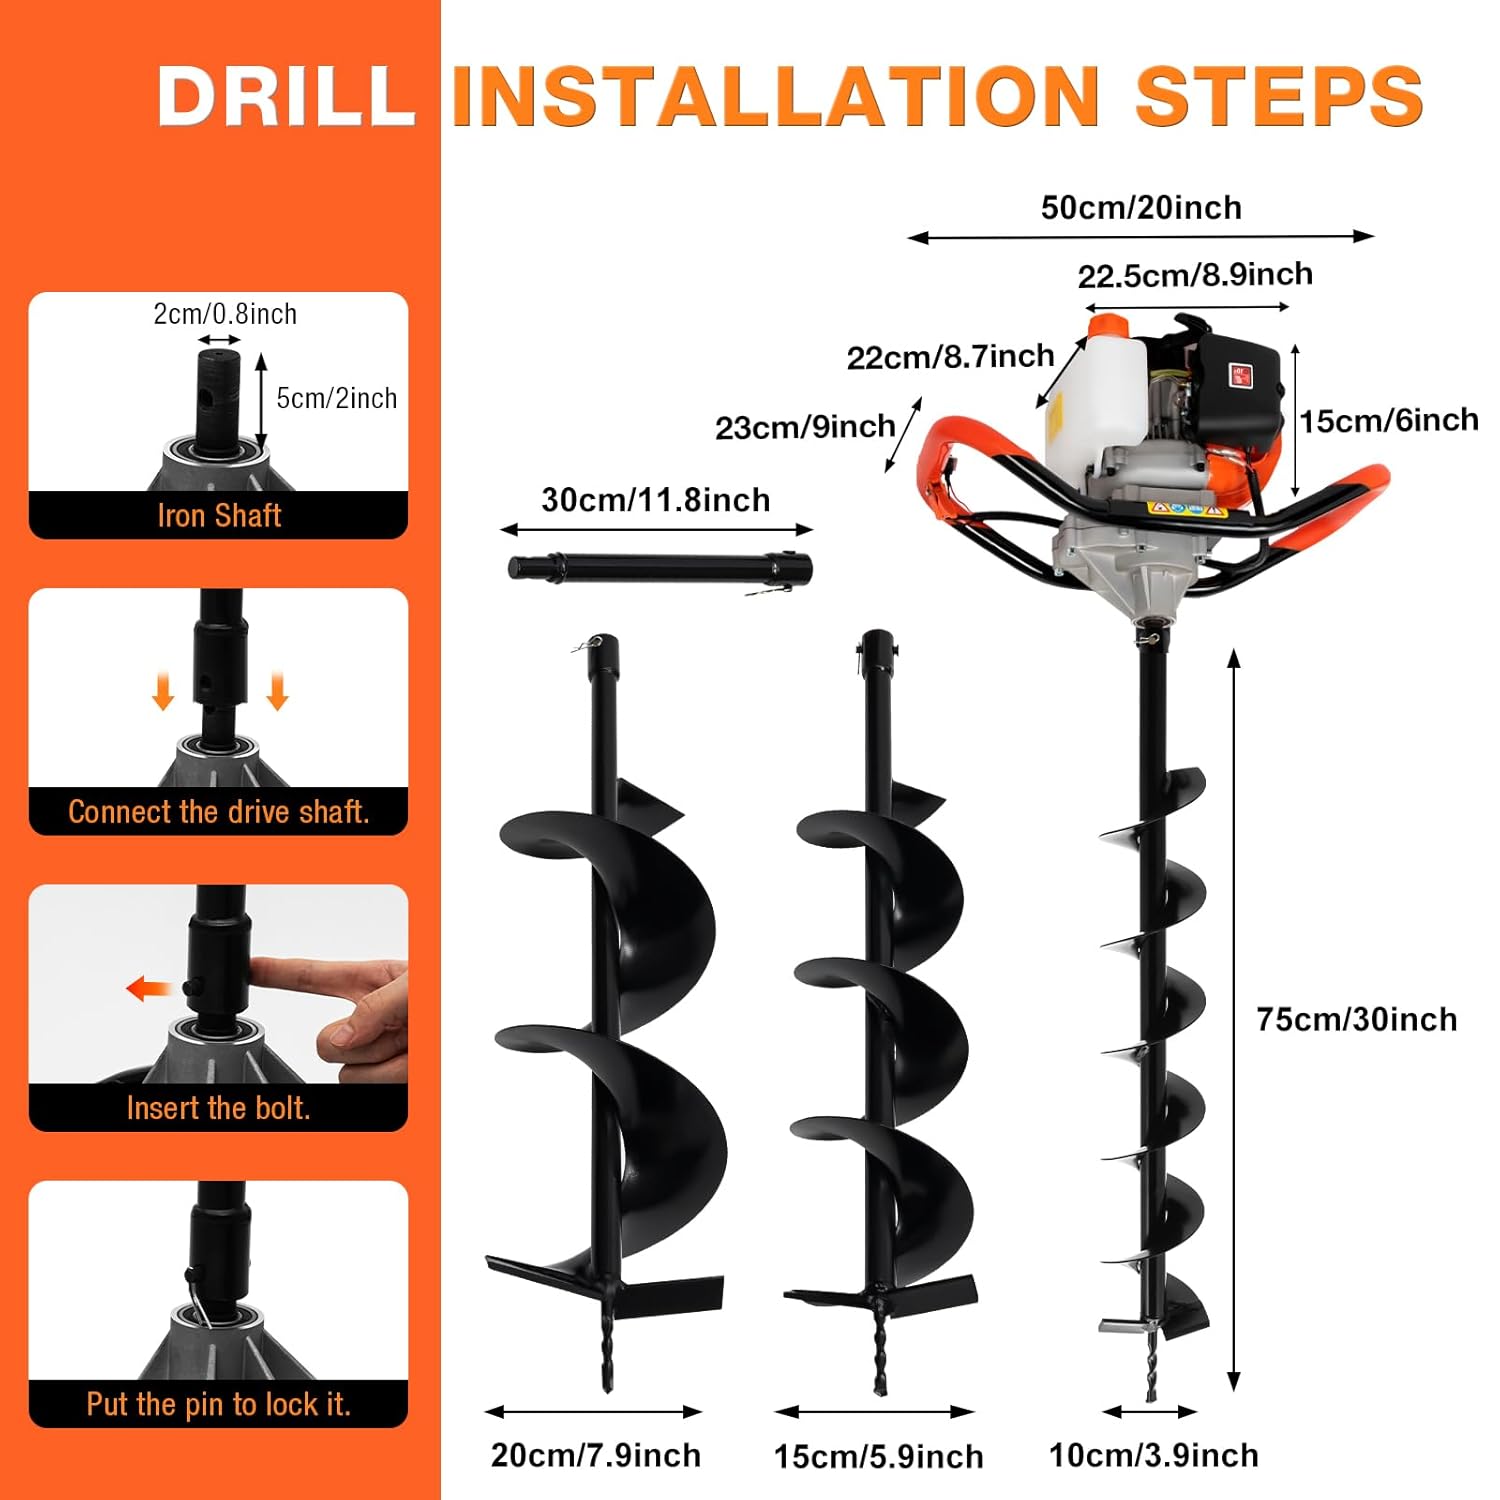
Figure 4.1: Drill Installation Steps
The auger comes with multiple drill bit sizes (4", 6", and 8") and an extension rod for varying depth requirements. Ensure the correct bit is selected for your task.
5. Fuel Mixing
This auger operates on a 2-stroke engine and requires a specific fuel mixture. Use only two-stroke engine oil, not four-stroke oil.
- Prepare Fuel: Use a clean, approved fuel container.
- Mixing Ratio: The recommended fuel mix ratio is 1:25 (1 part two-stroke oil to 25 parts gasoline).
- Mix Thoroughly: Add the correct amounts of oil and gasoline to the mixing bottle. Close the bottle and shake it evenly to ensure a consistent mixture.

Figure 5.1: Fuel Ratio Introduction
Note: Oils are not included with the product.
6. Operating Instructions
Familiarize yourself with the controls and starting procedure before operating the auger.
6.1. Controls Overview

Figure 6.1: Practical Details and Controls
- On/Off Button: Simple switch for power control.
- Smooth Manual Starter: For initiating engine operation.
- PP Engine Housing: Provides protection against drops and impacts.
- Aluminum Gearbox: Heat tolerant and sealed for durability.
- Steel Handle with Rubber Sleeve: Offers a stable and comfortable grip.
- Large Fuel Tank (0.3 gal): Allows for extended use without frequent refueling.
- Throttle Switch: Adjusts engine speed to suit different soil conditions.
6.2. Starting Method
- Turn on the Switch: Locate and activate the On/Off switch to the "On" position.
- Prime the Fuel: Before each start, press the oil bubble (primer bulb) several times to suction fuel into the oil pipe until it is visible.
- Close Damper (Cold Start): When starting a cold engine, close the damper switch first.
- Pull Start Handle: When ignition is heard, pull the start handle 5-8 times.
- Open Damper: Once the engine starts, open the damper switch.

Figure 6.2: Starting Method
6.3. Drilling Operation
Hold the auger firmly with both hands using the ergonomic handles. Position the auger bit over the desired drilling location. Gradually apply throttle to begin drilling. Allow the auger to dig into the soil, applying steady downward pressure. If the auger binds, release the throttle and clear any obstructions before resuming. The powerful 52CC engine with 8500RPM rotational speed is designed for various soil conditions, including sandy soil, forested areas, and farmland.
Video 6.1: Demonstration of Auger Post Hole Digger in use, showing how to start and operate the machine for digging holes.

Figure 6.3: Wide Usage Scenarios
7. Maintenance
Regular maintenance ensures the longevity and optimal performance of your earth digger.
- Engine Cooling: The engine features large cooling holes for long-lasting operation. Keep these clear of debris.
- Gearbox: The gearbox is constructed with ball-bearing shafts and alloy gears. Check for any unusual noises or resistance during operation.
- Cleaning: After each use, clean the auger bit and the main unit to remove soil and debris.
- Storage: Store the auger in a dry, secure location, away from direct sunlight and extreme temperatures.

Figure 7.1: Engine Heat Dissipation Features

Figure 7.2: Low Fuel Consumption System
8. Troubleshooting
If you encounter issues with your earth digger, refer to the following common problems and solutions:
| Problem | Possible Cause | Solution |
|---|---|---|
| Engine does not start | Incorrect fuel mixture, no fuel, spark plug issue, damper setting. | Check fuel level and mixture ratio. Ensure spark plug is clean and connected. Verify damper is set correctly for cold/warm start. |
| Loss of power during operation | Clogged air filter, improper fuel mixture, dull auger bit. | Clean or replace air filter. Verify fuel mixture. Inspect and sharpen/replace auger bit. |
| Auger binds in soil | Hard soil, roots, rocks. | Reduce downward pressure. Clear obstructions. Consider pre-soaking very hard soil. |
9. Specifications
Detailed technical specifications for the DMSIDN 52cc-2 Stroke Gas Powered Earth Digger:
- Engine Type: Single Cylinder, 2-stroke, air-cooled
- Cylinder Capacity: 52cc
- Horsepower: 2.4hp
- Power Output: 1.9W / 7500rpm
- Rotational Speed: 8500rpm (maximum)
- Fuel Mix Ratio: 1:25 (Two-stroke oil to gasoline)
- Weight: 10.35kg (approx. 22.8 lbs)
- Item Dimensions: 30.7 x 14 x 19.7 inches
- Drill Bits Included: 4", 6", 8"
- Bit Length: 31"
- Extension Bar: 12"
- Material: Metal, High-Speed Steel or Tungsten Carbide, Plastic or Rubber
- Cutting Diameter: 8 Inches (maximum)
- Minimum Bore Diameter: 4 Inches
- Finish Type: Uncoated or Black Oxide
- Shank Type: Round Shank
- Surface Recommendation: Soil
10. Warranty and Support
For warranty information, technical support, or replacement parts, please contact DMSIDN customer service. Keep your purchase receipt and product model number (mhc200) handy when contacting support.
Return Policy: The product typically has a 30-day return policy for refund or replacement. Please refer to your retailer's specific return policy for details.