1. Introduction
This manual provides detailed instructions for the safe and efficient operation, maintenance, and troubleshooting of your VEVOR Fully Automatic Cup Sealing Machine, Model WY-980. Please read this manual thoroughly before operating the machine to ensure proper use and to prevent damage or injury.

Figure 1: VEVOR Fully Automatic Cup Sealing Machine (Model WY-980)
This image shows the overall view of the VEVOR Fully Automatic Cup Sealing Machine, highlighting its compact design and digital control panel.
2. Safety Information
For your safety, the VEVOR Cup Sealer Machine is designed with an anti-pinch security door. This feature automatically stops operation upon contact with foreign objects or accidental touches, ensuring user safety during operation.
- Always ensure the machine is placed on a stable, level surface.
- Do not operate the machine with wet hands or in wet environments.
- Keep hands and loose clothing away from moving parts during operation.
- Unplug the machine before cleaning or performing any maintenance.
- Ensure proper ventilation around the machine during use.

Figure 2: Anti-Pinch Safety Mechanism
This image illustrates the anti-pinch safety feature, showing how the machine automatically stops if an object or hand is detected, preventing accidents.
3. Setup and Installation
3.1 Unpacking and Placement
Carefully remove the cup sealing machine from its packaging. Place the machine on a sturdy, flat, and dry surface. Ensure there is adequate space around the machine for ventilation and operation.
3.2 Film Roll Installation
Proper installation of the sealing film is crucial for optimal performance. Follow these steps:
- Install the right film roll onto the designated spindle.
- Securely fix the film roll in place.
- Pass the film through the electric eye-sensing device.
- Guide the film through the tension tube.
- Fix the film securely.
- Install the left film roll onto its spindle.
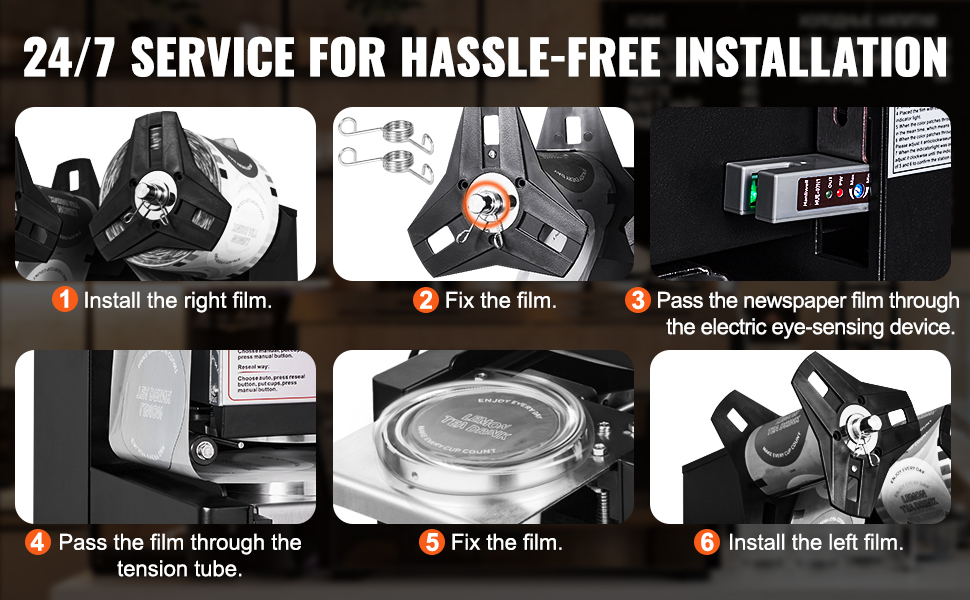
Figure 3: Film Installation Guide
This image provides a step-by-step visual guide for installing the sealing film correctly onto the VEVOR Cup Sealing Machine.
3.3 Power Connection
Connect the machine to a suitable power outlet (230 Volts, 420 Watts). Ensure the power supply matches the machine's requirements.
3.4 Cup Ring Installation
The machine includes additional rings to prevent loss and ensure proper cup fit. Choose the correct ring according to the mouth of the cup you are using.

Figure 4: Cup Caliber and Height Compatibility
This image illustrates the machine's compatibility with 90/95mm cups and heights from 90-190mm, along with the use of additional rings for proper fit.
4. Operating Instructions
4.1 Cup Compatibility
The VEVOR Cup Sealing Machine is compatible with cups ranging from 90 mm to 190 mm in height and 90/95 mm in diameter. It is designed for cups and film materials made of PP/PE/PS. Important: The machine is incompatible with PET material, paper cups, glass cups, etc. The cup and film material should always be the same for effective sealing.
4.2 Temperature Adjustment
The smart heating ring adjusts to your cup's material for a perfect seal. The temperature adjustment range is 50-250°C (122-482°F). For optimal sealing, it is recommended to choose dark-colored induction blocks for the sealing film.

Figure 5: Heat Sealing Mechanism
This image highlights the high-temperature heat sealing ring and its ability to create leak-proof seals for various compatible cup materials (PS, PE, PP).
4.3 Dual Operating Modes
The machine offers both manual and automatic modes to suit varying operational needs:
- Manual Mode: Ideal for lower traffic periods, saving electricity.
- Automatic Mode: Suitable for higher traffic, saving time and effort.
Switch between modes easily to match your pace.
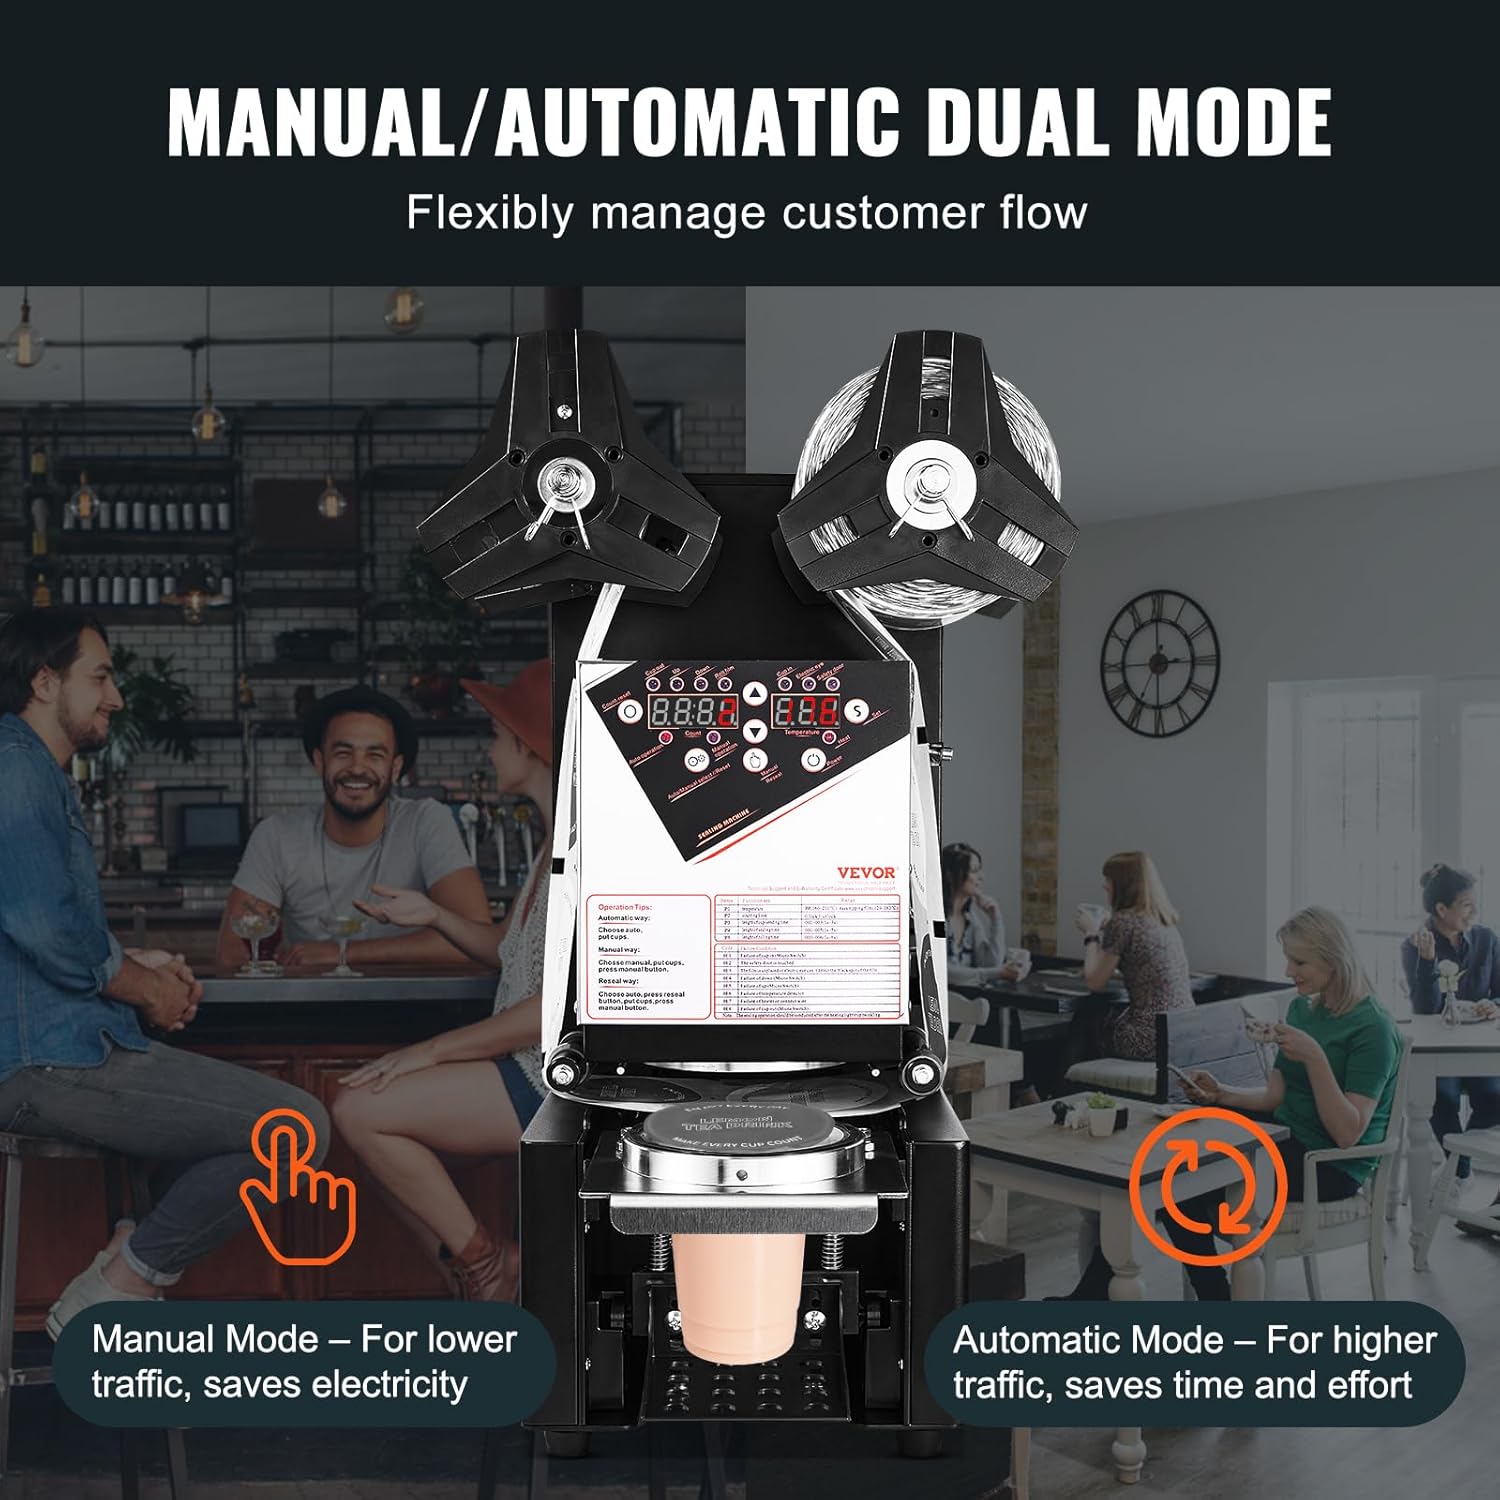
Figure 6: Dual Operating Modes
This image visually represents the two operating modes: manual for energy saving during low traffic, and automatic for efficiency during high traffic.
4.4 Sealing Process and Automatic Counting
The machine features an LCD intelligent display that provides multiple functions, including temperature adjustment, zeroing, and automatic cup counting. This allows for effortless tracking of sealed cups.
The automatic up/down holder ensures steady cup entry and exit. The lowest height is 9 cm, and the highest height is 18 cm. Non-slip rubber foot pads provide double stability.

Figure 7: Digital Control Panel
This image displays the LCD intelligent control panel, showing features like resetting, quantity tracking, and temperature display.
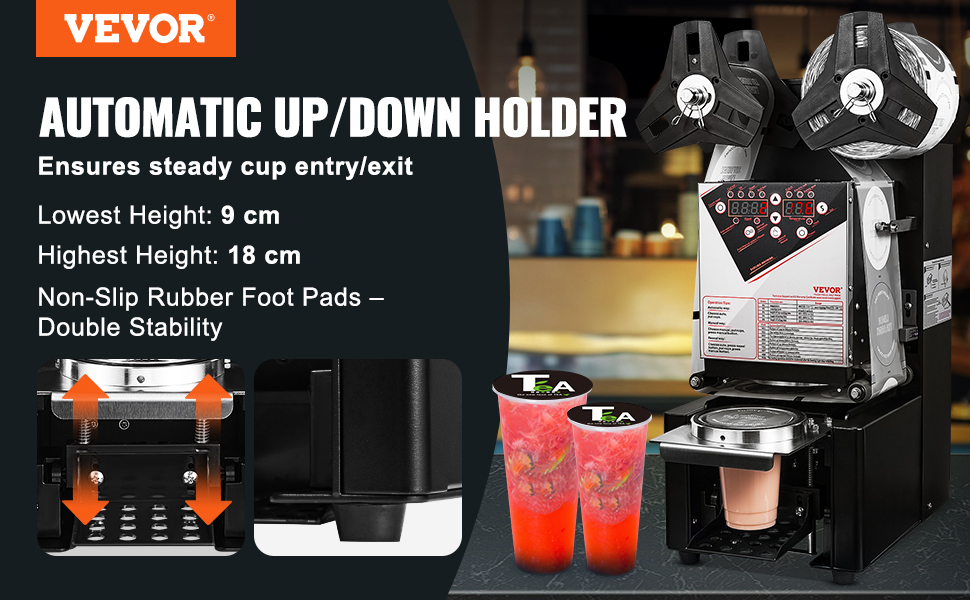
Figure 8: Automatic Cup Holder
This image demonstrates the automatic up/down cup holder, ensuring smooth and stable cup handling during the sealing process.
4.5 One-Touch Reseal Feature
The machine includes a convenient one-touch reseal feature for added flexibility.
5. Maintenance
5.1 General Cleaning
Regular cleaning of the machine is essential for maintaining hygiene and optimal performance. Use a damp cloth to wipe down exterior surfaces. Avoid using abrasive cleaners or solvents.
5.2 Cleaning the Film Path
Ensure the film path and the area around the electric eye sensor are free from debris or film residue. This is crucial for accurate film feeding and sealing.
6. Troubleshooting
6.1 Error Code E3
If the machine displays an E3 error, it typically indicates an issue with the sealing film or the electric eye sensor. First, ensure that any used sealing film in the upper left corner of the machine is completely cleaned out. Then, reinstall the sealing film and attempt to seal a cup. If the E3 fault persists, adjust the sensitivity of the electric eye sensor.
To adjust the electric eye sensor: The blank area of the sealing film should be inside the light-emitting slot. If the detection indicator (OUT) is on, adjust the electric eye damping screw clockwise until the detection indicator (OUT) is off. This ensures the sensor correctly detects the film's position.
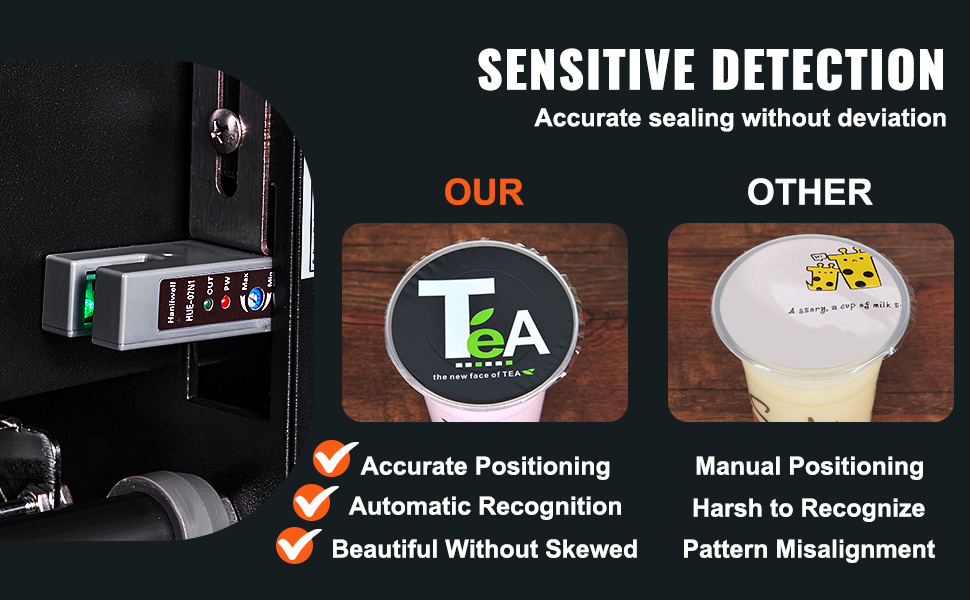
Figure 9: Sensitive Detection and Adjustment
This image illustrates the sensitive detection system and how accurate positioning is achieved, contrasting it with manual positioning issues. It also shows the electric eye sensor.
6.2 Sealing Issues (Leaks, Incomplete Seals)
- Incorrect Cup/Film Material: Ensure both the cup and film are made of compatible materials (PP/PE/PS). The machine is not compatible with PET materials, which can lead to melting or improper sealing.
- Temperature Setting: Verify the temperature setting is appropriate for the material being sealed. Adjust as necessary within the 50-250°C range.
- Film Alignment: Check that the sealing film is properly aligned and tensioned. Refer to Section 3.2 for correct film installation.
7. Specifications
| Attribute | Detail |
|---|---|
| Item Model Number | WY-980 |
| Brand | VEVOR |
| Material | Stainless Steel |
| Color | Black |
| Item Weight | 54.04 Pounds (approx. 24.5 kg) |
| Power Source | Corded Electric |
| Operation Mode | Automatic |
| Wattage | 420 watts |
| Voltage | 230 Volts |
| UPC | 197988813668 |
| Product Dimensions | 15.16 x 13.98 x 25.59 inches (385 x 355 x 650 mm) |
| Sealing Speed | 500-650 cups/h |
| Max Sealing Cup Height | 7.48 in / 190 mm |
| Temperature Range | 122°F-482°F / 50°C-250°C |

Figure 10: Key Specifications and Dimensions
This image provides a visual summary of the VEVOR Cup Sealing Machine's specifications, including its model number, sealing speed, dimensions, and weight.
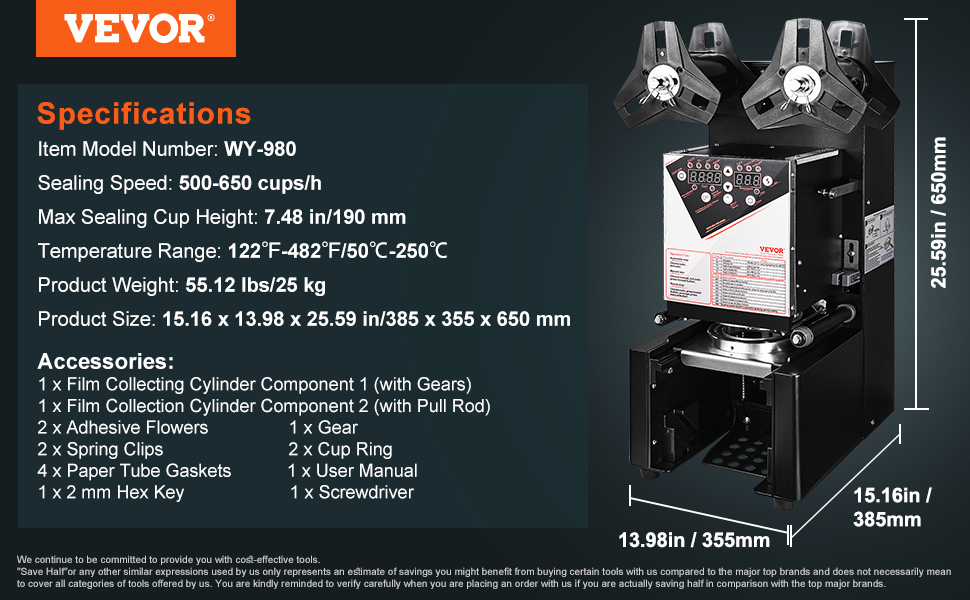
Figure 11: Specifications and Included Accessories
This image details the machine's specifications and lists the accessories included with the product, such as film collection cylinders, adhesive flowers, spring clips, cup rings, and the user manual.
8. Warranty and Support
For warranty information and customer support, please refer to the documentation provided with your purchase or visit the official VEVOR website. VEVOR is committed to providing reliable products and customer assistance.
For additional support or inquiries, please contact VEVOR customer service through their official channels.
9. Product Applications
The VEVOR Cup Sealing Machine is versatile and suitable for various commercial settings requiring efficient cup sealing.
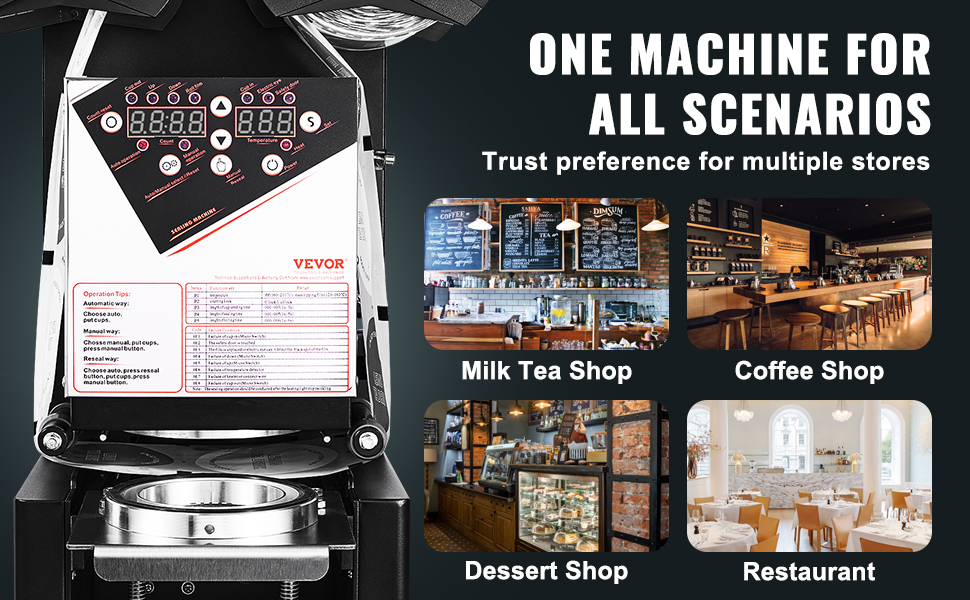
Figure 12: Versatile Applications
This image showcases the machine's suitability for various businesses, including milk tea shops, coffee shops, dessert shops, and restaurants.