1. Introduction
This document provides essential instructions for the setup, operation, and troubleshooting of your KRPTQJoo replacement remote control, Model CXE5116. This remote is designed as a replacement for specific Pioneer AVH series car receivers and is not a universal remote control. Please ensure compatibility with your unit before use.
Compatible Pioneer Models include: AVH-3850DVD, AVH-X7850BT, AVH-X6850DVD, AVH-X5850BT, AVH-X4850DVD, AVH-X2850BT, AVH-X1850DVD, AVH-X5750BT, AVH-P3450DVD, AVH-2500NEX, AVIC-W6600NEX, AVI-C6100NEX, AVH-P8400BH, AVH-X8500BHS, AVH-290BT, AVH-291BT, AVH-195BT, AVH-295BT, AVH-1300NEX, AVH-X390BS, AVH-2300NEX, AVH-X490BS, AVH-190DVD.
2. Setup
2.1 Battery Installation
The remote control requires two (2) AAA alkaline batteries (not included). Follow these steps to install them:
- Open the battery compartment cover located on the back of the remote control.
- Insert two new AAA batteries, ensuring the positive (+) and negative (-) terminals align correctly with the markings inside the compartment.
- Close the battery compartment cover securely.
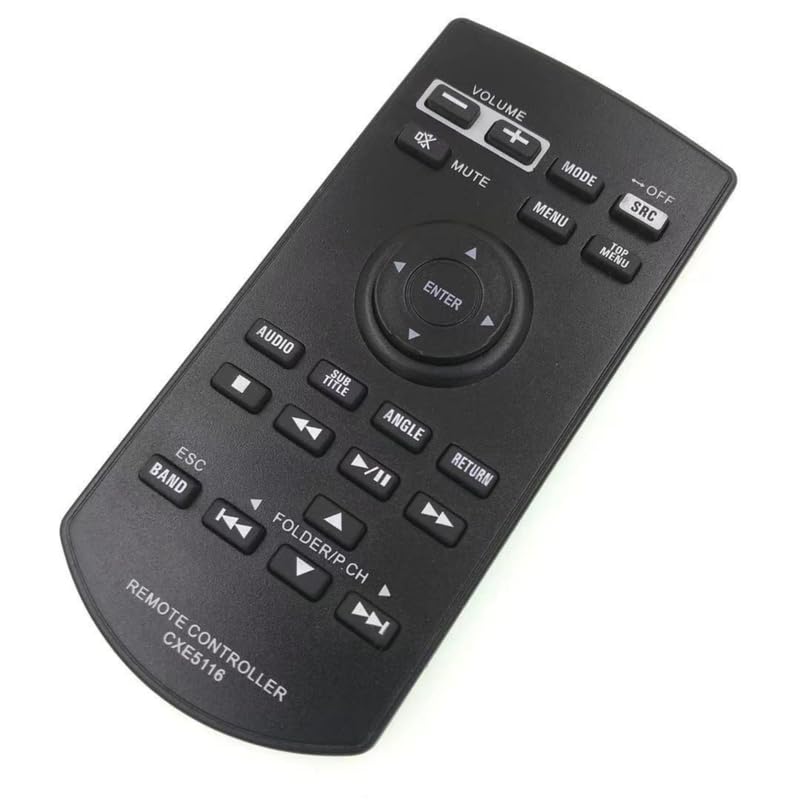
Figure 1: Remote control with the battery compartment open for battery installation.
2.2 Initial Use
No programming or setup code is required for this replacement remote control. Once batteries are installed, it should function immediately with compatible Pioneer AVH series car receivers.
- Plug one end of the power cord into your car receiver unit, and the other end into an electrical outlet (if applicable for bench testing) or ensure the car receiver is powered on in your vehicle.
- Aim the transmitter end of the remote control directly at the infrared receiver on your car unit. Ensure there are no obstructions between the remote and the unit.
- Press any button (e.g., Power, Volume) to test functionality.
3. Operating Instructions
The KRPTQJoo replacement remote control provides direct access to various functions of your Pioneer AVH series car receiver. Familiarize yourself with the button layout for optimal use.

Figure 2: Overview of the remote control buttons.
3.1 Basic Functions
- VOLUME (+/-): Adjusts the audio volume level.
- MUTE: Silences the audio output.
- MODE: Cycles through available audio/video modes (e.g., Radio, CD, USB).
- SRC (Source): Selects the input source.
- OFF: Powers off the unit.
- MENU: Accesses the main menu of the car receiver.
- TOP MENU: Navigates to the top level of a disc menu.
- Directional Arrows (Up, Down, Left, Right) & ENTER: Used for menu navigation and selection.
- AUDIO: Accesses audio settings.
- SUB TITLE: Changes subtitle language/display for compatible media.
- ANGLE: Changes camera angle for compatible media.
- RETURN: Goes back to the previous screen or menu.
- Play/Pause (►/⏸): Controls media playback.
- Skip/Fast Forward/Rewind (◀◀, ►►): Skips tracks or fast forwards/rewinds media.
- ESC (Escape): Exits current function or menu.
- BAND: Changes radio bands (e.g., FM1, FM2, AM).
- FOLDER/P.CH: Navigates folders or preset channels.
4. Troubleshooting
If your remote control is not functioning as expected, please review the following common issues and solutions:
4.1 Remote Control Not Responding
- Batteries: Ensure batteries are new and installed correctly. Old or improperly inserted batteries are a common cause. Try rolling the batteries within the compartment to ensure good contact with the springs.
- Line of Sight: Verify there are no obstructions between the remote control and the car receiver's infrared sensor. The remote operates using infrared signals, which require a clear path.
- Compatibility: Double-check the model number on your car receiver's sticker label against the list of compatible models. If your model is not listed, the remote may not be compatible.
- Remote Damage: Although remotes are tested before shipping, physical damage during transit can occur. Inspect the remote for any visible damage.
4.2 Testing Remote Functionality
You can test if the remote control is emitting an infrared signal using a smartphone camera (iPhones may not work for this test):
- Open the camera app on your smartphone.
- Point the front end of the remote control (where the IR emitter is located) towards the smartphone camera lens.
- Press any button on the remote control. If the remote is functional, you should see a light flashing on your phone screen from the remote's LED.
4.3 Car Receiver Reset
Sometimes, resetting the car receiver can resolve communication issues:
- Unplug your car receiver unit for approximately 50 seconds, then plug it back in.
- Concurrently, consider restoring the default settings of your car receiver. Refer to your car receiver's user manual for instructions on how to use the 'Reset' option to restore factory-default settings.
- After resetting the unit, remove and re-install the batteries in the remote control, then attempt to use it again.
4.4 Pairing or Code Mismatch
In rare cases, if the remote control code does not match the main unit, pairing or a code change might be necessary. If this issue arises, please contact customer support for specific steps, as these procedures vary by car receiver model.
5. Specifications
| Brand | KRPTQJoo |
| Model Number | CXE5116 |
| Special Feature | No Programming Required, Not Universal Replacement |
| Color | Black |
| Max Number of Supported Devices | 1 |
| Compatible Devices | Stereo System (Pioneer AVH Series) |
| Connectivity Technology | Infrared |
| Controller Type | Button Control |
| Maximum Range | 8 Meters |
| Number of Batteries | 2 AAA batteries required |
| Battery Type | Alkaline |
| Item Weight | 45 Grams |
| Item Dimensions (L x W x H) | 6"L x 1"W x 2"H |
6. Warranty and Support
6.1 Warranty Information
This KRPTQJoo remote control comes with a 100-day warranty from the date of purchase. This warranty covers manufacturing defects under normal use. It does not cover damage caused by misuse, accidents, or unauthorized modifications.
6.2 Customer Support
If you have any questions, encounter issues not covered in this manual, or require assistance, please contact us via Amazon Messages. To expedite support, please provide the following information:
- Your specific car receiver model number.
- A detailed description of the issue.
- Photos of your original remote control (if available) and the new remote.
Your cooperation in troubleshooting helps us provide the best possible solution.