Introduction
Thank you for choosing the Vanity Art 51 Inch Unassembled Bathroom Vanity. This manual provides detailed instructions for the safe assembly, installation, operation, and maintenance of your new vanity. Please read all instructions carefully before beginning assembly and retain this manual for future reference.
Safety Information
- Always wear appropriate safety gear, including safety glasses, during assembly.
- Ensure all parts are present and undamaged before assembly. Do not attempt to assemble if any parts are missing or broken.
- Keep small parts away from children during assembly to prevent choking hazards.
- This vanity is heavy. Two or more people are recommended for lifting and moving the assembled unit.
- Ensure the installation surface is level and capable of supporting the vanity's weight.
Package Contents
Verify that all components are included in your package:
- Vanity cabinet panels (sides, back, bottom, top supports)
- Drawer boxes and drawer fronts
- Soft-closing drawer slides
- Cabinet doors
- Soft-closing hinges
- Shelves and shelf pins
- Assembly hardware (screws, dowels, cam locks, etc.)
- Legs/base components for floor mounting
- Instruction manual
Note: Vanity top and sink are not included with this model.
Setup and Assembly
Assembly is required for this vanity. Please follow the steps below carefully. Recommended tools include a screwdriver (Phillips head), hammer, and level.
Step 1: Prepare the Workspace
Clear a spacious, clean, and flat area for assembly. Lay down a blanket or cardboard to protect the vanity components from scratches.
Step 2: Assemble the Cabinet Frame
Connect the side panels, bottom panel, and back panel using the provided hardware (dowels, screws, cam locks). Ensure all connections are secure and the frame is square.

Image: Interior view of the unassembled vanity cabinet frame, showing where drawer slides and shelf supports will be installed.
Step 3: Install Drawer Slides
Attach the cabinet-side drawer slides to the interior panels of the vanity frame using the designated screws. Ensure they are level and aligned correctly for smooth drawer operation.
Step 4: Assemble Drawers
Assemble the drawer boxes by connecting the side, front, and back panels. Install the drawer-side slides onto the assembled drawer boxes. Attach the drawer fronts to the assembled drawer boxes.
Step 5: Install Cabinet Doors and Shelves
Attach the soft-closing hinges to the cabinet doors and then to the vanity frame. Adjust hinges as needed for proper door alignment. Insert shelf pins into the pre-drilled holes and place the shelves.

Image: Assembled vanity with doors and drawers open, showcasing the interior storage layout.
Step 6: Attach Base and Leveling Feet
Secure the base components to the bottom of the vanity. If included, attach and adjust leveling feet to ensure the vanity sits stable and level on the floor.
Step 7: Final Placement
Carefully move the assembled vanity to its desired location. This is a floor-mounted unit. Ensure it is level before installing any countertop or plumbing fixtures.

Image: Fully assembled Vanity Art 51 Inch Bathroom Vanity, ready for countertop installation.
Operating Instructions
This vanity is designed for straightforward use and storage.
Soft-Closing Drawers and Doors
The vanity is equipped with soft-closing mechanisms for both drawers and doors. To operate, simply push the drawer or door gently towards the closed position. The mechanism will engage and slowly pull the drawer or door shut, preventing slamming and reducing wear.
Storage Utilization
Utilize the multiple compartments and drawers for organizing various bathroom accessories, toiletries, and linens. The internal shelves can be adjusted to accommodate items of different heights.
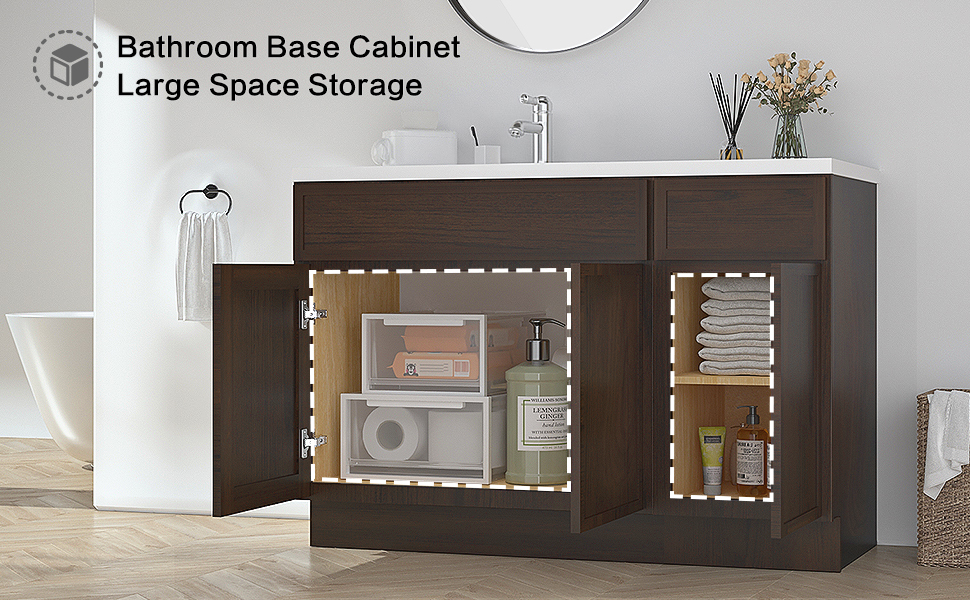
Image: Example of organized interior storage within a bathroom vanity.
Maintenance
Proper care will ensure the longevity and appearance of your Vanity Art bathroom vanity.
Cleaning
- Wipe surfaces regularly with a soft, damp cloth.
- For stubborn marks, use a mild, non-abrasive cleaner specifically designed for wood or engineered wood surfaces.
- Avoid harsh chemicals, abrasive cleaners, or scouring pads, as these can damage the finish.
- Promptly wipe up any spills to prevent water damage, especially since the engineered wood is water-resistant but not waterproof.
General Care
- Periodically check all hardware connections and tighten if necessary.
- Avoid placing extremely hot or cold items directly on the vanity surface without protection.
- Keep the vanity away from direct sunlight or extreme temperature changes to prevent warping or fading.
Troubleshooting
Here are solutions to common issues you might encounter:
Drawers or Doors Not Closing Smoothly
- Check for Obstructions: Ensure nothing is blocking the drawer slides or door hinges.
- Adjust Hinges/Slides: Soft-closing hinges and drawer slides often have adjustment screws. Refer to the specific hardware instructions for adjustment.
- Verify Leveling: An unlevel vanity can cause alignment issues. Use a level to check and adjust the vanity's position.
Wobbly Vanity
- Tighten Connections: Re-check all assembly hardware and tighten any loose screws or cam locks.
- Adjust Leveling Feet: If your vanity has leveling feet, adjust them until the unit is stable on the floor.
Specifications
| Feature | Detail |
|---|---|
| Brand | Vanity Art |
| Model Number | VA4136-2R+VA4115-1BR |
| Product Dimensions | 21"D x 51"W x 32.5"H |
| Material | Engineered Wood |
| Color | Brown |
| Mounting Type | Floor Mount |
| Door Style | Soft Closing |
| Special Features | Easy to Installation, Soft Close Doors, Water Resistant |
| Assembly Required | Yes |
| Included Components | Shelves |

Image: Dimensional drawing of the vanity.
Warranty and Support
For warranty information or technical support, please contact Vanity Art customer service directly. Details can typically be found on the manufacturer's website or through your purchase documentation.
You can also visit the official Vanity Art store for more information: Vanity Art Store