Introduction
Thank you for choosing the Sunrosa 48"x76" Double Sliding Frameless Shower Door. This manual provides detailed instructions for the safe installation, operation, and maintenance of your new shower door. Please read all instructions carefully before beginning installation and retain this manual for future reference.
Safety Information
- Always wear safety glasses during installation.
- Handle glass panels with extreme care. Tempered glass, while strong, can shatter if struck on the edges or corners.
- Ensure the installation area is clear and dry.
- Use appropriate tools and ensure they are in good working condition.
- It is recommended that two people install this product due to the weight and size of the glass panels.
- Verify wall structure can support the weight of the shower door.
- Do not overtighten screws, as this can damage components or glass.
Package Contents
Please verify that all components are present and undamaged before beginning installation. If any parts are missing or damaged, contact Sunrosa customer support immediately.
- Tempered Glass Panels (2)
- Top Track/Rail
- Bottom Guide/Track
- Wall Brackets/Profiles
- Sliding Rollers/Hardware
- Handles/Towel Bar
- Waterproof Strips/Seals
- Fasteners and Anchors
- Installation Manual
Tools Required
- Measuring Tape
- Pencil
- Level
- Drill
- Drill Bits (appropriate for wall material)
- Screwdriver (Phillips and Flathead)
- Caulking Gun and Silicone Sealant (mildew-resistant)
- Safety Glasses
- Utility Knife
Setup and Installation
Careful measurement and preparation are crucial for a successful installation. Ensure your shower opening width is between 44 and 48 inches and height is 76 inches.
Step 1: Measure and Prepare the Opening
Measure the width of your shower opening at the top, middle, and bottom. Use the smallest measurement for reference. Ensure the walls are plumb and the threshold is level. Mark the desired height for the top rail.

Image: Shower Door Dimensions. This diagram illustrates the adjustable width of 44-48 inches and a fixed height of 76 inches, along with other key measurements for installation planning.
Step 2: Install Wall Brackets/Profiles
Position the wall brackets on each side of the shower opening, ensuring they are plumb. Mark the drilling locations. Important: When drilling holes for the brackets, aim for the upper part of the slot to allow maximum adjustment for leveling the top bar later. Drill pilot holes and secure the brackets using appropriate anchors and screws for your wall type.
Step 3: Install Top Track/Rail
Attach the top track to the installed wall brackets. Ensure it is perfectly level. Secure it with the provided fasteners. This track will support the sliding glass panels.
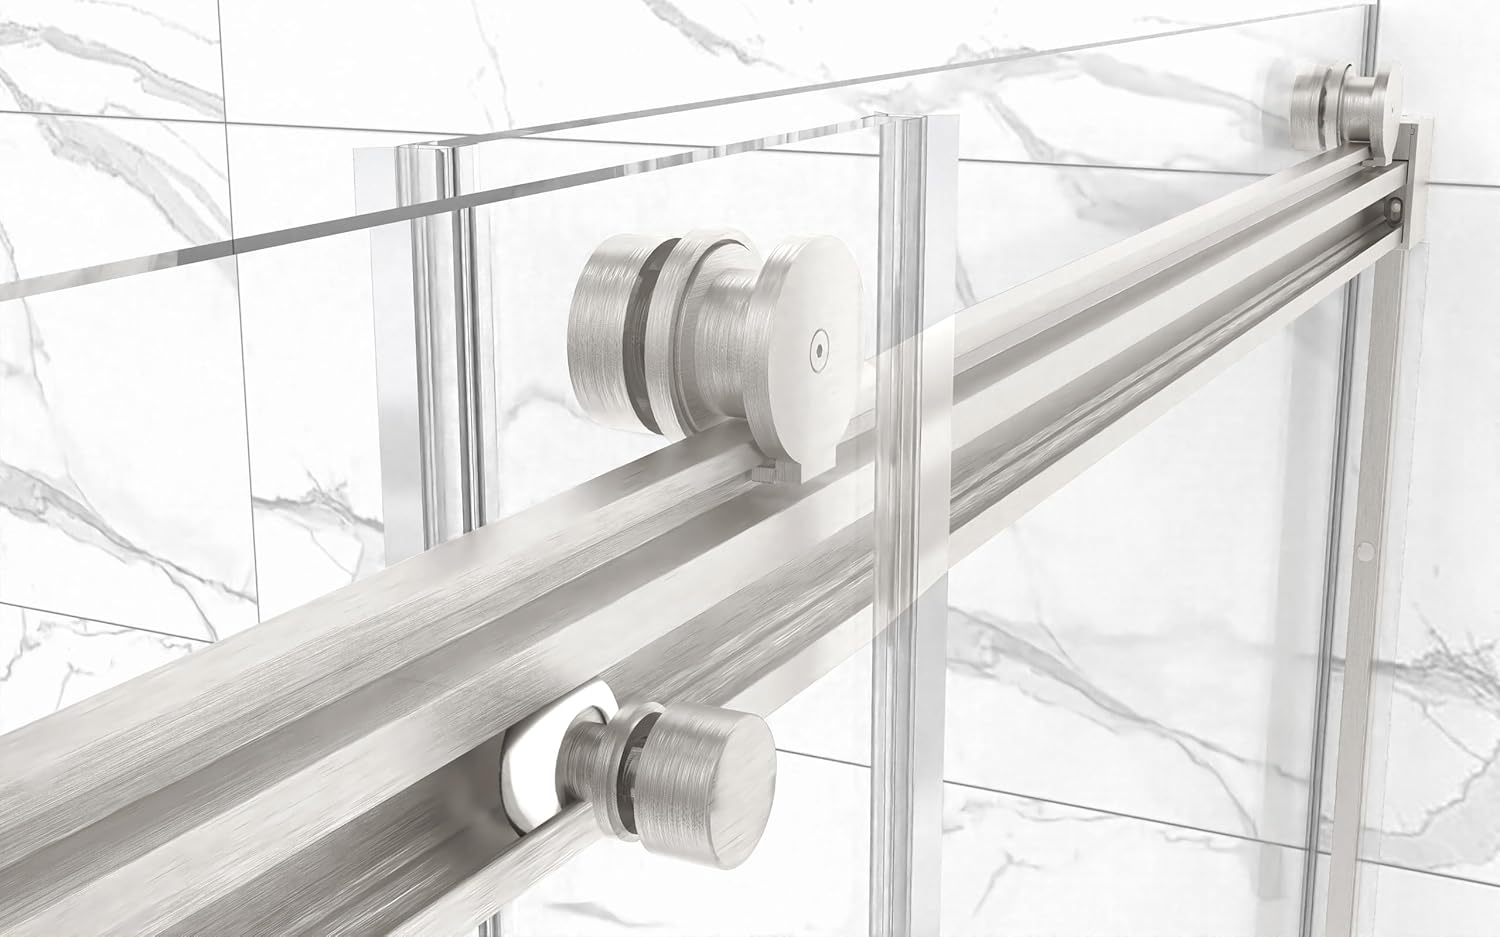
Image: Top Track and Rollers. This image shows the brushed nickel top track and the smooth-gliding rollers that facilitate the movement of the glass panels.
Step 4: Install Bottom Guide/Track
Place the bottom guide on the shower threshold, aligning it with the top track. Mark its position. Secure the bottom guide to the threshold. This guide helps stabilize the glass panels and ensures smooth sliding.

Image: Bottom Guide. A detailed view of the bottom guide, which helps keep the sliding glass panels aligned and prevents water leakage.
Step 5: Hang Glass Panels
Carefully lift each glass panel and attach the rollers to the top edge. Then, gently hang the panels onto the top track. Ensure the panels are properly seated in the bottom guide. Adjust the rollers as needed for smooth operation.

Image: Installed Shower Door. This image displays the fully installed Sunrosa double sliding frameless shower door in a bathroom setting, showcasing its design and functionality.
Step 6: Install Handles and Waterproof Strips
Attach the handles to the designated holes in the glass panels. Install the waterproof strips along the vertical edges of the glass panels and the bottom edge to prevent water leakage. Trim excess length with a utility knife if necessary.

Image: Shower Door Handle. A close-up view of the brushed nickel handle, designed for comfortable grip and complementing the frameless glass.
Step 7: Apply Silicone Sealant
Apply a bead of mildew-resistant silicone sealant along the exterior base of the bottom guide and where the wall brackets meet the wall. Allow the sealant to cure completely (typically 24-48 hours) before using the shower.
Reversible Installation
The Sunrosa shower door is designed for reversible installation, allowing you to customize the opening direction to best suit your bathroom layout. The glass panels can be configured to slide from either the left or right side.

Image: Reversible Installation. This diagram illustrates how the shower door can be installed to open from either the left or right side, offering flexibility for different bathroom configurations.
Operating Instructions
To open or close the shower door, gently slide the glass panels along the top track and bottom guide using the handles. Avoid forcing the doors. The double sliding design allows for entry from either side.
Maintenance and Care
Regular cleaning and maintenance will ensure the longevity and appearance of your Sunrosa shower door.
- Glass Cleaning: Use a soft cloth or sponge with a non-abrasive glass cleaner or a mixture of white vinegar and water. Wipe down the glass after each use to prevent water spots and soap scum buildup.
- Hardware Cleaning: Clean the brushed nickel hardware with a soft, damp cloth. Avoid abrasive cleaners, harsh chemicals, or scouring pads, as these can damage the finish.
- Seals and Strips: Periodically check the waterproof strips for wear or damage. Clean them gently to remove any mold or mildew. If they become loose or damaged, they may need replacement to maintain water integrity.
- Tracks and Rollers: Keep the top track and bottom guide free of debris, soap scum, and hair to ensure smooth sliding operation. Lubricate rollers with a silicone-based lubricant if they become stiff.

Image: Tempered Glass Detail. This image highlights the 5/16-inch (8mm) thick clear tempered glass, emphasizing its safety certification and easy-to-clean surface.
Troubleshooting
| Problem | Possible Cause | Solution |
|---|---|---|
| Doors do not slide smoothly. | Debris in tracks, misaligned rollers, lack of lubrication. | Clean tracks thoroughly. Check roller alignment and adjust if necessary. Apply silicone-based lubricant to rollers and tracks. |
| Water leaks from the shower door. | Damaged or improperly installed waterproof strips, insufficient silicone sealant, misaligned panels. | Inspect and re-seat or replace waterproof strips. Reapply silicone sealant where needed. Ensure glass panels are properly aligned and seated in the bottom guide. |
| Door does not close securely. | Worn or flimsy closure point/seal, misaligned panels. | Inspect the vertical waterproof strips for wear. If the closure point is integrated into the strip and appears flimsy, replacement of the strip may be necessary. Ensure panels are correctly aligned. |
| Clear strips detaching from glass. | Adhesive failure, wear and tear. | Clean the glass and strip thoroughly. Re-attach with a strong, waterproof adhesive suitable for glass and plastic, or replace the strip. |
Specifications
| Feature | Detail |
|---|---|
| Brand | Sunrosa |
| Model Number | 1-4876N |
| Dimensions (W x H) | Adjustable 44"-48" x 76" |
| Glass Thickness | 5/16 inch (8mm) Tempered Glass |
| Material | Aluminum, Glass |
| Style | Bypass Sliding, Frameless |
| Color/Finish | Brushed Nickel |
| Item Weight | 129.4 pounds |
| Assembly Required | Yes |
Warranty and Support
Sunrosa stands behind the quality of its shower doors. If you are not completely satisfied or receive a defective product, please contact Sunrosa customer support for prompt resolution. Refer to your purchase documentation for specific warranty terms and contact information.
For assistance, please visit the official Sunrosa Store or contact customer service through your retailer.
Online Support: Sunrosa Store on Amazon