CuisinAid 17 in Floor Drill Press
CuisinAid 17-inch Floor Drill Press Instruction Manual
Model: 17 in Floor Drill Press | Brand: CuisinAid
Introduction
This manual provides essential information for the safe and efficient operation, maintenance, and troubleshooting of your CuisinAid 17-inch Floor Drill Press. Designed for precision drilling in various materials such as wood and metal, this powerful tool features a 12 Amp pure copper motor and variable speed control from 200 to 3630 RPM. Please read this manual thoroughly before assembly, operation, or maintenance to ensure proper use and to prevent injury or damage.

Figure 1: The CuisinAid 17-inch Floor Drill Press shown with included accessories such as hex wrenches and a chuck key.
Safety Instructions
Always prioritize safety when operating power tools. Failure to follow these instructions may result in serious injury or property damage.
General Safety
- Read and understand all instructions before operating the drill press.
- Keep the work area clean and well-lit. Cluttered or dark areas invite accidents.
- Do not operate power tools in explosive atmospheres, such as in the presence of flammable liquids, gases, or dust.
- Keep children and bystanders away while operating a power tool. Distractions can cause you to lose control.
- Securely mount the drill press to a stable workbench or floor using the bolt holes in the base to prevent movement during operation.
Electrical Safety
- Power tool plugs must match the outlet. Never modify the plug in any way.
- Avoid body contact with grounded surfaces such as pipes, radiators, ranges, and refrigerators. There is an increased risk of electric shock if your body is grounded.
- Do not expose power tools to rain or wet conditions. Water entering a power tool will increase the risk of electric shock.
- Do not abuse the cord. Never use the cord for carrying, pulling, or unplugging the power tool. Keep cord away from heat, oil, sharp edges, or moving parts.
Personal Safety
- Always wear appropriate personal protective equipment (PPE), including safety glasses, hearing protection, and a dust mask.
- Dress properly. Do not wear loose clothing or jewelry. Keep your hair, clothing, and gloves away from moving parts.
- Do not overreach. Keep proper footing and balance at all times.
- Use clamps or a vise to secure the workpiece. Holding the workpiece by hand can lead to loss of control and injury.
- Ensure the telescoping spindle guard is properly in place and adjusted before operation. This guard helps protect against flying debris and accidental contact with the drill bit.

Figure 2: The telescoping spindle guard provides protection during drilling operations.
Components and Parts
Familiarize yourself with the main components of your CuisinAid 17-inch Floor Drill Press:
- Motor Housing: Encloses the 12 Amp pure copper motor.
- Head Assembly: Contains the motor, spindle, and chuck.
- Spindle: The rotating shaft that holds the drill chuck.
- Drill Chuck: Holds the drill bit securely.
- Telescoping Spindle Guard: Transparent guard for safety.
- Depth Stop: Mechanism to control drilling depth.
- Feed Handles: Used to lower the drill bit into the workpiece.
- Column: The main vertical support for the head and table.
- Worktable: Adjustable platform for supporting the workpiece. Can tilt 0-45°.
- Table Height Adjustment Crank: Used to raise or lower the worktable.
- Base: Heavy cast iron base for stability, with mounting holes.
- Power Switch: On/Off switch, often with a safety cover.
- Speed Adjustment Lever/Knob: For variable speed control.

Figure 3: Overview of the 17-inch Floor Drill Press, highlighting its robust construction and key components.
Setup
Follow these steps for initial setup and assembly:
- Unpacking: Carefully remove all components from the packaging. Inspect for any shipping damage. Retain packaging for future transport or storage.
- Base and Column Assembly: Attach the column to the heavy cast iron base. Ensure all bolts are securely tightened. The sturdy cast iron base is designed to prevent walking during operation and includes bolt holes for mounting.
- Head Assembly Installation: Mount the head assembly onto the top of the column. Secure it firmly according to the instructions provided in the separate assembly diagram (if applicable).
- Worktable Installation: Slide the worktable assembly onto the column. Adjust its height and secure it with the locking mechanism.
- Chuck Installation: Clean the tapered surfaces of the spindle and the drill chuck. Insert the chuck onto the spindle with a firm push. A light tap with a rubber mallet on the chuck can help seat it properly.
- Mounting: For optimal stability and safety, bolt the drill press base to a sturdy workbench or the floor using appropriate fasteners.

Figure 4: The robust cast iron base includes pre-drilled holes for secure mounting to a workbench or floor.
Operating Instructions
Adjusting Speed (200-3630 RPM)
The CuisinAid drill press features a continuously variable speed control, allowing precise adjustment for different materials and drill bit sizes.
- Ensure the drill press is turned off and unplugged before adjusting speed.
- Locate the speed adjustment mechanism, typically a lever or knob on the head assembly.
- Adjust the speed within the 200 to 3630 RPM range according to the material being drilled. Lower speeds are generally for harder materials and larger drill bits, while higher speeds are for softer materials and smaller bits.

Figure 5: The drill press offers a wide speed range from 200 to 3630 RPM for versatile drilling.
Adjusting Worktable Height and Angle
The worktable can be adjusted vertically and tilted for angled drilling.
- To adjust height: Loosen the table locking knob. Use the table height adjustment crank to raise or lower the table to the desired position. Tighten the locking knob securely.
- To tilt the table: Loosen the table tilt locking bolts. Adjust the table to the desired angle (up to 45° left or right). Use the angle scale for precision. Tighten the tilt locking bolts firmly before drilling.

Figure 6: The worktable height can be easily adjusted using the crank mechanism.

Figure 7: The worktable can tilt up to 45 degrees to the right or left for angled drilling operations.
Setting Drilling Depth
The adjustable depth stop allows for consistent and precise drilling depths.
- Lower the drill bit until it just touches the workpiece.
- Adjust the depth stop mechanism to the desired drilling depth.
- Lock the depth stop in place. The drill will stop feeding once this depth is reached.
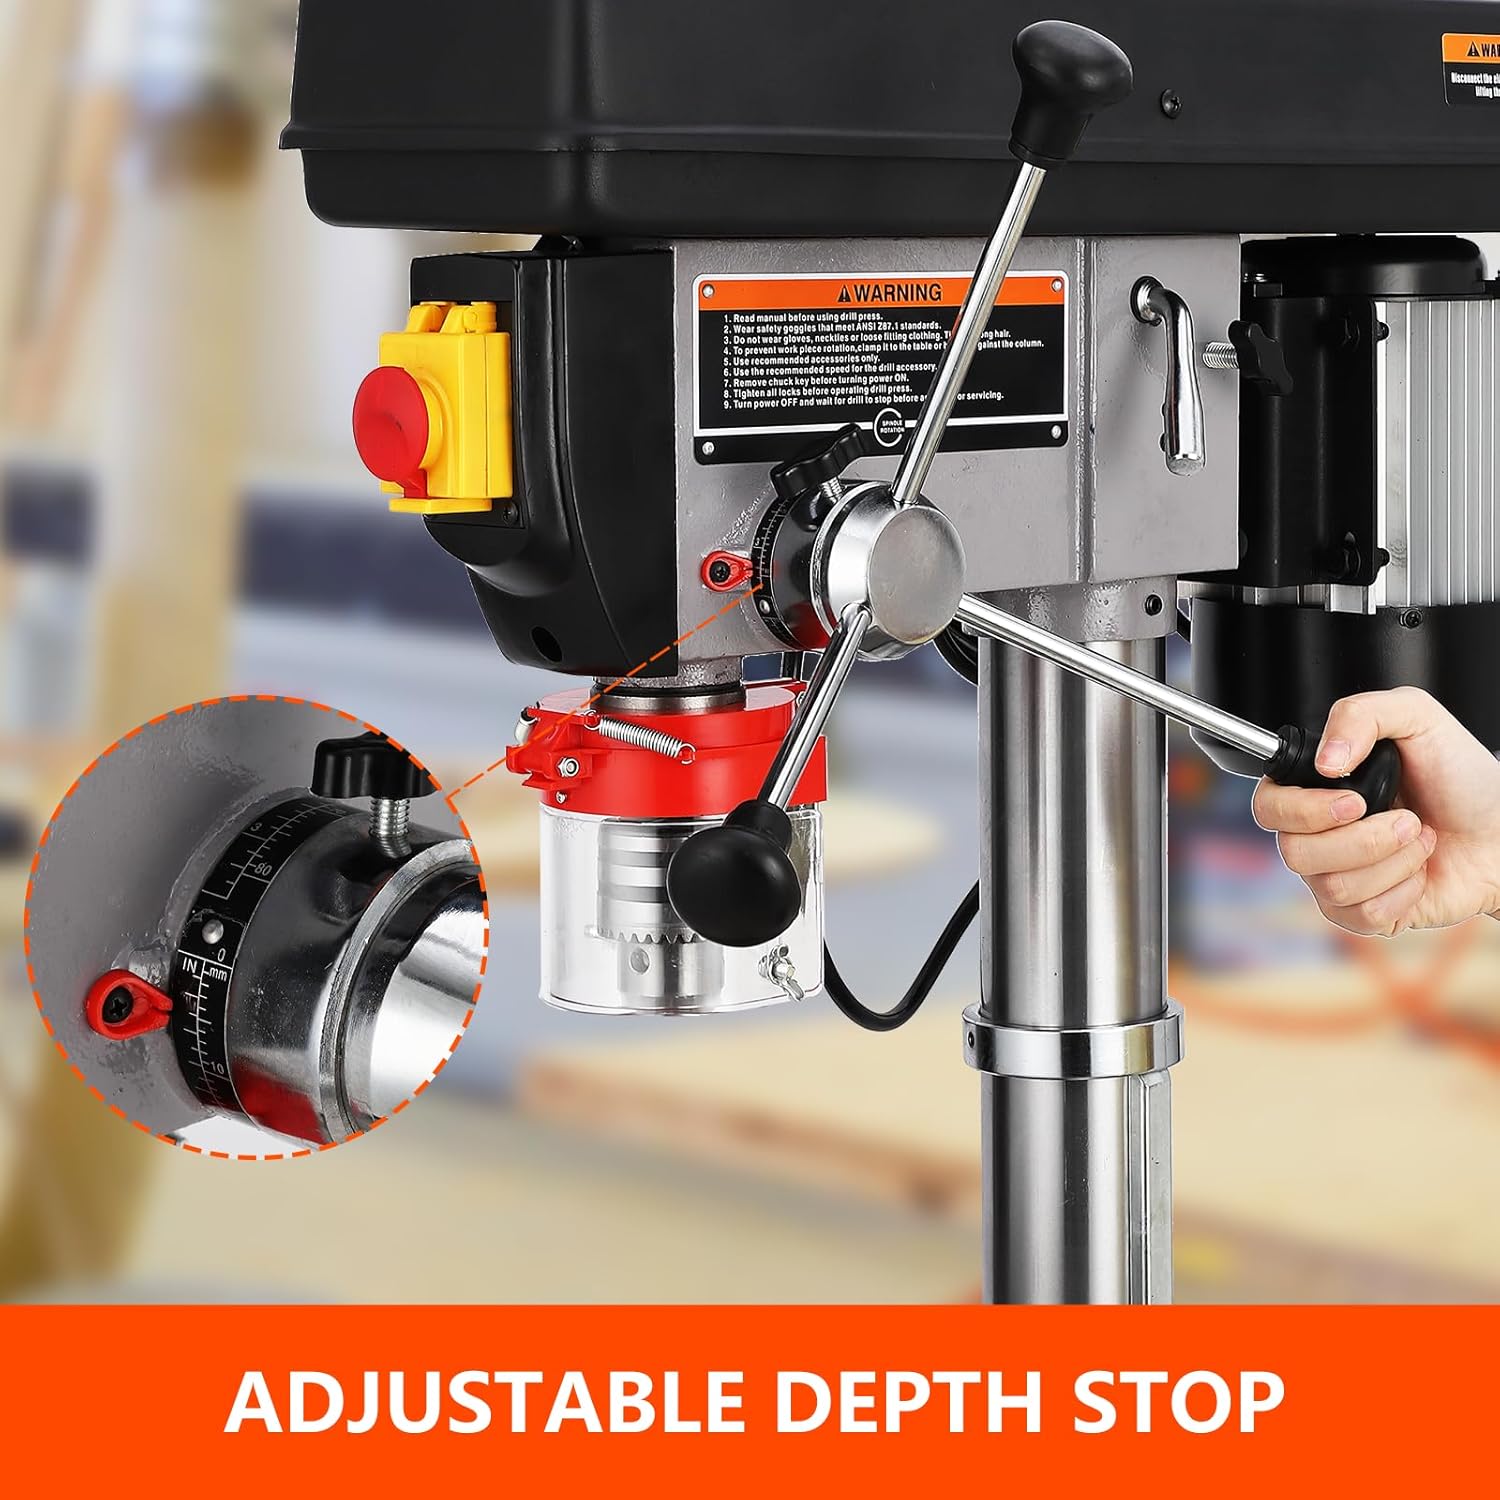
Figure 8: The adjustable depth stop ensures consistent and accurate drilling depths.
Drilling Operation
- Select the appropriate drill bit for your material and task. Insert it securely into the chuck.
- Position the workpiece on the worktable and secure it with clamps or a vise. Never hold the workpiece by hand.
- Ensure the spindle guard is in place.
- Turn on the drill press. Allow it to reach full speed before engaging the workpiece.
- Slowly lower the drill bit into the workpiece using the feed handles, applying steady, even pressure. Do not force the drill.
- Once the hole is drilled, retract the drill bit from the workpiece before turning off the machine.
Maintenance
Regular maintenance ensures the longevity and optimal performance of your drill press.
- Cleaning: After each use, unplug the drill press and clean off all chips, dust, and debris from the table, column, and head assembly. Use a brush or vacuum; never use compressed air as it can force debris into bearings.
- Lubrication: Periodically apply a light coat of machine oil to the column, rack, and pinion gear for smooth table height adjustment. Lubricate the spindle and chuck mechanisms as recommended in the detailed service manual (if applicable).
- Belt Tension: Check the drive belt tension periodically. Adjust if necessary to prevent slippage and ensure consistent power transfer.
- Chuck Care: Keep the chuck jaws clean and free of debris. If the chuck becomes stiff, clean it thoroughly and apply a small amount of light oil.
- Electrical Inspection: Regularly inspect the power cord for any damage. Ensure all electrical connections are secure.

Figure 9: The powerful pure copper motor features an efficient heat dissipation system, contributing to longer machine life.
Troubleshooting
This section addresses common issues you might encounter with your drill press.
| Problem | Possible Cause | Solution |
|---|---|---|
| Drill press does not start. | No power supply; Power switch off; Motor overload. | Check power cord and outlet; Ensure switch is ON; Allow motor to cool, check for obstructions. |
| Excessive vibration or noise. | Loose mounting bolts; Worn or loose drive belt; Unbalanced drill bit. | Tighten all mounting bolts; Adjust or replace drive belt; Replace or re-seat drill bit. |
| Drill bit not cutting efficiently. | Dull drill bit; Incorrect speed for material; Insufficient feed pressure. | Sharpen or replace drill bit; Adjust speed (refer to operating instructions); Apply steady, appropriate feed pressure. |
| Worktable difficult to adjust. | Column or rack is dirty/dry; Locking mechanism too tight. | Clean and lubricate column and rack; Loosen locking mechanism before adjusting. |
Specifications
Technical specifications for the CuisinAid 17-inch Floor Drill Press:
| Model Number | 17 in Floor Drill Press |
| Power Source | Corded Electric |
| Voltage | 120 Volts |
| Amperage | 12 Amps |
| Motor Type | Pure Copper Motor |
| Maximum Rotational Speed | 3630 RPM |
| Minimum Rotational Speed | 200 RPM |
| Chuck Capacity | 1 inch |
| Drill Capacity (Wood/Metal) | 1 inch |
| Swing | 17 inches |
| Spindle Travel | 3.2 inches |
| Column Diameter | 3.2 inches |
| Base Size | 20" x 13.8" |
| Table Size | 14.2" x 14.2" |
| Product Dimensions (L x W x H) | 10"L x 5"W x 30"H |
| Item Weight | 159.7 pounds |
| Material | Alloy Steel (main construction) |
| UPC | 198290815531 |
Warranty and Support
For warranty information, technical support, or replacement parts, please contact CuisinAid customer service. Keep your purchase receipt and product model number handy when contacting support.
Brand: CuisinAid
Refer to the official CuisinAid website or your purchase documentation for specific contact details and warranty terms.
Ask a question about this manual
Ask about setup, troubleshooting, compatibility, parts, safety, or missing instructions. Manuals+ will review the question and use this page’s manual context to help answer it.