1. Introduction
This manual provides detailed instructions for the assembly, operation, and maintenance of your ketive Garden Potting Bench with Metal Tabletop, Model Potting Bench-11. Please read this manual thoroughly before assembly and use to ensure proper function and longevity of the product. Keep this manual for future reference.

Image 1.1: Overview of the ketive Garden Potting Bench, Model Potting Bench-11. This image displays the complete potting bench with its metal tabletop, upper shelf, lower slatted shelf, and integrated drawer, along with gardening tools and potted plants.
2. Safety Information
Observe the following safety precautions to prevent injury and damage to the product:
- Ensure all components are securely fastened before use.
- Do not exceed the maximum load capacity of 100 pounds for the tabletop and lower shelf.
- Keep small children and pets away from the assembly area.
- Use appropriate tools for assembly as specified in the instructions.
- Place the potting bench on a stable, level surface to prevent tipping.
- Avoid prolonged exposure to extreme weather conditions to preserve the wood and metal components.
3. Package Contents
Verify that all parts are present before beginning assembly. If any parts are missing or damaged, contact customer support.
- Fir Wood Frame Components (legs, crossbars, lattice back)
- Galvanized Metal Tabletop
- Upper Shelf
- Slatted Lower Shelf
- Sliding Drawer Assembly
- 3 Side Hooks
- Waterproof Rubber Feet (4 units)
- Assembly Hardware (screws, bolts, nuts, etc.)
- Instruction Manual
4. Setup and Assembly
The ketive Garden Potting Bench is designed for straightforward assembly. It is recommended to have a second person assist during certain steps.
4.1 Tools Required
- Phillips Head Screwdriver
- Wrench (if bolts are included)
- Rubber Mallet (optional, for gentle tapping)
4.2 Assembly Steps
- Unpack Components: Carefully remove all parts from the packaging and lay them out on a clean, flat surface. Verify against the package contents list.
- Assemble Base Frame: Attach the main leg supports to the lower slatted shelf using the provided hardware. Ensure the triangular support structures are correctly oriented for stability.
- Install Lattice Back: Secure the diamond lattice back panel to the rear uprights of the frame.
- Attach Metal Tabletop: Place the galvanized metal tabletop onto the main frame. Secure it using the designated screws. Ensure the raised edges are facing upwards.
- Assemble and Install Drawer: Assemble the sliding drawer components according to the separate drawer instructions. Insert the assembled drawer into its designated slot beneath the tabletop.
- Attach Upper Shelf: Mount the upper shelf to the top of the lattice back, securing it with the appropriate hardware.
- Install Side Hooks: Attach the three side hooks to the designated locations on the side of the bench.
- Attach Rubber Feet: Press or screw the waterproof rubber feet onto the bottom of each leg.
- Final Check: Ensure all screws and bolts are tightened. Gently shake the bench to confirm stability.
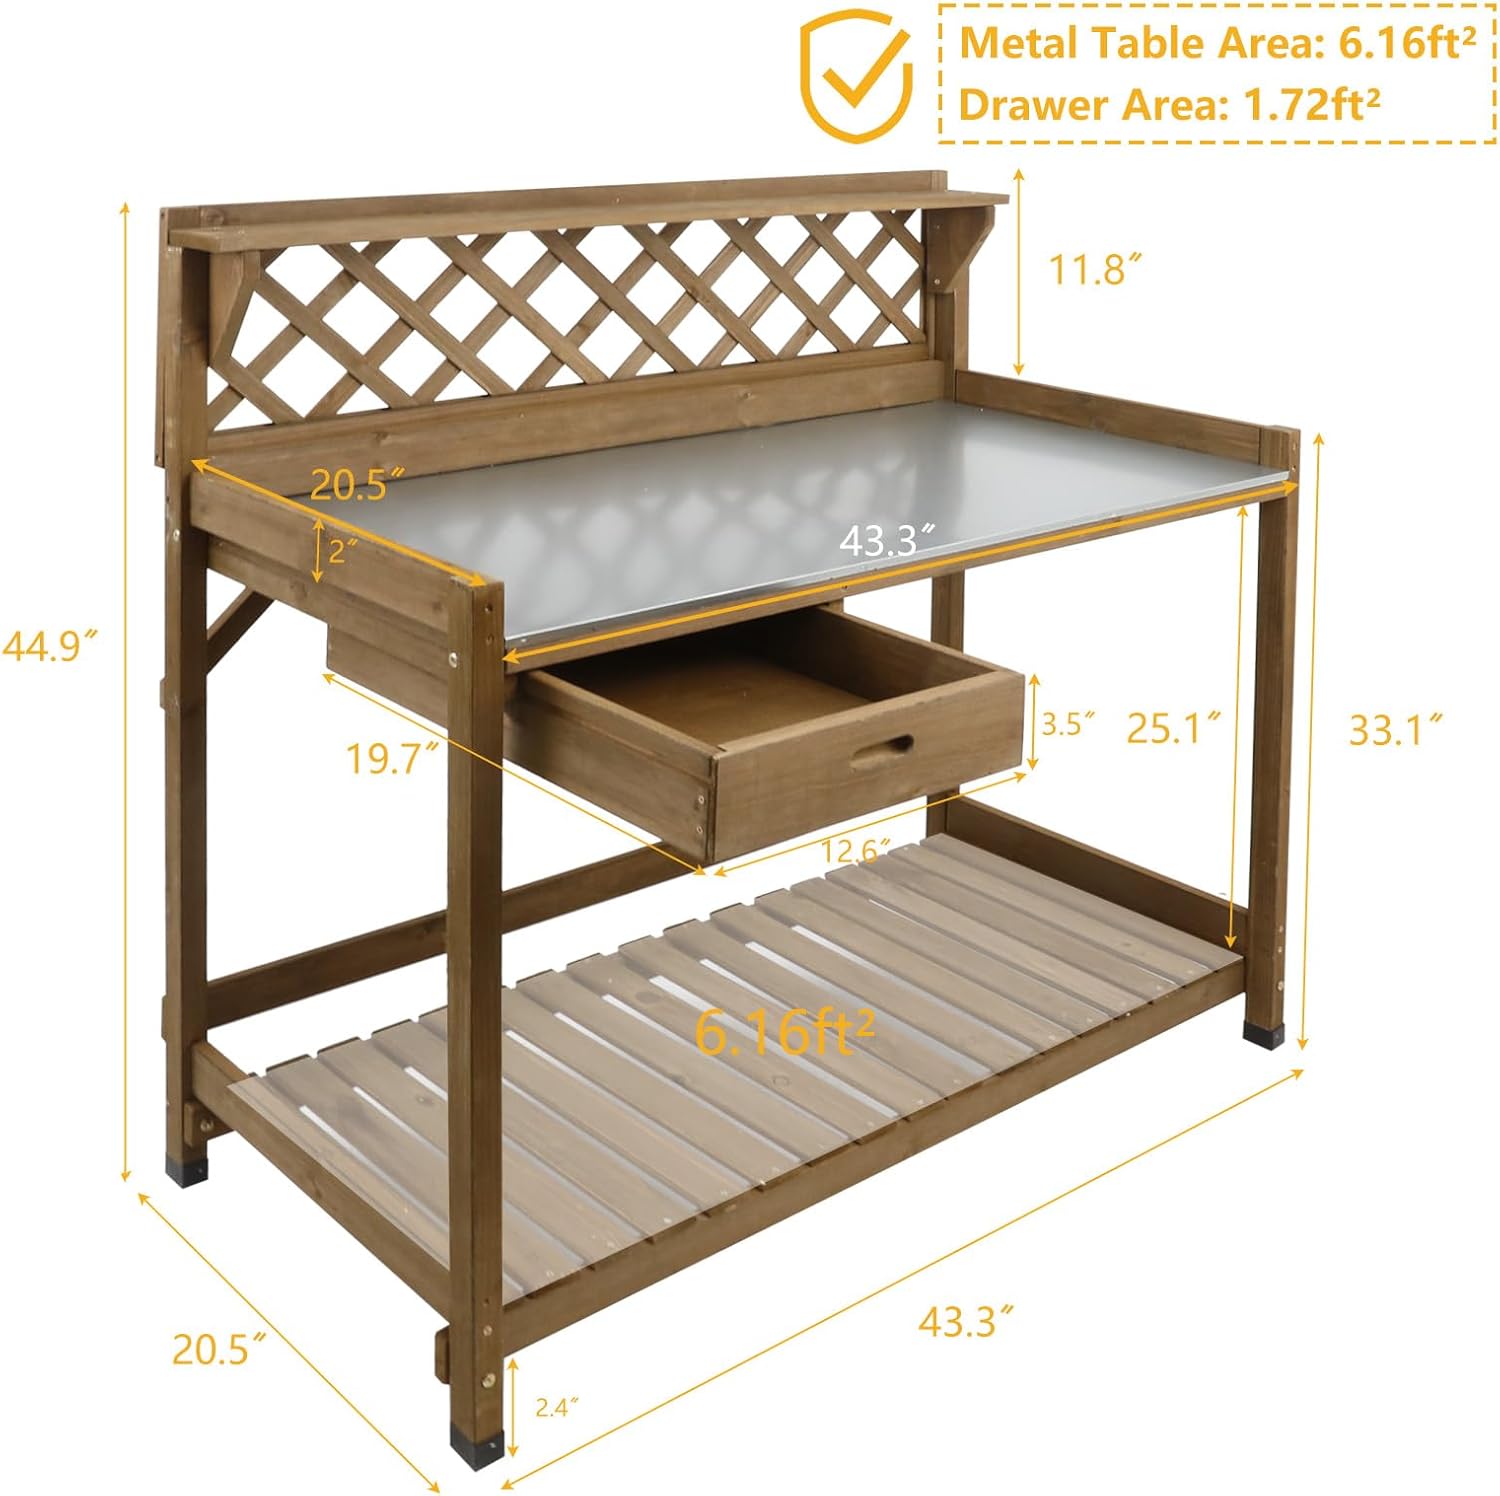
Image 4.1: Dimensional overview of the potting bench. This image illustrates the overall height, width, and depth, as well as the dimensions of the metal tabletop, drawer, and lower shelf, aiding in assembly and placement.

Image 4.2: Close-up view of key structural elements including the triangular frame reinforcement, the decorative diamond lattice pattern, and the wooden rod designed to enhance bench stability.
5. Operation
The ketive Garden Potting Bench is designed to facilitate various gardening tasks efficiently.
5.1 Using the Workstation
- Metal Tabletop: Use the galvanized metal tabletop for potting plants, mixing soil, or performing other gardening tasks. Its waterproof and easy-to-clean surface is ideal for messy activities. The raised edges help prevent soil or tools from falling off.
- Upper Shelf: The top shelf is suitable for holding small potted plants, seed packets, or frequently used small tools.
- Sliding Drawer: Store small accessories, gloves, or labels in the integrated sliding drawer to keep them organized and protected.
- Side Hooks: Utilize the three side hooks for hanging gardening tools such as trowels, cultivators, or pruning shears, keeping them readily accessible.
- Lower Slatted Shelf: The spacious lower shelf is designed for storing larger items like bags of soil, empty pots, watering cans, or other gardening supplies.

Image 5.1: Detail of the galvanized metal tabletop, highlighting its durable and waterproof surface, which is easy to clean and resistant to damage from gardening activities.
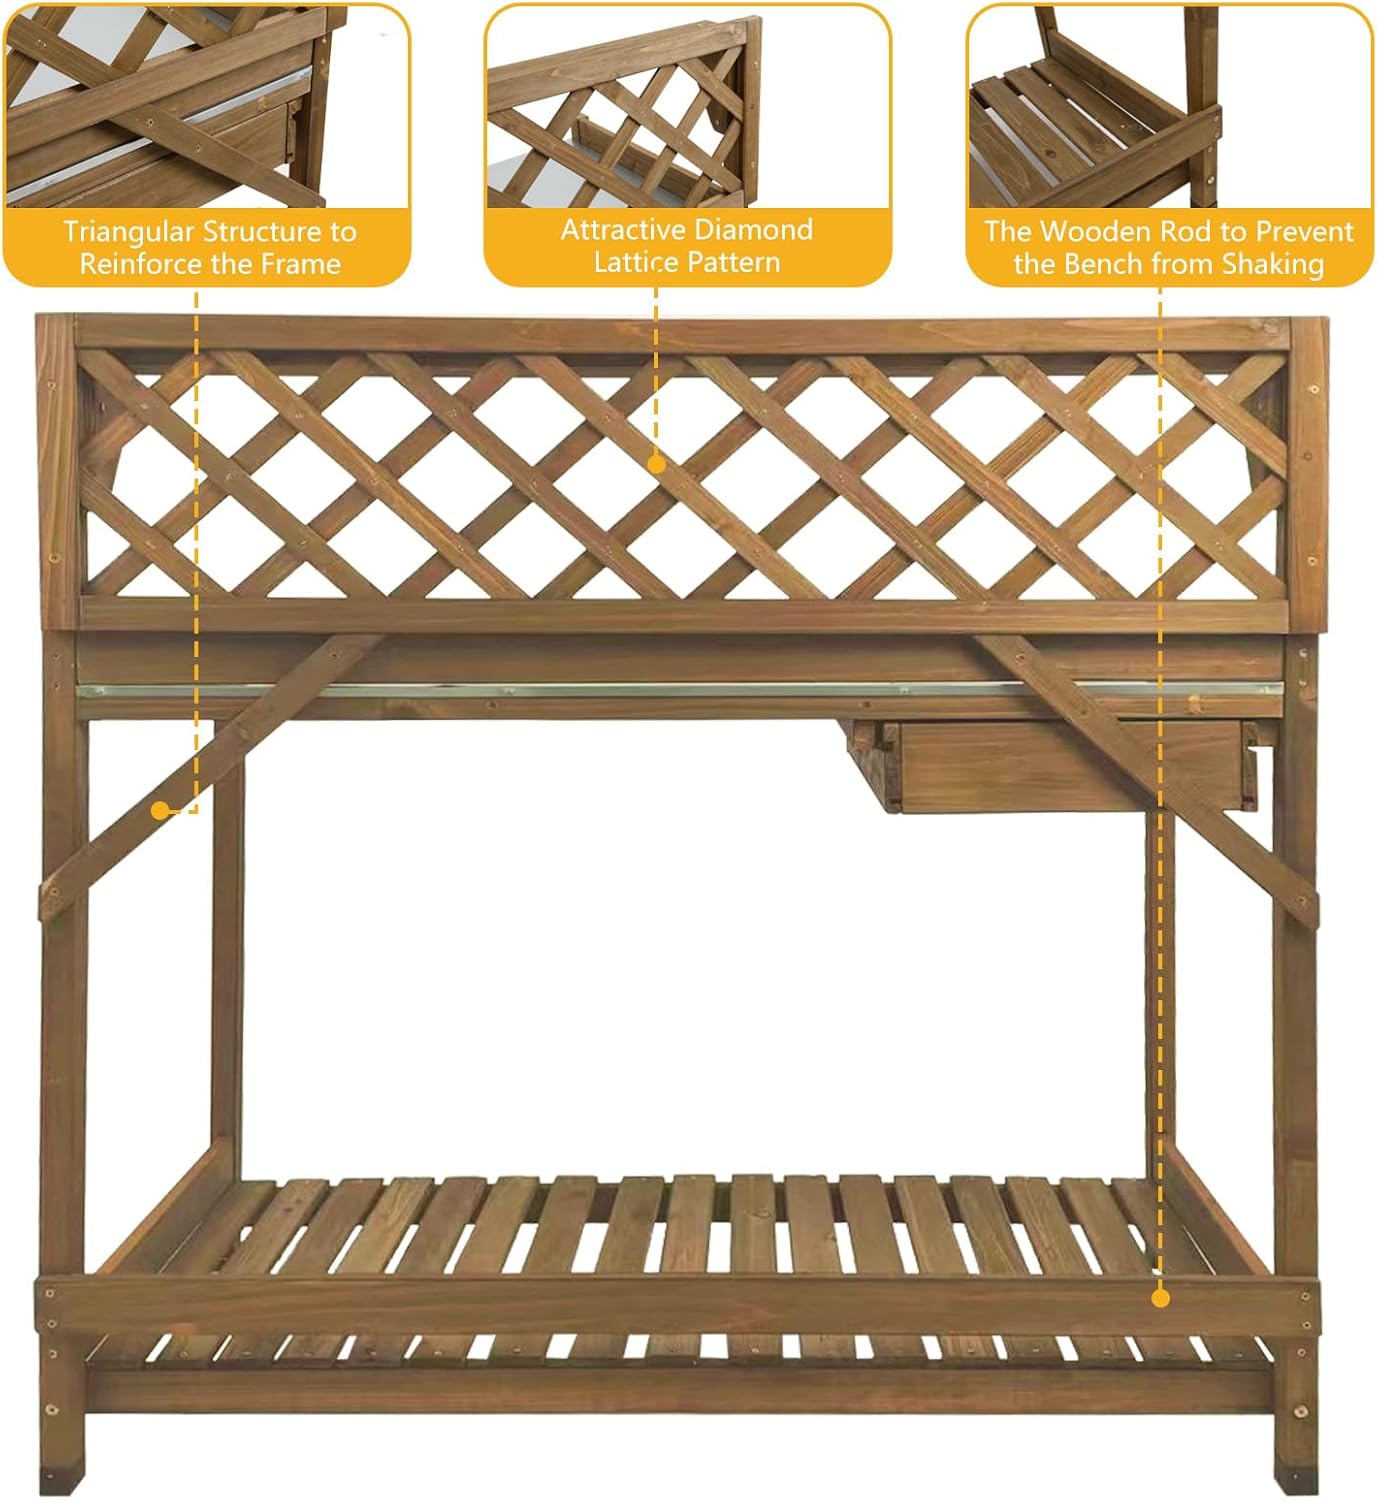
Image 5.2: This image illustrates the various storage options of the potting bench, including the convenient top shelf for small items, the three side hooks for tools, and the large slatted bottom shelf for bulkier supplies.

Image 5.3: A close-up view of the integrated sliding drawer, designed for organized storage of small gardening accessories.
6. Maintenance
Regular maintenance will extend the life and appearance of your potting bench.
- Cleaning: Wipe the galvanized metal tabletop with a damp cloth after each use. For the wooden parts, use a soft, dry cloth. Avoid harsh chemicals that may damage the wood finish.
- Wood Protection: While the fir wood is durable, applying a wood sealant or stain annually can help protect it from weathering and moisture, especially if the bench is exposed to outdoor elements.
- Hardware Check: Periodically check all screws and bolts to ensure they remain tight. Retighten as necessary to maintain structural integrity.
- Storage: If possible, store the potting bench in a covered area during harsh weather conditions or off-season to prolong its lifespan.
- Rubber Feet: Ensure the waterproof rubber feet are intact and properly seated to protect the bench from ground moisture.

Image 6.1: Close-up of the waterproof rubber feet, which protect the bench legs from moisture and prevent damage to surfaces.
7. Troubleshooting
This section addresses common issues you might encounter with your potting bench.
| Problem | Possible Cause | Solution |
|---|---|---|
| Bench feels wobbly or unstable. | Loose hardware; uneven surface. | Ensure all screws and bolts are tightened. Move the bench to a level surface. Check if rubber feet are properly installed. |
| Drawer does not slide smoothly. | Obstruction; misaligned drawer slides. | Check for debris in the drawer tracks. Re-check drawer assembly and alignment. |
| Wood appears discolored or weathered. | Prolonged exposure to sun/rain without protection. | Apply a wood sealant or stain. Store in a covered area when not in use. |
| Metal tabletop shows scratches. | Sharp tools or abrasive cleaning. | Use a protective mat when working with sharp objects. Clean with soft materials. Minor scratches are cosmetic and do not affect function. |
8. Specifications
| Feature | Detail |
|---|---|
| Brand | ketive |
| Model Number | Potting Bench-11 |
| Material | Fir Wood, Galvanized Metal (tabletop) |
| Color | Brown |
| Product Dimensions (L x W x H) | 43.5"D x 20.5"W x 45"H |
| Item Weight | 28 Pounds |
| Load Capacity (Tabletop & Lower Shelf) | 100 Pounds |
| Drawer Dimensions (L x W x H) | 12.6"L x 19.7"W x 3.5"H |
| Lower Shelf Dimensions (L x W x H) | 43.3"L x 20.5"W x 25.1"H |
| Assembly Required | Yes |
| Finish Type | Painted |
9. Warranty and Customer Support
For warranty information, missing parts, or any questions regarding your ketive Garden Potting Bench, please contact ketive customer support. Refer to your purchase documentation for specific warranty terms and contact details.
Typically, customer support can be reached via the retailer where the product was purchased or through the manufacturer's official website.