Zapco ADSP-Z8 IV-8
Zapco ADSP-Z8 IV-8 User Manual
8-Channel Digital Sound Processor Amplifier
1. Introduction
Thank you for choosing the Zapco ADSP-Z8 IV-8. This integrated digital sound processor and amplifier is engineered to deliver exceptional audio fidelity and powerful performance for your vehicle's sound system. This manual provides detailed instructions for installation, operation, maintenance, and troubleshooting to ensure you get the best experience from your device. Please read this manual thoroughly before installation and use.
2. Product Overview
The Zapco ADSP-Z8 IV-8 combines an advanced 8-channel digital sound processor with a high-power 8-channel amplifier in a single, compact unit. It is designed to provide precise sound tuning capabilities and robust power output for a truly immersive audio experience.
2.1 Key Features
- Integrated 8-Channel DSP and 8-Channel Amplifier
- High-Resolution Audio Processing (24 bit/192 KHz ADC, 32 bit/192 KHz DAC)
- Multiple Input Options: Low-level RCA, High-level Speaker, Optical, AUX
- Flexible Output Configuration: 8 Channels (80W x 8 @ 4Ω, 120W x 8 @ 2Ω) or 4 Channels Bridged (240W x 4 @ 4Ω)
- Comprehensive Sound Tuning: Graphic & Parametric EQ, Time Alignment, Polarity Control
- Included 1-inch LCD Display for basic control
- USB Connectivity for PC-based software control
- Bluetooth Streaming capability
2.2 Product Components

Figure 2.1: The Zapco ADSP-Z8 IV-8 digital sound processor amplifier unit shown with its wired remote control.

Figure 2.2: Top panel displaying various input connections (RCA, Optical, USB) and the bottom panel showing speaker output terminals and power input.

Figure 2.3: Detailed view of the input section, including RCA, Optical, Remote, USB, and High-Level Input ports.
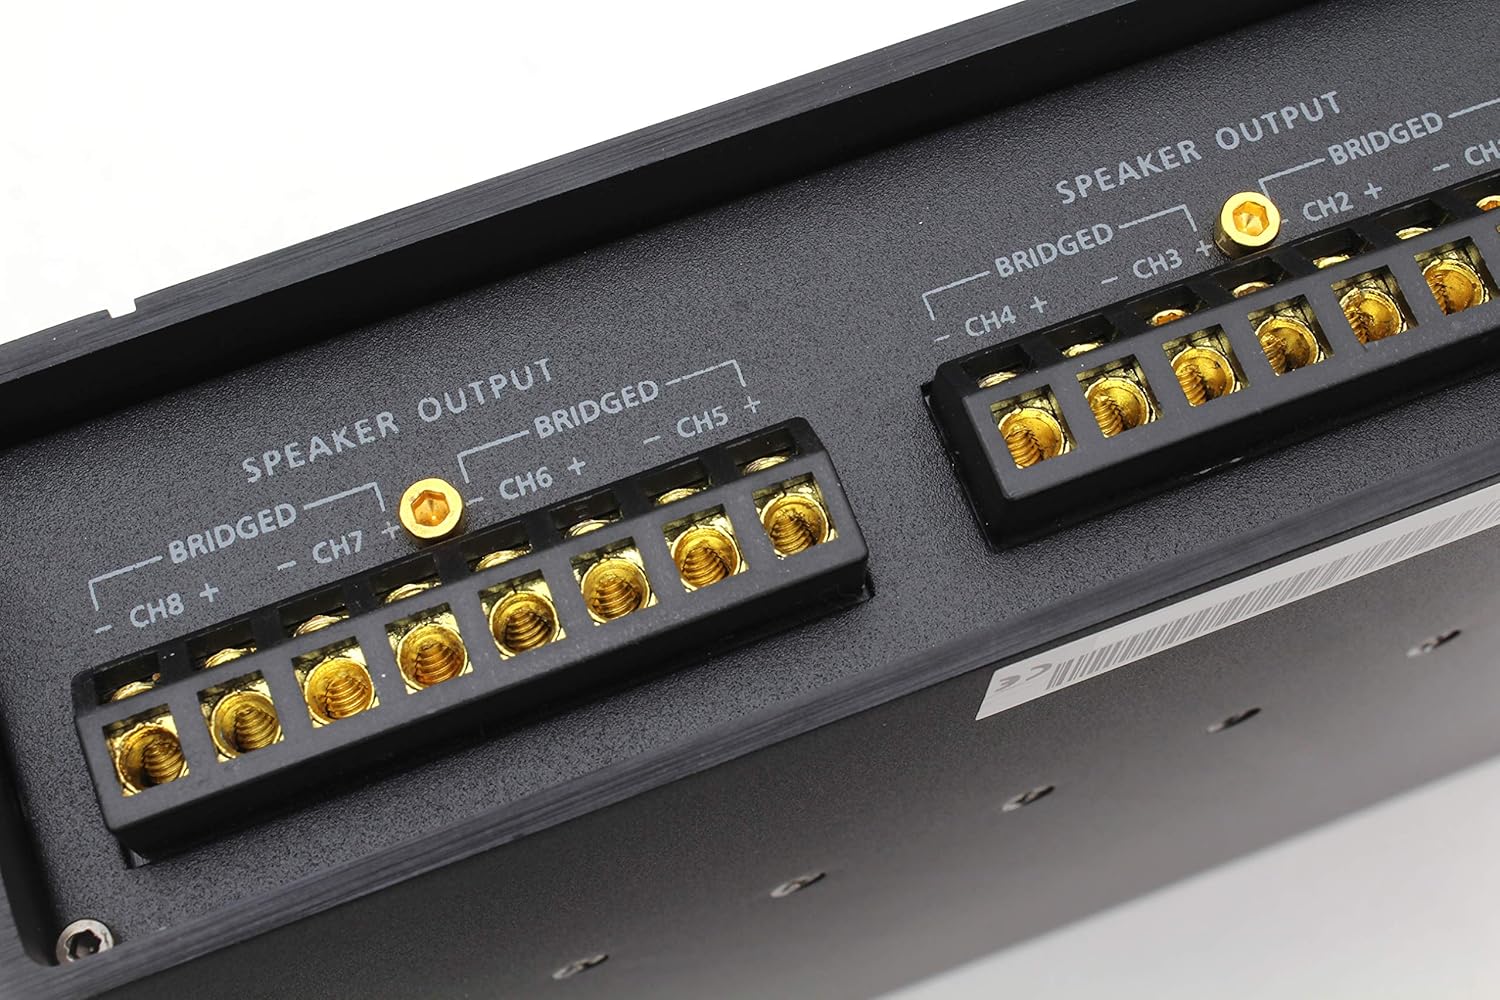
Figure 2.4: Close-up of the speaker output terminals, clearly labeled for individual channels and bridged configurations.

Figure 2.5: The wired remote control unit with a display and rotary knob for volume and menu navigation.

Figure 2.6: The included wiring harness for high-level input and power connections.

Figure 2.7: The Quick Start Guide, illustrating connection diagrams for the DSP and amplifier sections.
3. Setup and Installation
Proper installation is crucial for optimal performance and safety. It is recommended that installation be performed by a qualified professional.
3.1 Mounting Considerations
- Choose a dry, well-ventilated location away from direct sunlight and heat sources.
- Ensure adequate airflow around the unit for cooling.
- Mount the unit securely to a solid surface using appropriate hardware to prevent vibration.
3.2 Power Connections
Connect the power input terminals (+12V, REM, GND) to your vehicle's electrical system. Use appropriate gauge wiring for power and ground connections to prevent voltage drop and ensure stable operation.
- +12V: Connect to the vehicle's positive battery terminal via a fused power cable.
- GND: Connect to a clean, unpainted metal chassis point in the vehicle.
- REM (Remote): Connect to the remote turn-on output of your head unit or ignition switch.
3.3 Input Connections
The ADSP-Z8 IV-8 supports various audio input sources:
- Low-Level RCA Inputs (FL, RL, SUBL, AUX L, FR, RR, SUBR, AUX R): Connect to the RCA pre-outs of your head unit or other audio sources.
- High-Level Speaker Inputs (Higa-Spk In): Use the provided wiring harness to connect directly to your head unit's speaker outputs if RCA outputs are not available.
- Optical Input: For digital audio sources, connect via an optical cable.
- AUX Inputs: Additional analog input for external devices.
3.4 Output Connections
Connect your speakers to the designated speaker output terminals. Ensure correct polarity for all connections.
- Speaker Output (CH1-CH8): Connect individual speakers to their respective channels.
- Bridged Output: For higher power output to fewer speakers (e.g., subwoofers), bridge channels as indicated on the unit (e.g., CH1+ and CH2- for bridged output).
3.5 Remote Control and Data Connections
- Remote Display: Connect the included 1-inch LCD display to the 'REMOTE' port for basic control and status display.
- USB: Connect to a PC for advanced tuning using Zapco's DSP software.
- BT (Bluetooth): For Bluetooth audio streaming and potentially wireless control (check software compatibility).
4. Operating Instructions
Once installed, the ADSP-Z8 IV-8 can be controlled via the wired remote display or through the dedicated PC software.
4.1 Power On/Off
The unit will power on automatically when the remote turn-on signal is received from your head unit. It will power off when the remote signal is removed.
4.2 Using the Remote Display
The 1-inch LCD display allows for basic adjustments and monitoring:
- Volume Control: Use the rotary knob to adjust the master volume.
- Input Selection: Navigate through input sources (e.g., Low-Level, High-Level, Optical, AUX).
- Preset Recall: Select pre-configured sound presets.
- Display Information: View current volume level, input source, and other status indicators.
4.3 Advanced Tuning with PC Software
For full control over the DSP functions, connect the unit to a PC via USB and use the Zapco DSP software (available for download from the Zapco website).
- Equalization (EQ): Adjust frequency response using Graphic or Parametric EQ for each channel group.
- Crossovers: Set high-pass, low-pass, and band-pass filters for each channel.
- Time Alignment: Precisely adjust the delay for each speaker to ensure sound arrives at the listening position simultaneously.
- Polarity: Invert the phase of individual channels (0°/180°).
- Level Control: Fine-tune the output level of each channel.
- Input Mixing: Configure how input signals are routed to output channels.
- Save/Load Presets: Create and store multiple sound profiles for different music genres or listening preferences.
5. Maintenance
Regular maintenance helps ensure the longevity and optimal performance of your ADSP-Z8 IV-8.
- Cleaning: Use a soft, dry cloth to wipe the exterior of the unit. Do not use harsh chemicals or abrasive cleaners.
- Ventilation: Ensure that the ventilation openings are not blocked by debris or other objects.
- Connections: Periodically check all power and signal connections to ensure they are secure and free from corrosion.
- Environmental Conditions: Avoid exposing the unit to extreme temperatures, humidity, or direct water contact.
6. Troubleshooting
If you encounter issues with your ADSP-Z8 IV-8, refer to the following common problems and solutions:
| Problem | Possible Cause | Solution |
|---|---|---|
| No Power | Blown fuse; Loose power/ground connection; No remote turn-on signal. | Check and replace fuse; Secure all power and ground wires; Verify remote wire connection to head unit. |
| No Sound Output | Incorrect input selection; Muted channels; Loose speaker connections; DSP settings incorrect. | Select correct input source; Check mute status in DSP software; Verify speaker wiring; Reset DSP settings if necessary. |
| Distorted Sound | Input gain too high; Speaker impedance mismatch; Damaged speaker; Clipping. | Adjust input gain levels; Ensure speakers match amplifier impedance; Inspect speakers for damage; Reduce volume. |
| Remote Display Not Working | Loose cable connection; Damaged remote cable. | Ensure remote cable is securely plugged into the unit and display; Inspect cable for damage. |
| Cannot Connect to PC | USB cable issue; Driver not installed; Software not running. | Try a different USB cable/port; Install necessary USB drivers from Zapco website; Ensure DSP software is open and running. |
If the problem persists after attempting these solutions, please contact Zapco customer support or a qualified installer.
7. Specifications
Detailed technical specifications for the Zapco ADSP-Z8 IV-8:
| Feature | Specification |
|---|---|
| DSP Processor | Cirrus Logic CS47048 |
| DSP Power | 150 MHz/32 bit/48 KHz |
| ADC | Cirrus Logic CS5368 24 bit/192 KHz |
| DAC | Cirrus Logic CS47048 32 bit/192 KHz |
| Low Level (Pre) Sensitivity | 8 / 1-5 VRMS |
| High Level (Spk In) Sensitivity | 6 / 2-20 V |
| AUX Inputs Sensitivity | 1 / 0.2-4 VRMS |
| Optical IN | 24 bit-192 KHz |
| Output Channels RCA / Sensitivity | 8 / 4 VRMS |
| Frequency Response (-3dB) | 10 Hz - 22.5 KHz |
| S/N Ratio Digital Input | 110 dBA |
| S/N Ratio Analog Input | 106 dBA |
| THD+N Digital Input | 0.002 % |
| THD+N Analog Input | 0.005 % |
| Crosstalk at 1 KHz | 90 dB |
| F/R EQ | 1-6 ch Gr. & Par./31 poles |
| Effect EQ | 7-8 ch Gr. & Par./11 poles |
| Time Alignment (Range/Steps) | 0/15 ms / 0.02 ms |
| Max Delay (Cm/Steps) | 515 cm / 0.68 cm |
| Polarity | 0/180° |
| Display (included) | 1” LCD Display |
| PC/Dashboard Connection | USB/6-Pin Mini DIN |
| Unit Dimensions (L x W x H) | 210mm x 125mm x 48mm (8.27 x 4.92 x 1.89 inches) |
| Amp Power @ 4 Ω | 8 x 80 watts |
| Amp Power @ 2 Ω | 8 x 120 watts |
| Amp Power @ 4 Ω Bridged | 4 x 240 watts |
| Item Weight | 10 pounds |
8. Warranty and Support
8.1 Warranty Information
The Zapco ADSP-Z8 IV-8 comes with a 1-Year Limited Warranty from the date of purchase. This warranty covers defects in materials and workmanship under normal use. It does not cover damage caused by improper installation, accident, misuse, abuse, negligence, or unauthorized modification.
Please retain your proof of purchase for warranty claims. For detailed warranty terms and conditions, refer to the official Zapco website or contact customer support.
8.2 Customer Support
For technical assistance, troubleshooting beyond this manual, or warranty inquiries, please contact Zapco customer support. You can typically find contact information on the official Zapco website (www.zapco.com) or through your authorized dealer.