1. Introduction and Overview
This manual provides detailed instructions for the installation, operation, and maintenance of your POCREATION HUD OBD2 Speedometer Smart Gauge. This device offers a comprehensive display of vehicle data, enhancing your driving experience with real-time information and customizable interfaces.
Key Features:
- Dual System Compatibility: Supports both OBD2 and GPS modes for broad vehicle compatibility.
- Dynamic Display: Features LED lighting that changes color based on driving speed and alarm conditions (blue for normal, flashing red for alarms).
- Customizable Interface: Offers multiple display interfaces to personalize the information shown, including speed, RPM, voltage, fuel consumption, and more.
- Extensive Data Monitoring: Provides access to over 100 types of vehicle data in OBD mode and essential driving metrics in GPS mode.
- Alarm Functions: Includes configurable alarms for overspeed, excessive rotation speed, water temperature, and voltage.
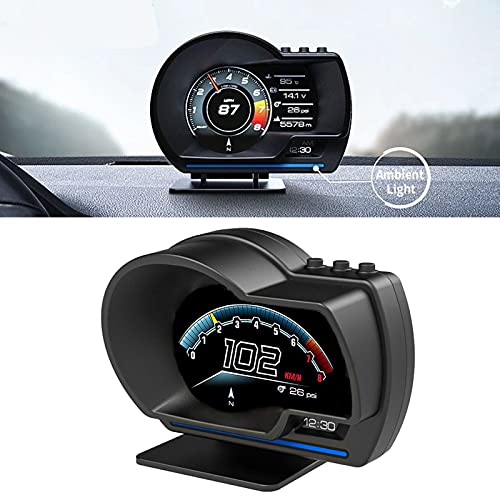
Image 1.1: The POCREATION HUD OBD2 Speedometer Smart Gauge displayed on a vehicle dashboard, showing speed and other metrics.
2. Setup Instructions
Package Contents:
- 1 x Host Unit
- 1 x OBD Line
- 1 x USB Cable
- 1 x Small Lever
- 1 x Instruction Manual
- 1 x Double-sided Tape
- 1 x Holder
Installation Steps:
- Preparation: Ensure you have the LCD instrument (host unit) and the OBD cable ready.
- Locate OBD Interface: Find your vehicle's OBD interface. This is typically located under the dashboard on the driver's side. Connect the provided OBD cable to the meter and then to the vehicle's OBD port.
- Start Engine: Start your vehicle's engine, then turn on the ignition switch.
- Device Self-Test: The meter will power on, perform a self-test, and display the home screen. Once the self-test is complete, it will enter the working interface.
- Positioning: Remove the adhesive film from the bottom of the LCD meter's holder. Choose a suitable position on your dashboard that does not obstruct your view and securely fix the device.
Note: For vehicles with a voltage greater than 24V, please use the provided USB cable for power instead of the OBD cable.
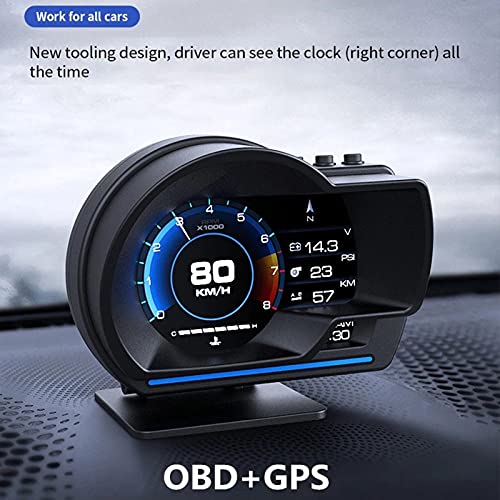
Image 2.1: The HUD device positioned on a car dashboard, showing its display in operation.
3. Operating Instructions
The HUD Smart Gauge operates in two primary modes: OBD2 and GPS. It can simultaneously display information from both modes.
OBD Mode Functions:
This mode is compatible with most vehicles manufactured after 2008 (or 2005 for European cars) and provides extensive vehicle data.
- Display Information: Vehicle speed, water temperature, voltage, fuel consumption, rotation speed (RPM), single trip mileage, total mileage, travel time, driving direction, number of satellites, altitude, current time, intake pressure, oil temperature, air-fuel ratio, turbine pressure, acceleration test results, brake test results, and data stream.
- Alarm Functions: Overspeed alarm, excessive rotation speed alarm, water temperature alarm, voltage alarm.
- Additional Features: Ability to clear fault codes.
GPS Mode Functions:
This mode is universally compatible with all vehicles and provides essential navigation and driving data.
- Display Information: Vehicle speed, voltage, satellite time, altitude, number of satellites, driving direction, single trip mileage, driving time, acceleration test results, brake test results.
- Alarm Functions: Overspeed alarm, low voltage alarm.
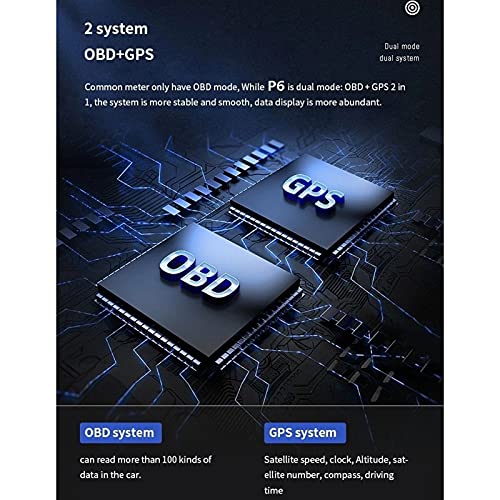
Image 3.1: Illustration of the dual OBD and GPS system, highlighting the stability and data abundance provided by both systems.
4. Display Interfaces
The device offers 9 distinct display interfaces, allowing you to choose the layout and information most relevant to your driving needs. You can switch between these interfaces to customize your view.
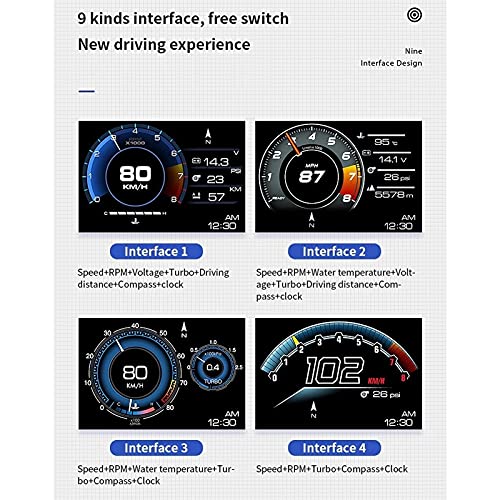
Image 4.1: Examples of four different display interfaces (Interface 1-4), showing various combinations of speed, RPM, voltage, turbo, compass, and clock.

Image 4.2: Examples of five more display interfaces (Interface 5-9), including detailed data like coolant temperature, mileage, acceleration test, brake test, and DTC status.
5. Ambient Light Feature
The HUD Smart Gauge includes an ambient light feature designed to enhance driving comfort and provide visual alerts.
- Normal Operation: During normal driving conditions, the ambient light will display a blue color. Its brightness automatically adjusts to the surrounding environment.
- Alarm Indication: If the device detects an abnormal driving condition, such as speeding or other triggered alarms, the ambient light will change to a flashing red color to alert the driver.
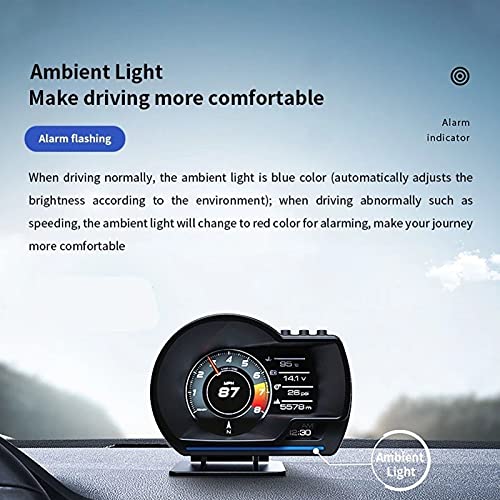
Image 5.1: The ambient light feature, illustrating the blue light for normal driving and the red flashing light for alarm conditions.
6. Maintenance
To ensure the longevity and optimal performance of your HUD Smart Gauge, follow these simple maintenance guidelines:
- Cleaning: Use a soft, dry cloth to gently wipe the display screen and the device's exterior. Avoid using abrasive cleaners or solvents, as these can damage the surface.
- Storage: If the device will not be used for an extended period, disconnect it from the vehicle's OBD port or USB power source and store it in a cool, dry place away from direct sunlight.
- Avoid Extreme Temperatures: Do not expose the device to extreme heat or cold, as this can affect its electronic components.
7. Troubleshooting
If you encounter any issues with your HUD Smart Gauge, please refer to the following common troubleshooting tips:
- Device Not Powering On: Ensure the OBD cable or USB cable is securely connected to both the device and the vehicle's port. Verify that the vehicle's ignition is on. For 24V vehicles, confirm the USB cable is used.
- No Data Displayed (OBD Mode): Check if your vehicle is OBD2 compliant (generally post-2008 for most cars, post-2005 for European cars). Ensure the OBD cable connection is firm. Try restarting the vehicle and the device.
- Inaccurate Speed/GPS Data (GPS Mode): Ensure the device has a clear view of the sky to acquire satellite signals. Driving in tunnels or heavily built-up areas may temporarily affect GPS accuracy.
- Alarms Triggering Incorrectly: Review the device settings to adjust alarm thresholds (e.g., overspeed limit).
- Clearing Fault Codes: The device supports clearing fault codes. Refer to the operating instructions for the specific menu option to perform this action.
If problems persist after attempting these steps, please contact POCREATION customer support.
8. Specifications
| Brand | POCREATION |
| Model | B0CXY5DQKV |
| Material | Glass, Metal, Plastic |
| Operating Voltage | 11V-18V (Use USB for >24V) |
| Display Type | HUD (Head-Up Display) |
| Connectivity | OBD2, GPS |
| Screen Size | 3 inches |
| Unit Count | 1.0 Count |
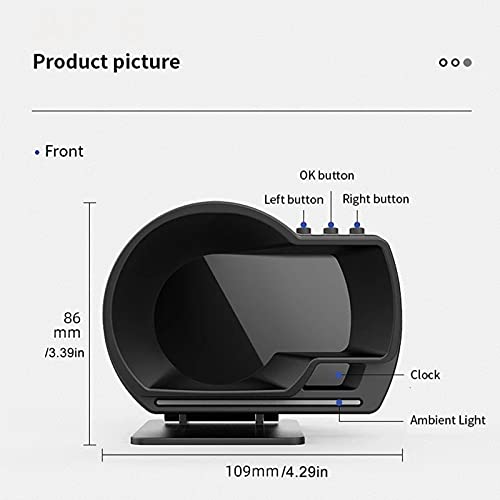
Image 8.1: Technical drawing showing the front view dimensions of the HUD device (109mm width, 86mm height).
9. Warranty Information
This POCREATION HUD OBD2 Speedometer Smart Gauge is covered by a manufacturer's warranty for 90 days from the date of purchase. This warranty covers defects in materials and workmanship under normal use. Please retain your proof of purchase for warranty claims.
The warranty does not cover damage caused by misuse, accident, unauthorized modification, or improper installation.
10. Support
For further assistance, technical support, or warranty inquiries regarding your POCREATION HUD OBD2 Speedometer Smart Gauge, please contact POCREATION customer service through the retailer where the product was purchased or visit the official POCREATION brand store online.
We are committed to providing high-quality products and support to our customers.