1. Product Overview
The ShakingTank Mini ARGB PC Fans Controller Kit is designed to manage the lighting effects of 5V 3-Pin Addressable RGB (ARGB) devices such as PC case fans, ARGB LED strips, ARGB M.2 coolers, and ARGB graphics card brackets. It features a compact controller unit and a 14-key remote control for easy customization of lighting modes, speeds, and colors. Power is supplied via a SATA connector.

2. Setup
2.1 Package Contents
- 1 x ShakingTank Mini ARGB Controller
- 1 x 14-Key Remote Control
2.2 Installation Guide
Step 1: Power Connection
Connect the SATA power connector from the ARGB controller cable to an available SATA power cable from your PC's power supply unit (PSU). Ensure a secure connection.

Step 2: ARGB Device Connection
Connect your 5V 3-Pin ARGB devices (fans, LED strips, etc.) to the 3-pin ARGB header on the controller unit. Ensure the arrow on the ARGB connector aligns with the corresponding marking on the controller header to prevent damage.

Important Note:
This controller supports 5V 3-Pin ARGB devices only. It is not compatible with 12V 4-Pin RGB headers found on some motherboards. Connecting to an incompatible header may cause damage to the controller or your ARGB devices. This controller operates independently and does not connect to the motherboard for software control.

3. Operating Instructions
3.1 Remote Control Functions
The 14-key remote control allows for easy adjustment of lighting effects. Ensure the remote is pointed towards the controller for optimal signal reception.

- Power Button (Red Circle with Line): Turns the ARGB lighting On or Off.
- Lock Button (Padlock Icon): Locks the current lighting mode.
- Settings Button (Gear Icon): Adjusts the number of LEDs to be controlled. (Note: 3-piece LED adjustment may not work after every press).
- Speed - (Speed Down Arrow): Decreases the speed of dynamic lighting effects.
- Speed + (Speed Up Arrow): Increases the speed of dynamic lighting effects.
- Mode - (Mode Down Arrow): Cycles backward through dynamic lighting modes.
- Auto (Play Button): Activates automatic cycling through all dynamic lighting modes.
- Mode + (Mode Up Arrow): Cycles forward through dynamic lighting modes.
- Dim (Sun Icon - Minus): Decreases the brightness of the lighting.
- Bright (Sun Icon - Plus): Increases the brightness of the lighting.
- White (W): Sets the lighting to static white.
- Red (R): Sets the lighting to static red.
- Green (G): Sets the lighting to static green.
- Blue (B): Sets the lighting to static blue.
3.2 On-Controller Button Functions
The controller unit itself has three buttons for basic control without the remote.
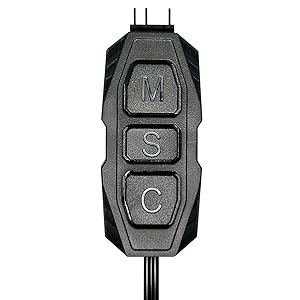
- M (Mode): Switches between different lighting modes.
- S (Speed): Switches lighting speed. Press and hold for 3 seconds to turn the lighting On or Off.
- C (Color): Switches lighting color. Press and hold for 3 seconds to adjust brightness.
4. Maintenance
4.1 Cleaning and Care
To maintain optimal performance, keep the controller and remote free from dust and debris. Use a soft, dry cloth for cleaning. Avoid using liquid cleaners or abrasive materials.
4.2 Storage
When not in use for extended periods, store the controller and remote in a cool, dry place away from direct sunlight and extreme temperatures.
5. Troubleshooting
5.1 Common Issues and Solutions
- Issue: ARGB lights are not turning on.
Solution: Ensure the SATA power connector is securely connected to the PSU. Verify that the 5V 3-Pin ARGB devices are correctly connected to the controller with proper pin alignment. Check if the power button on the remote or the 'S' button on the controller (long press) has been used to turn off the lights. - Issue: Remote control is not responding.
Solution: Ensure there are no obstructions between the remote and the controller. Check the remote's battery and replace if necessary. Try operating the controller using its physical buttons to confirm the controller itself is functioning. - Issue: Lighting effects are not changing.
Solution: Confirm that the 'Lock' button on the remote has not been activated. Try cycling through modes and colors using both the remote and the controller's physical buttons. - Issue: Incompatible connection warning.
Solution: This controller is designed for 5V 3-Pin ARGB devices only. Do not attempt to connect it to 12V 4-Pin RGB headers on your motherboard, as this will cause damage.
6. Specifications
6.1 Technical Specifications
| Feature | Specification |
|---|---|
| Model Number | MFX-ZHHN-1NNN6-R1 |
| Power Connector Type | SATA |
| Voltage | 5 Volts |
| Compatible Devices | Desktop PC ARGB Fans, LED Strips, M.2 Coolers, Graphics Card Brackets (5V 3-Pin ARGB) |
| Material | Polycarbonate (PC) |
| Product Dimensions | 3.38"L x 1.55"W x 0.35"H (Controller Unit) |
| Total Cable Length | Approx. 20.8 inches (53 cm) |
| Control Method | 14-Key Remote Control, On-Controller Buttons |
| Lighting Modes | 215 Dynamic Light Modes, 4 Static Light Colors |
7. Warranty and Support
7.1 Warranty Information
For specific warranty details, please refer to the purchase documentation or contact your retailer. Keep your proof of purchase for warranty claims.
7.2 Customer Support
If you encounter any issues not covered in this manual or require further assistance, please contact the manufacturer or your point of purchase for support.