Introduction
The Outzone V520 OBD2 Car Diagnostic Tool is a multi-functional vehicle fault diagnosis instrument designed to assist in maintaining your vehicle's health. It supports OBD II/EOBD nine standard protocols, offering a comprehensive suite of diagnostic functions. This device is plug-and-play, allowing for quick reading of vehicle fault information and parameters. It is applicable to all cars that comply with the OBD II protocol since 1996.
Key features include reading and clearing fault codes, displaying real-time data streams, I/M readiness status, and a built-in fault code library. The V520 also supports cloud printing for diagnostic reports and offers multi-language support.
Setup and Connection
The Outzone V520 is designed for ease of use with a simple plug-and-play operation. Follow these steps to connect the device to your vehicle:
- Locate the OBD II port in your vehicle. This port is typically found under the dashboard on the driver's side, but its exact location may vary by vehicle model.
- Ensure your vehicle's ignition is turned off before connecting the V520.
- Plug the V520's OBD connector firmly into the vehicle's OBD II port.
- Once connected, turn the vehicle's ignition to the "ON" position (do not start the engine unless instructed by a specific diagnostic procedure). The V520 will power on automatically.
- The device is now ready for use.
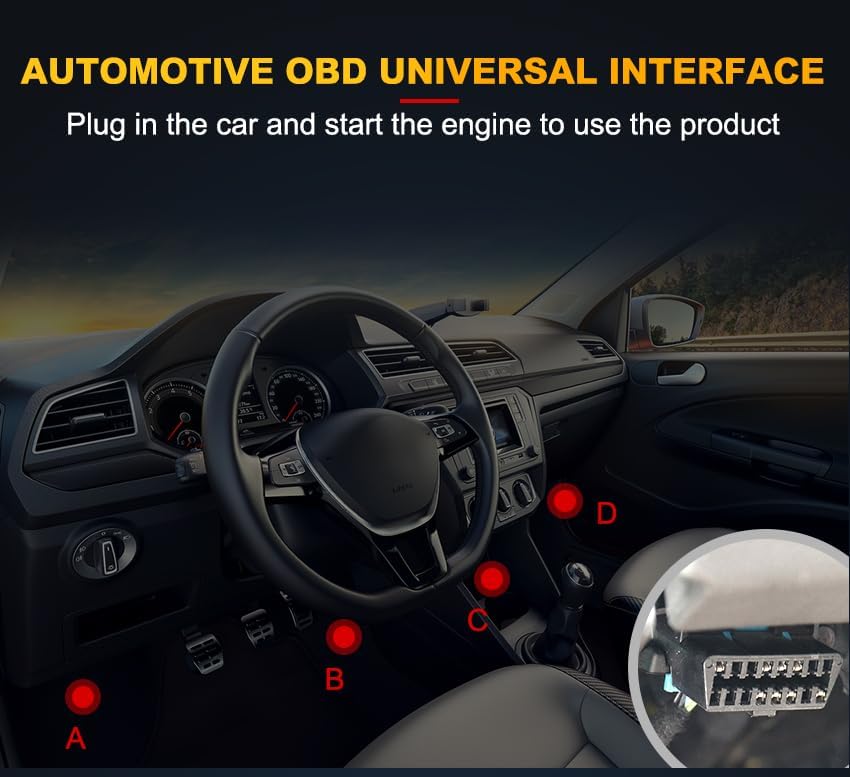
Figure 1: The Outzone V520 OBD2 Car Diagnostic Tool connected to a vehicle's OBD II port. The image shows the universal OBD connector plugged into the port, typically located under the dashboard. This connection provides power to the device and establishes communication with the vehicle's onboard computer system.
Operating Instructions
The Outzone V520 offers various functions accessible through its intuitive interface. Below are instructions for common operations.
Device Layout and Buttons

Figure 2: An overview of the Outzone V520's physical layout, highlighting its 2.8-inch color screen and various control buttons. Key elements include the universal OBD connector, fault code shortcut key (DTC), I/M readiness button (I/M), battery voltage button (BAT), navigation arrows (Up, Down, Left, Right), OK button, and EXIT button. The screen displays main menu options such as OBD/EOBD, Data Stream, DTC Lib, Cloud Print, Voltage, and Setup.
- 2.8-inch Color Screen: Displays diagnostic information and menu options.
- DTC (Fault Code Shortcut Key): Directly accesses the Diagnostic Trouble Code (DTC) functions.
- I/M (I/M Readiness): Checks the readiness status of emission-related monitors.
- BAT (Battery Voltage): Displays the current vehicle battery voltage.
- Navigation Arrows (Up, Down, Left, Right): Used to navigate through menus and select options.
- OK: Confirms selections or enters sub-menus.
- EXIT: Returns to the previous screen or exits a function.
Reading and Clearing Fault Codes
The V520 can quickly read and clear Diagnostic Trouble Codes (DTCs) that illuminate the Check Engine Light (MIL).
- Connect the V520 to your vehicle's OBD II port and turn the ignition ON.
- From the main menu, select "OBD/EOBD" or press the DTC button.
- Select "Read DTC" to view current, pending, and permanent fault codes. The screen will display the code and a brief description.
- To clear codes, select "Clear DTC". A confirmation prompt will appear. Confirm to erase the codes and turn off the Check Engine Light. Warning: Clearing codes will erase all diagnostic data. Ensure you have recorded any necessary information before proceeding.

Figure 3: The V520 displaying engine fault diagnosis. The screen shows options to Read DTC, Clear DTC, and Freeze Frame data. An example fault code (P3002) is shown with its description, and a prompt for erasing trouble codes is visible, illustrating the process of clearing the Check Engine Light.
Viewing Live Data Stream
Monitor various real-time parameters from your vehicle's engine control unit (ECU).
- From the main menu, select "Data Stream".
- The device will display a list of available live data parameters such as engine RPM, vehicle speed, coolant temperature, fuel system status, and more.
- Use the navigation buttons to scroll through the data.

Figure 4: The V520 displaying various real-time data streams from the vehicle. Examples of parameters shown include DTC_CNT (DTC count), DTCFRZF (DTC freeze frame), FUELSYS1/2 (Fuel System Status), LOAD_PCT (Calculated Load Value), ETC (Engine Coolant Temperature), and various short and long term fuel trims (SHRTFT, LONGFT).
I/M Readiness Status
Check the readiness of the emission monitoring systems to ensure your vehicle is ready for an emissions test.
- From the main menu, select "I/M Readiness" or press the I/M button.
- The screen will display the status of various monitors (e.g., MIL, MIS, FUE, CCM, CAT, HCAT, AIR, EVAP, O2S, EGR). A green checkmark indicates the monitor has completed its test, while a red 'X' indicates it has not.

Figure 5: The V520 displaying the I/M Readiness status. This screen shows the completion status of various emission-related monitors, such as MIL (Malfunction Indicator Lamp), DTC (Diagnostic Trouble Codes), MIS (Misfire Monitoring), FUE (Fuel System Monitoring), CCM (Comprehensive Component Monitoring), CAT (Catalyst Monitoring), HCAT (Heated Catalyst Monitoring), AIR (Secondary Air System Monitoring), EVAP (Evaporative System Monitoring), O2S (Oxygen Sensor Monitoring), and EGR (Exhaust Gas Recirculation System Monitoring).
Fault Code Library (DTC Lib)
The V520 has a built-in database of 35,901 fault codes, allowing you to quickly look up definitions.
- From the main menu, select "DTC Lib".
- Enter the fault code using the navigation buttons and the OK button.
- The device will display the definition of the entered code.

Figure 6: A visual representation of the V520's extensive 35,901 fault code library. The image shows a grid of various P-codes (Powertrain codes) and B-codes (Body codes), demonstrating the device's capability to quickly query and display definitions for a wide range of diagnostic trouble codes.
Cloud Printing Function
The V520 supports cloud printing, allowing you to generate and print diagnostic reports.
- After completing a diagnostic scan or viewing data, navigate to the "Cloud Print" option from the main menu.
- Follow the on-screen instructions, which typically involve scanning a QR code with a smartphone or tablet to access the diagnostic report online.
- From the online interface, you can print or save the report.

Figure 7: The V520's cloud printing interface. The screen displays a "Diagnostic Report" with data stream information and an option to "scan the code" (QR code) to access the report for printing or saving. This feature allows for easy sharing and archiving of diagnostic results.
Supported Languages
The Outzone V520 supports 10 languages for user convenience:
- English
- German
- French
- Spanish
- Italian
- Russian
- Dutch
- Chinese
- Japanese
- Portuguese
Language settings can typically be adjusted in the "Setup" menu of the device.
Maintenance
To ensure the longevity and optimal performance of your Outzone V520 OBD2 Car Diagnostic Tool, follow these maintenance guidelines:
- Cleaning: Use a soft, dry cloth to clean the device. Do not use abrasive cleaners, solvents, or strong chemicals, as these can damage the casing or screen.
- Storage: Store the device in a cool, dry place, away from direct sunlight and extreme temperatures. Keep it in its original packing box when not in use to protect it from dust and physical damage.
- Handling: Avoid dropping the device or subjecting it to strong impacts. The screen and internal components are sensitive.
- Cable Care: Do not bend or crimp the OBD cable excessively. Always grasp the connector when plugging or unplugging to avoid damaging the cable or the device's port.
- Software Updates: Check the official Outzone website periodically for any available software or firmware updates for the V520. Keeping the software updated can improve performance and compatibility.
Troubleshooting
If you encounter issues while using your Outzone V520, refer to the following common troubleshooting steps:
- Device Does Not Power On:
- Ensure the OBD II connector is fully and securely plugged into the vehicle's OBD II port.
- Verify that the vehicle's ignition is turned to the "ON" position. The device draws power from the vehicle's OBD II port.
- Check the vehicle's battery voltage. If the battery is too low, the device may not power on.
- "Link Error" or "Communication Error" Message:
- Confirm the OBD II connector is securely connected.
- Ensure the vehicle's ignition is ON.
- Verify that your vehicle is OBD II compliant (most vehicles manufactured in the US since 1996 are).
- Try connecting the device to a different OBD II compliant vehicle to rule out an issue with the tool itself or the vehicle's OBD system.
- Cannot Clear Codes:
- Ensure the ignition is ON and the engine is off (KOEO - Key On, Engine Off) when attempting to clear codes.
- If the underlying fault that triggered the code is still present, the code may reappear immediately after clearing. Address the root cause of the fault first.
- Screen Freezes or Device is Unresponsive:
- Disconnect the device from the vehicle, wait a few seconds, and then reconnect it to perform a reset.
If these steps do not resolve your issue, please contact Outzone customer support for further assistance.
Specifications
| Feature | Detail |
|---|---|
| Model | V520 |
| Display | 2.8-inch Color Screen (320x240 resolution) |
| Operating System | OBD2 |
| Supported Protocols | OBD II / EOBD (9 standard protocols) |
| Fault Code Library | Built-in 35,901 fault codes |
| Supported Languages | English, German, French, Spanish, Italian, Russian, Dutch, Chinese, Japanese, Portuguese |
| Item Weight | 10.7 ounces |
| Product Dimensions | 6.73 x 3.34 x 1.1 inches |
| Country of Origin | China |
| First Available Date | March 12, 2024 |
Warranty and Support
Outzone is committed to providing high-quality products and customer satisfaction. While specific warranty details are typically provided with your purchase documentation, Outzone offers support for its products.
If you have any questions, require technical assistance, or encounter any issues with your Outzone V520 OBD2 Car Diagnostic Tool, please contact Outzone customer support. When contacting support, it is helpful to have your order number readily available to facilitate a quicker resolution.
For the most up-to-date support information and contact methods, please refer to the official Outzone website or the contact details provided with your product packaging.