1. Introduction
This user manual provides detailed instructions for the setup, operation, maintenance, and troubleshooting of the Potensic FAA Compliant Remote Identification Broadcast Module (Model RID-916). This module is designed to ensure your drone complies with FAA Remote ID regulations, allowing for safe and legal operation of drones weighing over 250g.
The Potensic RID-916 module offers reliable performance with accurate GPS positioning and robust connectivity, making it an essential accessory for drone pilots.
2. Package Contents
Please verify that all items listed below are included in your package:
- Remote ID Module (x1)
- Action Camera Mount (x1)
- 3M Tape (x2)
- 3M Dual-Lock (x2)
- USB Cable (x1)
- User Manual (x1)
3. Product Features

The Potensic Remote ID Module, a compact and essential device for drone compliance.

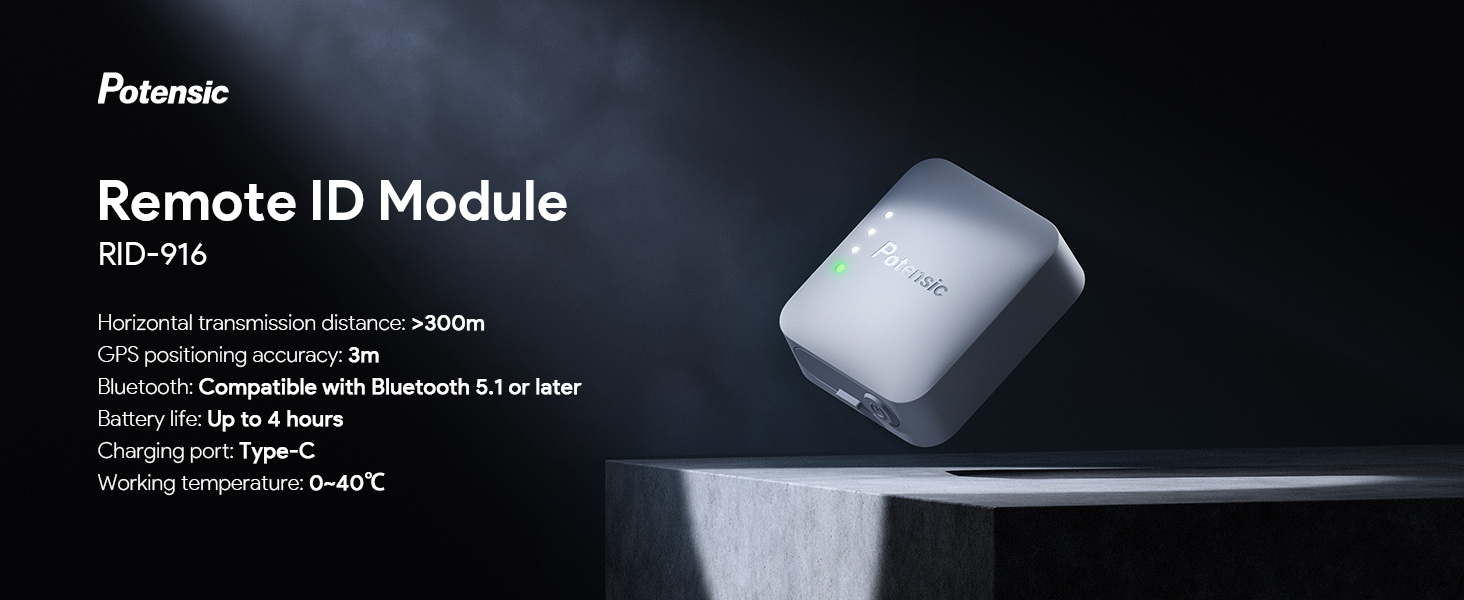
Enhanced Transmission: The module supports Bluetooth 5.1 and above, offering a horizontal transmission distance of over 300 meters. It features accurate GPS positioning with an error of less than 3 meters, broadcasting critical flight data.

Long-lasting Battery: Equipped with a battery that provides up to 4 hours of operation per charge, ensuring extended flight times. Charging is convenient via the Type-C port with built-in overcharge protection.

Durable Design: The module boasts an IP54 waterproof and dustproof rating, protecting it from splashes and dust intrusion during flight, which contributes to a longer product life.

Lightweight and Compact: Weighing less than 20g (0.7oz) and with dimensions of 1.24 x 1.48 x 0.63 inches, the module is designed for minimal impact on drone performance and easy storage.

Wide Compatibility: Compatible with all Potensic drones (e.g., ATOM SE, ATOM 3-Axis, Dreamer PRO series) and other drone models weighing over 250g, including various types of aircraft like gliders, helicopters, and multi-rotor drones.
4. Setup and Installation
The Potensic Remote ID Module offers multiple installation options to suit various drone models and preferences. Choose the method that best fits your drone and ensures optimal GPS signal reception.
4.1 Installation Methods
Velcro Tape Installation: This method provides a secure and reusable attachment. Attach one side of the Velcro tape to the remote ID module and the other side to a flat, clean surface on your drone. Then, securely fasten the module to the drone.

Other Options: In addition to Velcro, you can use 3M Tape for a more permanent attachment or the included Action Camera Mount for drones with compatible mounting points.
4.2 Installation Guidelines for Optimal Performance
To maximize GPS performance and ensure proper broadcasting, follow these guidelines when mounting the module:
- Ensure installation in an area free from propeller rotation obstruction.
- Mount the device where it will not block the drone's GPS antenna.
- Position the transmitter horizontally upward to improve GPS signal reception.

Refer to the diagram above for visual examples of optimal mounting positions on various drone models.
5. Operating Instructions
5.1 Powering On/Off
To power on the module, press and hold the power button until the LED indicators illuminate. To power off, press and hold the power button again until the LEDs turn off.
5.2 LED Status Indicators
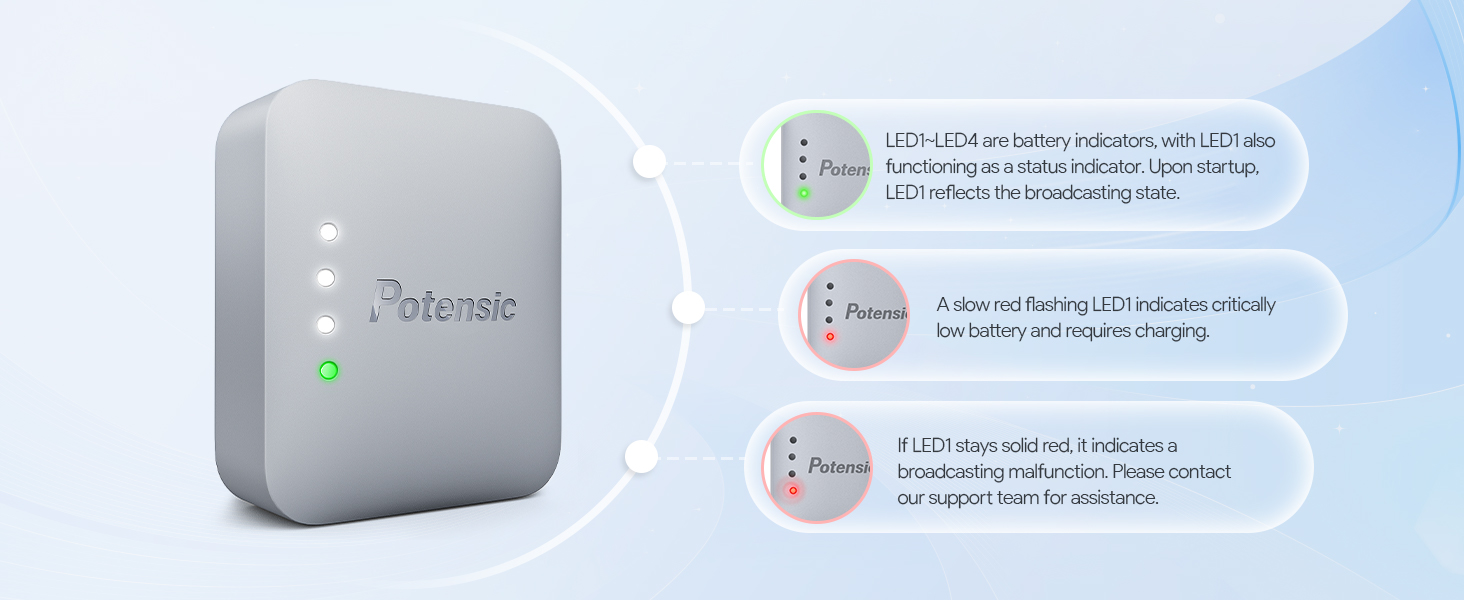
The module features four LED indicators (LED1-LED4) that provide information on battery level and broadcasting status.
- LED1-LED4: These LEDs indicate the battery level. Upon startup, LED1 also functions as a status indicator, reflecting the broadcasting state.
- Slow Red Flashing LED1: Indicates critically low battery and requires immediate charging.
- Solid Red LED1: If LED1 stays solid red, it indicates a broadcasting malfunction. Please contact our support team for assistance.
5.3 GPS Acquisition and Data Broadcasting
Upon powering on, the module will begin acquiring GPS satellites. This process may take approximately 5 minutes. Once satellites are acquired, the module will start broadcasting the following information via wireless broadcast:
- Drone serial number
- Take-off position
- Real-time latitude and longitude
- Altitude
- Flight speed
You can view this detailed information through common Remote ID applications such as Drone Scanner and OpenDrone ID OSM.
6. Maintenance
6.1 Charging the Module
Use the provided Type-C USB cable to charge the module. The charging port is designed with a dust plug to maintain cleanliness and prevent debris from entering. The module features overcharge protection, automatically stopping charging when the battery is full to ensure safety and prolong battery life.
Ensure the dust plug is properly seated when not charging to protect the port.
6.2 Storage
Store the module in a cool, dry place away from direct sunlight and extreme temperatures. Ensure the dust plug is in place to protect the charging port from environmental elements.
7. Troubleshooting
| Problem | Possible Cause | Solution |
|---|---|---|
| Module not powering on. | Low battery or power button not pressed long enough. | Charge the module fully. Press and hold the power button for a few seconds until LEDs illuminate. |
| LED1 flashing red slowly. | Critically low battery. | Recharge the module immediately using the provided USB-C cable. |
| LED1 solid red. | Broadcasting malfunction. | Restart the module. If the issue persists, contact Potensic customer support. |
| Slow GPS satellite acquisition (takes longer than 5 minutes). | Poor satellite signal due to environment or mounting position. | Ensure the module is mounted horizontally upward in an open area, away from obstructions. Allow more time for acquisition in challenging environments. |
| Module not detected by RID apps. | Module not broadcasting or app issues. | Check LED status (should not be solid red). Ensure Bluetooth is enabled on your device. Try restarting the app or module. |
| Battery not holding charge for stated duration. | Battery degradation or defect. | Ensure proper charging. If the issue persists after several charge cycles, contact Potensic customer support for assistance. |
8. Specifications
| Feature | Detail |
|---|---|
| Model Number | RID-916 |
| Product Dimensions | 1.24 x 1.48 x 0.63 inches (3.1 x 3.7 x 1.6 cm) |
| Item Weight | 0.67 ounces (19g) |
| Battery Type | 1 Lithium Ion battery (included) |
| Battery Life | Up to 4 hours |
| Charging Port | Type-C |
| Connectivity Technology | Bluetooth 5.1 and Up |
| Bluetooth Transmitting Power | Up to 8dbm |
| Horizontal Transmission Distance | Over 300m |
| GPS Positional Accuracy | Less than 3 meters |
| Ingress Protection (IP) Rating | IP54 (Waterproof & Dustproof) |
| Operating Temperature | 0°C to 40°C |
| Supported Applications | Drone Scanner, OpenDrone ID OSM |
| Specific Uses | FAA compliance for drone flights |
9. Warranty and Support
Potensic provides customer support for its products. If you encounter any issues not covered in this manual, or if troubleshooting steps do not resolve your problem, please contact Potensic customer service for assistance. Keep your purchase receipt for warranty claims.
For the most up-to-date support information and contact details, please visit the official Potensic website or refer to the contact information provided with your product packaging.