1. Introduction
Thank you for choosing the VEVOR Shower Curb Kit. This kit is designed to provide a reliable and waterproof foundation for your shower area, ensuring durability and ease of installation. Made with lightweight Expanded Polystyrene (EPS) and high-density HDPE waterproof membrane, it offers excellent resistance to water permeation.

Image 1.1: VEVOR 36"x36" Shower Curb Kit, showcasing the central drain opening.
This manual provides detailed instructions for the proper installation, care, and maintenance of your shower curb kit to ensure optimal performance and longevity.
2. Safety Information
Please read all safety warnings and instructions carefully before beginning installation. Failure to follow these instructions may result in property damage or personal injury.
- Always wear appropriate personal protective equipment (PPE), including safety glasses and gloves, during installation.
- Ensure the installation area is clean, dry, and free from debris.
- Verify that the subfloor is structurally sound and level before installation.
- Handle the EPS board with care to avoid damage.
- Keep all tools and materials out of reach of children and pets.
- Dispose of all waste materials responsibly according to local regulations.
3. Product Components
The VEVOR Shower Curb Kit (Model JQ-3636) typically includes the following components:
- Shower Curb Kit (EPS Shower Pan) x 1
- Waterproof Cloths x 2
- Instruction Manual x 1
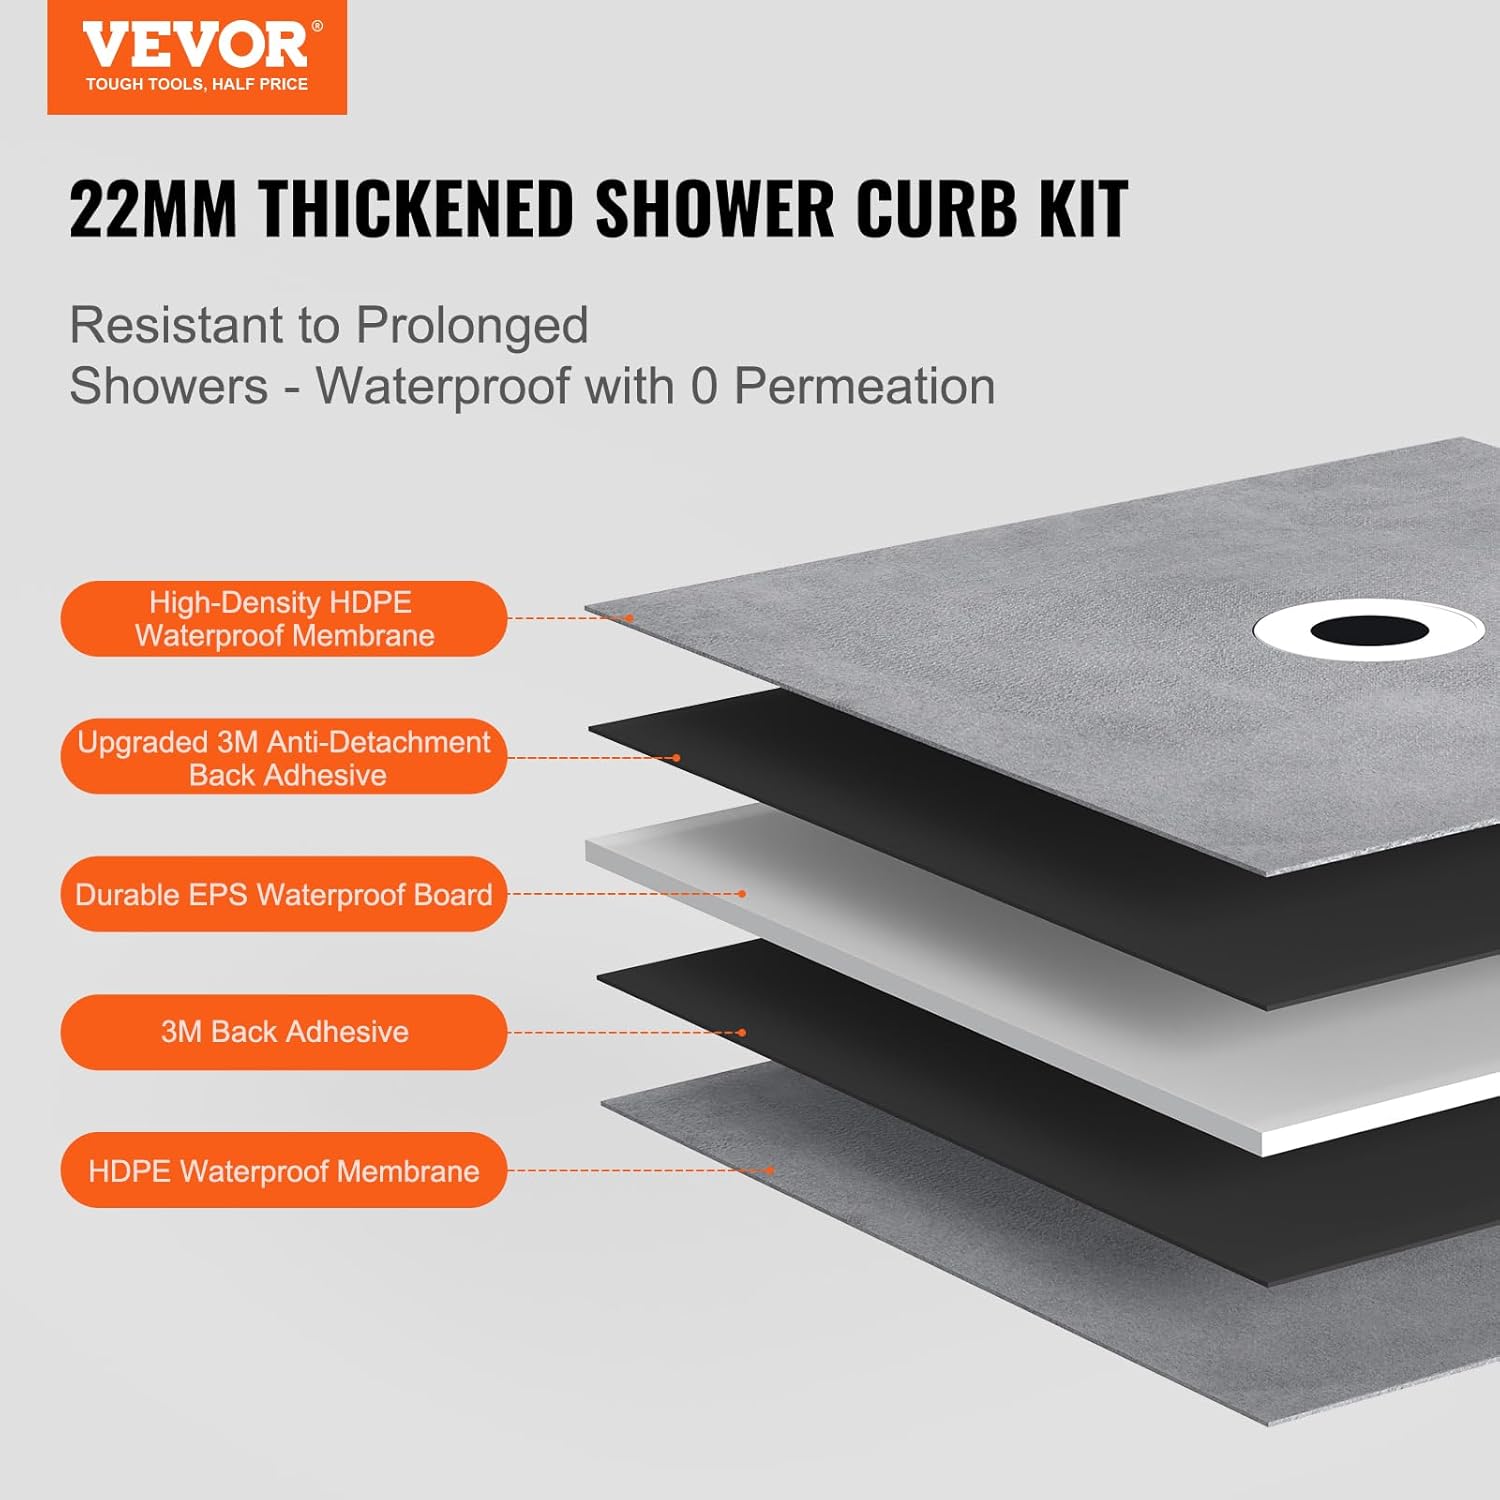
Image 3.1: Exploded view illustrating the 22mm thickened shower curb kit's layered construction for superior waterproofing.
4. Specifications
| Feature | Detail |
|---|---|
| Model Number | JQ-3636 |
| Product Dimensions | 36 x 36 x 0.87 inches (914 x 914 x 22 mm) |
| Net Weight | 2.20 lbs (1 kg) |
| Main Material | Lightweight Expanded Polystyrene (EPS) |
| Color | Gray |
| Drain Hole Diameter | 6.3 inches (160 mm) |

Image 4.1: Detailed dimensions and material specifications for the JQ-3636 shower pan.
5. Installation Guide
The VEVOR Shower Curb Kit is designed for easy installation without the need for traditional mortar beds. Follow these steps for a successful setup:
5.1 Preparation
- Clean the Installation Area: Ensure the subfloor is thoroughly cleaned, dry, and free of any dust, grease, or debris. A clean surface is crucial for proper adhesion.
- Verify Levelness: Check that the subfloor is level. While the shower pan provides a slope, a level base is essential for overall stability.
- Pre-fit the Shower Pan: Place the shower pan in the desired location to confirm fit and mark the position of the drain.

Image 5.1: Demonstrating the direct placement of the shower pan, eliminating the need for a mortar bed.
5.2 Applying Mortar and Setting the Pan
- Apply Mortar: Apply a thin, even layer of thin-set mortar or appropriate adhesive to the subfloor where the shower pan will be placed. Use a notched trowel to ensure good coverage.
- Set the Shower Pan: Carefully place the VEVOR shower pan onto the applied mortar. Align the drain opening with your plumbing.
- Level the Shower Tray: Gently press down on the shower pan, ensuring full contact with the mortar. Use a level to confirm it is properly seated and has the correct slope towards the drain.

Image 5.2: Visual guide for the installation process, from cleaning to final placement.
5.3 Waterproofing and Finishing
- Install Waterproof Cloths: Apply the provided waterproof cloths over the seams and corners where the shower pan meets the walls, using appropriate waterproofing adhesive or thin-set. Ensure complete coverage to prevent leaks.
- Connect Drain: Securely connect the shower drain assembly to the pan's drain opening according to the drain manufacturer's instructions.
- Tile Installation: Once the pan and waterproofing are set, you can proceed with tiling the shower floor and walls. The EPS material is easy to cut, allowing for precise tile fitting.

Image 5.3: Shower pan installed and ready for further waterproofing and tiling.
6. Care and Maintenance
Proper care and maintenance will extend the life of your VEVOR Shower Curb Kit and ensure its continued performance.
- Regular Cleaning: Clean the tiled shower floor regularly with non-abrasive, pH-neutral cleaners suitable for your tile and grout.
- Avoid Harsh Chemicals: Do not use harsh chemicals, abrasive cleaners, or scouring pads, as these can damage the grout, tile, or waterproofing membrane over time.
- Inspect Grout and Sealant: Periodically inspect grout lines and sealant around the drain and perimeter for any cracks or deterioration. Re-grout or re-seal as necessary to maintain waterproofing integrity.
- Drain Maintenance: Keep the shower drain clear of hair and debris to ensure proper water flow and prevent clogs.
7. Troubleshooting
Here are some common issues and their potential solutions:
- Issue: Water pooling on the shower floor.
- Solution: This indicates an issue with the slope. Ensure the shower pan was installed level and that the built-in slope directs water effectively to the drain. Re-evaluate the installation if pooling persists.
- Issue: Leaks around the shower pan perimeter.
- Solution: Check the waterproofing cloths and sealant application. Ensure all seams and corners are properly sealed and that the waterproof membrane is intact. Reapply sealant or waterproofing as needed.
- Issue: Drain clogging frequently.
- Solution: Regularly remove hair and soap scum from the drain cover and inside the drain pipe. Consider using a drain protector to minimize debris entry.
8. Warranty and Support
VEVOR products come with technical support and an E-Warranty Certificate. For any questions, technical assistance, or warranty claims, please visit the official VEVOR support website:
Please have your model number (JQ-3636) and purchase information ready when contacting support.
Image 8.1: VEVOR product packaging indicating support and warranty information.