Introduction
This manual provides essential information for the safe and efficient operation of your KORKIE 1000W Pure Sine Wave Inverter. Please read these instructions carefully before use and retain them for future reference. This inverter converts 12V DC power from a battery into 110V AC power, suitable for various electronic devices and appliances.

Image: The KORKIE 1000W Pure Sine Wave Inverter shown with included battery clamps and cigarette lighter adapter, along with spare fuses.
Safety Instructions
WARNING: Failure to follow these safety instructions may result in injury, damage to the inverter, or damage to connected devices.
- Ensure the inverter is connected to a 12V DC power source only. Do not connect to 24V or other voltage systems.
- Do not connect the inverter to an AC distribution wiring system.
- Avoid reverse polarity connection. Connect the positive (+) terminal of the inverter to the positive (+) terminal of the battery, and the negative (-) terminal of the inverter to the negative (-) terminal of the battery.
- Do not expose the inverter to rain, moisture, or extreme temperatures.
- Ensure adequate ventilation around the inverter. Do not block cooling vents.
- Do not open the inverter casing. There are no user-serviceable parts inside.
- Keep children away from the inverter and connected devices.
- Always disconnect the inverter from the power source before performing any maintenance or cleaning.
- The total power consumption of connected devices must not exceed the inverter's rated continuous power output (1000W).
- This inverter is designed for off-grid use. Do not connect it to a grid connection.
Product Overview
Familiarize yourself with the components of your KORKIE 1000W Pure Sine Wave Inverter.
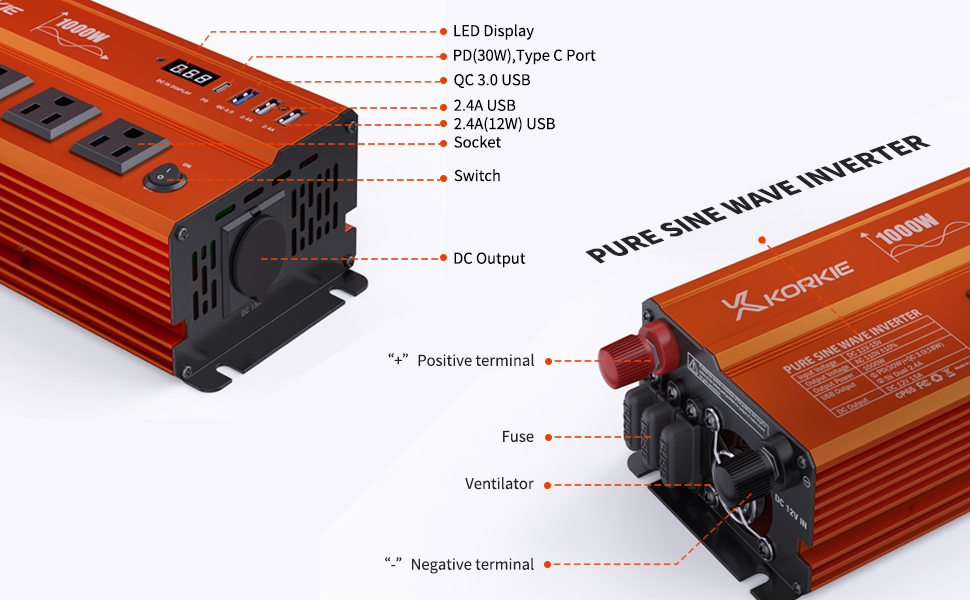
Image: Detailed diagram labeling the front and rear panels of the KORKIE 1000W inverter, showing AC outlets, USB ports, DC input terminals, fuses, and cooling fan.
- 1. LED Display: Shows input DC voltage.
- 2. PD (30W) Type-C Port: For fast charging compatible devices.
- 3. QC 3.0 USB Port: For Quick Charge compatible devices.
- 4. 2.4A USB Ports (x2): Standard USB charging ports.
- 5. AC Outlets (x3): 110V AC output for standard appliances.
- 6. Power Switch: Turns the inverter ON/OFF.
- 7. DC Output (Cigarette Lighter Socket): Provides 12V DC output.
- 8. Positive Terminal (+): Red terminal for positive battery connection.
- 9. Negative Terminal (-): Black terminal for negative battery connection.
- 10. Fuses: External replaceable fuses for protection.
- 11. Ventilator (Cooling Fan): Automatically activates to dissipate heat.
Setup Instructions
Follow these steps to properly set up your inverter.
- Choose a Location: Place the inverter on a flat, stable surface in a dry, well-ventilated area, away from direct sunlight, heat sources, and flammable materials. Ensure at least 6 inches of clear space around the inverter for proper airflow.
- Prepare the Power Source: Ensure your 12V DC battery is fully charged and capable of providing the necessary current.
- Connect to Battery (for high power draw):
- Ensure the inverter's power switch is in the OFF position.
- Connect the red battery clamp cable to the positive (+) terminal of the inverter.
- Connect the black battery clamp cable to the negative (-) terminal of the inverter.
- Connect the other end of the red battery clamp cable to the positive (+) terminal of your 12V battery.
- Connect the other end of the black battery clamp cable to the negative (-) terminal of your 12V battery.
- Ensure all connections are tight and secure.

Image: The KORKIE 1000W inverter connected to a car battery using the provided battery clamps, illustrating a typical setup for vehicle use.
- Connect to Cigarette Lighter Socket (for low power draw, typically up to 150W):
- Ensure the inverter's power switch is in the OFF position.
- Insert the cigarette lighter adapter into your vehicle's 12V cigarette lighter socket.
- Connect the other end of the adapter to the DC input port on the inverter.
- Note: The cigarette lighter connection is generally limited to lower power outputs (e.g., 150W) due to vehicle wiring limitations. For full 1000W output, direct battery connection is required.
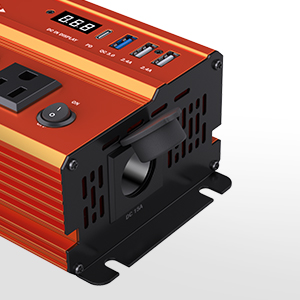
Image: A close-up view of the DC output port on the inverter, designed for the cigarette lighter adapter.
Operating Instructions
Once the inverter is properly connected to a 12V DC power source:
- Power On: Flip the power switch on the inverter to the "ON" position. The LED display will illuminate, showing the input DC voltage.
- Connect AC Devices: Plug your 110V AC appliances into the three AC outlets. Ensure the total wattage of all connected AC devices does not exceed 1000W.

Image: The KORKIE inverter connected to a laptop, drone, and other devices, demonstrating its multi-port charging capabilities.
- Use USB/Type-C Ports: Connect your USB-powered devices (phones, tablets, drones, etc.) to the PD Type-C, QC 3.0 USB, or standard 2.4A USB ports.

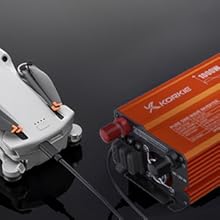
Images: A laptop and a drone being charged using the inverter's USB ports, highlighting its quick charge capabilities for various devices.
- Monitoring: The LED display shows the current DC input voltage. Monitor this to ensure your battery does not discharge too deeply.
- Pure Sine Wave Output: This inverter provides a pure sine wave output, which is identical to household AC power. This makes it suitable for sensitive electronics like laptops, medical equipment, and audio systems, preventing potential damage or malfunction that can occur with modified sine wave inverters.
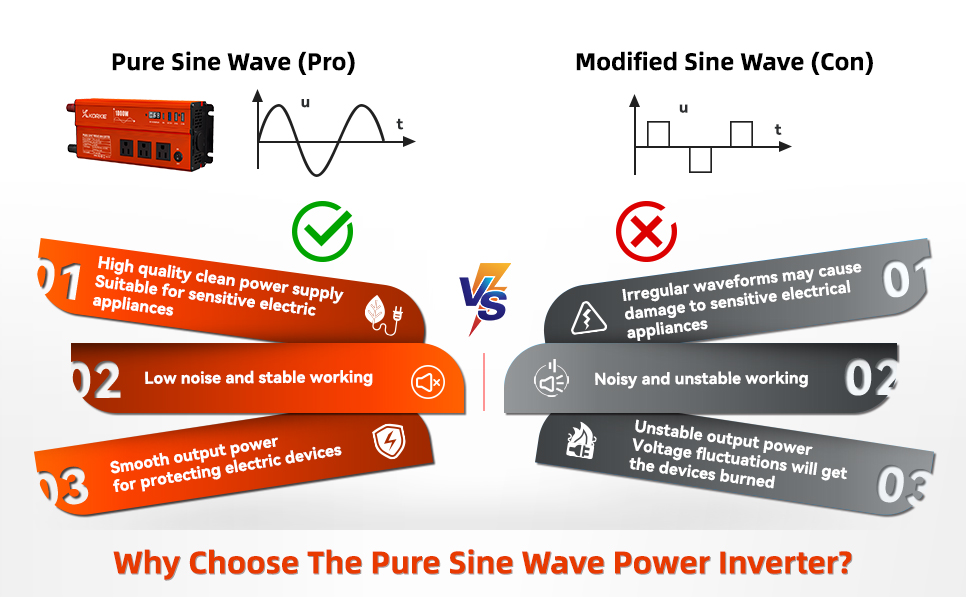
Image: A visual comparison illustrating the smooth waveform of pure sine wave power versus the stepped waveform of modified sine wave power, emphasizing the benefits of pure sine wave for sensitive electronics.
- Power Off: When finished, first disconnect all AC and USB devices, then flip the inverter's power switch to the "OFF" position. Finally, disconnect the inverter from the 12V DC power source.
Maintenance
- Cleaning: Periodically clean the exterior of the inverter with a dry, soft cloth. Ensure the cooling vents are free from dust and debris. Do not use liquid cleaners or solvents.
- Fuse Replacement: The inverter is equipped with external replaceable fuses. If the inverter stops working and no other fault is apparent, check the fuses.
- Disconnect the inverter from all power sources.
- Carefully remove the fuse covers.
- Inspect the fuses. If a fuse is blown (broken wire inside), replace it with a fuse of the exact same type and rating (e.g., 50A). Using an incorrect fuse can damage the inverter or create a fire hazard.
- Replace the fuse covers securely.
- Storage: When not in use for extended periods, store the inverter in a cool, dry place, away from direct sunlight and moisture.
Troubleshooting
If you encounter issues with your inverter, refer to the following common problems and solutions:
| Problem | Possible Cause | Solution |
|---|---|---|
| No power output / Inverter does not turn on. |
|
|
| Inverter shuts down / Overload protection activated. |
|
|
| Inverter is hot / Over-temperature protection activated. |
|
|
| Abnormal noise from inverter. |
|
|
Specifications
| Feature | Specification |
|---|---|
| Model Name | KORKIE-1000W |
| Input Voltage | 12V DC |
| Output Voltage | 110V AC |
| Output Waveform | Pure Sine Wave |
| Continuous Power | 1000W |
| USB Output | 1x PD (30W) Type-C, 1x QC 3.0 USB, 2x 2.4A USB |
| AC Outlets | 3 |
| Product Dimensions | 9.4 x 4.1 x 2.5 inches |
| Item Weight | 2.8 pounds |
| Protection Features | Overload, Over-temperature, Short-circuit, Reverse Polarity, Low Voltage, Over Voltage |
Warranty and Support
The KORKIE 1000W Pure Sine Wave Inverter comes with a 12-Month Warranty from the date of purchase.
This warranty covers manufacturing defects and malfunctions under normal use. It does not cover damage caused by misuse, accident, unauthorized modification, or improper installation.
For technical support, warranty claims, or any questions regarding your product, please contact KORKIE customer service. Refer to your purchase documentation or the seller's contact information for the most up-to-date support channels.
KORKIE is committed to providing 24-hour customer service to assist you with any issues.