1. Introduction
This manual provides detailed instructions for the setup, operation, and maintenance of your TERRAMASTER F2-424 NAS Storage 2-Bay device. The F2-424 is a high-performance Network Attached Storage solution designed for home and small office environments, featuring an N95 quad-core CPU, 8GB DDR5 RAM, dual 2.5GbE ports, and dual M.2 NVMe slots for enhanced performance and data management.

Figure 1: TERRAMASTER F2-424 NAS Storage 2-Bay device.

Figure 2: Key specifications and performance highlights of the F2-424 NAS.
2. Setup Guide
2.1 Package Contents
Before proceeding, ensure all components are present:
- TERRAMASTER F2-424 NAS Unit
- Power Adapter
- Ethernet Cable
- Quick Installation Guide
- Accessory Kit (screws for 2.5" drives, etc.)
2.2 Hardware Installation
2.2.1 Hard Drive (HDD) Installation
The F2-424 features tool-free hard disk trays for 3.5-inch HDDs. For 2.5-inch drives, screws from the accessory kit may be required.
- Gently pull the hard drive tray out from the front of the NAS unit.
- For 3.5-inch HDDs, align the drive with the tray and snap the side rails into place to secure it.
- For 2.5-inch HDDs/SSDs, place the drive in the tray and secure it with the provided screws from the bottom of the tray.
- Slide the populated tray back into the empty bay until it clicks into place. The innovative Push-Lock design automatically secures the inserted hard disk.

Figure 3: Hard drive installation using the Push-Lock design.
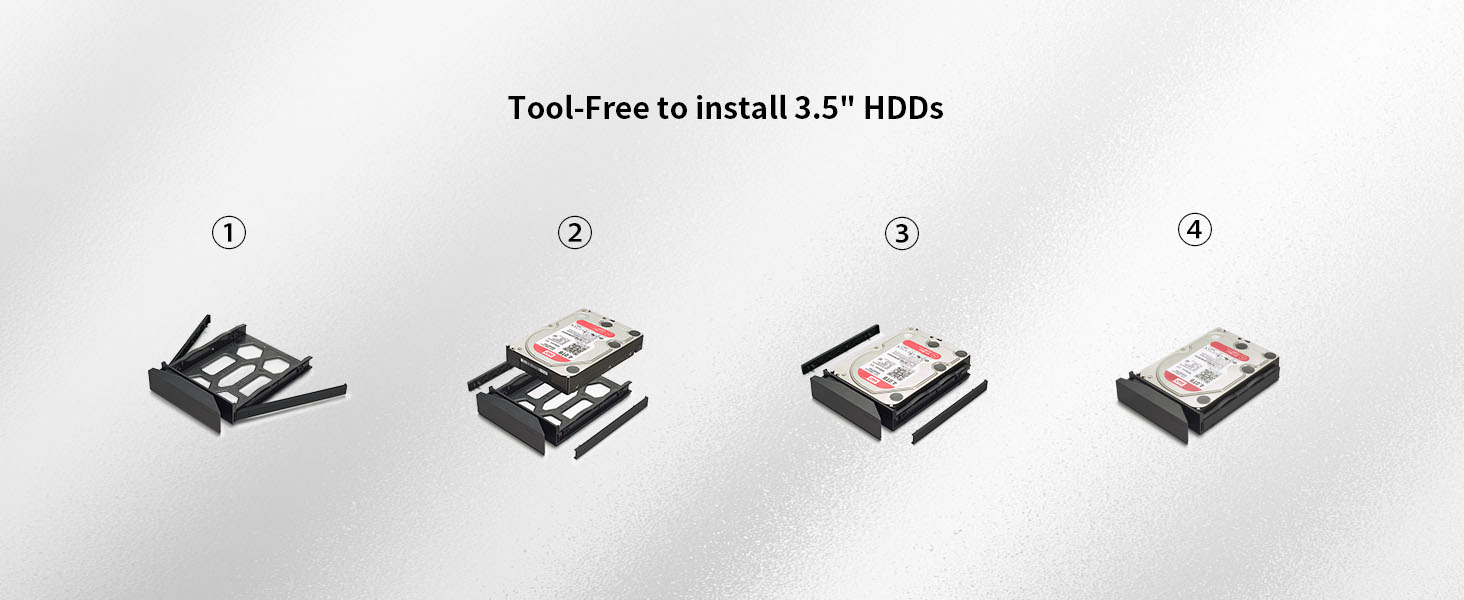
Figure 4: Tool-free 3.5-inch HDD installation process.
2.2.2 M.2 NVMe SSD Installation
The F2-424 includes dual M.2 NVMe slots for SSD caching, accessible via a side-sliding cover.
- Locate the side-sliding cover on the NAS unit.
- Gently push aside the cover to reveal the M.2 slots.
- Insert the M.2 NVMe SSD into the slot and secure it with the provided hand-tightened screw.
- Slide the cover back into place.

Figure 5: M.2 NVMe SSD installation via side-sliding cover.
2.3 Initial Connection and Power On
- Connect the NAS to your network router or switch using the provided Ethernet cable. The F2-424 has dual 2.5GbE ports.
- Connect the power adapter to the NAS and plug it into an electrical outlet.
- Press the power button on the front of the NAS. The indicator lights will illuminate, showing the device's status.

Figure 6: Rear panel connectivity of the F2-424 NAS.

Figure 7: Detailed view of high-speed connectivity ports.
2.4 Initializing the System (TOS)
Once powered on, access the TERRAMASTER Operating System (TOS) via a web browser on a computer connected to the same network. Refer to the Quick Installation Guide for the default IP address or discovery tool instructions.
3. Operating Instructions
3.1 Disk Array Configuration (RAID)
The F2-424 supports various RAID types including RAID 0, RAID 1, JBOD, Single, and TRAID (TerraMaster RAID).
- RAID 0: Stripes data across disks for maximum performance, but offers no data redundancy.
- RAID 1: Mirrors data across two disks for data redundancy, but uses half the total disk capacity.
- JBOD (Just a Bunch Of Disks): Combines disks into a single logical volume without RAID functionality.
- Single: Each disk operates independently.
- TRAID: TerraMaster's flexible disk array solution, offering data protection and optimized capacity.
Configure your preferred RAID type through the TOS web interface during initial setup or via the Storage Manager application.

Figure 8: TRAID (TerraMaster RAID) flexible disk array explanation.
3.2 Data Backup Solutions
The F2-424 offers multiple backup applications to enhance data security:
- Centralized Backup: Manage backups from multiple devices (PC, server, VM) to your NAS.
- Duple Backup: Create secondary backups of your NAS data to another remote NAS or cloud service.
- Snapshot: Create point-in-time copies of your data for easy recovery.
- CloudSync: Synchronize data with various public cloud services (e.g., Amazon S3, Dropbox, Google Drive).
- TFM Backup: TerraMaster's proprietary backup solution.
- USB Copy: Automatically back up data to or from external USB drives.

Figure 9: Overview of integrated backup applications.

Figure 10: Cloud drive synchronization capabilities.
3.3 Multimedia Server Functions
The F2-424 can function as a powerful multimedia server, supporting applications like Plex, Emby, DLNA, Roku, and iTunes. It also includes a Smart Photo Management Tool (Terra Photos) for organizing and sharing images.
- Plex/Emby: Stream your media library to various devices.
- DLNA/UPnP: Share multimedia content across compatible devices on your network.
- Terra Photos: Intelligently organize, manage, and share your photo collection.
- iTunes Server: Manage and stream your music files.

Figure 11: Multimedia server capabilities.
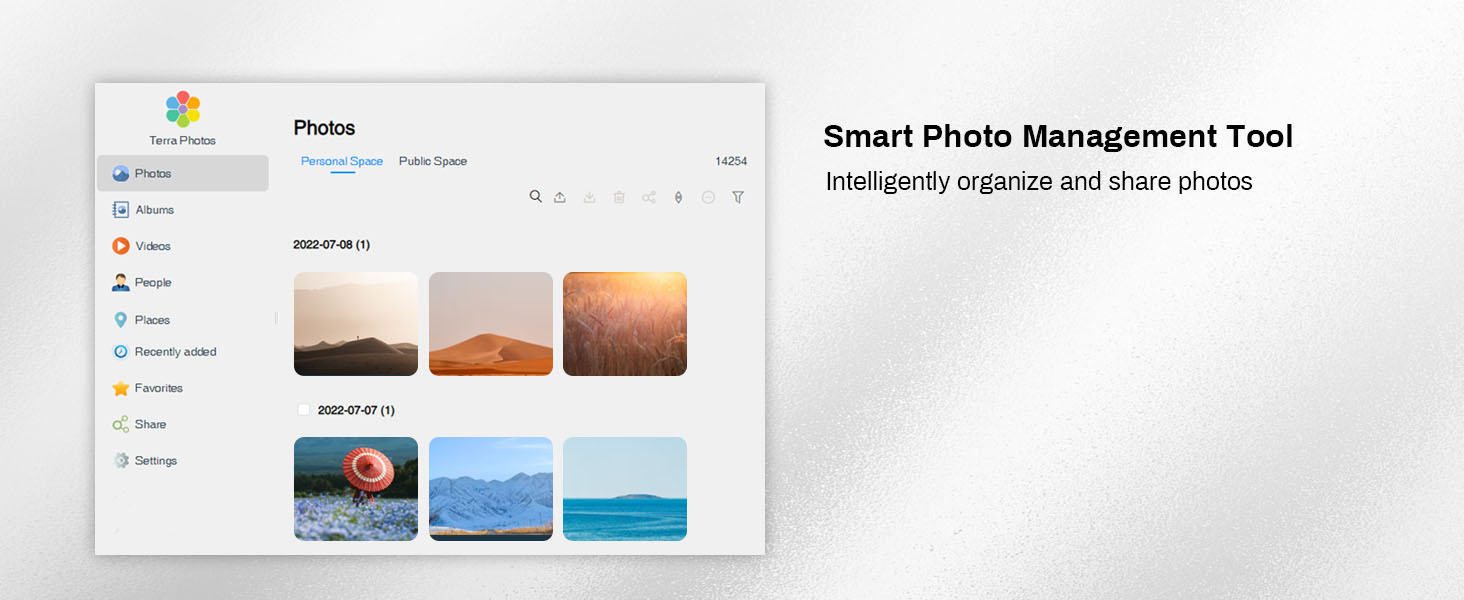
Figure 12: Smart Photo Management Tool (Terra Photos).
3.4 Surveillance Manager
The Surveillance Manager application allows you to connect IP cameras to your NAS for real-time monitoring, recording, and playback of video footage.

Figure 13: Surveillance Manager interface.
3.5 Data Security Features
The F2-424 incorporates features to enhance data security:
- Hyper-Lock WORM File System: Ensures data integrity by making files Write Once, Read Many, preventing accidental modification or deletion.
- Security Isolation Mode: Provides an isolated environment to protect against unauthorized access and cyber threats.

Figure 14: Hyper-Lock WORM File System for data integrity.
Figure 15: Security Isolation Mode for enhanced protection.
4. Maintenance
4.1 Disk Replacement
In the event of a disk failure or for capacity upgrades, individual disks can be replaced. Refer to the Storage Manager in TOS for instructions on safely replacing a disk within your configured RAID array to maintain data integrity.
4.2 Firmware Updates
Regularly check for and install firmware updates for the TOS operating system. Updates often include security patches, bug fixes, and new features. These can be managed directly through the TOS web interface.
4.3 Cleaning
To ensure optimal performance and longevity, keep the NAS unit clean. Use a soft, dry cloth to wipe the exterior. Ensure ventilation openings are free from dust accumulation. Do not use liquid cleaners directly on the device.
4.4 Noise Reduction and Cooling
The F2-424 is designed with sound-absorbing panels to minimize operational noise, achieving levels as low as 19dB(A). It also features a smart fan and strategically placed side and bottom vents for efficient heat dissipation, which is crucial for extending the lifespan of the device and its internal components.

Figure 16: Improved structure for heat dissipation and quiet operation.
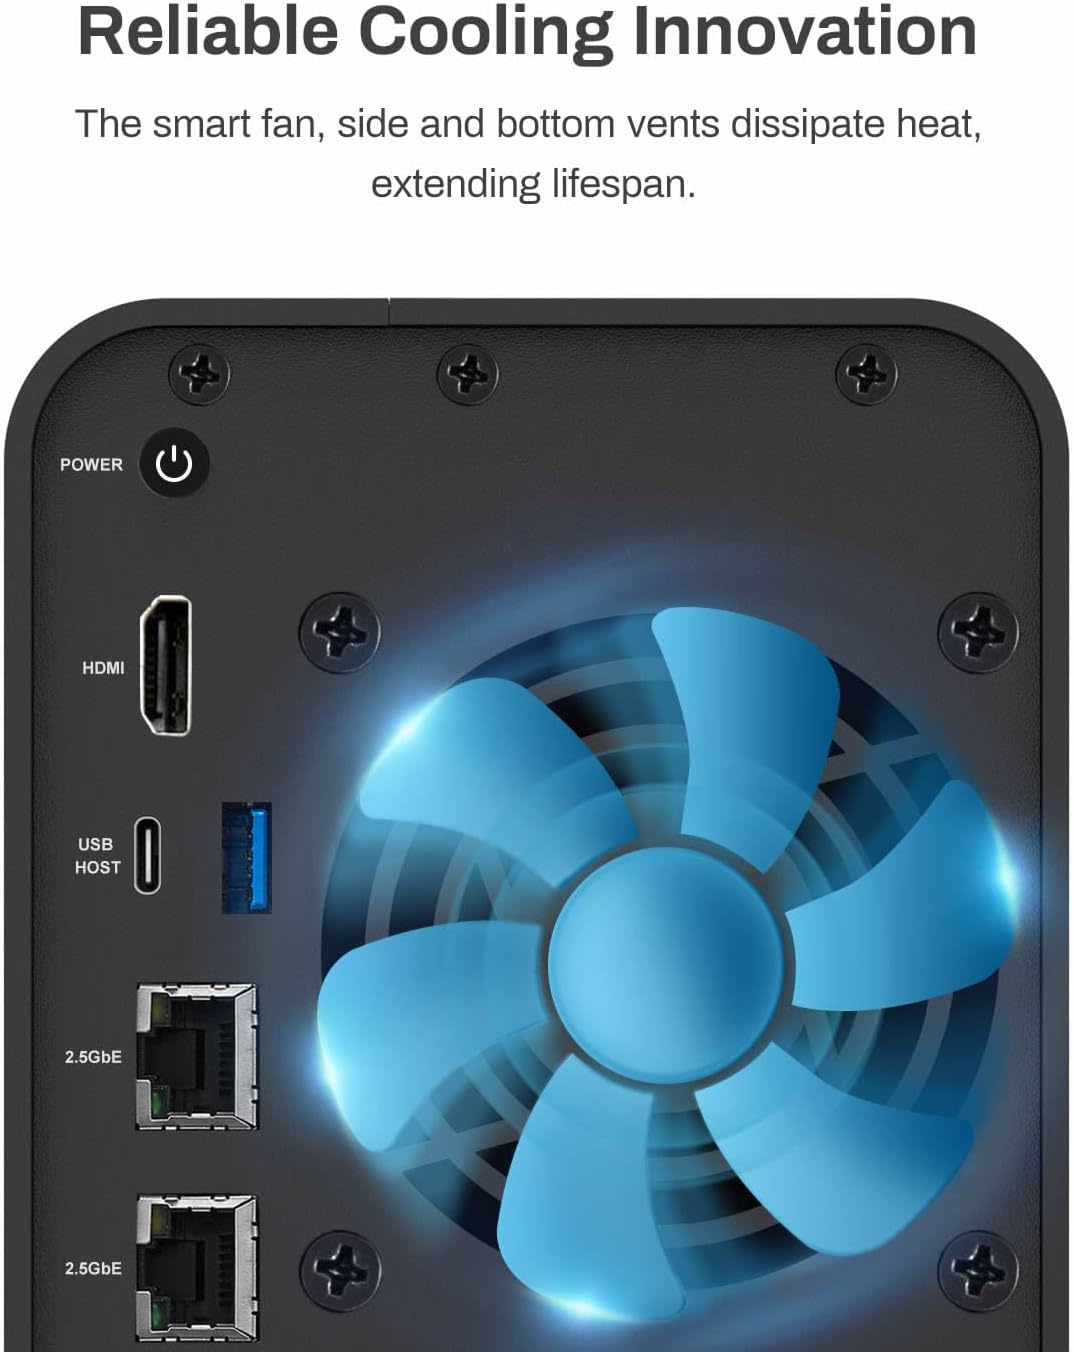
Figure 17: Reliable cooling innovation with smart fan and vents.
5. Troubleshooting
This section addresses common issues you might encounter with your TERRAMASTER F2-424 NAS. For more detailed troubleshooting, refer to the online knowledge base on the TERRAMASTER website.
5.1 NAS Not Powering On
- Ensure the power adapter is securely connected to both the NAS and a working electrical outlet.
- Verify the power outlet is functional by plugging in another device.
- Try a different power cable if available.
5.2 Cannot Access NAS on Network
- Check that the Ethernet cable is securely connected to both the NAS and your router/switch.
- Ensure your computer is on the same network as the NAS.
- Restart your router/switch and the NAS.
- Use the TERRAMASTER NAS discovery tool to locate the device's IP address.
- Temporarily disable any firewall software on your computer to check for interference.
5.3 Disk Errors or RAID Degradation
- Check the disk status indicators on the front of the NAS.
- Access the Storage Manager in the TOS web interface to view detailed disk health and RAID status.
- If a disk is reported as failed, follow the disk replacement procedure outlined in Section 4.1.

Figure 18: Micro-perforated indicator lights displaying work status.
6. Specifications
| Feature | Detail |
|---|---|
| Model | F2-424 |
| CPU | Intel N95 Quad-Core 4-thread (up to 3.4GHz) |
| GPU | Integrated UHD Graphics (0.75GHz, 16 Execution Units) |
| RAM | 8GB DDR5 4800MHz (non-ECC, upgradable up to 32GB) |
| Drive Bays | 2 x 3.5"/2.5" SATA HDD/SSD |
| M.2 Slots | 2 x M.2 NVMe (for SSD caching) |
| Ethernet Ports | 2 x 2.5GbE |
| USB Ports | 2 x USB 3.2 Gen 2 (10Gbps) |
| HDMI Port | 1 (for command display, not video output) |
| RAID Support | RAID 0, RAID 1, JBOD, Single, TRAID |
| Dimensions (HxWxD) | 6.06 x 4.68 x 8.74 inches (15.4 x 11.9 x 22.2 cm) |
| Weight | 4.6 pounds (2.09 kg) |
| Material | Plastic |
| Operating System | TOS (TerraMaster Operating System) |
7. Warranty Information
TERRAMASTER products typically come with a limited manufacturer's warranty. The duration and terms of the warranty may vary by region and retailer. Please retain your proof of purchase for warranty claims. For specific warranty details, refer to the documentation included with your product or visit the official TERRAMASTER website.
8. Customer Support
For technical assistance, product inquiries, or further support, please visit the official TERRAMASTER support website. You can find FAQs, knowledge base articles, driver downloads, and contact information for customer service.
TERRAMASTER Official Website: www.terramaster.com