Introduction
Thank you for purchasing the HOMCOM Shoe Bench. This manual provides essential information for the safe assembly, operation, and maintenance of your new entryway bench. Please read these instructions thoroughly before beginning assembly and retain them for future reference.

Image: Front view of the HOMCOM Shoe Bench, featuring a white finish and a grey seating cushion.
Safety Information
To ensure safe use of this product, please observe the following guidelines:
- Assembly is required. Follow all assembly steps carefully.
- Clean the product with a dry cloth only. Avoid abrasive cleaners.
- Do not exceed the specified weight capacities:
- Overall weight capacity: 286 lbs (130 kg)
- Bench seat weight capacity: 264 lbs (120 kg)
- Shelf weight capacity: 22 lbs (10 kg)
- Ensure all connections are secure before use. Periodically check and tighten fasteners.
- Keep small parts away from children during assembly.
Package Contents
Before assembly, verify that all components are present and undamaged. Refer to the included parts list in your packaging. If any parts are missing or damaged, contact customer support.
- MDF and Particleboard Panels
- Seating Cushion with Removable Cover
- Hardware Pack (screws, dowels, cam locks, hinges, handle)
- Adjustable Shelf Dividers
Setup and Assembly Instructions
Assembly typically requires two people. Use a clean, flat surface for assembly to prevent scratching the product. A Phillips head screwdriver and a hammer may be required (not included).
- Unpack and Identify Parts: Carefully remove all components from the packaging. Lay them out and compare them against the parts list provided in your box to ensure everything is present.
- Assemble the Main Frame: Connect the side panels to the bottom and back panels using the provided hardware (e.g., cam locks and dowels). Ensure all connections are snug.
- Install the Flip Drawer Mechanism: Attach the hinges and the flip drawer panel according to the diagrams. Ensure the drawer opens and closes smoothly.
- Insert Adjustable Shelf: Place the adjustable shelf dividers into the desired slots within the flip drawer. These can be removed or repositioned to accommodate different shoe sizes.
- Attach the Seating Cushion: Position the cushion securely on top of the bench.
- Final Check: Once assembled, gently shake the bench to ensure stability. Tighten any loose fasteners.

Image: The shoe bench with its flip drawer open, demonstrating the internal storage capacity for multiple pairs of shoes.

Image: A detailed view of the adjustable shelf mechanism within the flip drawer, showing two possible height settings for shoe storage.
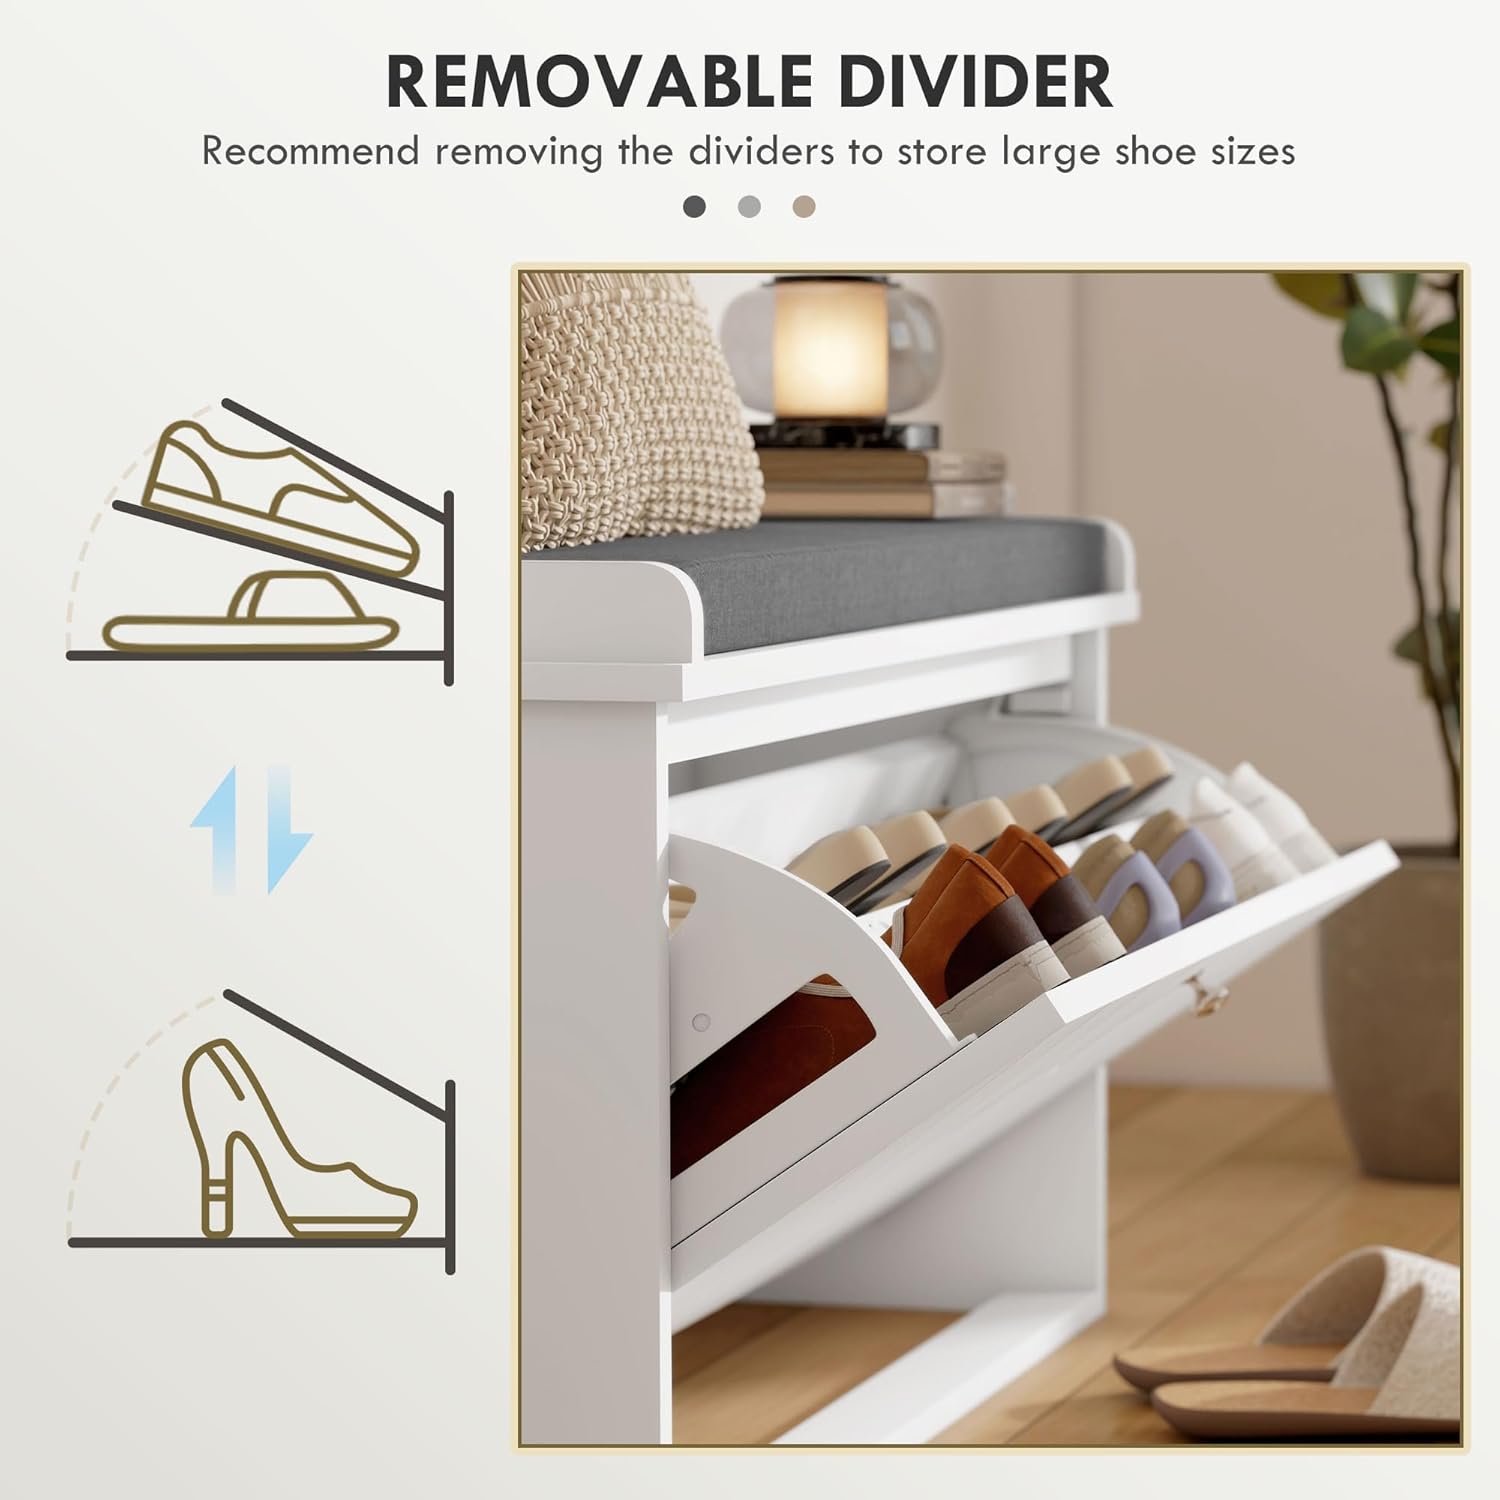
Image: An illustrative diagram demonstrating how the internal dividers can be adjusted or removed to store various shoe types, including high heels and ankle boots.
Operating Instructions
- Using the Flip Drawer: Gently pull the handle located on the front of the bench to open the flip drawer. Push it back to close. Ensure no items obstruct the closing mechanism.
- Adjusting Shoe Storage: The internal dividers within the flip drawer can be adjusted to two different levels or completely removed. This allows for flexible storage of various shoe sizes and types, such as sneakers, slippers, or ankle boots.
- Seating Function: The top surface of the bench is equipped with a padded cushion for comfortable seating. Always ensure the bench is on a stable, level surface before sitting. Do not stand on the bench.

Image: A close-up view highlighting the soft, breathable linen-feel fabric of the seating cushion and its removable cover.
Maintenance
- Cleaning the Bench: Wipe the engineered wood surfaces with a soft, dry cloth. For stubborn marks, a slightly damp cloth followed immediately by a dry cloth can be used. Avoid harsh chemicals or abrasive cleaners.
- Cushion Care: The cushion cover is removable for cleaning. Follow the care instructions on the cushion label. Typically, spot cleaning or gentle hand washing is recommended.
- Hardware Check: Periodically inspect all screws and fasteners to ensure they remain tight. Re-tighten as necessary to maintain stability and structural integrity.
- Placement: Avoid placing the bench in direct sunlight or near heat sources to prevent material degradation or discoloration.
Troubleshooting
| Problem | Possible Cause | Solution |
|---|---|---|
| Drawer is difficult to open/close. | Misaligned hinges or obstruction. | Check hinge alignment and ensure no items are blocking the drawer's path. Re-tighten hinge screws if loose. |
| Bench feels unstable. | Loose fasteners or uneven floor. | Verify all assembly screws are tightened. Move the bench to a level surface. |
| Shoes do not fit in the drawer. | Dividers are incorrectly positioned or shoe size exceeds capacity. | Adjust or remove the internal dividers. Note the maximum shoe size is CA Men's Size 10.5. |
Specifications
| Brand: | HOMCOM |
| Model Number: | 837-460V80WT |
| Colour: | White |
| Overall Dimensions (L x W x H): | 31.5" x 10.2" x 18.9" (80 x 26 x 48 cm) |
| Material: | Engineered Wood (MDF and Particleboard) |
| Special Features: | Adjustable Shelf, Flip Drawer, Padded Seat, Washable Cushion Cover |
| Item Weight: | 15 kg (33 lbs) |
| Overall Weight Capacity: | 286 lbs (130 kg) |
| Bench Seat Weight Capacity: | 264 lbs (120 kg) |
| Shelf Weight Capacity: | 22 lbs (10 kg) |
| Max Shoe Size: | CA Men's Size 10.5 |

Image: A technical diagram illustrating the key dimensions of the shoe bench, including length, width, and height.
Warranty and Support
For warranty information or customer support, please refer to the documentation included with your purchase or contact HOMCOM customer service directly. Contact details can typically be found on the manufacturer's website or on your purchase receipt.
Manufacturer: Aosom Canada
Place of Business: Markham, Ontario, CA
Telephone: 1-416-792-6088