Discover Your Mobility Electra 7 HD
Discover Your Mobility Electra 7 HD Bariatric Folding Electric Wheelchair User Manual
Model: Electra 7 HD
Introduction
This manual provides essential information for the safe and efficient operation, maintenance, and troubleshooting of your Discover Your Mobility Electra 7 HD Bariatric Folding Electric Wheelchair. Please read this manual thoroughly before using the wheelchair and retain it for future reference.
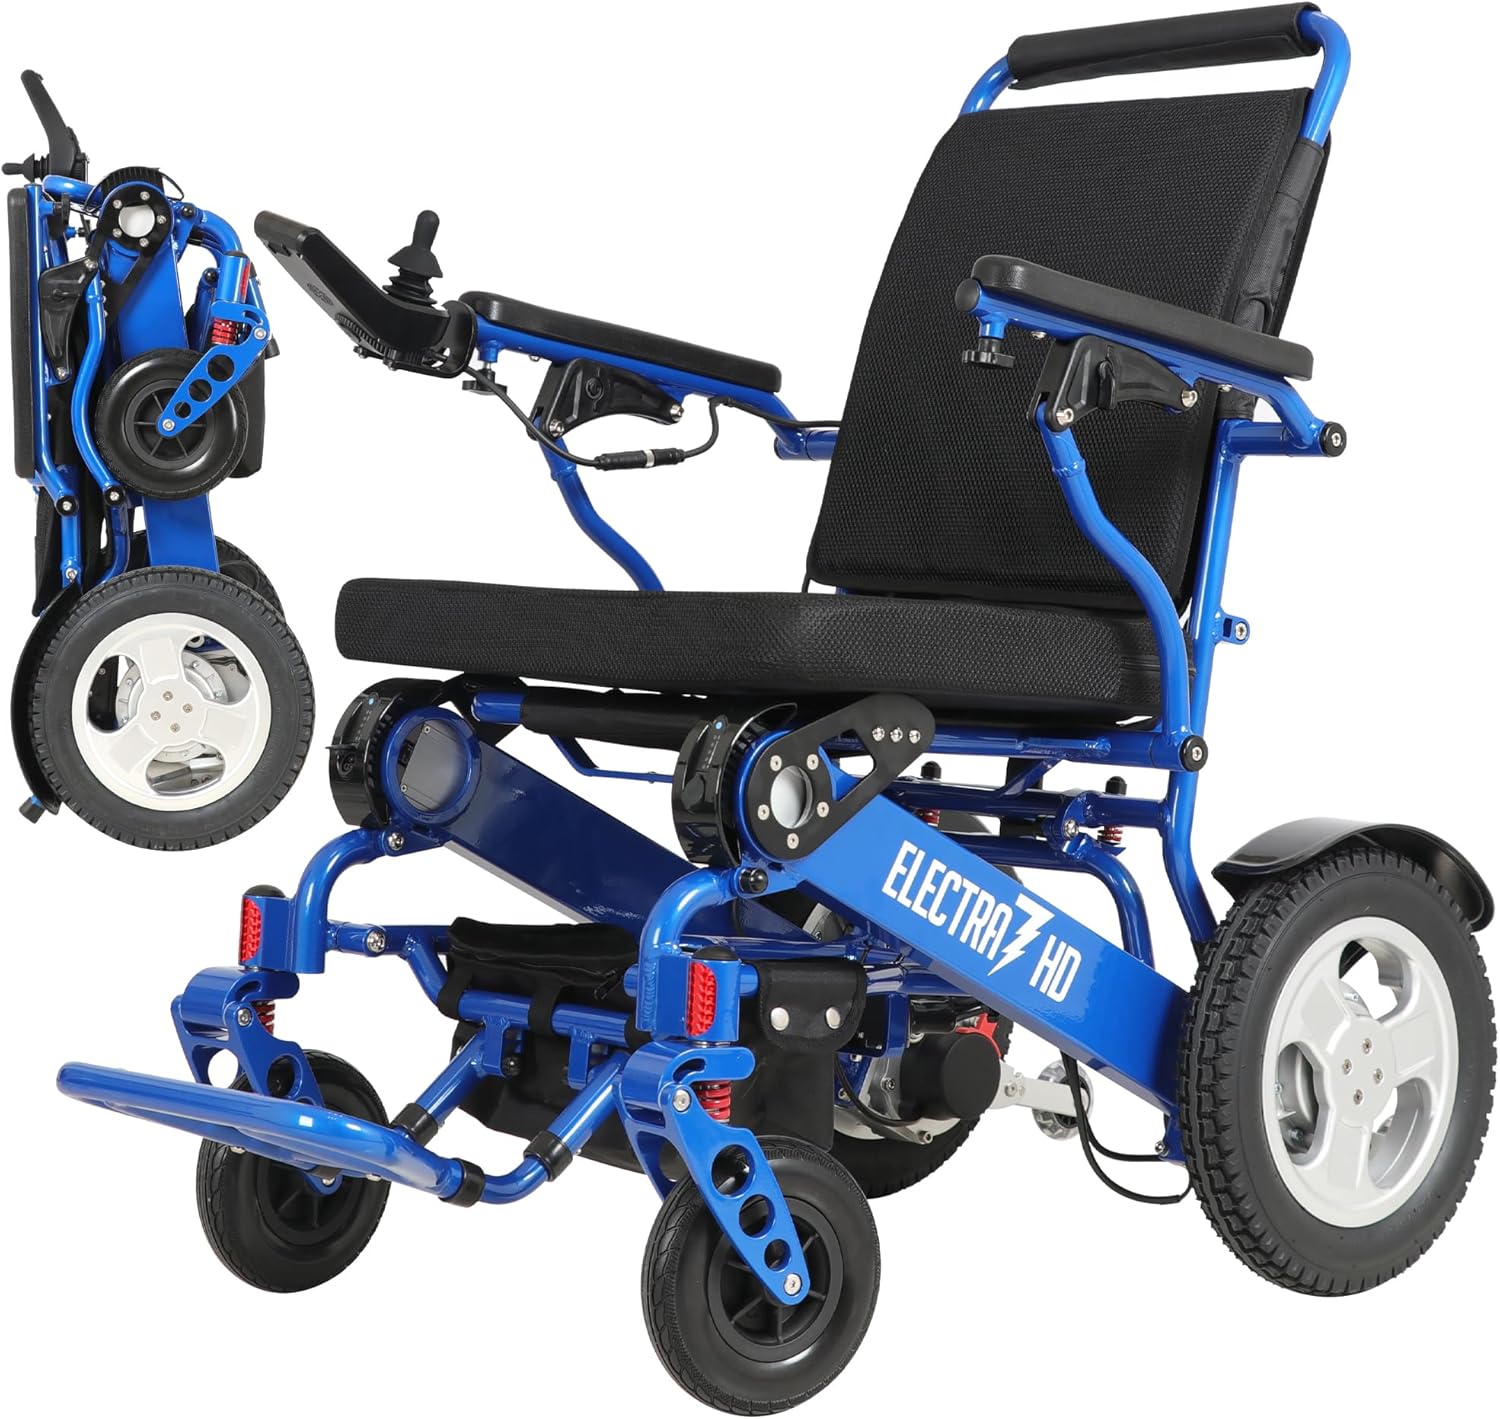
The Electra 7 HD Bariatric Folding Electric Wheelchair, designed for adults and seniors.
Safety Information
- Always ensure the anti-tip wheels are correctly adjusted before use.
- Do not exceed the maximum weight capacity of 400 lbs.
- Exercise caution when operating on inclines or uneven terrain.
- Ensure the battery is fully charged before extended use.
- This wheelchair is FAA Approved for air travel; however, always confirm specific airline regulations before flying.
Setup and Assembly
Your Electra 7 HD wheelchair comes largely pre-assembled. Follow these steps for initial setup.
1. Unboxing and Contents
Carefully open the shipping box and remove all components. Verify that all parts are present according to the packing list.
Video: Unboxing and assembly methods for electric wheelchairs. This video demonstrates the unboxing process and initial assembly steps for the electric wheelchair.
2. Unfolding the Wheelchair
To unfold the Electra 7 HD, place it on a flat surface. Hold the backrest and gently pull upwards until the frame locks into place. Ensure all locking mechanisms are securely engaged.
The Electra 7 HD wheelchair in its fully unfolded position, ready for use.
3. Installing the Controller
Attach the joystick controller to either the left or right armrest, depending on user preference. Secure it firmly using the provided fasteners. Connect the controller cable to the designated port on the wheelchair frame.

Close-up of the joystick controller being attached to the armrest.
4. Installing the Battery
Locate the battery compartment, typically beneath the seat. Slide the battery into the compartment until it clicks securely into place. Ensure the battery is fully seated.
Connect the battery power cable to the wheelchair's main power input. Confirm a secure connection.
5. Installing Anti-Tip Wheels
The anti-tip wheels provide stability and prevent the wheelchair from tipping backward. Insert the anti-tip wheels into their designated slots at the rear of the wheelchair frame. Adjust their height as needed for optimal stability on various terrains.

Image showing the footrests and anti-tip wheels of the wheelchair.
6. Installing Footrests and Leg Retention Straps
Attach the footrests to the front of the wheelchair frame. Ensure they are securely locked. If included, install the leg retention straps for added user safety and comfort.
7. Adjusting Armrests and Handlebar
The armrests can be lifted for easier transfers. Press the release button and lift the armrest. The handlebar height can also be adjusted by loosening the screws at the back, setting the desired height, and re-tightening.
Operating Instructions
Familiarize yourself with the controller and its functions before operating the wheelchair.
1. Controller Functions
The joystick controller allows for precise movement and speed control. It typically includes:
- Power On/Off Button: Activates or deactivates the wheelchair.
- Speed Display: Shows the current speed setting.
- Speed Acceleration/Deceleration Buttons: Adjusts the wheelchair's speed.
- Battery Display: Indicates the remaining battery charge.
- Horn Button: For alerting others.
- Analog Joystick: Controls direction and movement.

Diagram illustrating the various buttons and functions on the wheelchair's joystick controller.
Video: Aotedor Operation Video. This video demonstrates the basic operational controls of a similar electric wheelchair, including power, speed, and joystick movement.
2. Driving the Wheelchair
Turn on the power. Use the joystick to move forward, backward, and turn. Start at a low speed setting until you are comfortable with the controls. The Electra 7 HD features strong dual 250W motors for smooth maneuverability and handling of various terrains.
Video: Introducing the EAGLE HD. This video showcases the general operation and maneuverability of the electric wheelchair, including its ability to navigate hills and various outdoor environments.
3. Manual and Motorized Mode Switching
The wheelchair can be switched between motorized and manual push mode. Locate the red levers near the rear wheels. Push these levers down to disengage the motors for manual pushing, or pull them up to engage the motors for electric operation.
Maintenance
Regular maintenance ensures the longevity and safe operation of your wheelchair.
1. Battery Charging
The Electra 7 HD uses two Lithium Ion batteries. Charge the batteries using the provided charger. You can charge the batteries while installed on the wheelchair or remove them for off-board charging. A full charge provides up to 28 miles of travel range.

Image illustrating the long-range battery capability of the Electra 7 HD, showing potential travel distances for various activities.

The controller features a USB charging port, allowing for convenient charging of personal devices.
2. Cleaning
Wipe down the frame and seating surfaces with a damp cloth. Avoid using abrasive cleaners or excessive water directly on electrical components.
3. Tire Maintenance
The Electra 7 HD is equipped with solid rubber tires, which require minimal maintenance. Regularly inspect tires for any damage or excessive wear.
Troubleshooting
If you encounter issues with your wheelchair, refer to the following common problems and solutions.
- Wheelchair not powering on: Check battery connections and ensure the battery is charged. Verify the power on/off button on the controller is pressed.
- Wheelchair not moving: Ensure the motors are engaged (not in manual push mode). Check for any obstructions around the wheels.
- Error Code 42: This code indicates a potential issue with the CPU or wiring harness. Contact customer support for assistance and replacement parts.
Specifications
| Feature | Detail |
|---|---|
| Model | Electra 7 HD |
| Item Weight | 50 Pounds |
| Weight Capacity | 400 lbs |
| Seat Width | 21 inches (Memory Foam) |
| Motors | Dual 250W |
| Batteries | 2 Lithium Ion (included) |
| Folded Dimensions | 23" x 13" x 31" |
| Material | Aircraft-grade Aluminum Alloy |
| Tires | Solid Rubber |
| Approval | FAA Approved |

Side view of the Electra 7 HD, highlighting its compact dimensions and design.
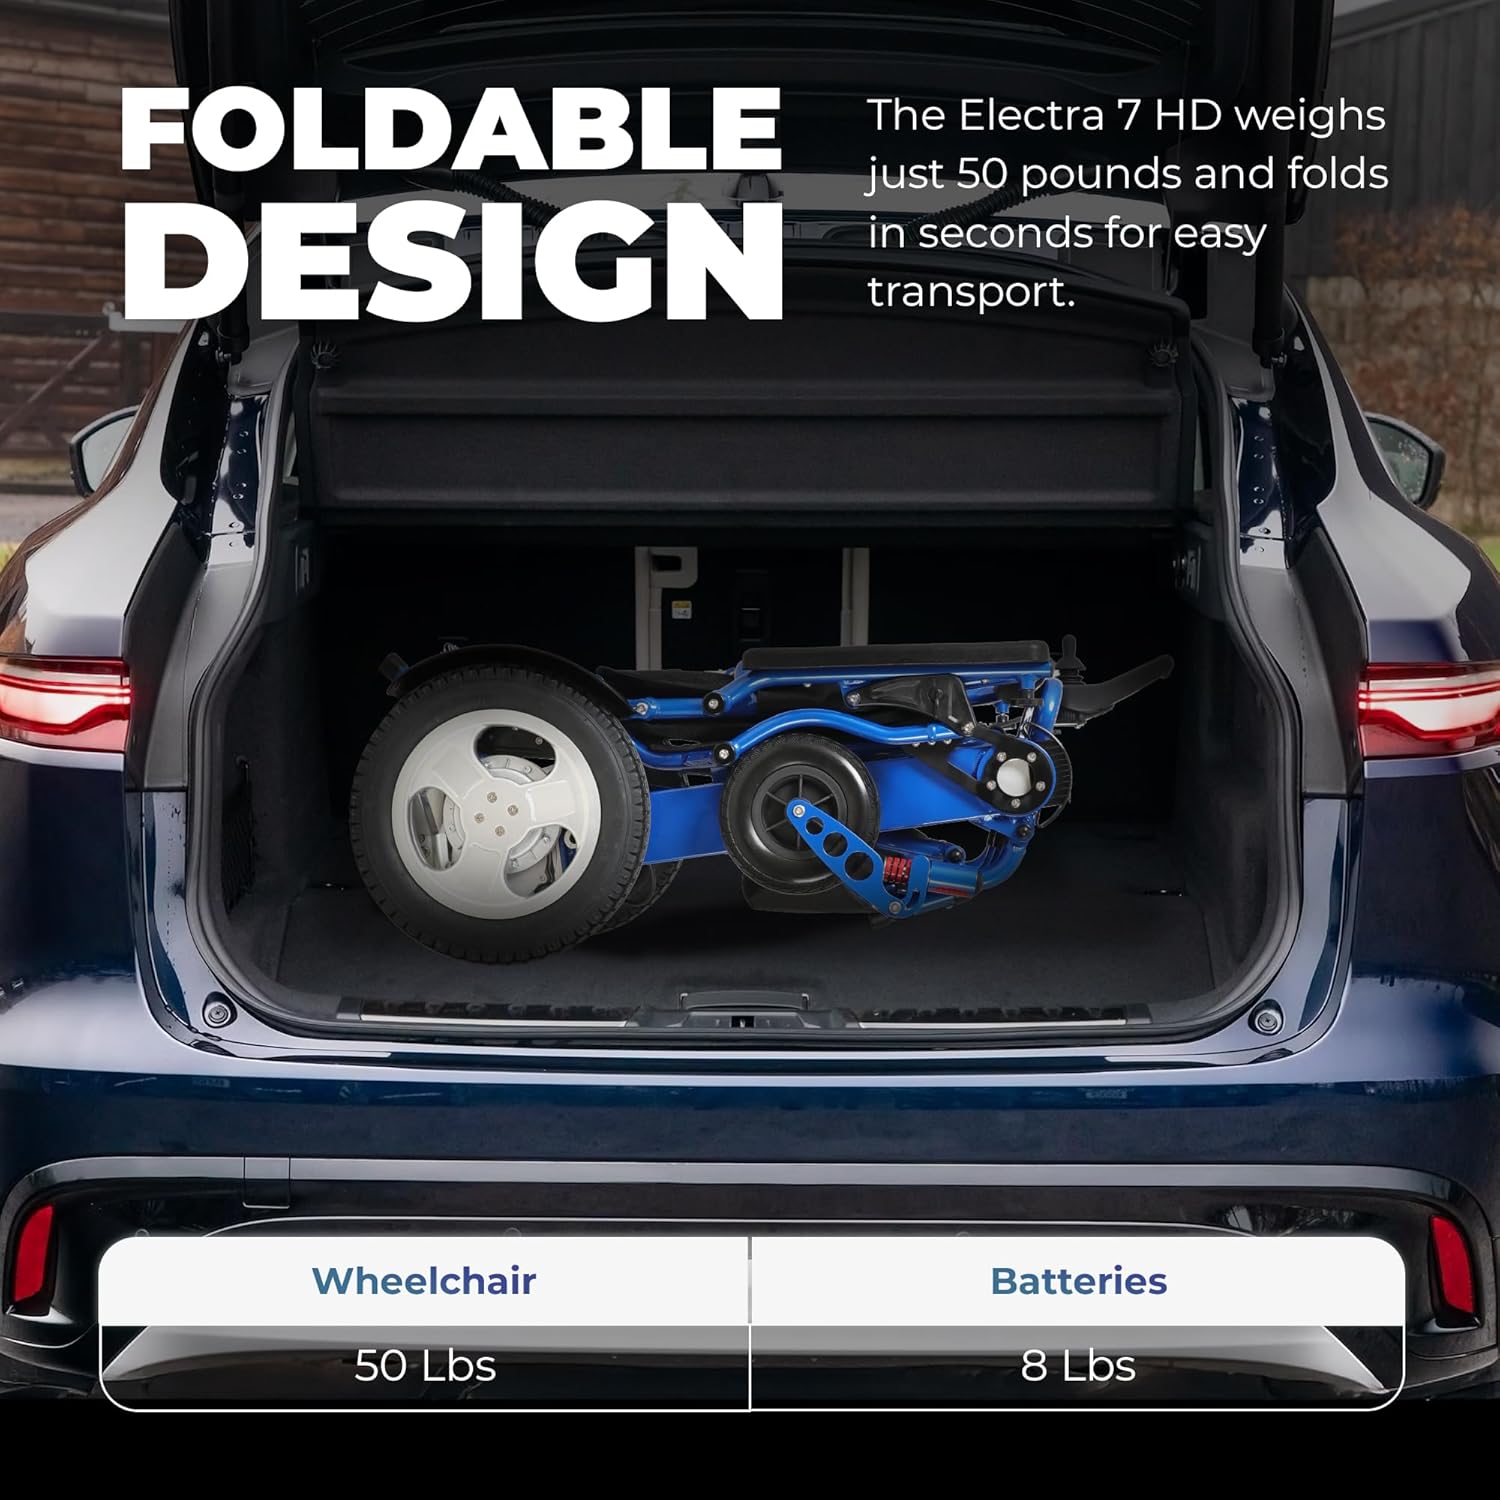
The Electra 7 HD in its folded state, demonstrating its compact size for transport in a vehicle trunk.
Warranty and Support
For any questions, concerns, or to report issues, please contact Discover Your Mobility customer support. While specific warranty details are not provided in this document, a 30-day refund/replacement policy is typically available for new products. Please refer to your purchase documentation for full warranty terms.
Statements regarding dietary supplements have not been evaluated by the FDA and are not intended to diagnose, treat, cure, or prevent any disease or health condition. This product is a mobility aid and not a medical treatment device.
Ask a question about this manual
Ask about setup, troubleshooting, compatibility, parts, safety, or missing instructions. Manuals+ will review the question and use this page’s manual context to help answer it.