Product Overview
This manual provides detailed instructions for the installation, operation, and maintenance of your Eridanus 24" x 16.5" Bathroom Sink. Designed for both wall-mount and countertop installations, this ceramic vessel sink offers modern aesthetics and durable functionality for your bathroom space.

Image: The Eridanus rectangular white ceramic bathroom sink, showcasing its modern design and integrated overflow, suitable for various bathroom styles.
Key Features
- Durable Ceramic Construction: Made from Premium Quality vitreous china, resistant to scratches, chips, and fading.
- Optimal Dimensions: 23.8 x 16.5 x 5.7 inches, providing ample space.
- Integrated Overflow: Includes a chrome finished overflow for improved draining.
- Flexible Installation: Supports both vessel countertop and wall-mount installation methods.
- Smooth, Non-Porous Surface: Ensures hygiene and easy cleaning.

Image: Visual breakdown of the sink's main components and features, including material, faucet hole, overflow, installation flexibility, and drain opening.
Safety Information
Please read all instructions carefully before beginning installation. Failure to follow these instructions may result in property damage or personal injury.
- Always observe all local plumbing and building codes.
- Shut off hot and cold water supplies before beginning any work. Inspect drain and supply tubing.
- Unpack the new sink and inspect it for damage. Do not install damaged products.
- The sink installation should be performed by professional and experienced installers for safety and to prevent damage.
- It is recommended that the sink be installed by at least two people due to its weight and size.
- Wear appropriate safety equipment, such as safety glasses, during cutting and installation.
Tools and Materials Required
Ensure you have the following tools and materials before starting the installation process:
- Safety Glasses
- Measuring Tape
- Drill
- Pencil
- Wrench
- Level
- Silicone Caulk / Sealant
- Hole Drill (for countertop installation)

Image: "What's in the Box" - illustrating the sink, mounting hardware, and installation guide included with the product.
Installation Guide
Wall Mount Installation
This section details the steps for wall-mounted installation, allowing you to customize the sink's height for optimal accessibility and space-saving.
- Determine Mounting Hole Spacing: Measure the distance between the mounting holes on the back of the sink.
- Mark Wall: Using a level and pencil, mark the desired height and horizontal line on the wall. Transfer the measured mounting hole spacing onto this line.
- Drill Holes: Drill pilot holes at the marked locations on the wall.
- Insert Anchors and Bolts: Securely insert the appropriate wall anchors into the drilled holes, followed by the mounting bolts. Ensure they are firmly seated.
- Align and Mount Sink: Carefully align the sink's mounting holes with the bolts on the wall. Slide the sink onto the bolts.
- Secure Sink: From underneath the sink, secure it to the wall using the provided washers and nuts. Tighten firmly but do not overtighten.
- Apply Sealant: Apply a bead of silicone sealant along the joint between the back of the sink and the wall to create a watertight seal.
Video: Official Eridanus guide for wall-mounted bathroom sink installation, demonstrating the steps from measuring to securing the sink.

Image: Depiction of the sink's versatile installation, showing both above-counter and wall-mount configurations.

Image: A visual guide to wall-mounted installation, detailing the process of marking the wall, drilling holes, and attaching the sink securely.
Countertop Installation
For countertop installation, follow these steps to integrate the sink seamlessly into your vanity.
- Mark Drain and Faucet Holes: Place the sink on the countertop in its desired position. Using a pencil, mark the locations for the drain and faucet holes.
- Drill Holes: Carefully drill the marked holes on the countertop using appropriate hole saws. Ensure the drain hole size exceeds 1 3/4 inches for proper fit.
- Apply Adhesive: Apply a suitable adhesive or silicone sealant to the bottom edge of the sink where it will contact the countertop.
- Position Sink: Carefully place the sink onto the countertop, aligning the drilled holes with the sink's drain and faucet openings.
- Install Drain: Install the drain assembly according to the drain manufacturer's instructions. Ensure to use a drain with overflow for this sink model.
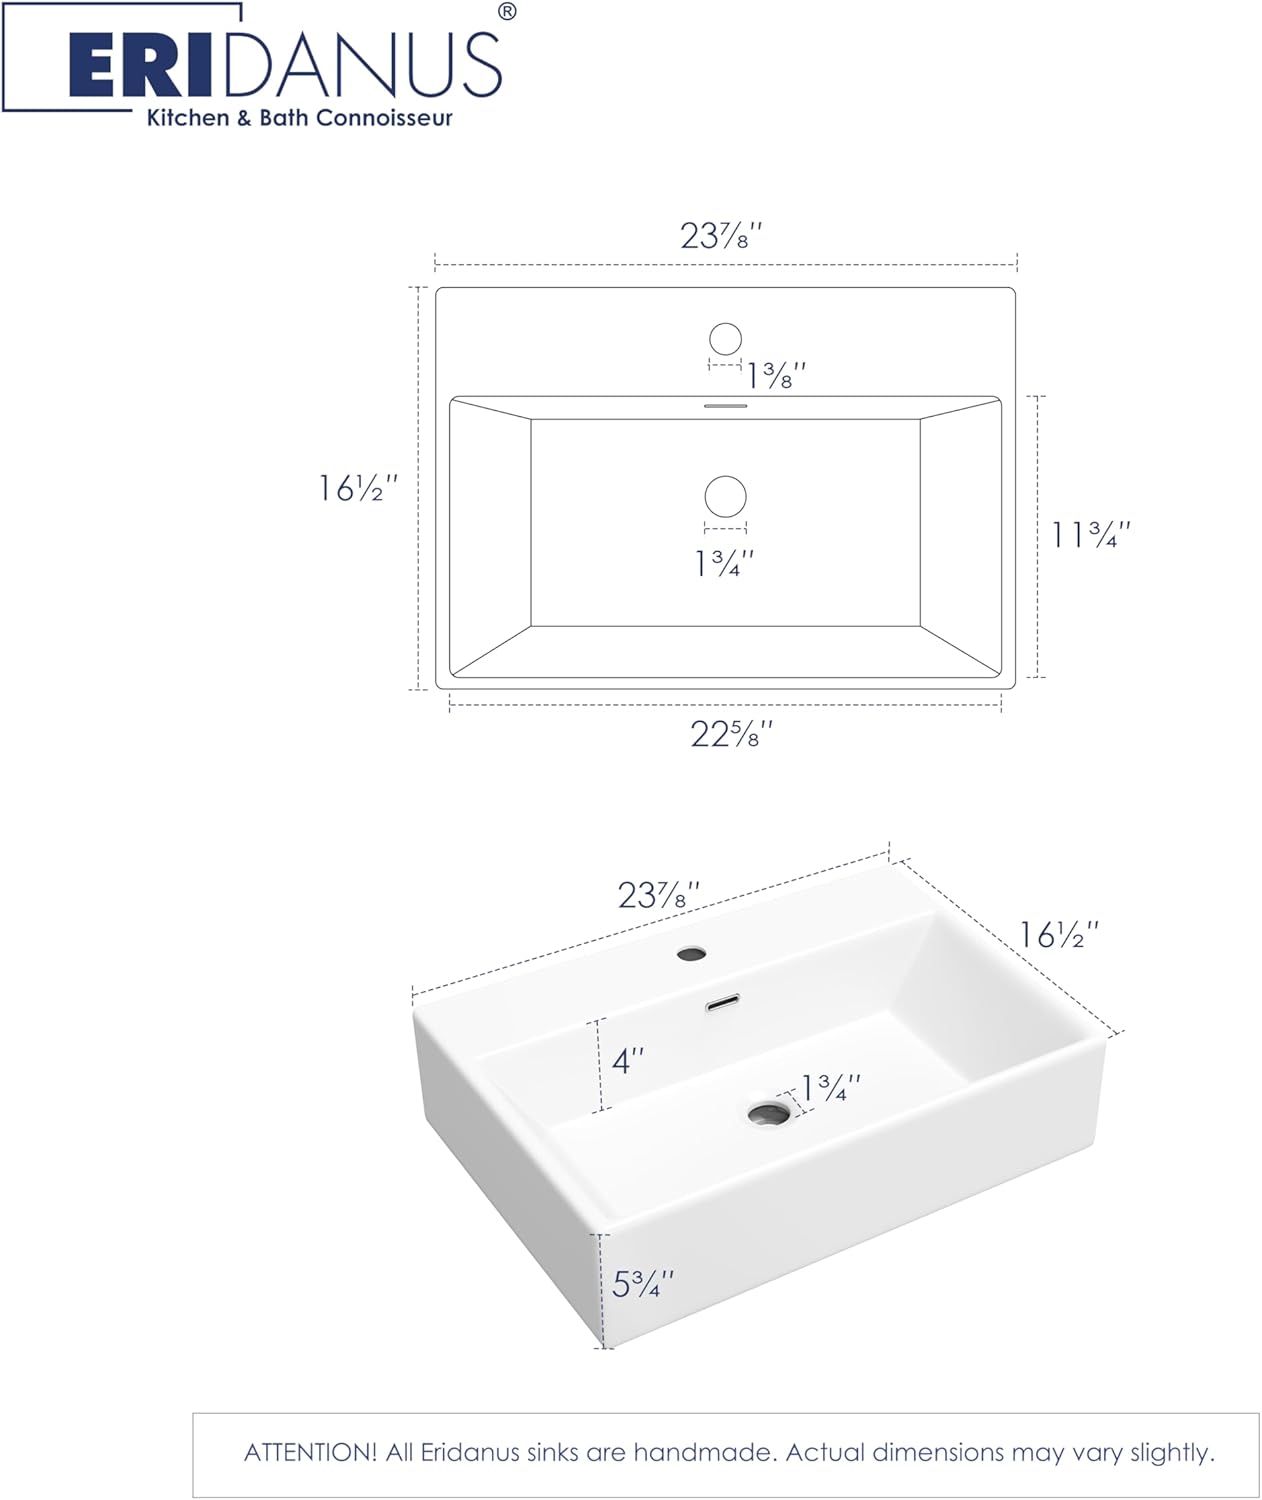
Image: Detailed dimensions of the sink, crucial for planning countertop cutouts and ensuring proper fit.

Image: A visual guide to countertop installation, detailing the process of marking the countertop, drilling holes, and applying adhesive for secure placement.
Product Features and Benefits
- High-Quality Material: Crafted from premium vitreous china, ensuring longevity and resistance to daily wear and tear.
- Scratch and Stain Resistant: The non-porous surface prevents discoloration and cracking, maintaining its pristine appearance.
- High-Temperature Resistance: Manufactured using 2336°F calcination, ensuring porcelain uniformity and durability.
- Easy to Clean: Smooth, glazed surface simplifies cleaning and maintenance, promoting a hygienic environment.
- Modern Rectangular Design: Adds a sleek and contemporary touch to any bathroom decor.

Image: Icons highlighting the sink's robust properties: round edges for safety, anti-scratch surface, high-temperature resistance, and oil resistance for easy cleaning.

Image: Cross-section diagram showing the advanced glass glazed surface, composed of base, color, and anti-smudge glazes for enhanced durability and cleanliness.
Care and Maintenance
Proper care and maintenance will ensure the longevity and aesthetic appeal of your Eridanus bathroom sink.
- Daily Cleaning: Wipe the sink with a soft, dry cloth after each use to prevent water spots and soap scum buildup.
- Regular Cleaning: For deeper cleaning, use a mild, non-abrasive cleaner and a soft sponge or cloth. Rinse thoroughly with water and dry.
- Avoid Harsh Chemicals: Do not use abrasive cleaners, scouring pads, or harsh chemicals (e.g., strong acids, alkalis, or bleach) as they can damage the ceramic glaze.
- Stain Removal: For stubborn stains, a paste of baking soda and water can be gently applied and then rinsed.
- Overflow Maintenance: Periodically clean the overflow channel to ensure proper drainage and prevent blockages.

Image: Highlighting the sink's smooth, non-porous surface that resists discoloration and cracking, making it easy to clean and maintain.
Troubleshooting
This section provides solutions to common issues you might encounter with your Eridanus bathroom sink.
| Problem | Possible Cause | Solution |
|---|---|---|
| Slow Drainage | Partial clog in drain or overflow. | Clear any debris from the drain and overflow. Use a drain cleaner if necessary, ensuring it's safe for plumbing. |
| Water Leaks Around Drain | Improperly sealed drain assembly or loose connections. | Check all drain connections for tightness. Reapply plumber's putty or silicone sealant if necessary. |
| Sink Not Level (Wall Mount) | Mounting bolts not perfectly aligned or tightened unevenly. | Adjust mounting bolts and re-check with a level. Ensure even tightening. |
| Water Spots/Stains | Hard water deposits or residue from cleaning products. | Wipe dry after each use. For deposits, use a mild vinegar solution (diluted) and rinse thoroughly. |
Specifications
| Attribute | Detail |
|---|---|
| Brand | Eridanus |
| Model Number | 104 |
| Color | White |
| Material | Ceramic |
| Product Dimensions (D x W x H) | 16.5"D x 23.8"W x 5.7"H |
| Size | 24" x 16.5" |
| Style | 24" x 16" Rectangle |
| Installation Type | Wall-Mount, Vessel Countertop |
| Finish Type | Polished |
| Shape | Rectangular |
| Drain Type | Pop-Up (not included with sink) |
| Item Weight | 43.2 pounds |
| Hole Count | 1 (for faucet) |
| Product Care Instructions | Wipe with Dry Cloth |

Image: Detail of the sink's unglazed back and bottom, a standard feature, along with the 7 5/8" mounting hole spacing.
Warranty and Support
Eridanus is committed to providing high-quality products and customer satisfaction. For any questions, concerns, or support needs regarding your sink, please refer to the contact information provided with your purchase or visit the official Eridanus website.
- Returns: Refer to the seller's return policy for details (e.g., 30-day refund/replacement).
- Protection Plans: Extended protection plans may be available for purchase separately.

Image: Eridanus customer service commitments, including 2-year support and hassle-free returns.


