EsaSam M400S 4G+64G
EsaSam Double Din Car Stereo Multimedia Radio User Manual
Model: M400S 4G+64G for KIA CEED 2012-2016
Introduction
This manual provides detailed instructions for the installation, operation, and maintenance of your EsaSam Double Din Car Stereo Multimedia Radio. Please read this manual thoroughly before using the product to ensure proper function and to prevent damage.
This unit is designed for KIA CEED models manufactured between 2012 and 2016. It features a 9-inch touchscreen, GPS navigation, MP5 player, DSP, RDS FM radio, Carplay, and Android Auto capabilities.
Safety Information
- Always consult a professional for installation if you are unsure about any steps. Incorrect installation can lead to damage to the unit or your vehicle.
- Do not operate the unit in a way that distracts you from driving. Always prioritize road safety.
- Avoid exposing the unit to extreme temperatures, direct sunlight for prolonged periods, or excessive moisture.
- Do not attempt to disassemble or modify the unit. This will void the warranty and may cause damage.
- Ensure all wiring is properly insulated and secured to prevent short circuits.
Package Contents
Please check the package contents upon receipt to ensure all items are present:
- Main Head Unit (9-inch Touchscreen)
- Power Harness
- GPS Antenna
- 4G Antenna (for models with 4G support)
- USB Cables
- RCA Cables
- Reversing Camera
- External Microphone
- Installation Frame (specific to KIA CEED 2012-2016)
- User Manual (this document)

Installation Guide
This section outlines the general steps for installing the car stereo. Professional installation is recommended.
1. Pre-Installation Check
- Ensure the vehicle's ignition is off and the battery is disconnected before starting any electrical work.
- Verify that the original center console matches the product's design for compatibility with KIA CEED 2012-2016.

2. Wiring Connections
Connect the provided wiring harness to the vehicle's existing wiring. Ensure all connections are secure.
- Power Harness: Connect to the vehicle's power supply.
- GPS Antenna: Connect to the designated port on the head unit and position it for optimal signal reception (e.g., on the dashboard).
- 4G Antenna: Connect to the designated port (if applicable) and position for best signal.
- USB Cables: Connect for external USB devices.
- External Microphone: Connect for improved call quality.
- Reversing Camera: Connect the camera to the video input and power it according to the vehicle's reverse light circuit.

Note: The image above shows various connection points including USB, RCA, and antenna ports. Ensure the cooling fan is connected and working for optimal performance.
3. Mounting the Head Unit
- Carefully insert the head unit into the dashboard opening, ensuring all wires are tucked away and not pinched.
- Secure the unit using the provided mounting brackets and screws.
- Reassemble the dashboard trim panels.
4. Initial Power-On
- Reconnect the vehicle's battery.
- Turn on the vehicle's ignition. The unit should power on automatically.
- Follow any on-screen prompts for initial setup, such as language selection and time zone.
Operating Instructions
1. Basic Functions
- Power On/Off: Press and hold the power button (usually on the front panel) to turn the unit on or off. A short press may mute/unmute.
- Volume Control: Adjust volume using the on-screen controls or steering wheel controls (if configured).
- Touchscreen Interface: Navigate through menus and applications by tapping and swiping on the 9-inch IPS display.
- Day/Night UI Switching: The system automatically switches between day and night interfaces for optimal visibility based on ambient light or vehicle's headlight status. This can also be manually adjusted in settings.

2. Radio (FM/AM/RDS)
- Access the "Radio" application from the main menu.
- Use the on-screen controls to scan for stations or manually tune to a frequency.
- Press and hold a preset button to save your favorite stations.
- RDS (Radio Data System) provides additional information like station name and program type where available.
3. Bluetooth Function
The unit supports Bluetooth 4.0 for hands-free calls and music streaming.
- Go to the "Bluetooth" application.
- Enable Bluetooth on your mobile phone and search for available devices.
- Select the car stereo's Bluetooth name (e.g., "CarBT") from your phone's list and pair.
- Once paired, you can make/receive calls, sync contacts, and stream audio.
4. CarPlay / Android Auto
The unit supports both wireless and wired CarPlay and Android Auto.
Wireless Connection:
- Ensure your phone's Bluetooth and Wi-Fi are enabled.
- On the car stereo, open the "CarPlay" or "Android Auto" application.
- Follow the on-screen instructions to connect your phone via Bluetooth first, then confirm the Wi-Fi connection.
Wired Connection:
- Connect your mobile phone to the car stereo using a USB cable.
- On the car stereo, open the "CarPlay" or "Android Auto" application.
- Confirm the connection on your phone if prompted.
5. GPS Navigation
The unit has built-in GPS and supports online and offline maps.
- Access the "Navigation" application.
- For offline maps, connect to Wi-Fi to download map data for your region.
- Enter your destination to receive turn-by-turn directions.
- Supports GPS, BDS, and GLONASS satellite systems for accurate positioning.
6. Multimedia Playback
- USB Playback: Connect a USB drive to one of the USB ports. The unit will automatically detect and allow playback of audio and video files.
- Supported Formats: Supports HD 1080P video and various audio formats.
- AUX-IN: Connect external audio sources via the AUX input.
7. 4G LTE & 5GHz WiFi Connectivity
The unit supports 4G LTE (with a SIM card slot) and 5GHz WiFi for internet access.
- 4G LTE: Insert a compatible 4G SIM card into the designated slot to access mobile data for online music, video, and navigation.
- 5GHz WiFi: Connect to a Wi-Fi hotspot for faster and more stable internet access. Go to Settings > Network > Wi-Fi to connect.
8. Steering Wheel Control (SWC)
The unit supports original steering wheel controls. To configure:
- Go to "Settings" > "System Settings" (or similar).
- Locate the "Steering Wheel Control" or "Canbus Protocol" option.
- Follow the on-screen instructions to learn or configure each button function.
9. Split Screen Function
This feature allows two applications to be displayed simultaneously on the screen.
- To activate, open one application, then long-press the recent apps button or drag another compatible app from the app drawer to the side of the screen.
- Adjust the split ratio by dragging the divider bar.
10. AHD Reversing Camera
The included AHD reversing camera provides a clear view of the area behind your vehicle when reversing.
- When the vehicle is shifted into reverse gear, the display will automatically switch to the camera view.
- The AHD camera offers higher resolution than standard cameras for improved visibility.
Optional Advanced Features
The following features require additional purchase and installation of compatible accessories.
1. ADAS DVR (Advanced Driver-Assistance Systems Digital Video Recorder)
An optional ADAS DVR can be connected to provide front vehicle distance prediction, front vehicle anti-collision warning, and lane deviation warning, enhancing driving safety.

2. OBD II (On-Board Diagnostics)
With an optional OBD II adapter, you can monitor real-time data from your vehicle's engine computer, diagnose issues, and clear fault codes directly from the car stereo display.
3. TPMS (Tire Pressure Monitoring System)
An optional TPMS allows you to monitor your tire pressure and temperature in real-time, providing warnings for abnormal conditions to enhance driving safety and tire longevity.
Specifications
The following table details the specifications for the EsaSam Car Multimedia Player, Model M400S 4G+64G, and other variants for comparison.
| Feature | M100CP/M150CP | M200S/M400S | M300S | M500S | M600S | M700S | M800S |
|---|---|---|---|---|---|---|---|
| Internet | 4G | 4G | 4G | 4G | 4G | 4G | 4G |
| OS | Android 12 | Android 12 | Android 12 | Android 12 | Android 12 | Android 12 | Android 12 |
| Core | 4-Core | 8-Core | 8-Core | 8-Core | 8-Core | 8-Core | 8-Core |
| RAM/ROM | 1G+32G | 2G+32G (M200S) 4G+64G (M400S) | 4G+32G | 4G+64G | 6G+128G | 8G+128G | 8G+256G |
| Car-Play/Auto | Wireless | Wireless | Wireless | Wireless | Wireless | Wireless | Wireless |
| BT module | 5.0 | 5.0 | 5.0 | 5.0 | 5.0 | 5.0 | 5.0 |
| Resolution | 1024*600 | 1280*720 | 1280*720 | 1280*720 | 1280*720 | 1280*720 | 1280*720 |
| Screen | IPS Screen | IPS Screen | IPS Screen | IPS Screen | IPS Screen | IPS Screen | IPS Screen |
| Cooling fan | No | Yes | Yes | Yes | Yes | Yes | Yes |
| DSP | Optional | Yes | Yes | Yes | Yes | Yes | Yes |
| RDS | Yes | Yes | Yes | Yes | Yes | Yes | Yes |
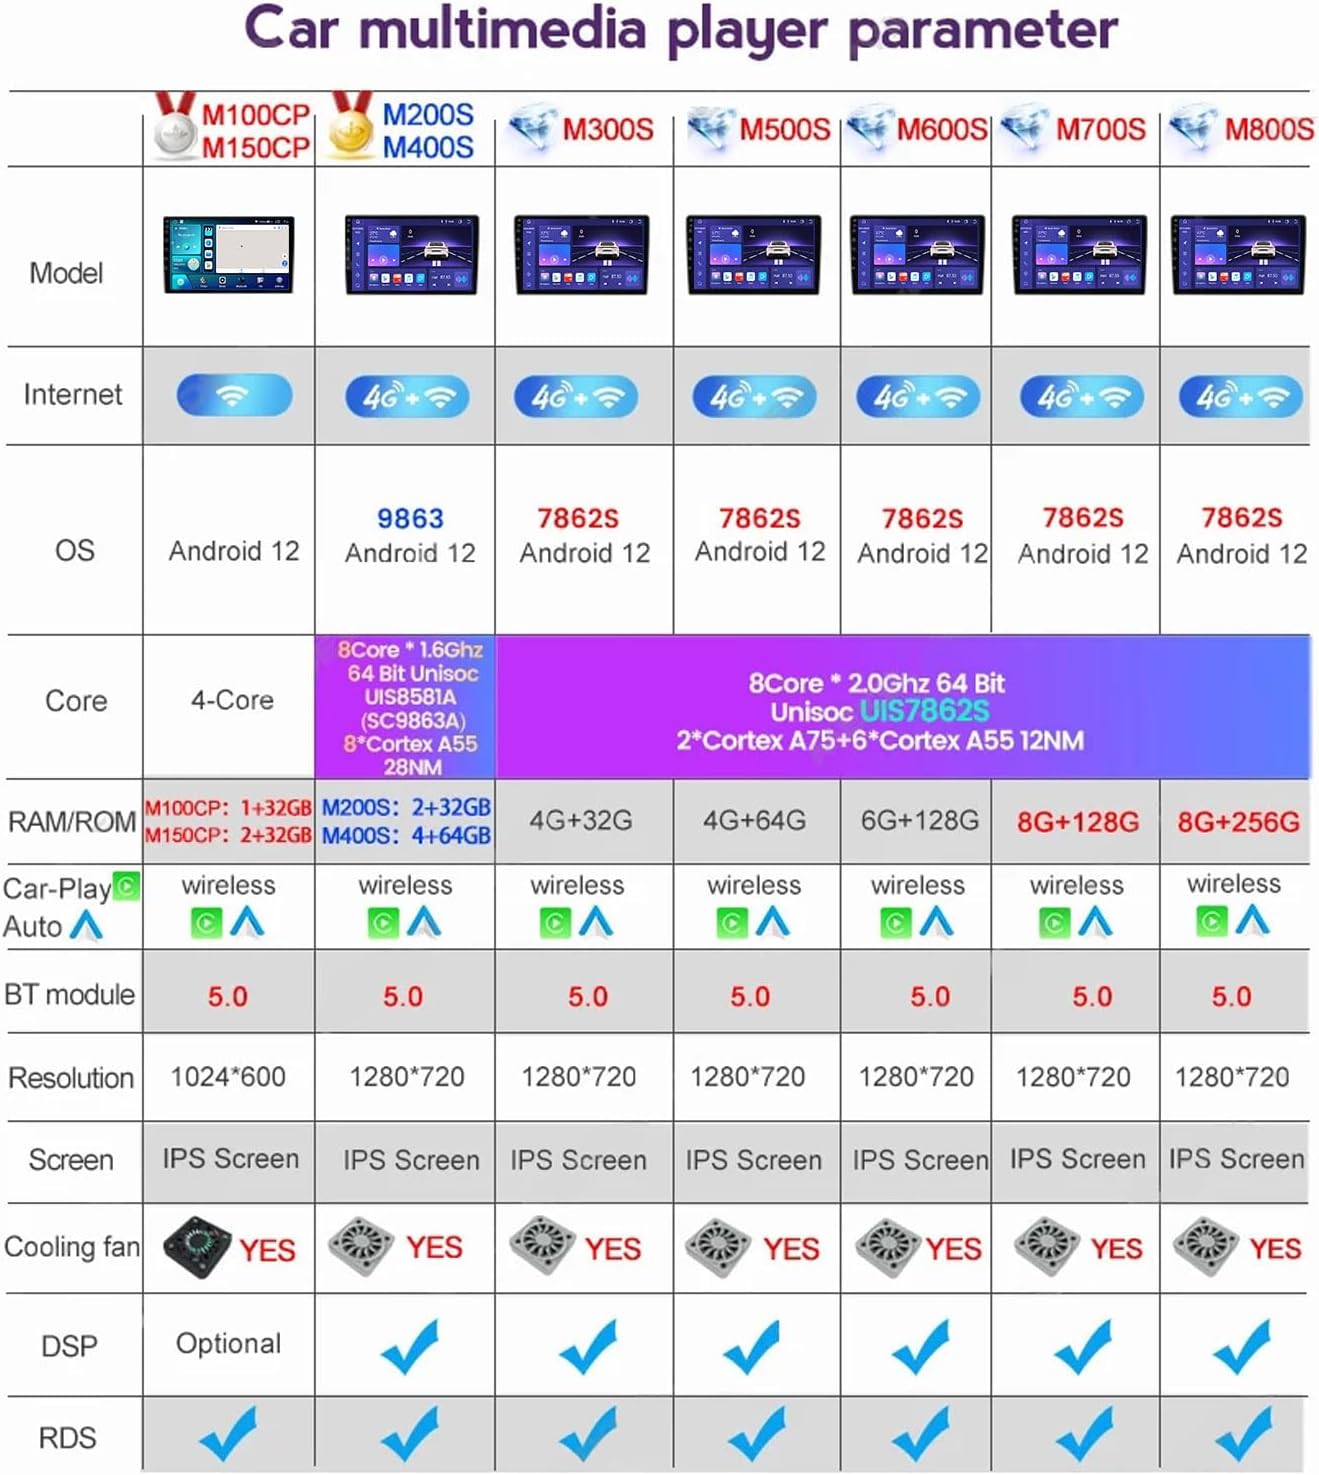
Note: The model covered by this manual is M400S 4G+64G. Specifications may vary slightly between different production batches.
Troubleshooting
Refer to this section for common issues and their solutions.
1. Unit Does Not Power On
- Check the vehicle's battery connection.
- Verify that the power harness is correctly connected and secure.
- Check the vehicle's fuse box for any blown fuses related to the stereo.
2. No Sound Output
- Ensure the volume is not muted or set too low.
- Check speaker wire connections.
- Verify the audio output settings in the unit's menu.
3. GPS Signal Not Found
- Ensure the GPS antenna is properly connected and positioned in an area with a clear view of the sky.
- Move the vehicle to an open area away from tall buildings or dense foliage.
- Check GPS settings in the unit's menu.
4. Bluetooth Connection Issues
- Ensure Bluetooth is enabled on both the car stereo and your mobile phone.
- Delete previous pairings on both devices and attempt to pair again.
- Restart both the car stereo and your mobile phone.
5. CarPlay/Android Auto Not Working
- For wired connections, ensure you are using a high-quality USB cable.
- For wireless connections, verify both Bluetooth and Wi-Fi are active on your phone.
- Check your phone's settings to ensure CarPlay/Android Auto is enabled and allowed for the device.
- Ensure the "CarPlay" or "Android Auto" app is selected on the head unit.
Factory Password: For M100S~M150S models, the factory password is 8888. For M200S~M800S models (including M400S), the factory password is 3368.
Maintenance
- Cleaning the Screen: Use a soft, lint-free cloth to gently wipe the touchscreen. Do not use abrasive cleaners or solvents.
- Software Updates: Periodically check for software updates to ensure optimal performance and access to new features. Updates can usually be found on the manufacturer's website or through the unit's system settings (requires internet connection).
- General Care: Keep the unit free from dust and debris. Avoid placing heavy objects on the unit or exposing it to excessive force.
Warranty and Support
This product comes with a standard manufacturer's warranty. Please refer to the warranty card included in your package for specific terms and conditions, including warranty period and coverage details.
For technical support, troubleshooting assistance, or warranty claims, please contact EsaSam customer service through the retailer where the product was purchased or visit the official EsaSam website for contact information.
Ask a question about this manual
Ask about setup, troubleshooting, compatibility, parts, safety, or missing instructions. Manuals+ will review the question and use this page’s manual context to help answer it.