1. Introduction
This manual provides detailed instructions for the setup, operation, and maintenance of your LetSketch Portable Mini Printer, Model WP9529. This compact thermal label maker is designed for various labeling needs, offering convenience and efficiency for organizing items in home, office, or classroom environments.
2. Product Overview
2.1 Package Contents
- LetSketch Portable Mini Printer (Model WP9529)
- USB Charging Cable (Type-C)
- One roll of printing paper (pre-installed or included)
- Instruction Manual (this document)
2.2 Device Components
Familiarize yourself with the main components of your printer:

Image 2.2.1: Front view of the LetSketch Portable Mini Printer WP9529, showing the power button and label output slot.
- Power Button: Located on the front, used to turn the device on/off.
- Label Output Slot: Where printed labels exit the device.
- Paper Compartment: Accessed by opening the cover, holds the label roll.
- USB-C Charging Port: For connecting the charging cable.
- Reset Hole: For resetting the device if necessary.
- Lanyard Connection Area: For attaching a lanyard for portability.
- Cutter/Open Slide: A slide mechanism on the side to either open the cover or cut the label.
2.3 Key Features
- Thermal Printing: Inkless printing technology.
- Compact Design: Product Dimension: 90 x 74 x 35.6 mm; Weight: 118g.
- Bluetooth Connectivity: Connects wirelessly to smartphones and tablets.
- Rechargeable Battery: 1200mAh Lithium Battery.
- Versatile Labeling: Supports various label types for organization (jars, freezer, cosmetics, home items).
- App-Controlled Editing: Features text, icons, barcodes, QR codes, images, date, and serial numbers.
- Durable Labels: Multi-coated paper designed to be waterproof, oil-proof, wear-resistant, corrosion-resistant, and tearable, with image retention for 5-10 years.
3. Setup
3.1 Charging the Printer
- Connect the provided USB Type-C charging cable to the printer's charging port.
- Connect the other end of the cable to a 5V/1A USB power adapter (not included).
- The charging time is approximately 2 to 3 hours. The LED indicator will show charging status.
Important: Use a 5V/1A power adapter for optimal charging.
3.2 Installing the "iLabel" Application
The printer operates via a dedicated mobile application called "iLabel".
- Search for "iLabel" in your device's app store (iOS App Store or Google Play Store).
- Download and install the application on your smartphone or tablet.

Image 3.2.1: Screenshot of the "iLabel" application interface on a smartphone, demonstrating label creation.
3.3 Loading Label Paper
The printer supports both gapped and continuous thermal label paper with a consumable width of 15mm.

Image 3.3.1: Diagram illustrating the quick paper loading process by opening the printer cover.
- Locate the "OPEN" slide on the side of the printer. Push it down to open the printer cover.
- Insert the label roll into the paper compartment, ensuring the printing side faces upwards and the paper feeds smoothly into the print head mechanism.
- Close the printer cover firmly until it clicks into place.
- Ensure a small portion of the label paper extends out of the output slot.
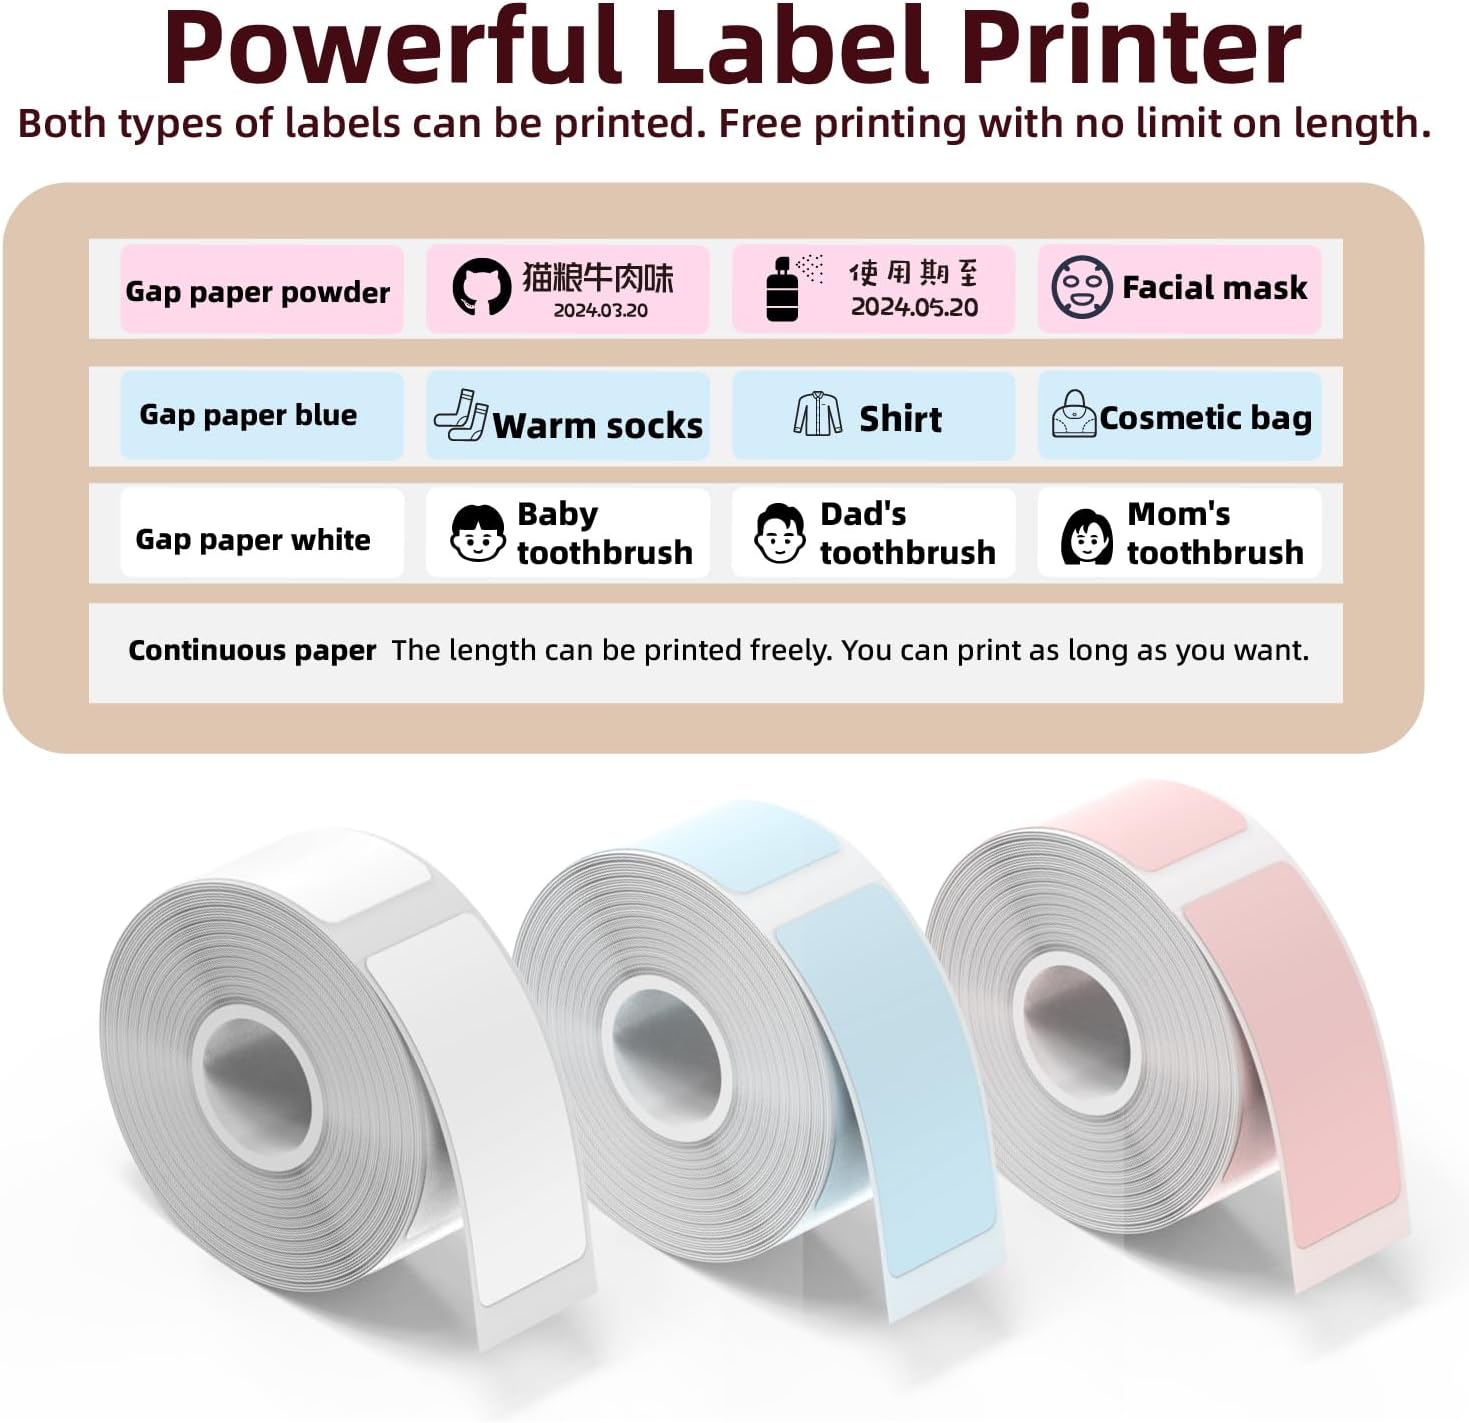
Image 3.3.2: Examples of gapped and continuous label paper types that can be used with the printer.
4. Operating Instructions
4.1 Powering On/Off
- To power on, press and hold the power button until the indicator light illuminates.
- To power off, press and hold the power button again until the indicator light turns off.
4.2 Connecting via Bluetooth
- Ensure your printer is powered on and within Bluetooth range of your smartphone or tablet.
- Open the "iLabel" application.
- Within the app, navigate to the device connection settings (usually an icon resembling a printer or Bluetooth symbol).
- Select your printer (e.g., "LetSketch WP9529" or similar) from the list of available devices to establish a connection.
4.3 Creating and Printing Labels
The "iLabel" app offers various tools for label design.
- Design Your Label:
- Use the app's interface to add text, select fonts and sizes, insert icons, barcodes, QR codes, or images.
- The app supports features like date and time printing, as well as serial numbers.
- You can choose between a "Quick Editor" for simple text labels or a more comprehensive editor for advanced designs.
- Preview and Adjust:
- After designing, press the "Print" button in the app.
- You will typically be directed to a preview screen where you can review your label.
- Adjust print intensity and the number of copies if prompted.
- Print:
- Confirm your settings and press "Print" again to send the job to the printer.
- The printer will then produce your labels.
- Cutting Labels:
- After printing, use the slide mechanism on the side of the printer (push up) to cut the label cleanly.
The printer has a memory function that remembers the last two templates printed, saving time for repeated settings.

Image 4.3.1: Examples of practical applications for the labels, including food preservation, cosmetic identification, kitchen organization, and home item classification.

Image 4.3.2: The printer shown alongside various colored label rolls and examples of printed labels on product packaging.
5. Maintenance
5.1 Cleaning the Print Head
To ensure optimal print quality, periodically clean the print head.
- Turn off the printer and disconnect it from the power source.
- Open the printer cover to access the print head.
- Gently wipe the print head with a soft, lint-free cloth lightly dampened with isopropyl alcohol.
- Allow the print head to dry completely before closing the cover and using the printer.
5.2 Battery Care
- Avoid fully discharging the battery frequently.
- Charge the printer regularly, even if not in use, to maintain battery health.
- Store the printer in a cool, dry place when not in use for extended periods.
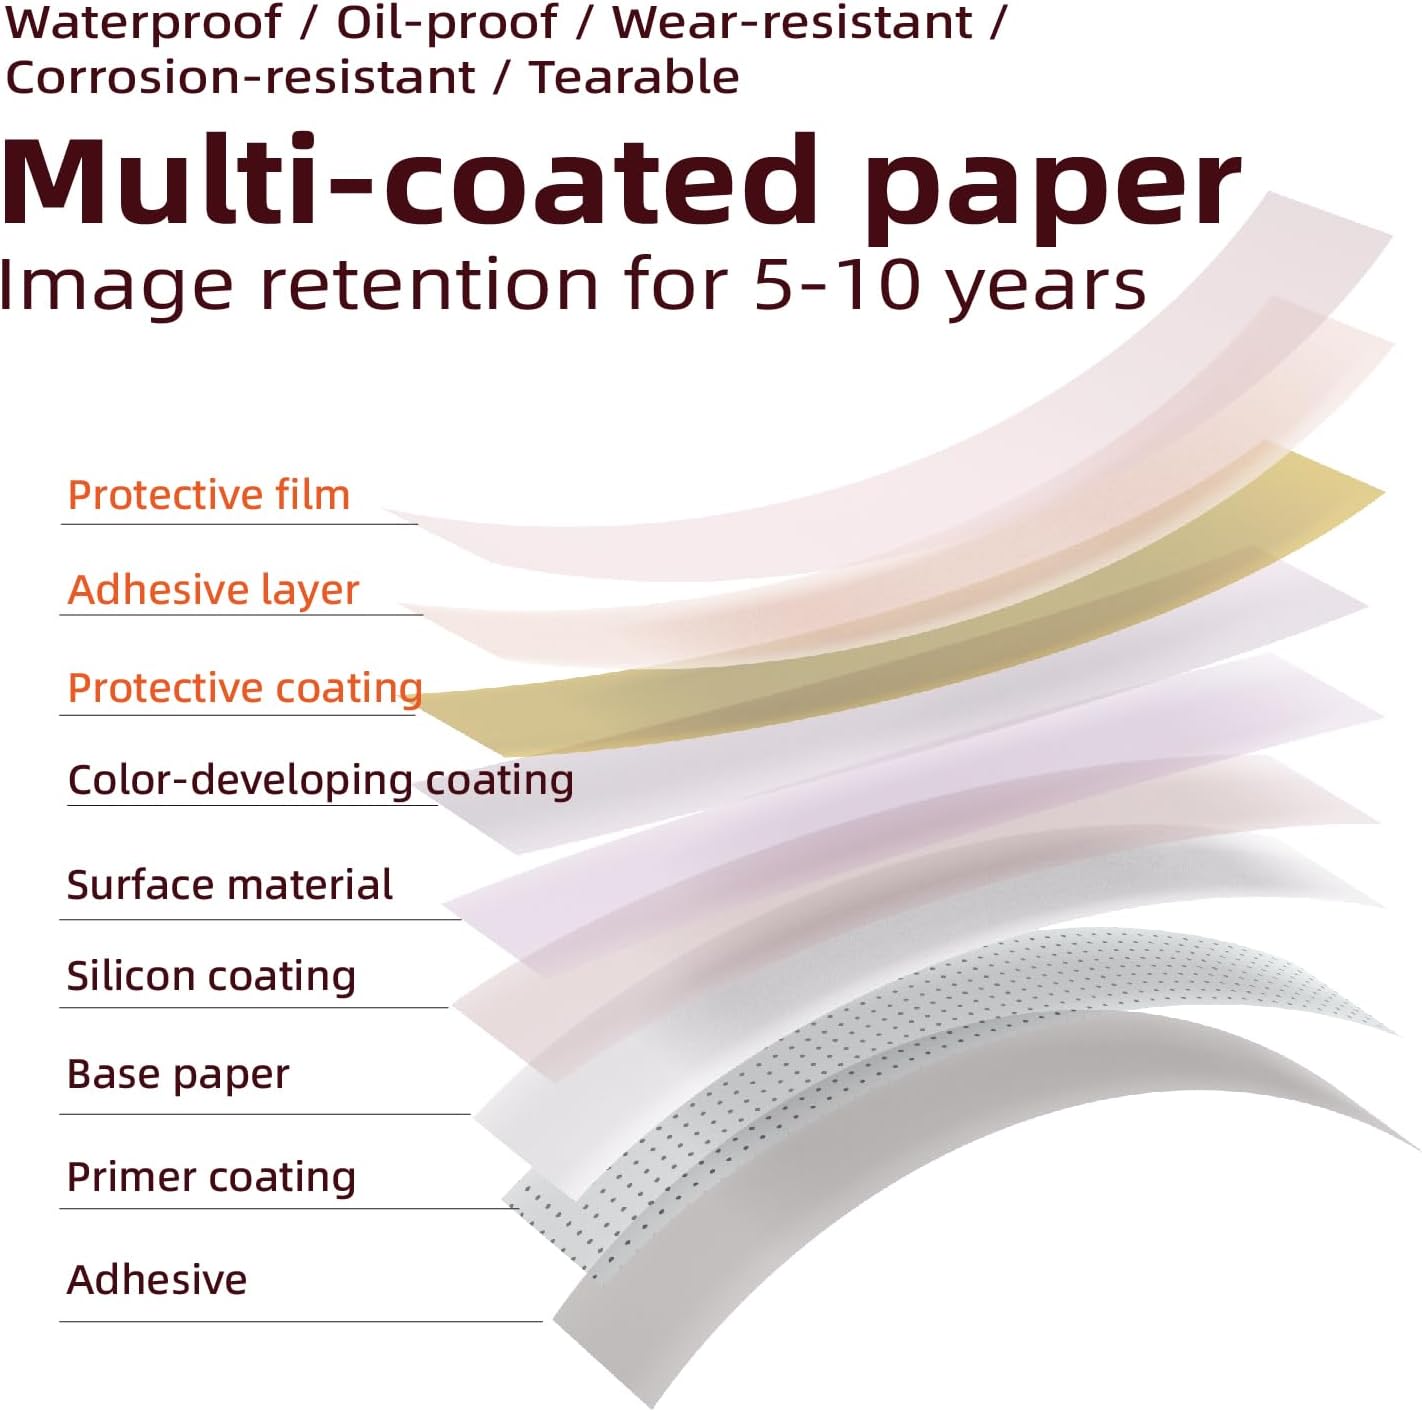
Image 5.2.1: Diagram illustrating the multi-layered structure of the durable label paper, highlighting its protective and adhesive properties.
6. Troubleshooting
| Problem | Possible Cause | Solution |
|---|---|---|
| Printer does not turn on. | Low battery or no charge. | Charge the printer for 2-3 hours using a 5V/1A adapter. |
| Cannot connect via Bluetooth. | Bluetooth is off on device, printer is off, or out of range. | Ensure Bluetooth is enabled on your mobile device. Turn on the printer. Move the printer closer to your device. Restart both devices. |
| Poor print quality or blank prints. | Print head dirty, incorrect paper loading, or low battery. | Clean the print head (see Section 5.1). Re-load the label paper correctly. Ensure the printer is sufficiently charged. |
| Labels are misaligned or multiple blank labels print. | Paper sensor issue, incorrect label type setting in app, or paper shifted. | Ensure the label paper is loaded straight and securely. Verify the label type (gapped/continuous) setting in the "iLabel" app matches your paper. If using gapped paper, ensure the gaps are detected correctly. |
| "Printhead overheating" error. | Excessive continuous printing. | Allow the printer to cool down for a few minutes before resuming printing. Avoid prolonged continuous printing sessions. |
7. Specifications
| Feature | Detail |
|---|---|
| Brand | LetSketch |
| Model | WP9529 |
| Product Dimensions | 90 x 74 x 35.6 mm (3.2D x 7W x 7H Centimetres) |
| Item Weight | 118 g |
| Print Type | Thermal Printing |
| Consumable Width | 15 mm |
| Maximum Media Size | 0.5 x 1.2 inch (approx. 13x30 mm for gapped labels) |
| Print Resolution | 203 DPI (Monochrome) |
| Battery Capacity | 1200mAh Lithium Battery |
| Charging Time | Approx. 2-3 Hours |
| Input | 5V/1A |
| Charging Port | Type-C |
| Connectivity | Bluetooth |
| Compatible Devices | Smartphones, Tablets |
| App Name | iLabel |
8. Warranty and Support
For warranty information and customer support, please refer to the documentation provided at the time of purchase or contact LetSketch customer service through their official website or the retailer where the product was purchased.
Please retain your proof of purchase for any warranty claims.