1. Safety Information
Please read and follow all instructions carefully before installation and use. Failure to do so may result in injury or damage. Keep these instructions for future reference.
- This product is intended for use with pets and small children.
- Never leave children or pets unattended near the gate.
- Ensure the gate is securely installed and latched at all times.
- Regularly check all parts for wear, damage, or loose connections. Discontinue use if any part is damaged.
- Do not use the gate at the top of stairs unless hardware mounted.
- Always ensure the gate opens away from stairs if installed at the top.
2. Product Overview
The COMOMY 55.1" Extra Tall Pet Gate is designed to safely contain cats and small pets within designated areas of your home. Its robust metal construction and thoughtful features provide security and convenience.
- Extra Tall Design: Standing at 55.1 inches, this gate is ideal for preventing even agile cats from jumping over.
- Adjustable Width: Fits openings from 29.5 inches to 40.6 inches wide, suitable for various doorways, stairs, and kitchen entrances.
- Ultra-Narrow Gaps: Features 1.37-inch gaps between bars to prevent small pets from squeezing through. Includes 2 spacer bars for additional gap reduction if needed.
- Double-Locking Mechanism: Ensures enhanced safety, making it challenging for pets to open while remaining easy for adults.
- Adjustable Cat Door: A small, adjustable pet door allows smaller pets to pass through without opening the main gate.
- Anti-Stumble Design: Includes a small ramp at the bottom to protect floors, reinforce the gate, and minimize stumbling hazards.
- Pressure Mounted: Easy, tool-free installation that protects wall surfaces. Hardware mounting is also an option for added security.

Image: The COMOMY 55.1 inch Extra Tall Pet Gate, showcasing its height and design.

Image: Comparison of the 55.1 inch 'Super High' gate with an 'Ordinary' 30 inch gate, demonstrating its effectiveness against jumping cats.

Image: Close-up view of the gate bars, highlighting the ultra-narrow 1.37 inch gaps to prevent small pets from passing through.
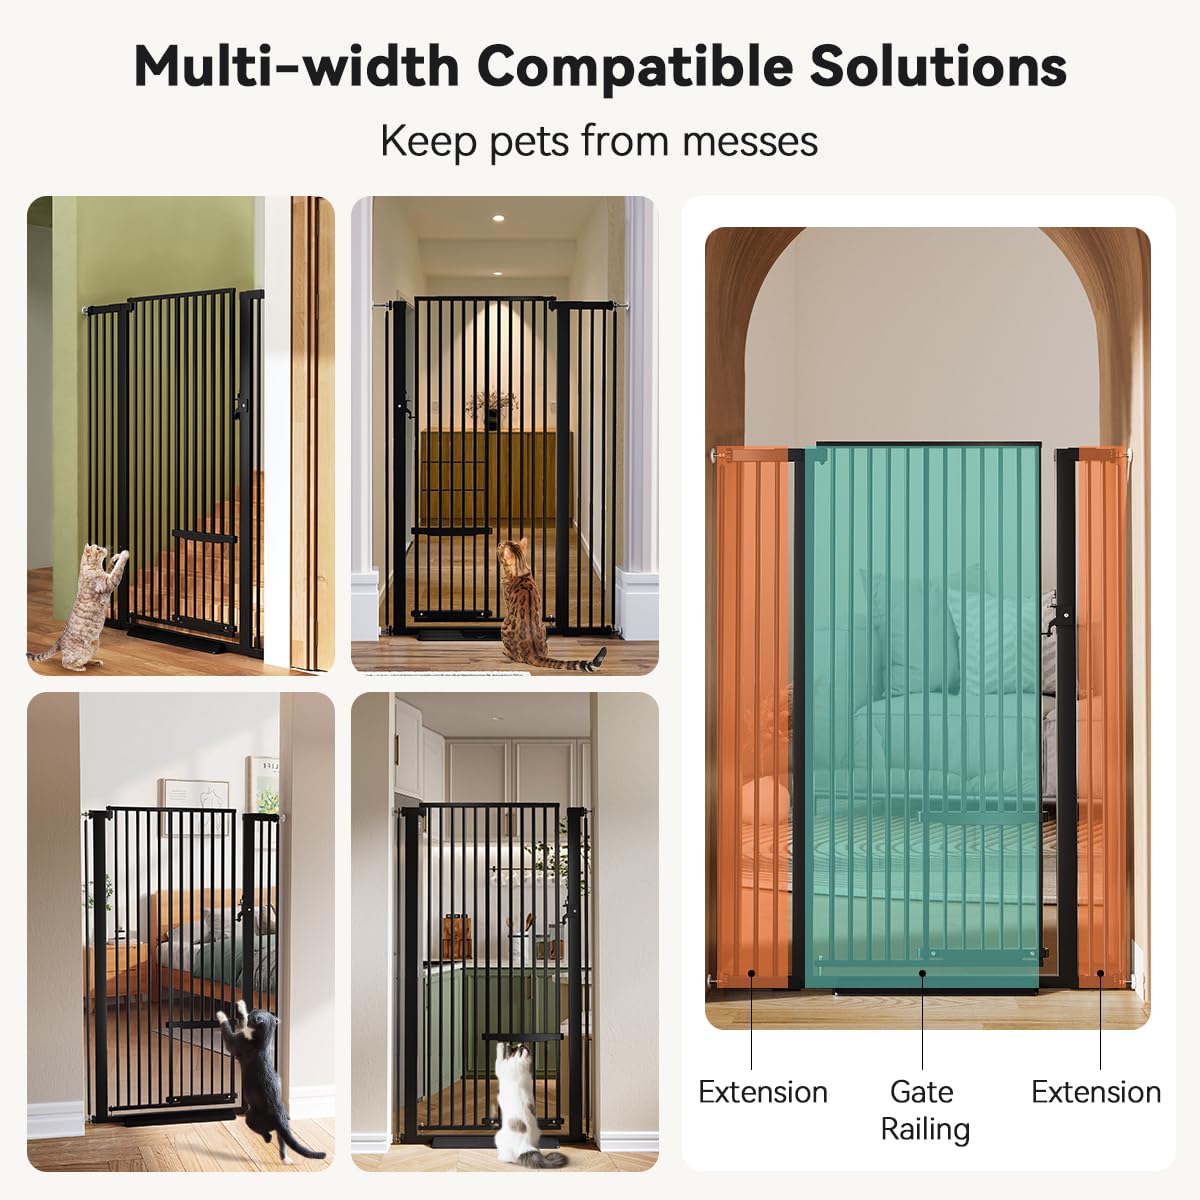
Image: Various configurations of the pet gate with extensions, illustrating its adaptability to different opening widths.
3. Setup Instructions
The COMOMY Pet Gate offers both pressure-mounted and hardware-mounted installation options. Choose the method best suited for your needs and follow the steps below.
3.1. Pressure Mounted Installation (Method 1)
This method is ideal for temporary use or when you prefer not to drill into walls.
- Measure Opening: Measure the width of your opening (29.5" to 40.6") to determine if extensions are needed. Refer to the diagram below for correct configuration.
- Insert Tension Bolts: Insert the 4 tension bolts into the corners of the gate/extension.
- Install Anti-Stumble Pedal (Optional): Place the anti-stumble pedal at the bottom of the gate frame if desired.
- Position Gate: Place the gate in the desired opening. Ensure the bottom of the gate frame is close to the floor with no overhang.
- Tighten Bolts: Rotate the tension bolts clockwise to tighten them against the wall or door frame until the gate is secure.
- Check Door Locks: Ensure the door locks align properly.
- Cut Zip Tie: Once stable, cut the zip tie holding the gate closed.
- Test Gate: Open and close the walk-through gate to ensure proper function and stability.

Image: Visual guide for pressure-mounted installation, showing steps from inserting bolts to testing the gate.
3.2. Hardware Mounted Installation (Method 2)
This method provides maximum security and is recommended for top-of-stairs use.
- Locate Drilling Points: Pre-assemble the gate and hold it in position to mark the four drilling points for the wall cups.
- Drill Holes & Secure Wall Cups: Drill holes, insert wall anchors, and secure the wall cups with screws.
- Install Tension Bolts: Insert tension bolts into the gate and then into the secured wall cups.
- Tighten Bolts: Tighten the tension bolts to secure the gate firmly.
- Check Door Locks: Ensure the door locks align properly.
- Cut Zip Tie: Once stable, cut the zip tie holding the gate closed.
- Test Gate: Open and close the walk-through gate to ensure proper function and stability.

Image: Visual guide for hardware-mounted installation, showing drilling and securing steps.
3.3. Spacer Bar Installation (If Needed)
If the gap between the gate and the wall is too wide (greater than 1.37 inches), use the provided spacer bars.
- Insert Screw: Insert the screw through the M10 nut and rod.
- Screw into Side Hole: Screw the assembly into the door's side hole.
- Adjust Spacing: Adjust the side spacing with the M10 nuts to achieve a gap of less than 1.37 inches.

Image: Steps for installing spacer bars to reduce gaps between the gate and the wall.
3.4. Installation Video Guide
Video: Official COMOMY guide on how to properly and easily install the pet gate.
4. Operating Instructions
4.1. Opening and Closing the Main Gate
The main gate features a double-locking design for security and can open in two directions.
- To Open: Lift the gate latch upwards and pull the gate open.
- To Close: Push the gate until it automatically latches shut. For extra security, push the small lever down to lock the latch.
- Hold Open Feature: The gate can secure at a 90° angle for free access.

Image: Illustration of the double-locking mechanism for enhanced security.

Image: Demonstrates the 180° dual-direction opening and anti-stumble pedal for convenient daily use.
4.2. Using the Adjustable Cat Door
The integrated cat door can be adjusted to four different heights to accommodate various pet sizes.
- To Adjust: Press both sides of the cat door simultaneously.
- Raise/Lower: Lift up or push down to the desired height until it clicks into place.
- To Open/Close: Lift up/down the door to allow passage for smaller pets.

Image: Shows how to adjust the height of the small pet door within the main gate.
5. Maintenance
To ensure the longevity and proper function of your COMOMY Pet Gate, follow these simple maintenance guidelines:
- Cleaning: Wipe the gate regularly with a soft, damp cloth and mild soap. Avoid abrasive cleaners or harsh chemicals that could damage the finish.
- Inspection: Periodically check all screws, bolts, and locking mechanisms to ensure they are tight and functioning correctly. Tighten any loose parts.
- Lubrication: If the gate hinges or latch become stiff, apply a small amount of silicone-based lubricant to ensure smooth operation.
- Storage: If storing the gate, ensure it is clean and dry. Store in a cool, dry place away from direct sunlight or extreme temperatures.
6. Troubleshooting
If you encounter any issues with your COMOMY Pet Gate, refer to the following common troubleshooting tips:
- Gate Not Latching: Ensure the gate is properly aligned within the door frame. Loosen the tension bolts slightly, adjust the gate's position, and then re-tighten. The gap between the door lock and frame is normal before full installation.
- Gate Feels Unstable: Re-tighten all tension bolts. If using pressure mounting, ensure the wall cups are firmly pressed against the surface. For hardware mounting, verify screws are securely fastened.
- Gaps Too Wide: If the gaps at the ends of the gate are wider than 1.37 inches, install the provided spacer bars as per the setup instructions.
- Gate Not Level: Adjust the tension bolts on the top or bottom corners to level the gate. Ensure the gate frame is horizontally and vertically aligned.

Image: Diagram illustrating correct positioning of the gate frame close to the floor without overhang.

Image: Visual guide for checking horizontal and vertical alignment of the gate.
7. Specifications
| Feature | Detail |
|---|---|
| Brand Name | COMOMY |
| Model Number | H7(7+14)B |
| Item Type Name | Cat Gate |
| Item Dimensions (W x H) | 40.6"W x 55.1"H |
| Fits Opening Widths | 29.5" to 40.6" |
| Material Type | Metal |
| Color | Black |
| Mounting Type | Pressure Mounted (Optional Hardware Mounted) |
| Target Species | Cat, Kitty, Dog, Doggy, Puppy, Pet |
| Closure Type | Buckle |
8. Warranty and Support
For warranty information, product support, or to purchase replacement parts, please contact COMOMY customer service through the retailer where the product was purchased or visit the official COMOMY website.
Please retain your proof of purchase for any warranty claims.