1. Introduction
This manual provides detailed instructions for the assembly, operation, and maintenance of your Outsunny 6' x 4' Metal Outdoor Storage Shed. Designed for durability and ease of use, this shed offers a practical solution for organizing your garden tools and outdoor equipment. Please read this manual thoroughly before beginning assembly and retain it for future reference.

Image 1.1: The Outsunny 6' x 4' Metal Outdoor Storage Shed, featuring its oak-colored panels and open double doors, revealing organized interior storage.

Image 1.2: The Outsunny storage shed situated in a garden, demonstrating its aesthetic integration into an outdoor space, with one door open.
2. Safety Information
Adhering to these safety guidelines is crucial for preventing injury and ensuring the structural integrity of your shed.
- Handle heavy components with care: Some parts of the shed may be heavy or have sharp edges. Exercise caution during handling.
- Ensure proper assembly for structural stability: Follow all assembly steps precisely to guarantee the shed's stability and safety. Incorrect assembly can lead to collapse or damage.
- Use gloves during assembly to avoid injuries: Protective gloves are recommended and often included to prevent cuts or scrapes from metal edges.
- Do not assemble in windy weather: Strong winds can make assembly dangerous and may cause panels to shift or fly, leading to injury or damage.
- Secure the shed to a level foundation: For optimal stability and longevity, the shed must be anchored to a solid, level base.
- Keep children and pets away during assembly: Small parts and tools can pose a hazard.
3. Package Contents
Before beginning assembly, verify that all components listed in your product's specific parts list (usually found in the included paper manual) are present and undamaged. Typical components include:
- Roof panels
- Wall panels (horizontal design)
- Door panels and frame components
- Support columns (7 total)
- Hardware kit (screws, nuts, washers)
- Ventilation grilles (2 units)
- Door latch, padlock, and keys
- Installation gloves
If any parts are missing or damaged, contact Outsunny customer support before proceeding with assembly.
4. Setup and Assembly Instructions
Assembly of this shed is designed to be efficient, with horizontal wall panels reducing complexity. It is recommended that 2-3 people install it together. Prepare your workspace and tools before starting.
4.1 Preparation
- Clear the area: Ensure a clear, level, and stable foundation for the shed.
- Gather tools: You will need an electric drill, a ladder, and other basic hand tools as specified in your detailed manual.
- Wear protective gear: Always wear the provided installation gloves to protect your hands.
- Remove protective film: Panels are covered with a clear plastic film for protection during shipping. This film must be removed from all panels before assembly. Note that this film can sometimes be challenging to peel off completely.
4.2 Assembly Steps
- Prepare Tools and Safety: Ensure you have an electric drill, a ladder, and other necessary tools. Always wear the supplied gloves for safety.
- Assemble Support Columns First: Begin by assembling the seven support columns. These provide enhanced stability compared to traditional shed designs.
- Install Wall Panels from Bottom to Top: Attach the horizontal wall panels, starting from the bottom and working your way upwards.
- Do Not Fully Tighten Screws: For proper alignment of all holes, do not fully tighten any screws until the entire structure is assembled. This allows for minor adjustments.
- Secure the Roof: Once wall panels and columns are in place, proceed with roof assembly, ensuring all components are securely fastened.
- Install Doors and Vents: Attach the door panels, ensuring smooth operation. Install the two ventilation grilles as indicated in the manual.
- Final Tightening: Once all components are in place and aligned, systematically tighten all screws and fasteners.
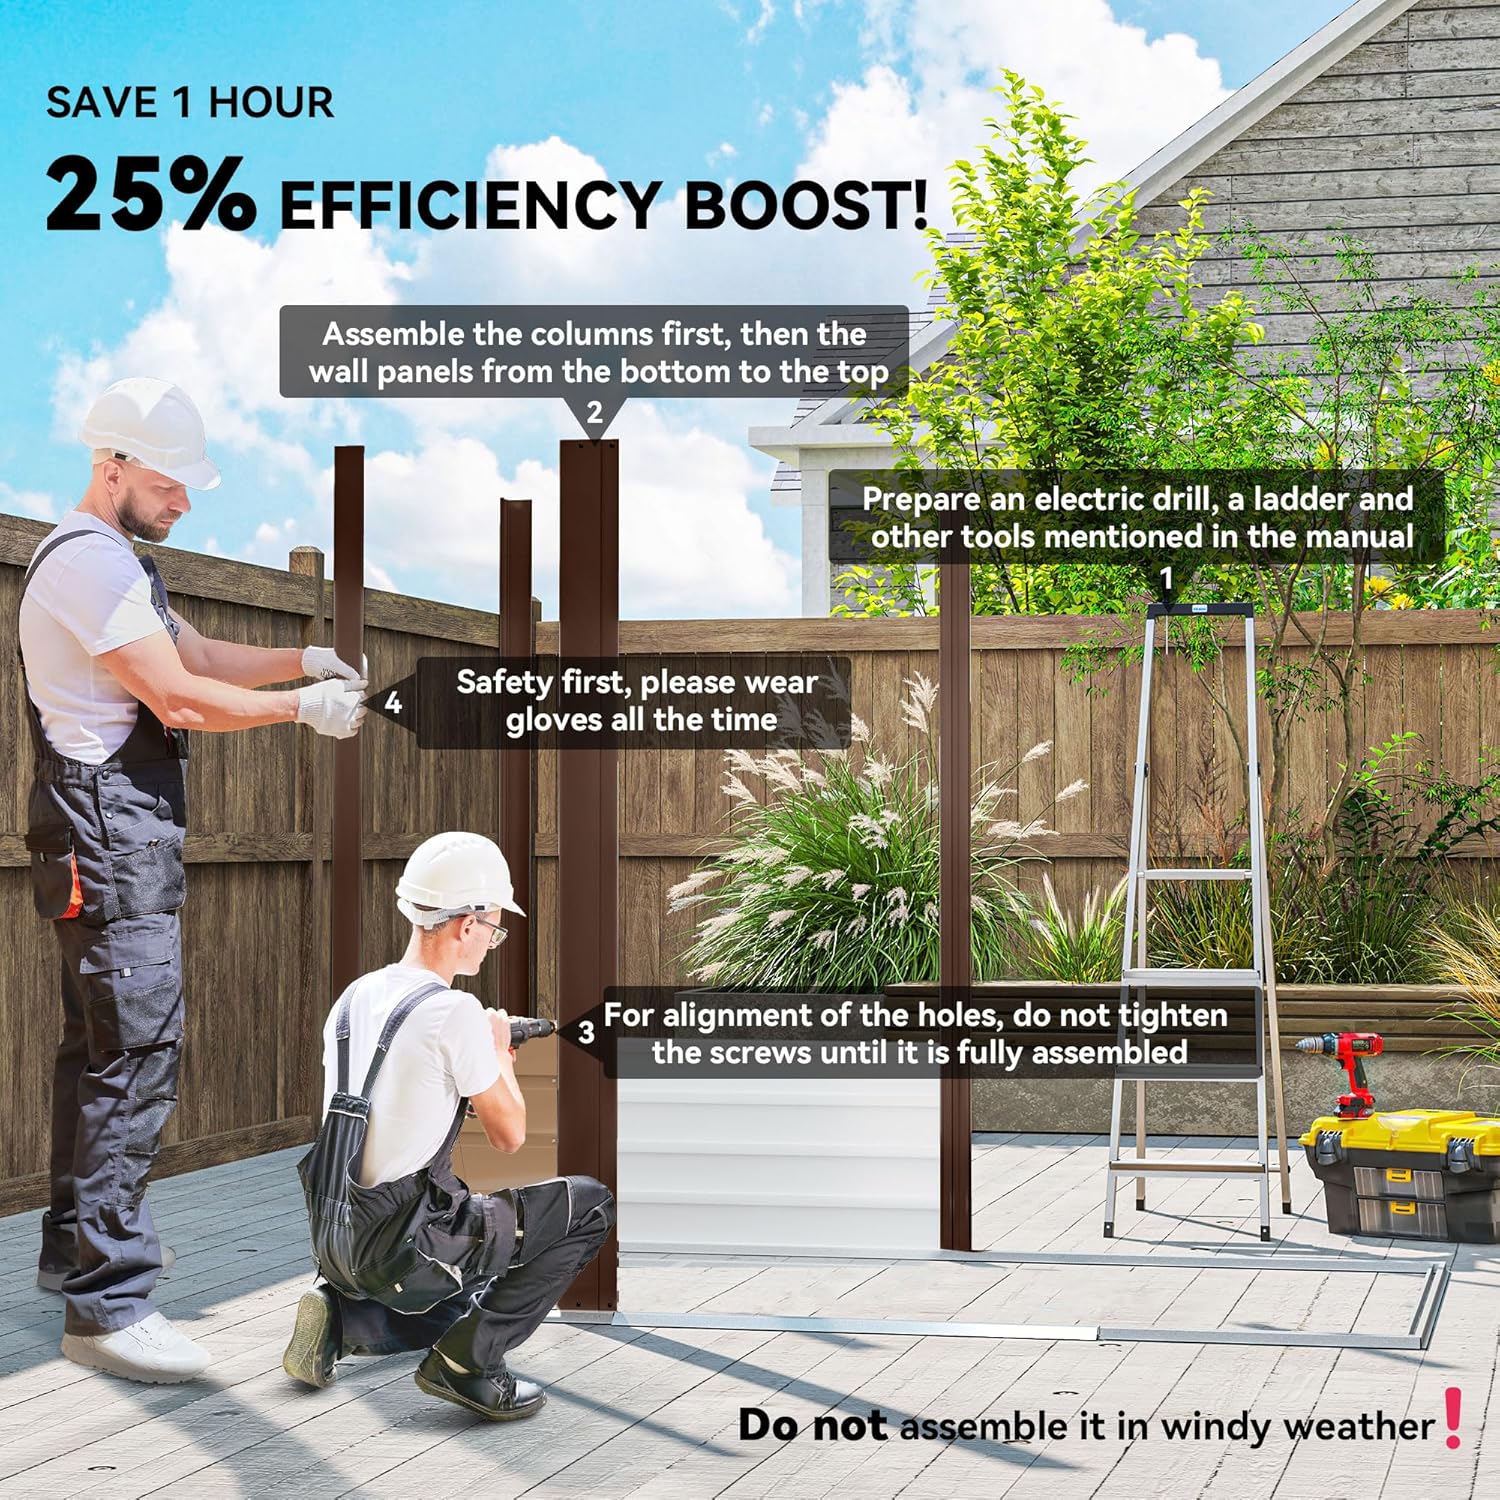
Image 4.1: Visual guide for shed assembly, highlighting the sequence of installing columns and wall panels, and emphasizing safety precautions like wearing gloves and avoiding assembly in windy conditions.

Image 4.2: Illustration of the shed's internal structure, emphasizing the seven support columns that contribute to enhanced stability and snow-bearing capacity.
5. Operating Instructions
Your Outsunny storage shed is designed for straightforward operation and secure storage.
5.1 Door Operation and Security
- Easy Access: The shed features a single hinged door with a small ramp at the base, facilitating easy entry and exit, especially for wheeled items.
- Lockable Door: For enhanced security, the door is equipped with a latch mechanism. A padlock and keys are included to secure your stored items.

Image 5.1: Detail of the shed's lockable door, showing the latch mechanism, padlock, and keys for securing contents.
5.2 Ventilation
- Two Ventilation Slots: The shed is equipped with two vents located near the roofline. These vents promote air circulation, helping to prevent odor buildup and keep the interior dry, which is beneficial for stored tools and equipment.

Image 5.2: A close-up view of the two ventilation vents on the shed, illustrating their design for air circulation.
6. Maintenance
Regular maintenance will extend the life and appearance of your storage shed.
- Cleaning: Clean the exterior of the shed periodically with mild soap and water. Avoid abrasive cleaners or harsh chemicals that could damage the finish.
- Check Fasteners: Annually, inspect all screws and bolts to ensure they remain tight. Re-tighten any loose fasteners to maintain structural integrity.
- Roof Inspection: Regularly check the roof for any debris buildup or signs of damage. The apex roof design is intended for efficient water runoff.
- Ventilation: Ensure the ventilation grilles remain clear of obstructions to allow for proper airflow.

Image 6.1: The apex roof design of the shed, demonstrating its effectiveness in shedding water to prevent accumulation.
7. Troubleshooting
This section addresses common issues you might encounter during assembly or use.
- Difficulty with Screw Alignment: If screw holes do not align perfectly, ensure that all screws are only finger-tight during initial assembly. This allows for minor adjustments to panels and frames before final tightening.
- Protective Film Removal: The clear plastic protective film on panels can sometimes be difficult to remove. Try peeling slowly from a corner. If stubborn, a gentle application of heat (e.g., from a hairdryer on low setting, held at a safe distance) might help loosen the adhesive, but proceed with caution to avoid damaging the panel finish.
- Shed Instability: Ensure the shed is placed on a completely level surface and securely anchored. Verify all fasteners are tightened. The seven support columns are designed to enhance stability.
- Door Not Closing Properly: Check for obstructions in the door track or frame. Ensure the shed is level and square. Adjust hinges or frame components if necessary (refer to your detailed manual for specific adjustment procedures).
8. Specifications
| Brand | Outsunny |
| Model Number | 84H-115V00AK |
| Color | Oak |
| Material | Alloy Steel |
| Product Dimensions (Overall) | 74.8" W x 52" D x 73.6" H (190 cm W x 132 cm D x 187 cm H) |
| Internal Size | 72" W x 48.4" D (183 cm W x 123 cm D) |
| Floor Space | 24 sq.ft. |
| Item Weight | 66 Pounds (29.9 kg) |
| Water Resistance Level | Waterproof |
| Door Style | Single Hinged, Lockable Door |
| Door Width | 29.5 Inches (75 cm) |
| Door Height | 63.4 Inches (161 cm) |
| Assembly Required | Yes |
| UPC | 196393010723 |

Image 8.1: Detailed dimensional diagram of the shed, including overall, floor, and inner storage measurements. It also advises measuring the foundation size before purchase.

Image 8.2: An interior view of the shed, showcasing its capacity to store various garden tools, equipment, and a workbench, demonstrating practical storage solutions.
9. Warranty and Support
For warranty information, please refer to the documentation included with your purchase or visit the official Outsunny website. For customer support, assistance with assembly, or to report missing/damaged parts, please contact Aosom Direct, the seller, or Outsunny customer service. Contact details are typically available on your purchase receipt or the product packaging.
This product is sold by Aosom Direct and typically includes a 30-day easy return policy. For specific return procedures, consult your purchase platform's return guidelines.