1. Introduction
This manual provides detailed instructions for the installation, operation, and maintenance of your Podofo 5-inch HD Touch Screen Single Din Car Stereo. This unit features Apple CarPlay, Android Auto, Bluetooth 5.1, Mirror Link, FM Radio, USB/TF/AUX inputs, and supports a backup camera. Please read this manual thoroughly before use to ensure proper functionality and safety.

Image 1.1: Overview of the Podofo 5-inch Single Din Car Stereo and its key features.
2. Setup
2.1. Package Contents
Before installation, verify that all components are present:
- Single Din Car Stereo Unit
- Power Cable
- Horn Cable
- Mounting Brackets (2)
- User Manual
- External Microphone
- HD Rear View Backup Camera

Image 2.1: Product dimensions and included accessories.
2.2. Installation Guidelines
The car stereo is designed for a standard single DIN slot. The unit dimensions are approximately 177mm (7.0 inches) in length, 52mm (2.0 inches) in height, and 103mm (4.1 inches) in depth. Professional installation is recommended.
- Disconnect Battery: Before starting, disconnect the negative terminal of your vehicle's battery to prevent electrical shorts.
- Remove Old Unit: Carefully remove your existing car stereo.
- Wiring Connections: Connect the provided power and horn cables to your vehicle's wiring harness. Ensure correct connections for constant power (yellow), accessory power (red), ground (black), and speaker outputs.
- External Microphone: Connect the external microphone to the designated port on the stereo for improved call quality.
- Backup Camera Installation:
- Mount the backup camera at the rear of your vehicle.
- Connect the camera's video output cable to the 'CAM IN' port on the stereo.
- Connect the camera's power wire (red) to the vehicle's reversing light positive wire.
- Connect the camera's ground wire (black) to a suitable chassis ground.
- Connect the trigger wire (labeled 'back' or 'reverse' on the power cable) to the reversing light positive wire. This signals the stereo to display the camera feed when reverse gear is engaged.
- Secure Unit: Slide the stereo into the single DIN slot and secure it using the provided mounting brackets.
- Reconnect Battery: Reconnect the negative terminal of your vehicle's battery.

Image 2.2: Detailed wiring diagram for the backup camera.
2.3. Initial Power-On
After installation, turn on your vehicle's ignition. The stereo should power on. Follow any on-screen prompts for initial setup, such as language selection or time setting.
3. Operating Instructions
3.1. Basic Controls
- Volume Knob: The large knob on the front panel controls the audio volume. Pressing it typically mutes/unmutes the audio.
- Seek Knob: The smaller knob is used for seeking radio stations or skipping tracks. Pressing it may pause/play media.
- Touch Screen: The 5-inch HD capacitive touchscreen provides intuitive control over all functions.
3.2. Apple CarPlay
Connect your iPhone to the stereo via a USB cable to activate Apple CarPlay. This allows you to access your phone's functions directly on the stereo display, including navigation, music, calls, messages, and voice control via Siri.

Image 3.1: Apple CarPlay interface in use, demonstrating wired connection.
3.3. Android Auto
Connect your Android smartphone to the stereo via a USB cable to activate Android Auto. This provides a safe and convenient way to use your phone's features while driving, such as Google Maps, music streaming, calls, and messages, with voice control via Google Assistant.

Image 3.2: Android Auto interface in use, demonstrating wired connection.
3.4. Phone Mirror Link Function
The Mirror Link function allows you to display your smartphone's screen directly on the car stereo. Connect your iOS (version 13.4 or higher) or Android (version 10.1 or higher) phone via a USB cable. This enables you to view content like Google Maps, Spotify, YouTube, and Waze on the larger screen.
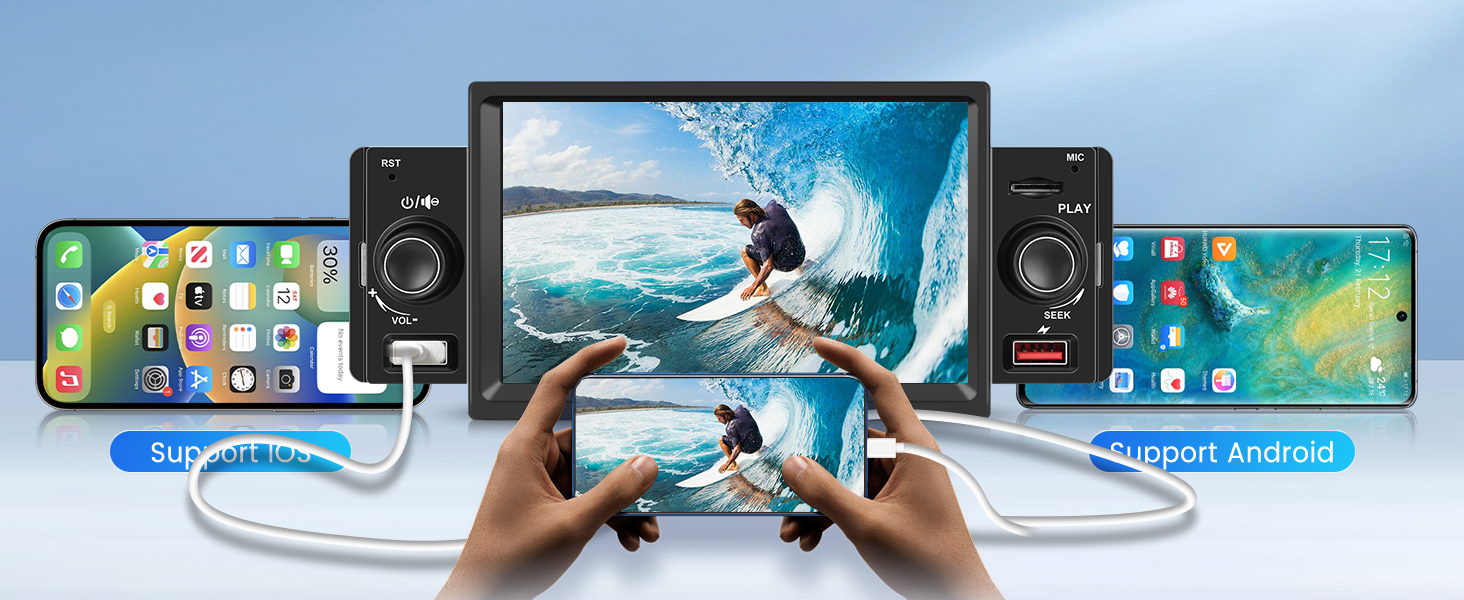
Image 3.3: Phone Mirror Link in action, displaying a phone's screen on the stereo.
3.5. Bluetooth 5.1
The stereo features Bluetooth 5.1 for wireless audio streaming and hands-free calling. Pair your smartphone with the stereo to make and receive calls using the built-in or external microphone, and stream music wirelessly.
- Enable Bluetooth on your smartphone.
- On the stereo, navigate to the Bluetooth menu and search for available devices.
- Select the stereo's name (e.g., "SWM151C") from your phone's Bluetooth list to pair.
- Once paired, you can access your phone's contacts, make calls, and play music through the stereo.

Image 3.4: Bluetooth 5.1 connectivity for calls and music.
3.6. FM Radio
Access the FM Radio function to listen to local radio stations. The stereo supports FM frequencies from 87.5-108MHz, providing stable reception even in challenging conditions.
- Select the FM Radio icon from the main menu.
- Use the seek function to automatically scan for stations or manually tune to a specific frequency.
- Save your favorite stations to preset buttons for quick access.

Image 3.5: FM Radio interface with frequency display and presets.
3.7. USB, TF Card, and AUX-in
The stereo supports various media inputs:
- USB: Connect a USB flash drive to play audio and video files. The unit has a front USB port.
- TF Card: Insert a TF (microSD) card into the designated slot to access media files.
- AUX-in: Use the 3.5mm AUX-in port to connect external audio devices.
Image 3.6: USB and TF card input locations.
3.8. HD Rear View Backup Camera
When the vehicle is shifted into reverse gear, the stereo automatically displays the feed from the connected HD backup camera. This feature includes night vision, a 170-degree ultra-wide viewing angle, and a waterproof design for enhanced safety during parking.

Image 3.7: Backup camera display and features.
3.9. Steering Wheel Control (SWC)
The stereo supports steering wheel controls, allowing you to manage audio functions (volume, track skipping, answering calls) without taking your hands off the wheel. This requires proper wiring and configuration in the stereo's settings menu.
- Access the 'Steering Wheel Control' settings in the stereo's menu.
- Follow the on-screen instructions to map your vehicle's steering wheel buttons to the desired stereo functions.

Image 3.8: Steering Wheel Control setup interface.
4. Maintenance
- Screen Cleaning: Use a soft, lint-free cloth to gently wipe the touchscreen. Do not use abrasive cleaners or solvents.
- General Cleaning: Keep the unit free from dust and debris. Use a dry cloth for the exterior.
- Software Updates: Periodically check the manufacturer's website for any available firmware updates to ensure optimal performance and access to new features.
5. Troubleshooting
| Problem | Possible Cause | Solution |
|---|---|---|
| Unit does not power on. | Incorrect wiring (power, ground, accessory). Blown fuse. | Check all power connections. Verify vehicle fuses and the stereo's inline fuse. Ensure battery is connected. |
| No sound or distorted audio. | Incorrect speaker wiring. Volume too low. Mute function active. | Check speaker connections. Adjust volume. Ensure unit is not muted. Check EQ settings. |
| Apple CarPlay/Android Auto not connecting. | Faulty USB cable. Phone software issue. | Use a high-quality USB data cable. Restart your phone and the stereo. Ensure phone's OS is up to date. |
| FM radio signal is weak or static. | Antenna not connected or damaged. Poor reception area. | Ensure the car antenna is properly connected. Try scanning for stations in a different location. |
| Backup camera not displaying. | Camera wiring incorrect. Trigger wire not connected. | Verify camera power, ground, video, and trigger wire connections. Ensure vehicle is in reverse. |
| Screen is white or unresponsive. | Software glitch. Hardware malfunction. | Try resetting the unit (locate a small reset button, usually a pinhole). If the issue persists, contact customer support. |
| Volume automatically reduces in reverse. | Feature enabled in settings. | Check the stereo's settings for a 'reverse mute' or 'reverse volume' option and disable it if desired. Note that some units may have this as a fixed behavior. |
6. Specifications
- Product Dimensions: 4.06 x 6.97 x 2 inches (103 x 177 x 52 mm)
- Item Weight: 1.87 pounds
- Model Number: 6614b589-9dff-4b4f-9413-3e2b49a3b245
- Brand: podofo
- Connectivity Technology: Bluetooth, USB Cable
- Controller Type: WINCE
- Special Feature: Touchscreen
- Compatible Devices: Smartphone
- Connector Type: 3.5mm Jack (AUX-in)
- Audio Output Mode: MP3/WMA/WAV/APE/FLAC
- Surround Sound Channel Configuration: 4.0
- Video Encoding: MKV/AVI/TS/TP/MP4/M4V (Maximum bit rate 50Mbps-80Mbps)
- Color: Black
7. Warranty & Support
Podofo is committed to providing quality products and customer satisfaction.
- Warranty: 24-month replacement available.
- Returns: 60-day return policy.
- Technical Support: Lifetime technical support is available.
- Customer Service: Expect a quick reply within 18 hours for inquiries.
For further assistance, please visit the official Podofo store or contact customer support through your purchase platform.

Image 7.1: Podofo customer service and warranty information.