FASTPRO 2fd063b7-efe8-471e-893c-094e073fcf03
FASTPRO 12V Cordless Jig Saw Instruction Manual
Model: 2fd063b7-efe8-471e-893c-094e073fcf03
1. Important Safety Instructions
Read all safety warnings and instructions before operating this power tool. Failure to follow the warnings and instructions may result in electric shock, fire, and/or serious injury. Save all warnings and instructions for future reference.
- Work Area Safety: Keep work area clean and well lit. Cluttered or dark areas invite accidents. Do not operate power tools in explosive atmospheres, such as in the presence of flammable liquids, gases, or dust.
- Electrical Safety: Power tool plugs must match the outlet. Never modify the plug in any way. Do not expose power tools to rain or wet conditions.
- Personal Safety: Always wear eye protection. Use hearing protection when operating for extended periods. Dress properly; avoid loose clothing or jewelry.
- Tool Use and Care: Do not force the power tool. Use the correct power tool for your application. Disconnect the battery pack from the power tool before making any adjustments, changing accessories, or storing power tools.
- Battery Tool Use and Care: Recharge only with the charger specified by the manufacturer. Use power tools only with specifically designated battery packs.
2. Product Overview
The FASTPRO 12V Cordless Jig Saw is designed for efficient cutting across various materials. This section provides an overview of the tool and its components.

Figure 2.1: FASTPRO 12V Cordless Jig Saw with its complete kit, including the saw, battery, charger, storage case, and various blades.
Key features include:
- Powerful Motor: Delivers 0-2,200 RPM for fast and efficient cutting.
- Adjustable Base Plate: Tilts from 0° to 45° for bevel cuts.
- Tool-Free Blade Changes: Quick and easy blade replacement with a blade-release lever.
- Variable Speed Control: Allows for optimal cutting speed based on material.
- Switch-Lock Button: Enhances safety when the saw is not in use or during transport.
- Built-in LED Light: Improves visibility in dark work areas.
- Blow-Molded Case: Provides convenient storage and transportation.
- Comprehensive Blade Set: Includes 10 pieces of blades for various cutting tasks.

Figure 2.2: Detailed view of the FASTPRO Jig Saw kit, showing the saw, 12V 1.5Ah battery, charger, storage case, 10-piece blade set, edge guide, and hex key wrench.
3. Setup and Assembly
3.1 Battery Installation and Charging
Ensure the battery is fully charged before first use. Connect the charger to a power outlet and insert the 12V 1.5Ah battery. The indicator light on the charger will show the charging status. Once charged, slide the battery pack into the base of the jig saw until it clicks securely into place.
3.2 Blade Installation and Removal
The jig saw features a tool-free blade-release lever for quick and easy blade changes.
- Ensure the tool is switched off and the battery is removed.
- Locate the blade-release lever on the front of the saw.
- Push the lever to open the blade clamp.
- Insert the T-shank blade into the blade clamp with the teeth facing forward. Ensure the blade is fully seated.
- Release the lever to secure the blade. Gently pull on the blade to confirm it is locked in place.
- To remove, repeat steps 2 and 3, then pull the blade out.

Figure 3.1: Illustration of the tool-free blade change mechanism, showing how to insert a T-shank blade into the jig saw.
4. Operating Instructions
4.1 Powering On/Off and Variable Speed Control
To start the jig saw, press the trigger switch. The tool features variable speed control, allowing you to adjust the cutting speed by varying the pressure on the trigger. For continuous operation, press the switch-lock button while the trigger is depressed. To stop, release the trigger or press the trigger again if the lock-on button is engaged.

Figure 4.1: The jig saw in operation, demonstrating its capability for faster and efficient cutting with sawdust visible.
4.2 Adjusting the Base Plate for Bevel Cuts
The base plate can be adjusted to make bevel cuts at angles from 0° to 45° to both the left and right sides.
- Ensure the tool is switched off and the battery is removed.
- Loosen the screws that secure the base plate.
- Tilt the base plate to the desired angle (0°, 15°, 30°, or 45°). Use a protractor or the markings on the base plate for accuracy.
- Tighten the screws firmly to secure the base plate in position.
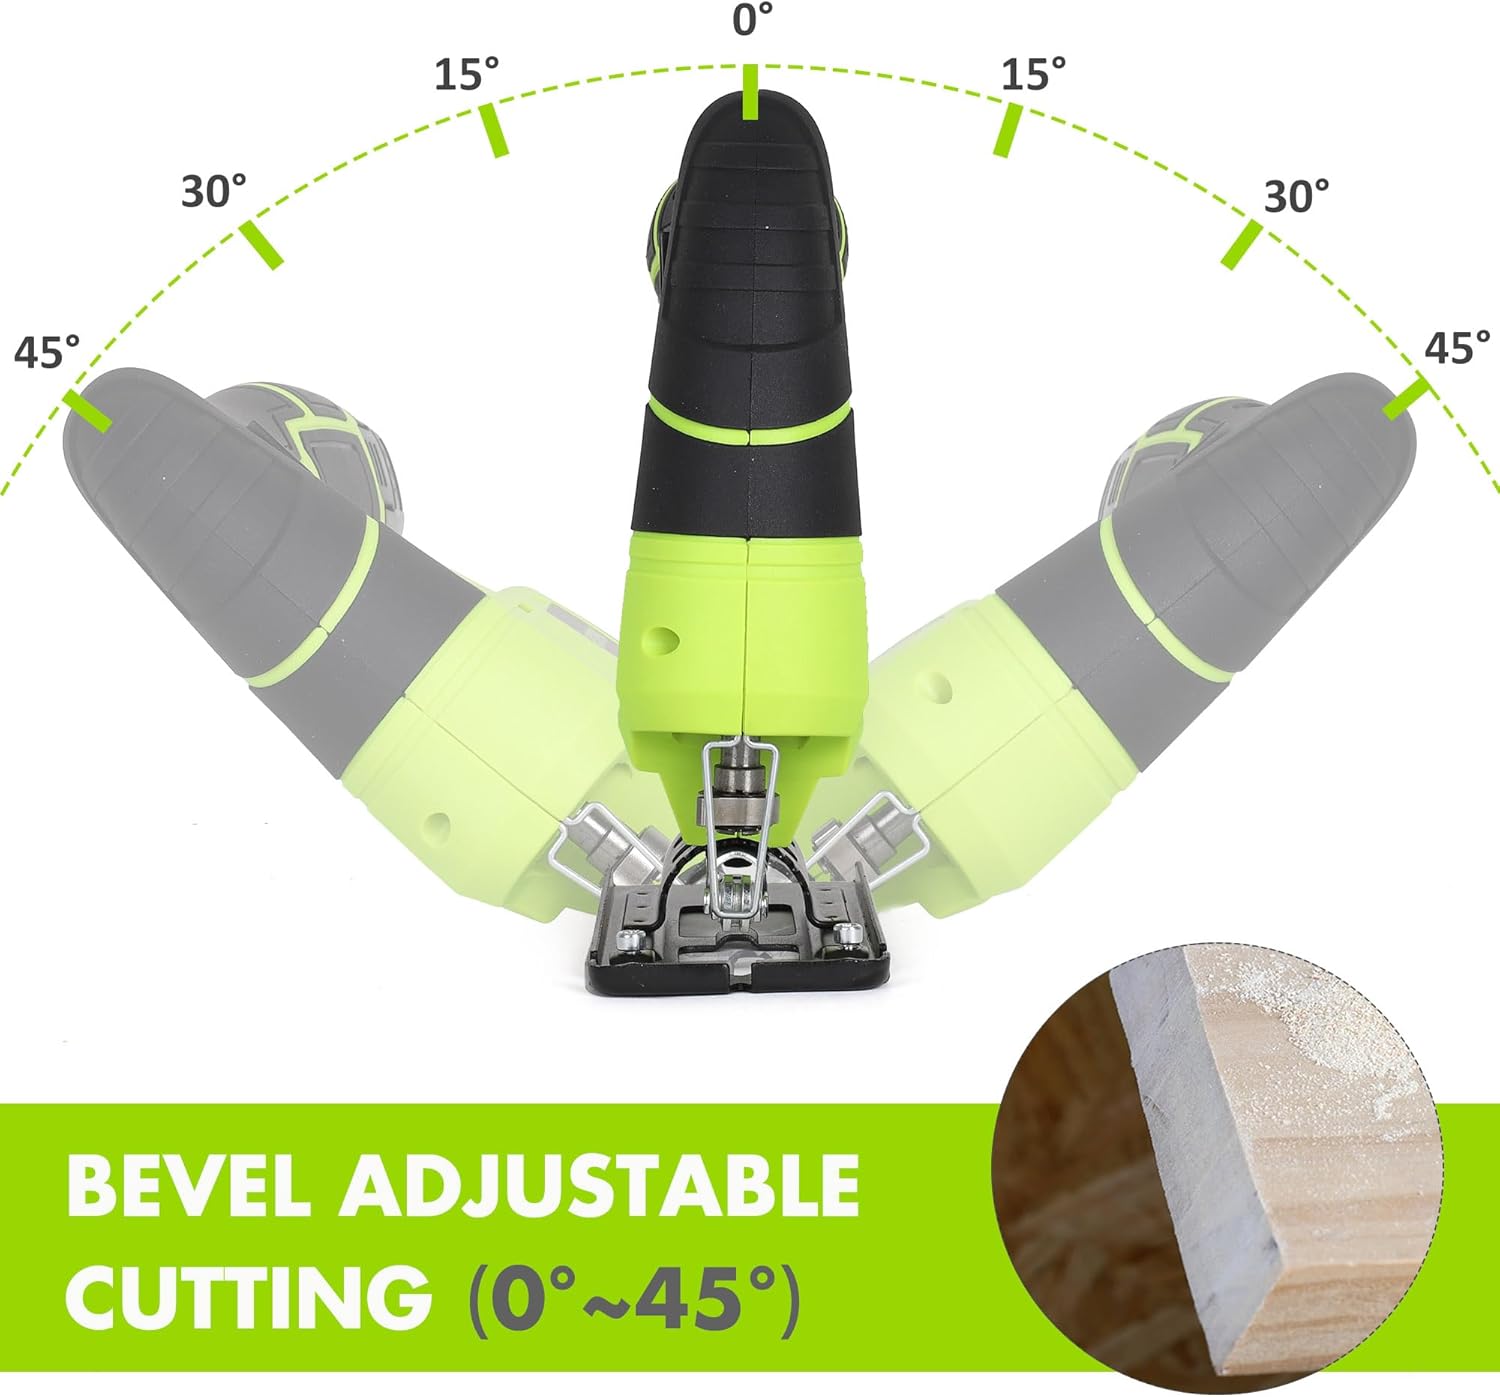
Figure 4.2: Diagram illustrating the adjustable base plate, showing bevel cutting angles from 0° to 45° left and right.
4.3 Using the Edge Guide
The included edge guide helps achieve precise straight cuts.
- Insert the edge guide into the slots on the base plate.
- Adjust the guide to the desired cutting width from the blade.
- Tighten the locking screw to secure the edge guide.
- Rest the edge guide against the edge of your workpiece to maintain a consistent cutting line.

Figure 4.3: The jig saw utilizing the edge guide to make a precise straight cut on a wooden board.
4.4 Built-in LED Light
The jig saw is equipped with a built-in LED light that illuminates the cutting area, improving visibility in dimly lit environments. The LED light activates automatically when the trigger is pressed.

Figure 4.4: Close-up of the jig saw's blade area, showing the built-in LED light illuminating the workpiece for improved visibility.
5. Maintenance
Regular maintenance ensures optimal performance and extends the life of your jig saw.
- Cleaning: After each use, clean the tool with a soft, damp cloth. Remove any sawdust or debris from the ventilation openings and around the blade clamp area. Do not use harsh chemicals or abrasive cleaners.
- Blade Inspection: Regularly inspect blades for sharpness and damage. Replace dull or damaged blades immediately to ensure efficient and safe cutting.
- Battery Care: Store batteries in a cool, dry place. Do not store fully discharged batteries for extended periods.
- Storage: When not in use, store the jig saw and its accessories in the provided blow-molded case, away from moisture and direct sunlight.
6. Troubleshooting
| Problem | Possible Cause | Solution |
|---|---|---|
| Saw does not start. | Battery not charged or not properly inserted. | Ensure battery is fully charged and securely inserted. |
| Blade not cutting efficiently. | Dull or incorrect blade for material. | Replace with a sharp, appropriate blade for the material. |
| Excessive vibration during operation. | Blade loose or bent; workpiece not secured. | Check blade for damage and ensure it is securely clamped. Secure workpiece firmly. |
| Difficulty removing battery. | Battery release mechanism stiff. | Apply firm, even pressure to the release button while pulling the battery. Ensure no debris is obstructing the mechanism. |
7. Specifications
| Feature | Detail |
|---|---|
| Brand | FASTPRO |
| Model Number | 2fd063b7-efe8-471e-893c-094e073fcf03 |
| Power Source | Battery Powered |
| Voltage | 12 Volts (DC) |
| No-Load Speed | 0-2,200 RPM |
| Battery Type | 12V 1.5Ah (included) |
| Product Dimensions | 32 x 27 x 11.99 cm |
| Item Weight | 2.04 kg |
| Handle Material | Nylon |
| Blade Material | High Speed Steel (for included blades) |
| Special Features | Adjustable Base Plate, Blow-Molded Case, Cordless Design, Built-in LED Light, Tool-Free Blade Change |
| Included Components | 1.5 Ah Battery, Charger, Storage Case, 10pcs Blades, Edge Guide |
8. Warranty and Support
For warranty information or technical support, please refer to the documentation included with your purchase or contact FASTPRO customer service directly. Keep your proof of purchase for any warranty claims.
For further assistance, please visit the official FASTPRO website or contact their customer support channels.
Ask a question about this manual
Ask about setup, troubleshooting, compatibility, parts, safety, or missing instructions. Manuals+ will review the question and use this page’s manual context to help answer it.