1. Introduction
Thank you for choosing the EVJUICION EV Charger. This manual provides essential information for the safe and efficient operation of your electric vehicle charger. Please read this manual thoroughly before use and retain it for future reference.
The EVJUICION EV Charger (Model EV-IEC-AC16-PV) is a portable 3.3 kW electric vehicle charging solution designed for convenience and safety. It features adjustable current settings, a delay timer, and robust weather resistance, making it suitable for various charging environments.
2. Safety Instructions
Always adhere to the following safety precautions to prevent injury, damage to the charger, or damage to your vehicle.
- Read All Instructions: Familiarize yourself with all operating procedures and safety warnings before using the charger.
- Proper Installation: Ensure the charger is installed and used in accordance with local electrical codes and regulations. If using the wall mount, ensure it is securely fastened to a suitable surface.
- Avoid Water Exposure: Although the charger is IP67 waterproof, avoid submerging it in water. Ensure the charging port on your vehicle is dry before connecting.
- Inspect Before Use: Before each use, inspect the charger cable, plug, and control box for any signs of damage, cracks, or wear. Do not use if damaged.
- Do Not Modify: Never attempt to open, disassemble, or modify the charger. This will void the warranty and may pose a safety risk.
- Children and Pets: Keep the charger out of reach of children and pets during operation and storage.
- Ventilation: Ensure adequate ventilation around the charger during operation to prevent overheating.
- Emergency Disconnect: In case of an emergency, immediately disconnect the charger from the power outlet and the vehicle.
3. Product Overview
The EVJUICION EV Charger is designed for efficient and safe charging of electric vehicles. It includes a control box with an integrated display, a Type 2 charging connector, and a UK 3-pin plug.
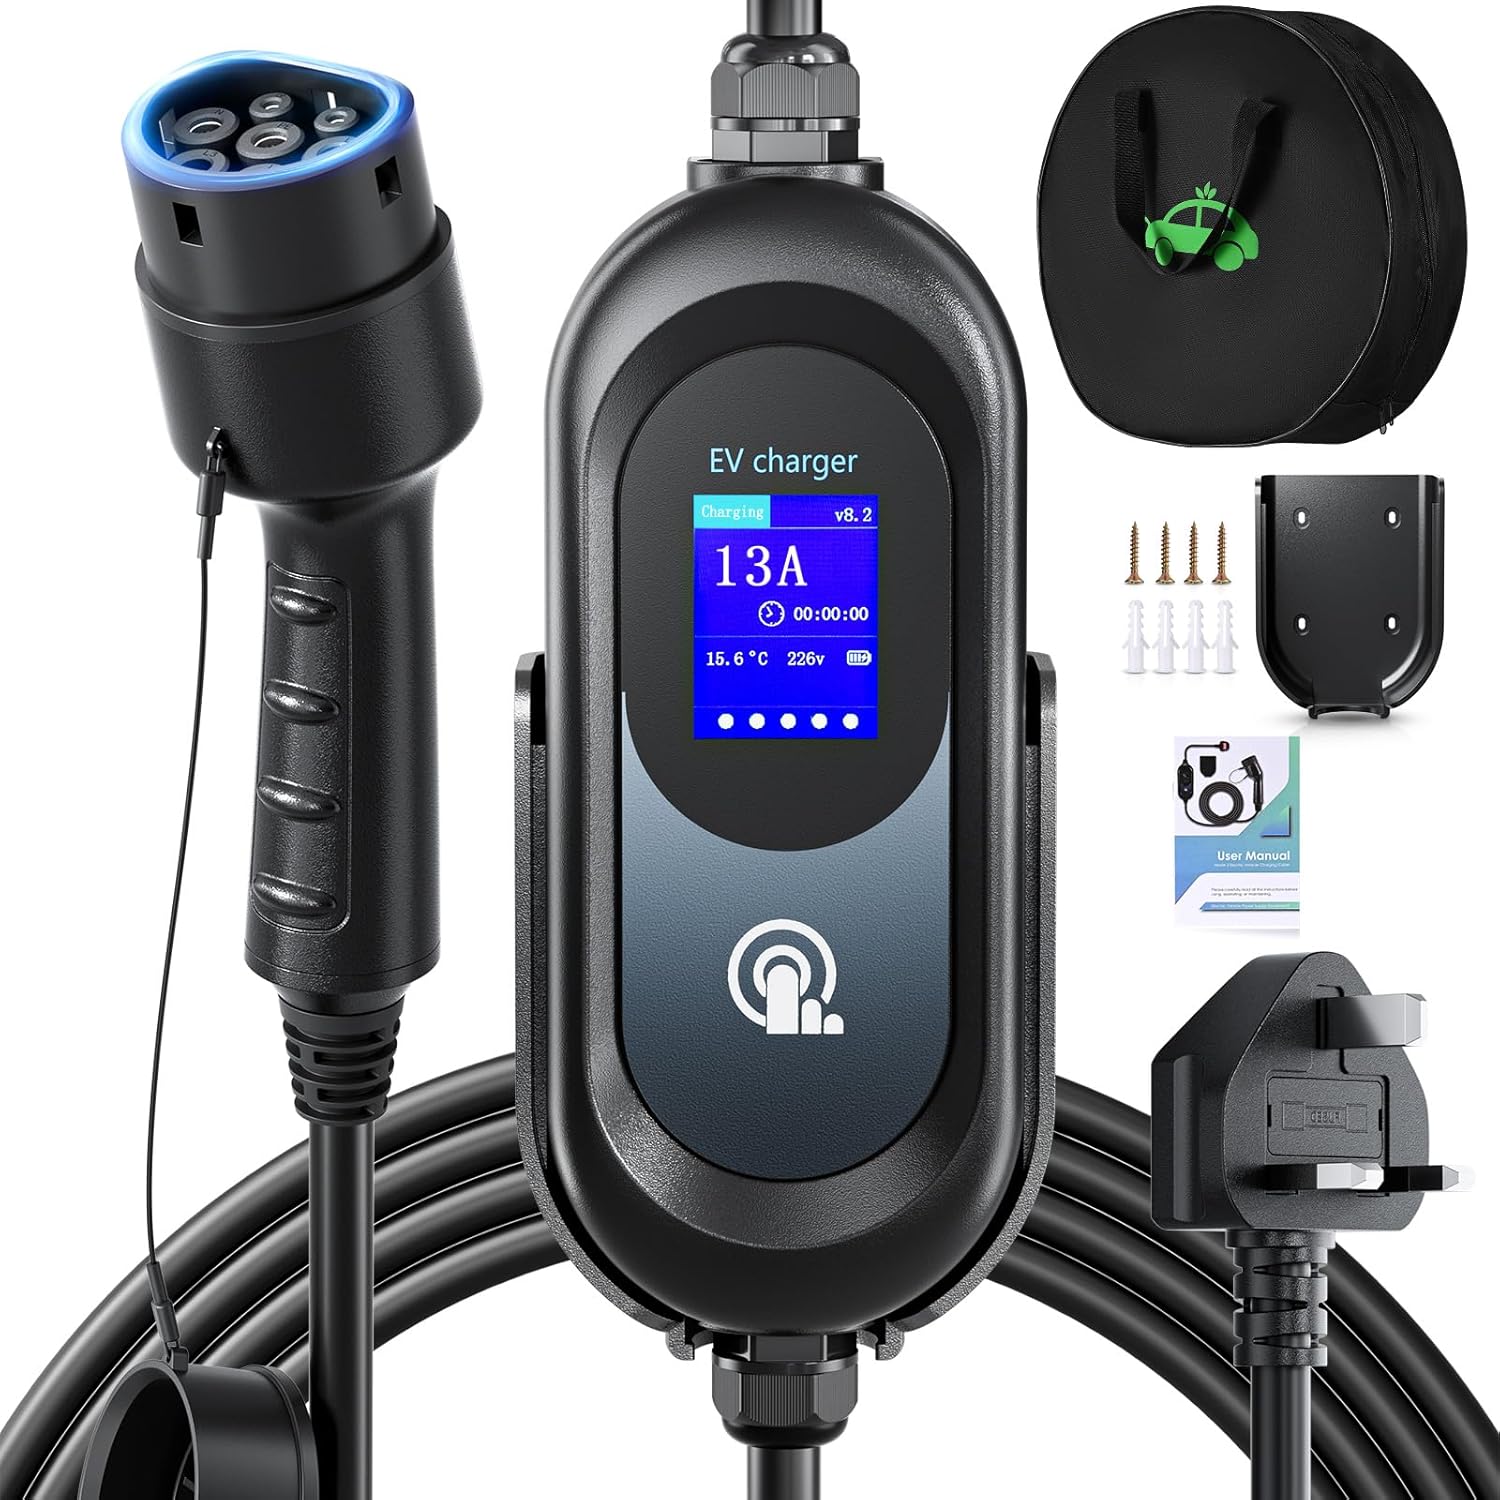
Image 3.1: Overview of the EVJUICION EV Charger and included accessories.
3.1. Package Contents
Verify that all items are present in the package:
- 1 x EV Charger (Control Box with Cable and Connectors)
- 1 x Charger Holster (Wall Mount Bracket)
- 1 x Storage Bag
- 1 x User Manual
- 4 x Screws
- 4 x Expansion Anchors

Image 3.2: Detailed view of the package contents and their respective quantities.
3.2. Key Features
- Adjustable Current: Selectable charging currents of 6A, 8A, 10A, or 13A to suit different power supplies and charging needs.
- Delay Timer: Program a delayed start for charging from 2 to 12 hours, ideal for off-peak electricity rates.
- Touch Control: Intuitive heat induction touch interface for easy setting adjustments.
- High Protection Rating: IP67 waterproof and dustproof, suitable for indoor and outdoor use in various weather conditions.
- Comprehensive Safety: Built-in protections against over/under voltage, overheating, overcurrent, leakage, short-circuit, surge, lightning, and ground damage.
- Universal Compatibility: Compatible with all European electric vehicles and plug-in hybrids that meet IEC 62196-2 standards.
4. Setup and Installation
4.1. Wall Mount Installation (Optional)
The included wall mount holder allows for secure storage of the charger control box, preventing wear and tear on domestic sockets and keeping the charging area tidy.
- Choose Location: Select a suitable, sturdy wall near your desired charging location, ensuring it is within reach of a standard UK 3-pin power outlet.
- Mark Holes: Place the charger holster against the wall and mark the positions for the four screw holes.
- Drill Holes: Use an appropriate drill bit to drill holes at the marked positions. Insert the expansion anchors into the drilled holes.
- Secure Holster: Align the holster with the anchors and secure it to the wall using the provided screws. Ensure it is firmly attached.
- Mount Charger: Slide the EV charger control box into the mounted holster.

Image 4.1: Illustration of the wall mount installation process, showing correct and incorrect mounting methods.
5. Operating Instructions
The EVJUICION EV Charger features an intuitive touch control interface for managing charging parameters.
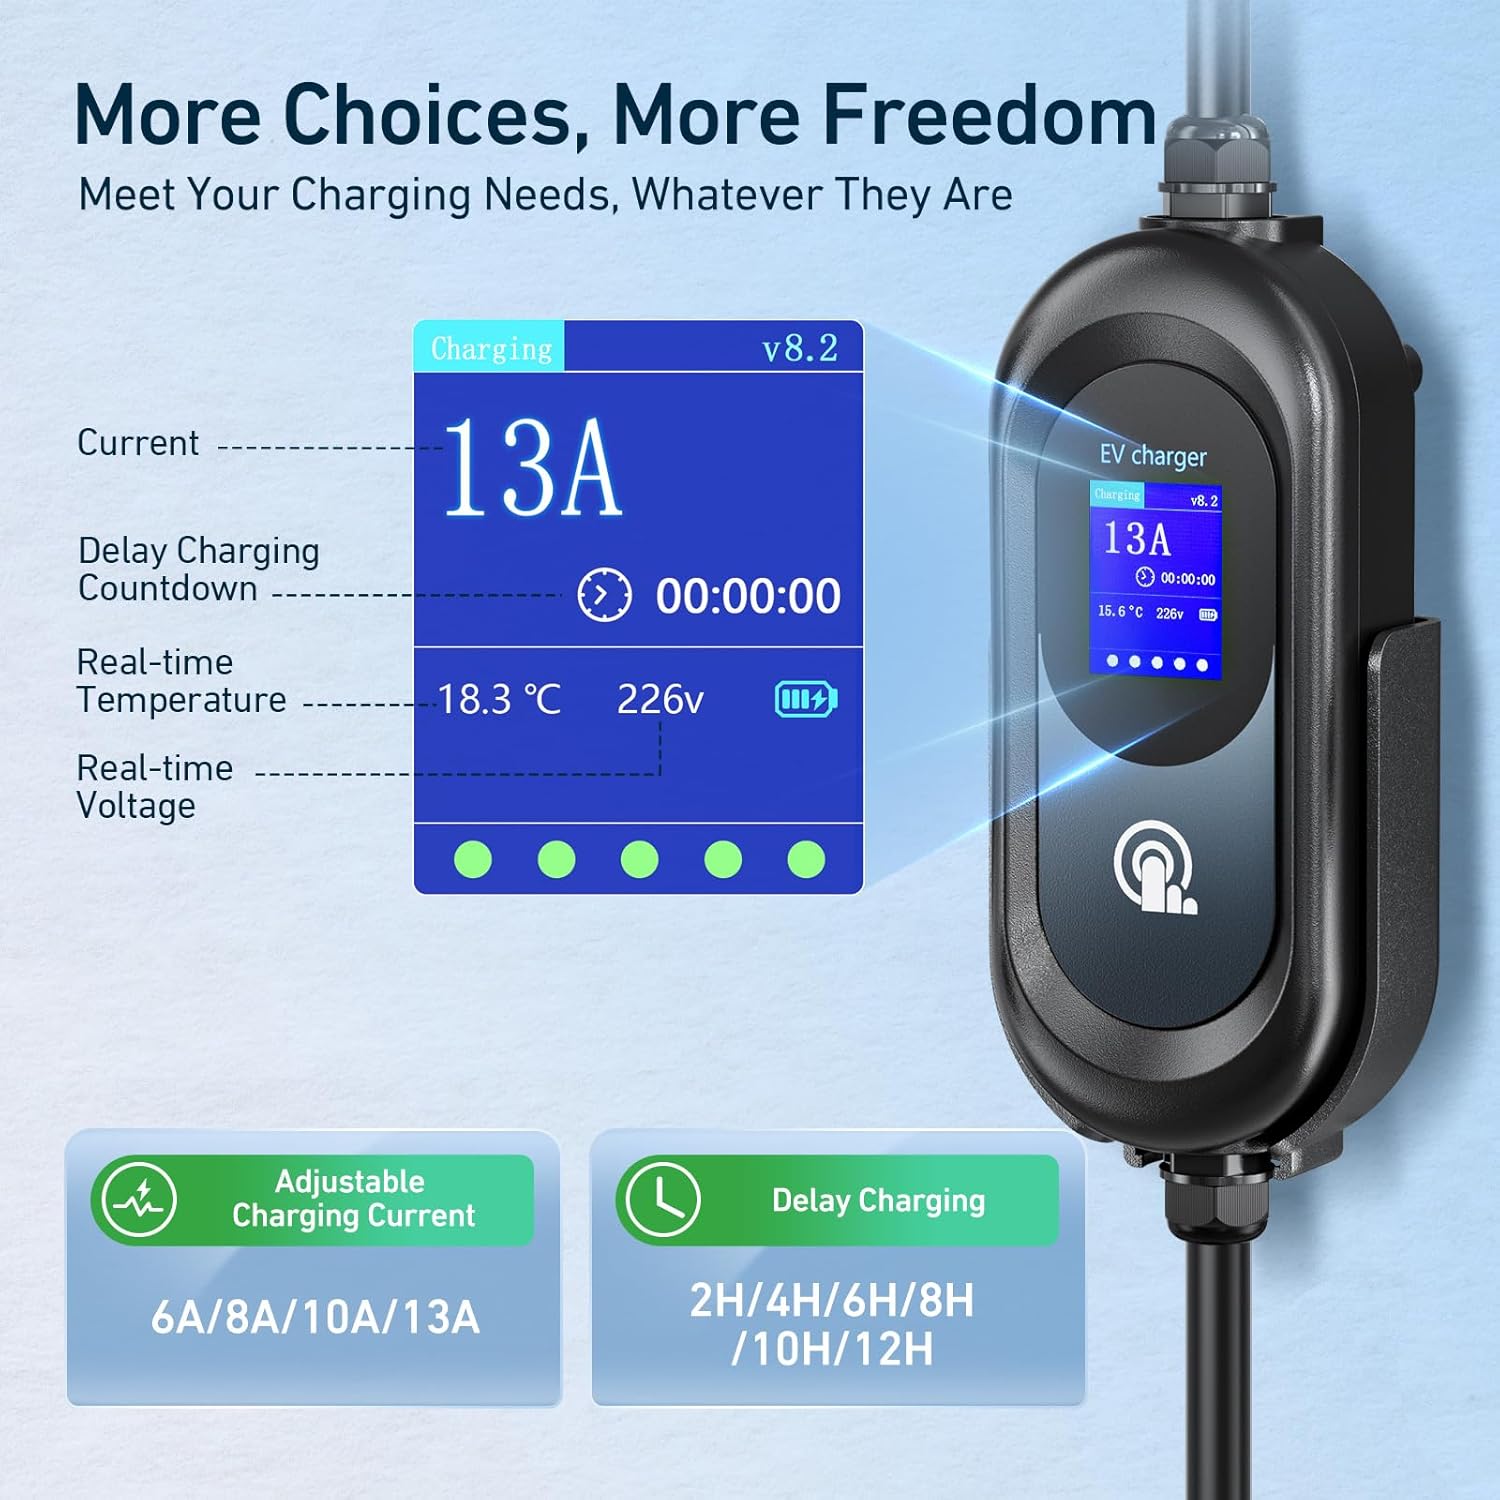
Image 5.1: Charger display interface and available settings for current and delay.
5.1. Basic Charging Procedure
- Connect to Power: Plug the UK 3-pin plug into a standard 230V AC power outlet. The charger display will illuminate.
- Connect to Vehicle: Insert the Type 2 charging connector into your vehicle's charging port. Ensure a secure connection.
- Start Charging: The charger will typically begin charging automatically with the last saved current setting.
- Monitor Display: The display will show the current charging status, including current (A), temperature, and voltage (V).
- Stop Charging: To stop charging, first disconnect the Type 2 connector from your vehicle, then unplug the charger from the power outlet.
5.2. Adjusting Charging Current
The charger allows you to select from 6A, 8A, 10A, or 13A. This setting is remembered for subsequent charges.
- Ensure Disconnected: The charger must be disconnected from the vehicle to adjust the current.
- Short Press: With the charger plugged into the wall but not the vehicle, briefly touch the control button on the display to cycle through the available current settings (6A, 8A, 10A, 13A).
- Long Press: Once your desired current is displayed, press and hold the control button for a few seconds until the setting is saved.
- Connect to Vehicle: You can now connect the charger to your vehicle to begin charging with the selected current.
5.3. Setting a Delay Timer
The delay timer allows you to schedule charging to start after a set number of hours (2-12 hours). This setting must be configured each time you wish to use it.
- Ensure Disconnected: The charger must be disconnected from the vehicle to set the delay timer.
- Short Press: With the charger plugged into the wall but not the vehicle, briefly touch the control button to cycle through the delay timer options (2H, 4H, 6H, 8H, 10H, 12H).
- Long Press: Once your desired delay time is displayed, press and hold the control button for a few seconds until the setting is saved.
- Connect to Vehicle: Connect the charger to your vehicle. The display will show a countdown, and charging will begin automatically after the set delay.

Image 5.2: Utilizing the delay timer for scheduled charging during off-peak hours.
6. Maintenance
Regular maintenance ensures the longevity and safe operation of your EV charger.
- Cleaning: Disconnect the charger from all power sources before cleaning. Use a soft, dry cloth to wipe the control box and cables. Do not use abrasive cleaners or solvents.
- Cable Inspection: Periodically inspect the entire length of the charging cable for cuts, fraying, or kinks. Ensure the connectors are clean and free of debris.
- Storage: When not in use, store the charger in its provided bag in a cool, dry place, away from direct sunlight and extreme temperatures. Use the wall mount to keep the control box secure.
- Avoid Damage: Do not drive over the cable or subject it to excessive tension or sharp bends.
7. Troubleshooting
If you encounter issues with your EVJUICION EV Charger, refer to the following common problems and solutions:
| Problem | Possible Cause | Solution |
|---|---|---|
| Charger not powering on | No power from outlet; damaged plug/cable | Check power outlet with another device. Inspect plug and cable for damage. |
| Charging not starting | Vehicle not properly connected; delay timer active; fault detected | Ensure Type 2 connector is fully inserted. Check if delay timer is set. Disconnect and reconnect. Check for error codes on display. |
| Error code on display | Internal fault; external issue (e.g., over/under voltage) | Note the error code. Disconnect charger from both power and vehicle, wait 5 minutes, then reconnect. If error persists, contact support. |
| Slow charging speed | Current setting too low; vehicle limitation | Adjust the charging current to a higher setting (e.g., 13A) if your electrical circuit supports it. Consult your vehicle's manual for charging capabilities. |
If the problem persists after attempting these solutions, please contact customer support.
8. Specifications
Technical details for the EVJUICION EV Charger Model EV-IEC-AC16-PV.
| Feature | Detail |
|---|---|
| Model Number | EV-IEC-AC16-PV |
| Brand | EVJUICION |
| Input Voltage | 230 Volts AC |
| Output Voltage | 230 Volts AC |
| Max Power Output | 3.3 kW |
| Adjustable Current | 6A / 8A / 10A / 13A |
| Cable Length | 6 meters |
| Connector Type | Type 2 (IEC 62196-2) |
| Power Plug Type | UK 3-pin plug |
| IP Rating | IP67 (Waterproof and Dustproof) |
| Operating Temperature | -25°C to +50°C |
| Certifications | CE, TÜV, UKCA |
| Product Dimensions (Control Box) | Approx. 38P x 10l x 38H cm |

Image 8.1: The charger's weather resistance, suitable for various outdoor conditions.

Image 8.2: Durability features including pure copper cable, silver-plated contacts, and resistance to physical stress.

Image 8.3: Overview of the charger's comprehensive safety protection mechanisms and certifications.
9. Warranty and Support
EVJUICION offers a one-year unconditional return and exchange service for products with quality issues. If you experience any quality-related problems with your product within one year of purchase, please contact us directly via Amazon. We are committed to providing a replacement or a full refund.
For further assistance, troubleshooting, or inquiries not covered in this manual, please reach out to EVJUICION customer support through your Amazon purchase history.