Leo Jaymz IB 4S
Leo Jaymz DIY Electric Bass Guitar Kit - IB 4S Instruction Manual
Model: IB 4S
1. Introduction
Welcome to the world of DIY instrument building with the Leo Jaymz IB 4S Electric Bass Guitar Kit. This comprehensive kit provides all the necessary components to assemble your own 4-string electric bass guitar, featuring a roasted ash body, roasted maple neck, and laurel wood fingerboard. Designed for ease of assembly, this kit utilizes plug-in connections, eliminating the need for soldering.
2. Components Overview
Your Leo Jaymz IB 4S kit includes all parts required for assembly. Please verify that all components listed below are present before beginning assembly.

Figure 2.1: Complete Kit Contents
This image displays all the components included in the Leo Jaymz DIY Electric Bass Guitar Kit, such as the roasted ash body, roasted maple neck, tuning pegs, bridge, pickups, control knobs, wiring harness, guitar strap, audio cable, and various screws and tools.
2.1. Main Components
- Roasted Ash Body: Pre-drilled with cavities for pickups, controls, and neck attachment.
- Roasted Maple Neck: Features a laurel wood fingerboard with 24 frets and 6mm pearl dot inlays. The headstock is shaped and pre-drilled for machine heads.
- Tuning Pegs: Four black alloy tuning pegs for the headstock.
- Bridge: Black bass bridge for string anchoring.
- Pickups: Two bass pickups designed for the pre-routed body cavities.
- Control Knobs and Hardware: Black control knobs and associated hardware for tone and volume.
- Wiring Harness: Pre-wired with pluggable connectors for easy, solder-free installation.
2.2. Accessories and Tools
- Guitar Strap: Included for comfortable playing.
- Audio Cable: For connecting the bass to an amplifier.
- Guitar Strings: A set of 4 nickel bass strings.
- Copper Foil Tape: Thickened single-sided tape for shielding cavities to reduce noise.
- Truss Rod Cover: For the headstock.
- Allen Wrench: For truss rod adjustments and other fittings.
- Spring Claw & Screw Kits: Various screws and springs for assembly.
- Back Cover: For the control cavity.

Figure 2.2: Guitar Accessories
This image provides a closer look at the various accessories and smaller components that come with the kit, such as the audio cable, guitar strings, copper foil tape, truss rod cover, tuning pegs, allen wrench, bridge, switch and knob assembly, pickups, back cover, guitar strap, and various screw kits.
3. Assembly Instructions
The Leo Jaymz IB 4S kit is designed for straightforward assembly with plug-in connections, eliminating the need for soldering. Follow these steps carefully.
3.1. Neck and Body Attachment
- Carefully align the neck with the neck pocket on the body. Ensure a snug fit.
- Secure the neck to the body using the provided neck plate and screws. Tighten screws evenly to avoid stress on the wood.

Figure 3.1: Roasted Maple Neck
This image shows the roasted maple neck from multiple angles, highlighting its construction and the laurel wood fingerboard.

Figure 3.2: Roasted Ash Guitar Body
This image displays the roasted ash guitar body, showcasing its pre-drilled cavities for pickups and controls, and the precise screw holes for easy assembly.
3.2. Installing Tuning Pegs and Bridge
- Install the four tuning pegs into the pre-drilled holes on the headstock. Secure them with the provided screws and bushings.
- Mount the bridge onto the body using the designated screw holes. Ensure it is straight and securely fastened.
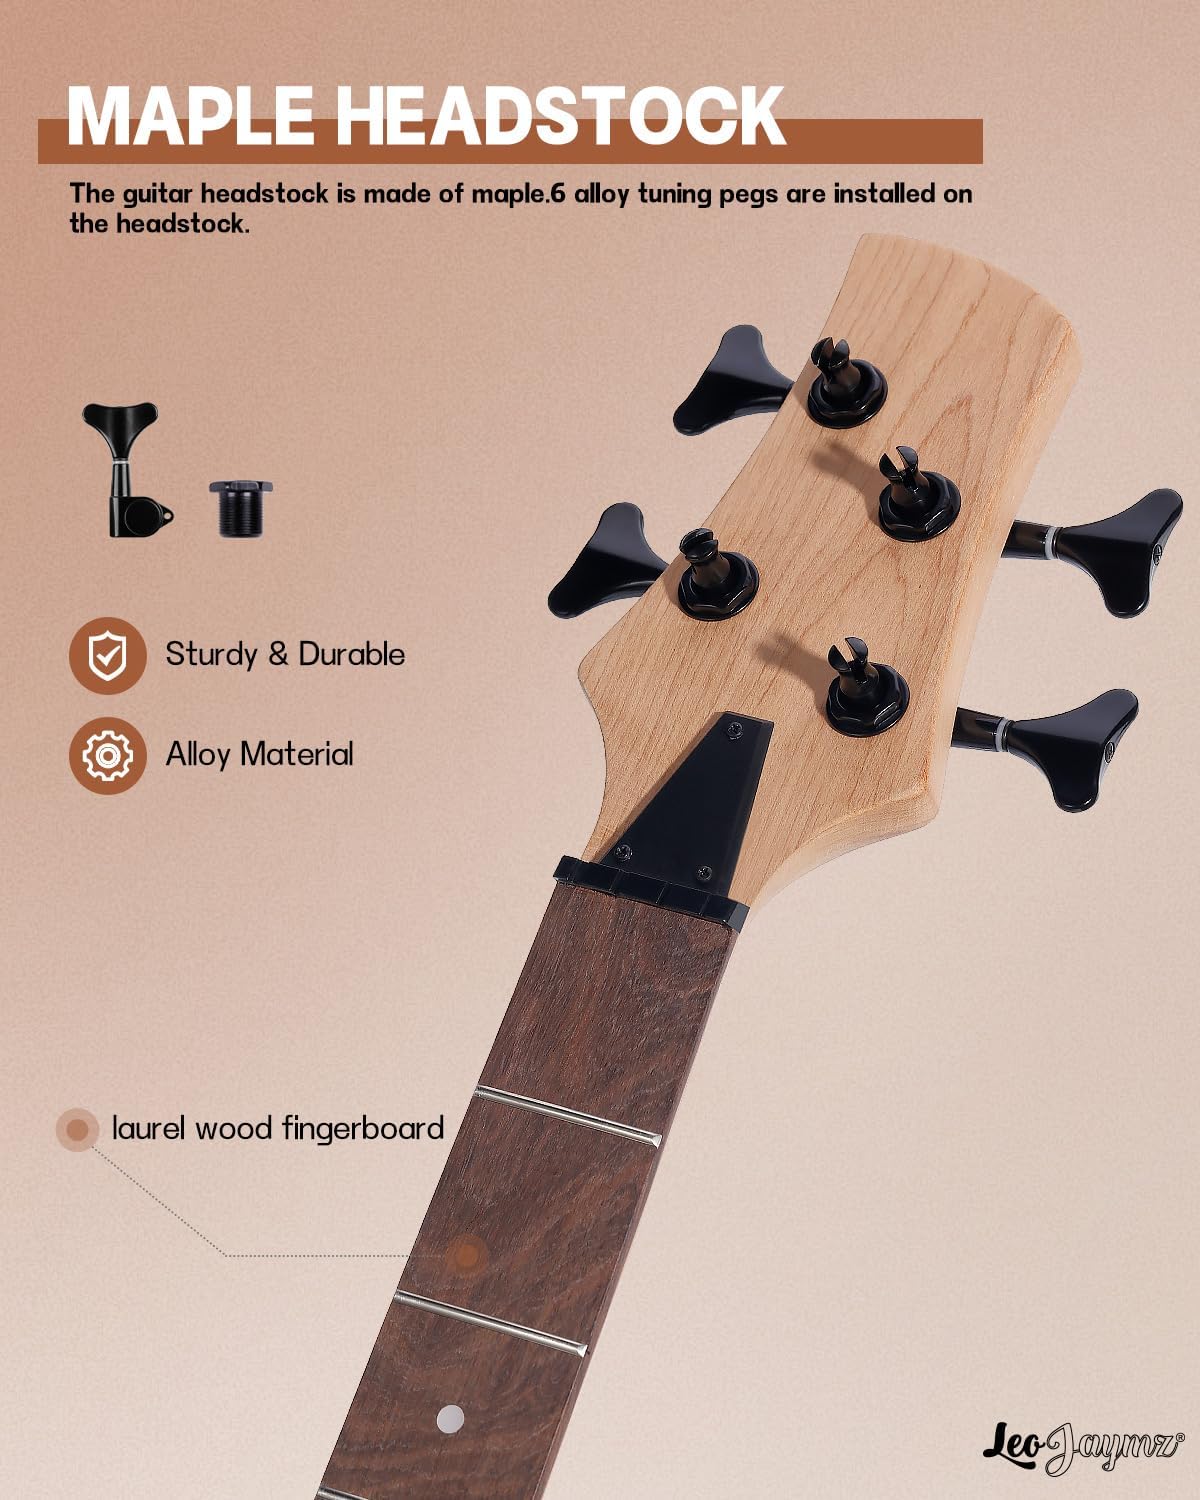
Figure 3.3: Maple Headstock with Tuning Pegs
This image shows a detailed view of the maple headstock with the tuning pegs properly installed, emphasizing their sturdy alloy construction.
3.3. Wiring and Electronics
The wiring system features plug-in connections for simplified assembly.
- Install the pickups into their respective cavities.
- Connect the pickup wires to the main wiring harness using the plug-in connectors. Ensure connections are firm.
- Install the control knobs and switch into the pre-drilled holes on the body. Connect their wires to the harness.
- Optional: Apply the provided copper foil tape to the inside of the pickup and control cavities. This helps reduce electromagnetic interference and noise.
- Once all wiring is connected, carefully place the wiring harness and components into the control cavity.
- Attach the back cover to the control cavity using the small screws.

Figure 3.4: Plug-and-Play Wiring
This image illustrates the simple plug-in connection system for the wiring, highlighting that no soldering is required for assembly.
3.4. Stringing and Final Touches
- Install the bass strings through the bridge and over the nut, winding them onto the tuning pegs.
- Attach the guitar strap buttons to the body. The kit includes an upgraded strap buckle for easy removal.
- Perform initial tuning and check all connections.

Figure 3.5: Upgraded Strap Buckle and Brand Logo
This image highlights the upgraded guitar strap buckle, designed for easier attachment and removal, and also shows the Leo Jaymz brand logo on the guitar body.
4. Operating Your Bass Guitar
Once assembled, your Leo Jaymz IB 4S bass guitar operates like any standard electric bass.
- Tuning: Use the tuning pegs to adjust the pitch of each string. Standard bass tuning is E-A-D-G (from thickest to thinnest string).
- Connecting to an Amplifier: Use the provided audio cable to connect the bass's output jack (6.35mm) to your bass amplifier.
- Volume and Tone Controls:
- Volume Knob: Controls the overall output level of the guitar.
- Tone Knob: Adjusts the treble frequencies, allowing you to brighten or darken your sound.
- Playing: Practice proper posture, fretting technique, and plucking/picking methods to produce sound.
5. Maintenance
Regular maintenance will ensure the longevity and optimal performance of your bass guitar.
- Cleaning: Wipe down the body, neck, and strings with a soft, dry cloth after each use to remove sweat and grime.
- String Replacement: Replace strings regularly (e.g., every 1-3 months depending on usage) to maintain tone and playability.
- Truss Rod Adjustment: The truss rod, accessible via the headstock, allows for neck relief adjustments. If you notice excessive bowing or back-bowing of the neck, use the provided Allen wrench for minor adjustments. Consult a professional if unsure.
- Fretboard Care: Periodically clean and condition the laurel wood fingerboard to prevent drying and cracking.
- Storage: Store the bass in a stable environment, away from extreme temperature changes and humidity fluctuations.
6. Troubleshooting
Here are some common issues and their potential solutions.
| Problem | Possible Cause | Solution |
|---|---|---|
| No sound from amplifier |
|
|
| Excessive hum or buzzing |
|
|
| Strings buzzing on frets |
|
|
7. Specifications
| Feature | Detail |
|---|---|
| Model Number | IB 4S |
| Brand | Leo Jaymz |
| Instrument Type | Electric Bass Guitar (DIY Kit) |
| Number of Strings | 4 |
| Body Material | Roasted Ash Wood |
| Neck Material | Roasted Maple |
| Fretboard Material | Laurel Wood (24 frets) |
| String Material | Nickel |
| Connector Type | 6.35mm Jack |
| Item Weight | 13.52 pounds (6.15 kg) |
| Package Dimensions | 36.1 x 23.5 x 3.6 inches |
| First Available Date | March 7, 2024 |
8. Warranty and Support
Information regarding specific warranty terms or direct customer support contacts for the Leo Jaymz IB 4S DIY Electric Bass Guitar Kit was not provided in the product data. Please refer to the seller's or manufacturer's official website for the most up-to-date warranty information and support channels.
For general inquiries or assistance with assembly, you may also visit the Leo Jaymz Store on Amazon.
Related Documents - IB 4S
 |
Leo Jaymz BC Electric Guitar DIY Kit Assembly Instructions Comprehensive guide for assembling the Leo Jaymz BC Electric Guitar DIY Kit, covering safety instructions, component identification, assembly steps, setup, and tuning. |
 |
Leo Jaymz Hollow Body DIY Kits User Manual A comprehensive user manual for assembling and setting up a Leo Jaymz Hollow Body DIY Bass Guitar Kit. Includes safety instructions, component lists, assembly steps, wiring diagrams, and setup guides for truss rod, string action, and intonation. |
 |
Leo Jaymz 2025 Musical Instrument Catalog Explore the 2025 Leo Jaymz catalog featuring high-quality electric guitars, basses, amplifiers, and DIY kits. Discover the history and craftsmanship behind the brand. |
 |
Fender Guitars Owner's Manual: History, Models, Setup, and Care Explore the rich history, iconic models, detailed setup guides, and essential maintenance tips for Fender guitars in this comprehensive owner's manual. |
Ask a question about this manual
Ask about setup, troubleshooting, compatibility, parts, safety, or missing instructions. Manuals+ will review the question and use this page’s manual context to help answer it.