1. Product Overview
The HBN BNDS-X2 Digital Timer Switch is designed for precise and automated control of electrical devices. It features easy DIN rail installation, flexible programming options for daily and weekly schedules, and a robust design suitable for various applications. This timer helps manage power consumption efficiently and enhances convenience in both indoor and outdoor settings.

Front view of the HBN Digital Timer Switch BNDS-X2, showing the LCD display and control buttons.

Back view of the HBN Digital Timer Switch BNDS-X2, displaying model information and electrical ratings.

Examples of the timer switch in use, including controlling outdoor lighting and managing power for household devices.
2. Technical Specifications
| Feature | Specification |
|---|---|
| Model Number | BNDS-X2 |
| Brand | HBN |
| Color | White |
| Material | Plastic |
| Product Dimensions (L x W x H) | 6.5 x 3.5 x 8.5 cm (2.56 x 1.38 x 3.35 inches) |
| Item Weight | 130 g (0.29 lbs) |
| Max. Switching Capacity | 16A / 3680W |
| Voltage / Frequency | 230V / 50Hz |
| Minimum Switching Time | 1 Minute |
| Number of Programs | 8 ON/OFF Programs |
| Weekly Combinations | 15 different combinations |
| Features | Random function, Manual control (ON, AUTO, OFF), Summer/Winter time, 24-hour mode, Backup battery |
| Protection Class | IP20 |

Diagram illustrating the precise dimensions of the timer switch for installation planning.
3. Safety Instructions
- Electrical Safety: Installation should only be performed by a qualified electrician or in accordance with local electrical codes. Ensure power is disconnected before installation or maintenance.
- Indoor Use (IP20): This device has an IP20 rating, meaning it is protected against solid objects larger than 12.5mm but has no protection against water. It is intended for indoor use only and must not be exposed to moisture, rain, or splashing water.
- Overload Protection: Do not exceed the maximum load capacity of 16A / 3680W. Overloading can cause damage to the device and pose a fire hazard.
- Child Safety: The timer includes a child lock feature to prevent accidental changes to settings. Keep the device out of reach of children.
- Operating Environment: Operate the device within specified temperature and humidity ranges. Avoid extreme temperatures or dusty environments.
4. Installation
The HBN BNDS-X2 Digital Timer Switch is designed for easy mounting on a standard 35mm DIN rail within a fuse box or distribution board.
4.1 Mounting on DIN Rail
- Ensure the main power supply to the distribution board is switched off at the circuit breaker.
- Locate an available space on the DIN rail.
- Align the timer switch with the DIN rail and press it firmly until it clicks into place.
- Ensure the protective cover over the display and buttons is securely in place after installation to prevent accidental adjustments.
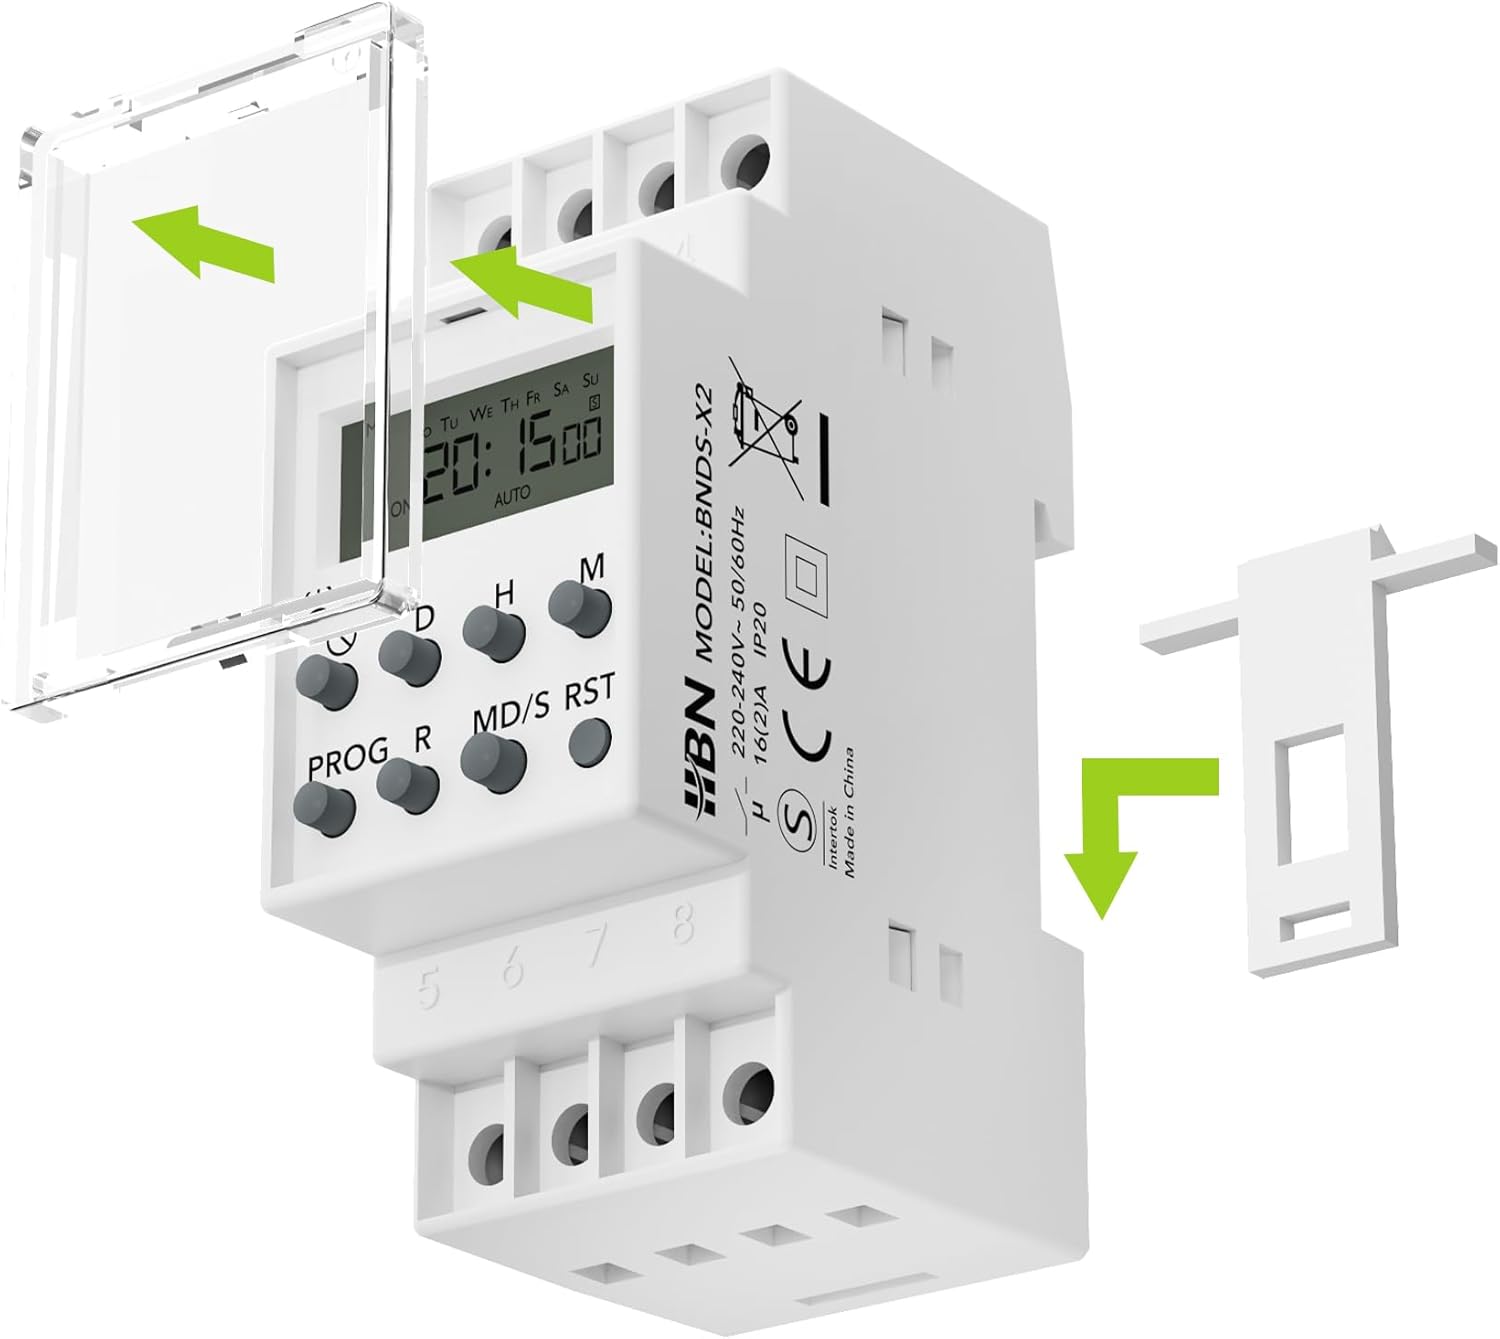
Visual guide for mounting the timer switch onto a standard DIN rail, including removal of the protective cover.
4.2 Wiring Diagram
Follow the wiring diagram carefully. Incorrect wiring can damage the device or connected appliances.
- Terminal N (1): Connect to the Neutral conductor.
- Terminal L (2): Connect to the Phase conductor (220VAC).
- Terminal COM (7): Common terminal for the relay. Connect the phase from L (2) to COM (7) if controlling a switched phase.
- Terminal NO (8): Normally Open contact. Connect this to the load (e.g., lamp, appliance). The circuit will be closed when the timer switches ON.
- Terminal NC (6): Normally Closed contact. This terminal is closed when the timer is OFF and opens when the timer switches ON. (Not typically used for standard ON/OFF control).
- Terminals 3 & 4: Test inputs for relay triggering (shorting 3 and 4 will trigger the relay).
- Terminal 5: No function.

Wiring schematic showing connections for Neutral (N), Phase (L), Common (COM), and Normally Open (NO) terminals to control a load.
After wiring, ensure all connections are secure and insulated before restoring power.
5. Initial Setup
5.1 First Use and Backup Battery
Upon first use, the internal backup battery may be low. Connect the timer to power for at least 30 minutes to charge the battery. This battery retains your programmed settings during power outages.
5.2 Setting Current Time and Day
- Press the CLOCK button (often indicated by a clock icon) to enter time setting mode.
- Press the D (Day) button to set the current day of the week.
- Press the H (Hour) button to set the current hour (24-hour format).
- Press the M (Minute) button to set the current minute.
- Press the CLOCK button again to exit time setting mode and save the changes.
The display will show the current time and day. If the display is blank, ensure the device is powered and the backup battery has sufficient charge.
6. Operating Instructions
The timer allows for up to 8 ON/OFF programs with various weekly combinations.
6.1 Programming ON/OFF Times
- Press the PROG button to enter programming mode. The display will show "1 ON".
- Press D to select the day(s) for the first ON program. You can cycle through 15 different day combinations (e.g., daily, weekdays, weekends, specific days).
- Press H to set the hour for the first ON program.
- Press M to set the minute for the first ON program.
- Press PROG again. The display will show "1 OFF". Repeat steps 2-4 to set the OFF time for the first program.
- Continue pressing PROG to set up to 8 ON/OFF programs (2 ON/OFF times per program). Each press will cycle through "2 ON", "2 OFF", "3 ON", etc., up to "8 OFF".
- After setting all desired programs, press the CLOCK button to exit programming mode and return to the current time display.

Visual representation of the timer's display during programming, highlighting ON/OFF states and day indicators.
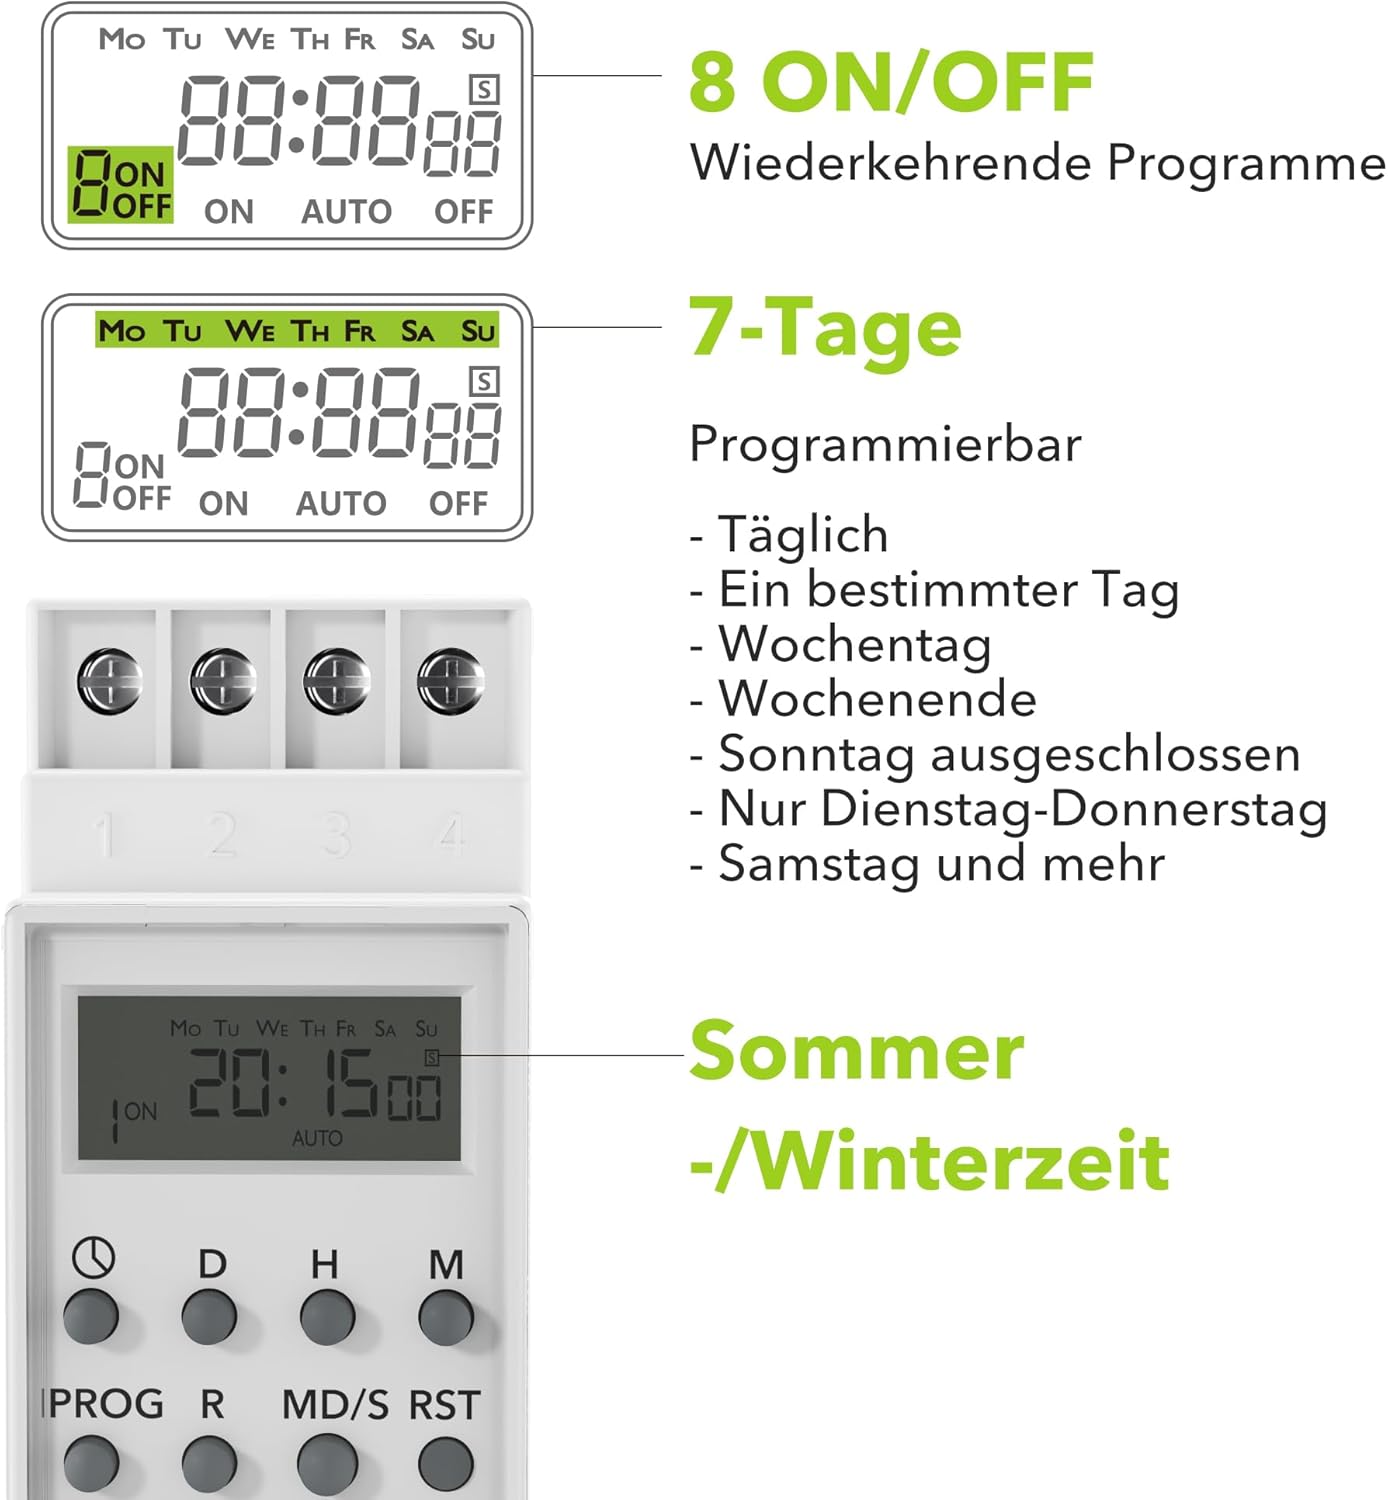
Examples of the 7-day programming options, including daily, specific days, weekdays, and weekends.
6.2 Manual Control (ON/AUTO/OFF)
Press the ON/AUTO/OFF button to cycle through the manual control modes:
- ON: The connected device will remain continuously ON, overriding all programmed settings.
- AUTO: The timer will operate according to the programmed ON/OFF times. This is the standard operating mode.
- OFF: The connected device will remain continuously OFF, overriding all programmed settings.
6.3 Summer/Winter Time Adjustment
To adjust for Daylight Saving Time (Summer/Winter time):
- Press and hold the CLOCK button.
- While holding CLOCK, press the MD/S button (often labeled with a sun/snowflake icon) to toggle between standard time and daylight saving time (+1 hour).
6.4 Random Function
The random function adds a random delay (typically 2-32 minutes) to programmed ON/OFF times, making it appear as if someone is home. This is useful for security purposes.
- Press the R (Random) button to activate or deactivate the random function. An "R" or similar indicator will appear on the display when active.
7. Maintenance
- Cleaning: Wipe the device with a soft, dry cloth. Do not use abrasive cleaners or solvents. Ensure no liquids enter the device.
- No User-Serviceable Parts: The timer switch contains no user-serviceable parts. Do not attempt to open or repair the device yourself. Refer all servicing to qualified personnel.
- Storage: If storing the device for an extended period, ensure it is kept in a dry, cool place away from direct sunlight.
8. Troubleshooting
| Problem | Possible Cause | Solution |
|---|---|---|
| Display is blank. | No power supply; Backup battery is depleted. | Check power connections. Connect the timer to power for at least 30 minutes to charge the backup battery. |
| Programs are not running. | Timer is in ON or OFF manual mode; Incorrect programming; Random function is active. | Press ON/AUTO/OFF until "AUTO" is displayed. Review and correct programmed times. Deactivate random function if not desired. |
| Time or programs are lost after power outage. | Backup battery is depleted or faulty. | Ensure the timer is connected to power for sufficient time to charge the backup battery. If the issue persists, the battery may need replacement (contact support). |
| Device does not respond to button presses. | Child lock is active; Device malfunction. | Refer to the manual for child lock deactivation (usually a combination of buttons). If unresponsive, try a full reset. |
8.1 Full Reset
If the device malfunctions or you wish to clear all settings, perform a full reset:
- Locate the small RST (Reset) button, usually recessed to prevent accidental presses.
- Use a pointed object (e.g., a paperclip) to press the RST button. The display will clear, and all settings will be reset to factory defaults.
- After resetting, you will need to set the current time and reprogram all desired ON/OFF times.
9. Warranty and Support
HBN products are manufactured to high-quality standards. This product is covered by a standard warranty in accordance with local consumer protection laws. For specific warranty terms, please refer to your purchase documentation or the seller's policy.
If you encounter any issues or require technical assistance, please contact HBN customer support through the retailer where you purchased the product or visit the official HBN website for contact information.
Please have your model number (BNDS-X2) and purchase details ready when contacting support.


