Introduction
This instruction manual provides essential information for the installation and handling of the ONN 100012588 TV Repair Parts Kit, Version 3. This kit is designed to replace specific components within compatible ONN television models, restoring functionality. It is intended for use by qualified technicians or individuals with advanced knowledge of electronics repair. Proper handling and installation are crucial for safety and optimal performance.
What's Included
The ONN 100012588 TV Repair Parts Kit - Version 3 typically includes the following components. Please verify the contents of your package against this list:
- Main Board: Part numbers such as M21072-MT, M22219-MT, M22177-MT, M22214-MT, 515C90100M13, M22218-MT, M22176-MT. This board processes video and audio signals and manages overall TV functions.
- Power Supply Board: Part number 514C7001M21. This board regulates and supplies power to all components of the television.
- T-Con Board: Part numbers such as RUNTK0529FVZA, RUNTK0334FVYR, RUNTK6396TPZC. The T-Con (Timing Controller) board processes signals from the main board to the LCD panel.
- WiFi Module: Part numbers such as 1246663, WC5EM2601F. This module enables wireless network connectivity for the television.
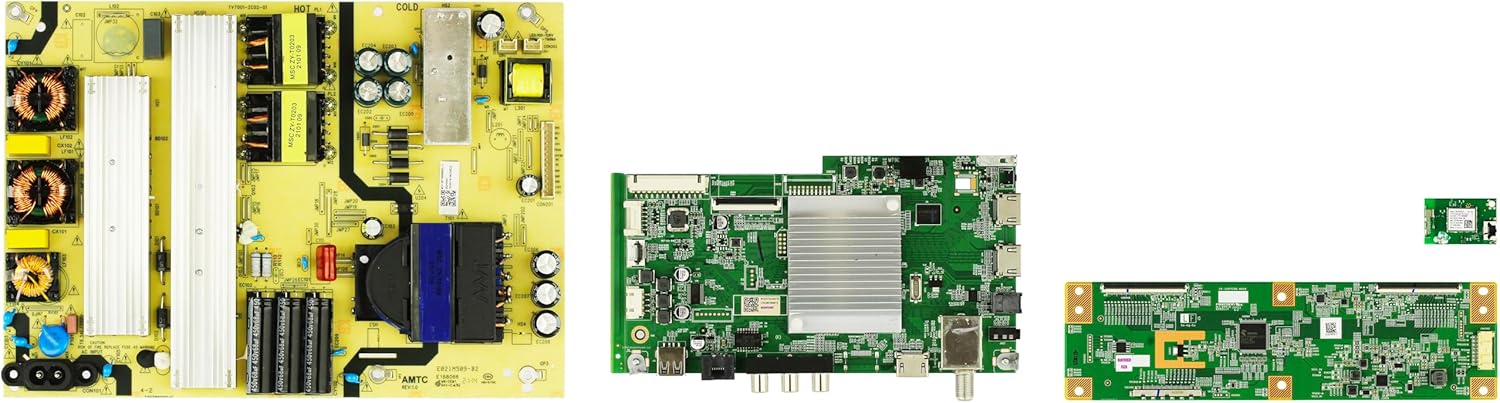
Figure 1: Components of the ONN 100012588 TV Repair Parts Kit. This image displays the power supply board (left), main board (center), T-Con board (bottom right), and WiFi module (top right), which are typical components found in this repair kit.
Setup and Installation
Important Safety Precautions:
- Always disconnect the television from the power outlet before beginning any repair work.
- Discharge any residual power from capacitors on the power supply board before handling.
- Wear anti-static wrist straps to prevent electrostatic discharge (ESD) damage to sensitive electronic components.
- Work in a clean, well-lit, and organized environment.
- If you are not confident in your ability to perform the repair, seek assistance from a qualified technician.
General Installation Steps:
- Disassembly: Carefully remove the back cover of the television. Document the location of all screws and connectors.
- Identify Faulty Component: Locate the board or module that needs replacement. Compare it with the new part from the kit to ensure compatibility.
- Disconnect Cables: Gently disconnect all cables and ribbon connectors attached to the faulty component. Note their orientation and connection points.
- Remove Faulty Component: Unscrew and carefully remove the old board/module from the TV chassis.
- Install New Component: Position the new board/module in its place, ensuring proper alignment. Secure it with the original screws.
- Reconnect Cables: Reconnect all cables and ribbon connectors to the new component, ensuring they are firmly seated and correctly oriented. Double-check all connections.
- Reassembly: Before fully reassembling the TV, perform initial testing. Once confirmed functional, replace the back cover and all screws.
Note: Specific disassembly and reassembly procedures may vary by TV model. Refer to your television's service manual for detailed instructions.
Operating and Testing
After installing the repair parts, perform the following tests to ensure proper operation:
- Initial Power-Up: Connect the TV to a power outlet. Observe if the power indicator light illuminates and if the TV attempts to power on.
- Display Check: If the main board or T-Con board was replaced, check for a stable image on the screen. Look for any flickering, lines, or color distortions.
- Audio Check: If the main board was replaced, verify audio output by connecting an audio source or tuning to a channel.
- Connectivity Check: If the WiFi module was replaced, attempt to connect to a wireless network. Verify internet access and streaming capabilities.
- Input Verification: Test all input ports (HDMI, USB, etc.) by connecting external devices.
- Remote Control Functionality: Ensure the TV responds correctly to commands from the remote control.
If any issues persist after testing, refer to the Troubleshooting section.
Maintenance
Electronic components generally require minimal maintenance. However, following these guidelines can help prolong the life of your TV and its components:
- Keep Clean: Periodically clean the exterior of the TV with a soft, dry cloth. Avoid using liquid cleaners directly on the screen or vents.
- Ventilation: Ensure the TV's ventilation openings are not blocked to prevent overheating, which can damage internal components.
- Environmental Conditions: Operate the TV in a stable environment, avoiding extreme temperatures, high humidity, or direct sunlight.
- Power Protection: Consider using a surge protector to safeguard against power fluctuations.
- Professional Inspection: If you notice any unusual behavior, sounds, or smells from the TV, disconnect it from power and consult a qualified technician.
Troubleshooting
This section addresses common issues that may arise after replacing TV components. Always ensure the TV is unplugged before inspecting internal components.
| Problem | Possible Cause | Solution |
|---|---|---|
| TV does not power on. | Incorrectly installed power supply board, loose power cable, faulty main board. | Verify all connections to the power supply board. Ensure the power cable is securely plugged in. Re-check main board connections. |
| No picture, but audio is present. | Faulty T-Con board, loose T-Con ribbon cables, backlight issue (not related to this kit). | Ensure T-Con board is correctly installed and ribbon cables are firmly seated. |
| Picture but no audio. | Faulty main board, incorrect audio settings. | Verify main board connections. Check TV audio settings. |
| No WiFi connectivity. | Faulty WiFi module, loose antenna connection. | Ensure WiFi module is correctly installed and antenna cables are connected. Reset TV network settings. |
| Intermittent power or display. | Loose connections, component overheating. | Re-check all board connections. Ensure proper ventilation. |
If the problem persists after attempting these solutions, it is recommended to consult a professional television repair technician.
Specifications
This kit is designed for specific ONN TV models. Compatibility should always be verified with the original part numbers from your television.
- Product Name: ONN 100012588 TV Repair Parts Kit - Version 3
- Brand: ShopJimmy
- Model Number: 100012588
- Included Components (Example Part Numbers):
- Main Board: M21072-MT, M22219-MT, M22177-MT, M22214-MT, 515C90100M13, M22218-MT, M22176-MT
- Power Supply: 514C7001M21
- T-Con Board: RUNTK0529FVZA, RUNTK0334FVYR, RUNTK6396TPZC
- WiFi Module: 1246663, WC5EM2601F
- Compatibility: Designed for specific ONN 100012588 TV models (verify part numbers).
Warranty and Support
Warranty: This product comes with a 180-Day Warranty from the date of purchase. This warranty covers defects in materials and workmanship under normal use. It does not cover damage resulting from improper installation, misuse, accidents, or unauthorized modifications.
Customer Support: For technical assistance, warranty claims, or further inquiries, please contact ShopJimmy customer support. Refer to your purchase documentation for specific contact information or visit the official ShopJimmy website.


