
Introduction
Thank you for choosing the AOC 27B3HA2 27-inch Full HD LED Monitor. This manual provides essential information for the safe and efficient use of your new monitor. Please read it thoroughly before installation and operation, and keep it for future reference.
The AOC 27B3HA2 features a 27-inch Full HD (1920 x 1080) IPS panel, offering wide viewing angles and vibrant colors. It includes a 100Hz refresh rate and 1ms MPRT response time for smooth visuals, Adaptive Sync technology, and eye-care features like Flicker-Free and Low Blue Light modes to enhance user comfort during extended use.

Figure 1: Front view of the AOC 27B3HA2 monitor highlighting its 27-inch size, 100Hz refresh rate, Full HD resolution, Adaptive Sync, IPS panel, and 1ms MPRT response time.
Safety Information
- Power Source: Use only the power adapter supplied with the monitor. Ensure the power outlet is properly grounded.
- Placement: Place the monitor on a stable, flat surface. Avoid direct sunlight, heat sources, or excessive dust. Ensure adequate ventilation around the monitor.
- Moisture: Do not expose the monitor to rain or moisture. Do not place objects filled with liquids on the monitor.
- Cleaning: Disconnect the power cord before cleaning. Use a soft, dry cloth. Do not use liquid cleaners or aerosol cleaners.
- Ventilation: Do not block ventilation openings.
- Servicing: Do not attempt to service the monitor yourself. Refer all servicing to qualified service personnel.
Package Contents
Verify that all items are present in your package. If any items are missing or damaged, contact your retailer.
- AOC 27B3HA2 Monitor
- Monitor Stand (Base and Neck)
- Power Cable
- HDMI Cable
- Quick Setup Guide
- Warranty Card
Setup
1. Assembling the Monitor Stand
- Carefully place the monitor face down on a soft, clean surface to prevent scratches.
- Attach the stand neck to the back of the monitor by aligning the tabs and pushing until it clicks into place.
- Attach the stand base to the stand neck. Secure it with the captive screw located on the underside of the base.

Figure 2: Rear view of the monitor showing the stand attachment point.
2. Connecting Cables
Ensure the monitor and your computer are turned off before making any connections.
- Power Connection: Connect the power cable to the monitor's power input and then to a grounded electrical outlet.
- Video Connection (HDMI): Connect one end of the HDMI cable to the HDMI port on your computer's graphics card and the other end to the HDMI 1.4 port on the monitor.
- Video Connection (VGA): Alternatively, connect one end of the VGA cable to the VGA port on your computer and the other end to the VGA port on the monitor.
- Audio Input: If using VGA for video and you want audio through the monitor's speakers, connect an audio cable from your computer's audio output to the Audio In port on the monitor.
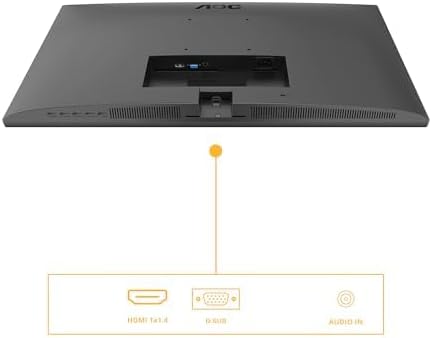
Figure 3: Diagram illustrating the available input ports on the monitor: HDMI 1.4, VGA (D-SUB), and Audio In.
3. Powering On
- Turn on your computer.
- Press the power button on the monitor. The power indicator light should illuminate.
- The monitor should automatically detect the active input signal. If not, you may need to manually select the input source using the OSD menu.
Operating the Monitor
On-Screen Display (OSD) Menu
The OSD menu allows you to adjust various monitor settings. The control buttons are typically located on the bottom or back of the monitor.
- Press the Menu button to open the OSD menu.
- Use the navigation buttons (Up/Down or Left/Right) to browse through menu options.
- Press the Select/OK button to enter a sub-menu or confirm a setting.
- Press the Exit button to go back to the previous menu or exit the OSD.
Key OSD Settings
- Luminance: Adjust brightness, contrast, and gamma settings.
- Image Setup: Fine-tune image position, clock, and phase (primarily for VGA input).
- Color Setup: Select color temperature, user color, or preset modes.
- OSD Setup: Adjust OSD language, position, and transparency.
- Extra: Select input source (HDMI, VGA), reset settings, or view information.
- Game Setting: Enable or disable Adaptive Sync, adjust response time (Overdrive), and other gaming-related features.
- Low Blue Light: Activate this mode to reduce blue light emission for eye comfort.
- Flicker-Free: This technology is always active to minimize screen flickering and reduce eye strain.
Maintenance
Cleaning the Monitor
- Always unplug the monitor from the power outlet before cleaning.
- Use a soft, lint-free cloth slightly dampened with water or a mild, non-abrasive screen cleaner.
- Do not spray cleaner directly onto the screen. Apply it to the cloth first.
- Wipe the screen gently to remove dust and smudges.
- For the monitor casing, use a soft, dry cloth. Avoid harsh chemicals.
Storage
If you need to store the monitor for an extended period, disconnect all cables, disassemble the stand if necessary, and pack it in its original packaging or a suitable protective box. Store in a cool, dry place.
Troubleshooting
| Problem | Possible Solution |
|---|---|
| No image on screen |
|
| "No Signal" message |
|
| Image is blurry or distorted |
|
| No sound from speakers |
|
Specifications
| Feature | Description |
|---|---|
| Model Number | 27B3HA2 |
| Screen Size | 27 Inches (68.6 cm) |
| Panel Type | IPS |
| Resolution | 1920 x 1080 (Full HD) |
| Aspect Ratio | 16:9 |
| Refresh Rate | 100 Hz |
| Response Time | 1ms MPRT |
| Brightness | 250 cd/m² |
| Video Inputs | 1x HDMI 1.4, 1x VGA (D-SUB) |
| Audio Input | Yes |
| Special Features | Adaptive Sync, Flicker-Free, Low Blue Light |
| Product Dimensions (with stand) | 9.06 x 24.41 x 18.11 inches |
| Item Weight (with stand) | 11.66 pounds |
| Manufacturer | AOC |
| EPREL Registration Number | 1859411 |
For detailed product information and energy labeling, please refer to the official EPREL database:
 View EPREL Product Information Sheet
Figure 4: EPREL QR code and link for detailed product information.
Warranty and Support
AOC monitors are manufactured to the highest quality standards. For information regarding your product's warranty, please refer to the warranty card included in your package or visit the official AOC website.
For technical support or customer service, please contact AOC directly:
- Supplier: AOC International (Europe) B.V.
- Address: Prins Bernhardplein 200 1097 JB Amsterdam, Netherlands
- Customer Care Email: kevin.yang@tpv-tech.com
- Customer Care Phone: +31 (0)20 504 6962
- Official Website: https://eu.aoc.com
Please have your monitor's model number (27B3HA2) and serial number ready when contacting support.


