
NCLTHS K88
NCLTHS K88 Security Access Control Keypad User Manual
Model: K88
1. Product Overview
The NCLTHS K88 is a robust, metal stand-alone access control keypad designed for secure entry management. It utilizes RFID technology and supports up to 2000 users, making it suitable for various applications from residential buildings to commercial offices. This manual provides detailed instructions for installation, operation, and maintenance of your K88 keypad.
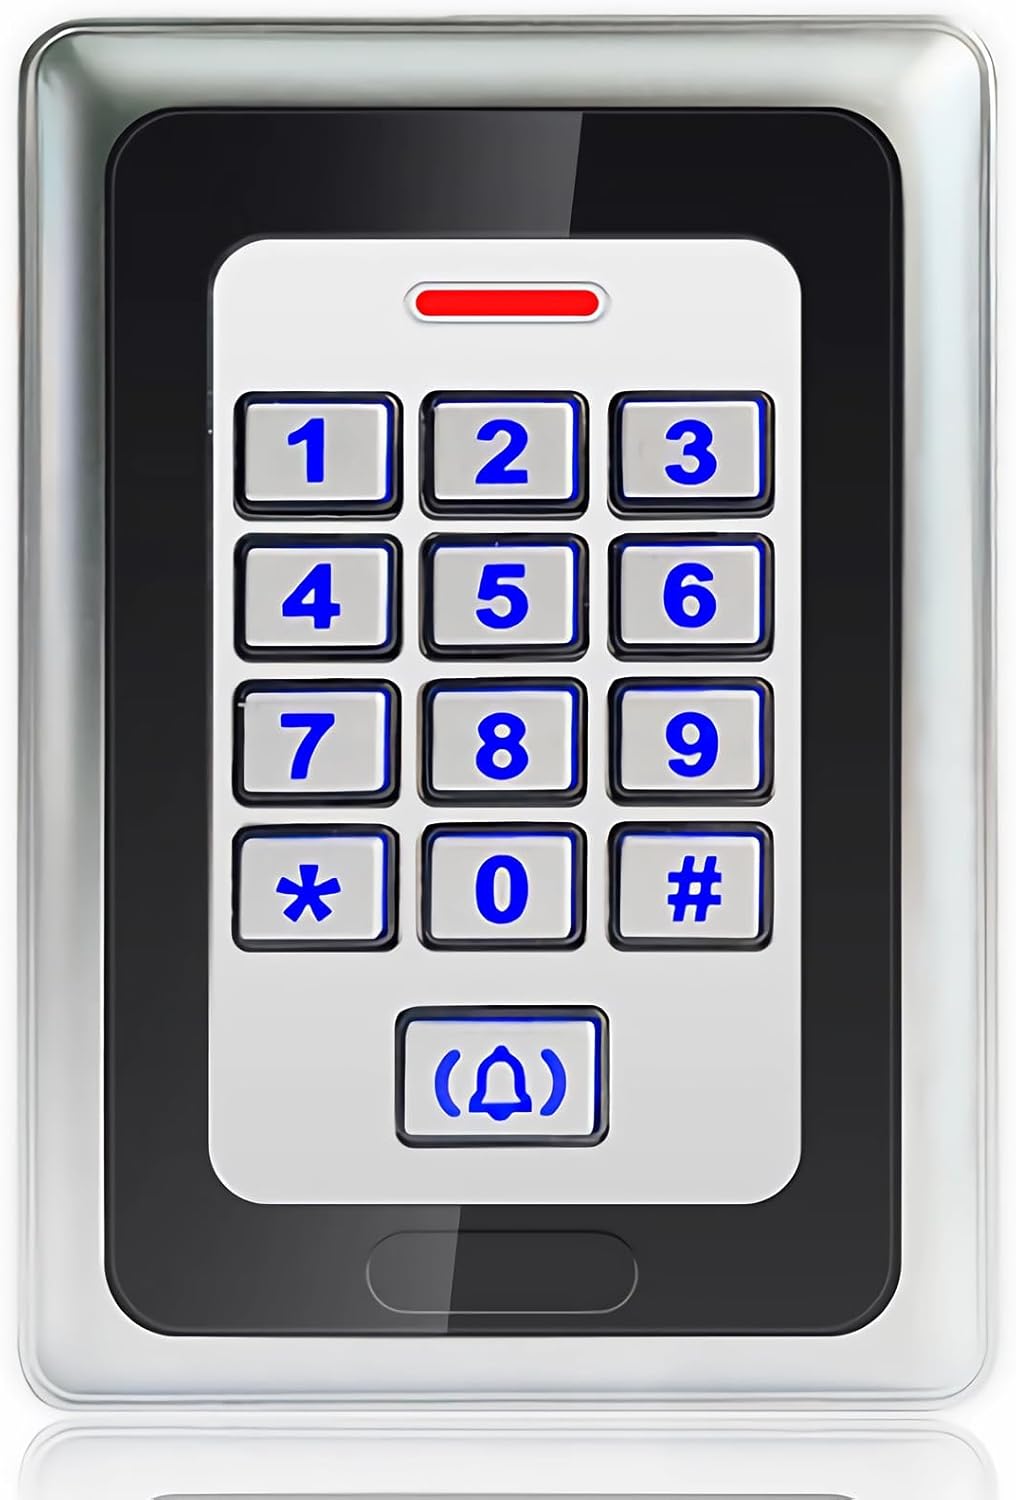
Figure 1: Front view of the NCLTHS K88 Security Access Control Keypad.
Key Features:
- Advanced Security: Utilizes RFID technology for secure access control.
- High User Capacity: Supports up to 2000 users.
- Durable Construction: Sturdy metal stand-alone design.
- Proximity RFID Card Support: Convenient access via RFID cards.
- Versatile Application: Suitable for offices, residential buildings, warehouses, and more.
2. Package Contents
Please verify that all items are present in your package:
- 1 x NCLTHS K88 Access Control Machine
- 1 x User Manual (this document)
- 1 x Screw Package for installation
3. Installation
3.1 Mounting the Keypad
The NCLTHS K88 keypad is designed for screw-in installation. Choose a suitable location near the door that requires access control, ensuring it is protected from direct weather exposure if installed outdoors.
- Mark the drilling points on the wall using the keypad's backplate as a template.
- Drill holes at the marked points.
- Insert wall plugs (if necessary) into the drilled holes.
- Secure the keypad's backplate to the wall using the provided screws.
- Attach the keypad unit to the backplate.
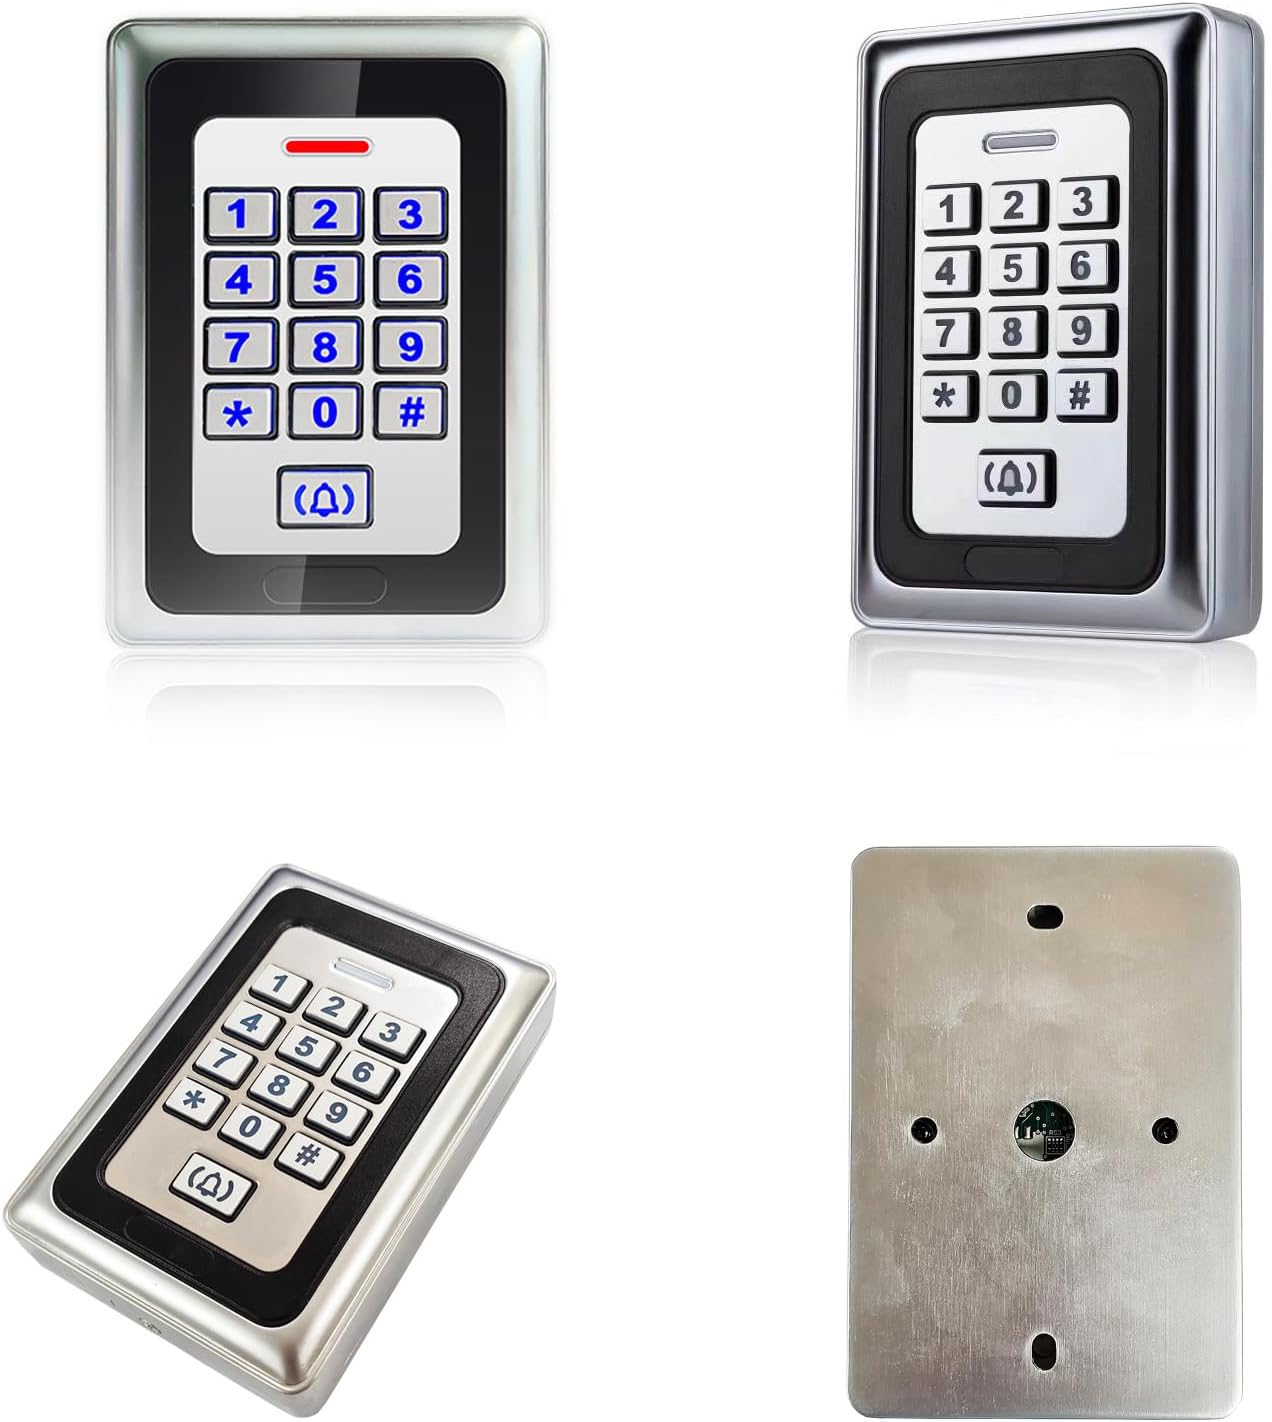
Figure 2: Various views of the K88 keypad, showing the mounting plate.
3.2 Wiring Diagram
Proper wiring is crucial for the correct functioning of the access control system. Refer to the diagram below for connections to your power supply, electric lock, and optional access reader.
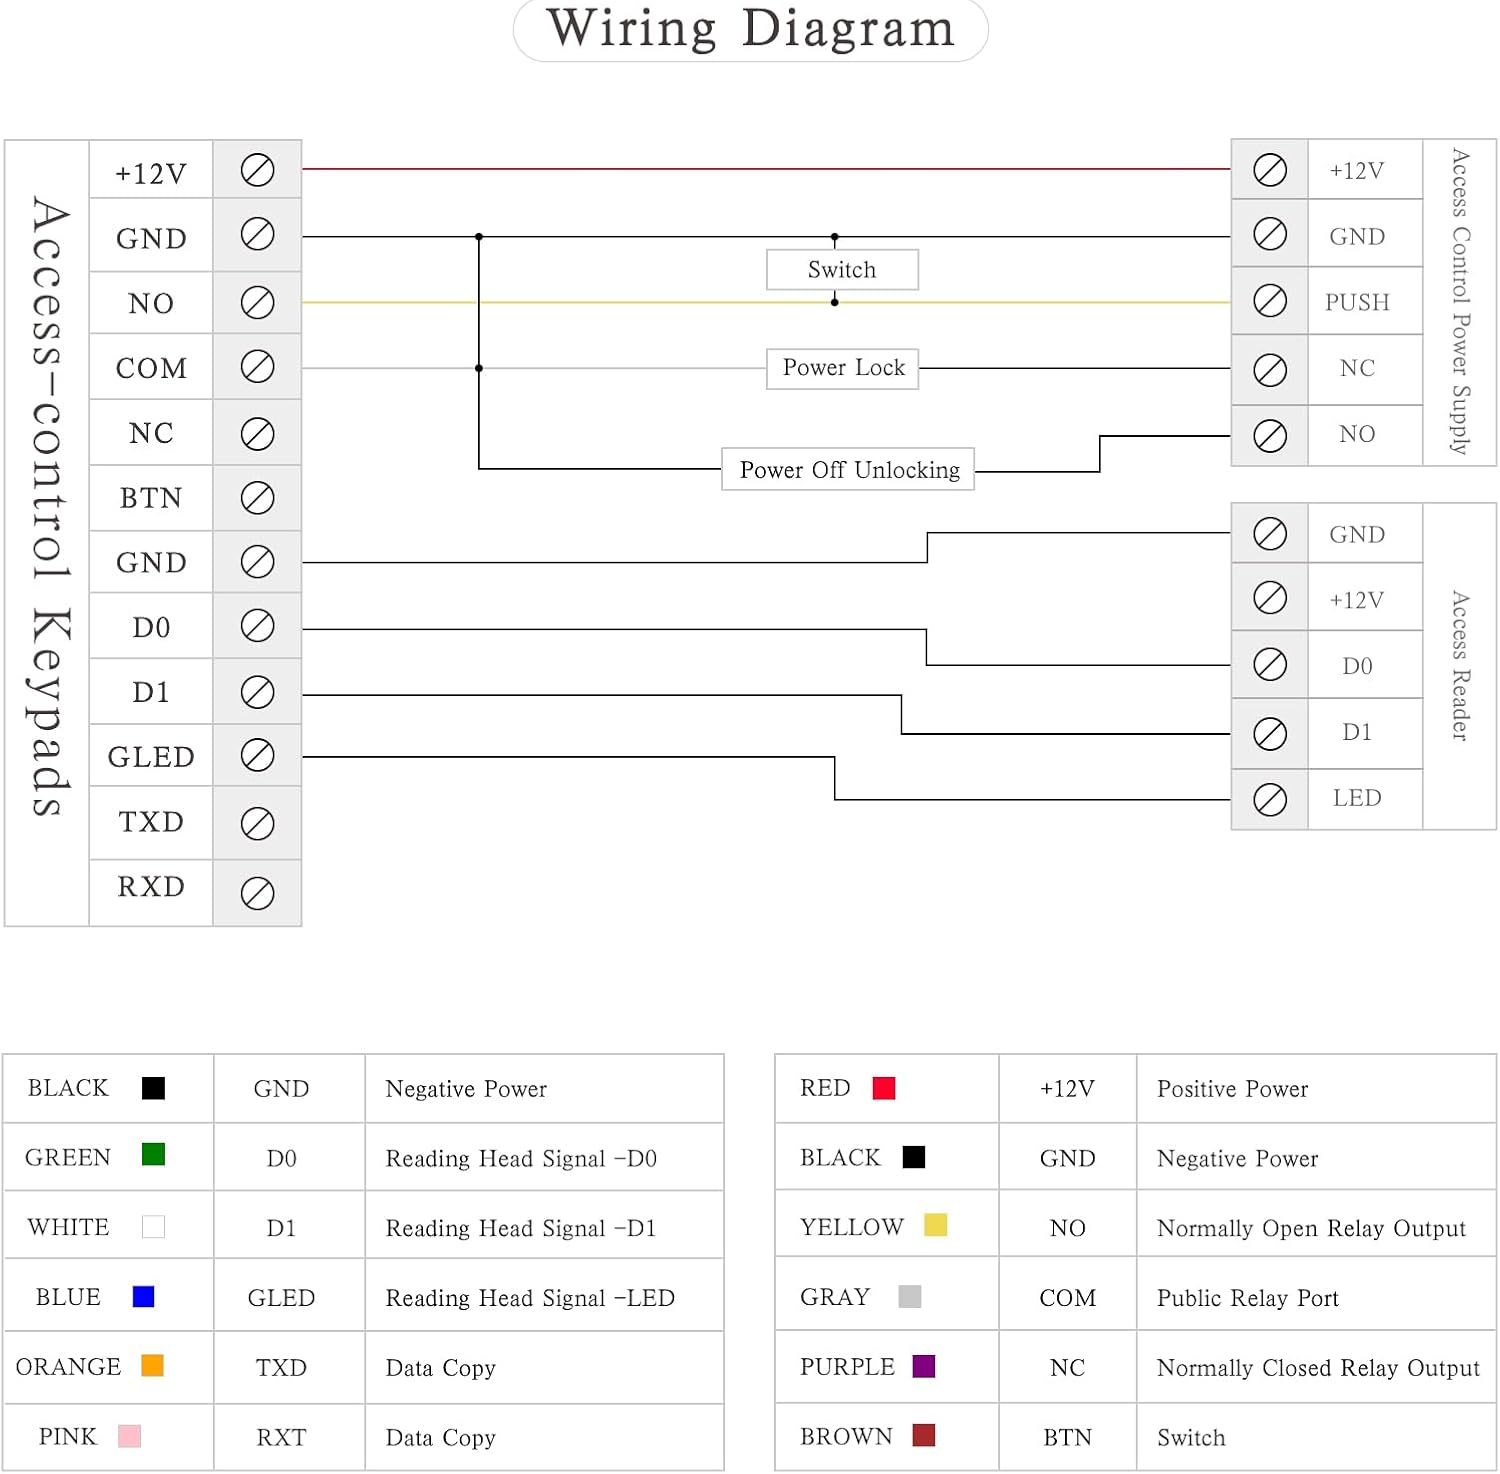
Figure 3: Detailed wiring diagram for the NCLTHS K88 keypad.
Important Wiring Notes:
- +12V (Red): Connect to the positive terminal of your 12V DC power supply.
- GND (Black): Connect to the negative terminal of your 12V DC power supply and the common ground for other components.
- NO (Yellow): Normally Open relay output. Connect to the electric lock for normally open configurations.
- COM (Gray): Common relay output. Connect to the electric lock.
- NC (Purple): Normally Closed relay output. Connect to the electric lock for normally closed configurations.
- BTN (Brown): Connect to an external exit button.
- D0 (Green) & D1 (White): Data lines for connecting an external Wiegand reader.
- GLED (Blue): Green LED indicator for external reader.
- TXD & RXD (Orange & Pink): Data copy functions (advanced use).
Always ensure power is disconnected before performing any wiring to prevent electrical shock or damage to the device.
4. Operation
The NCLTHS K88 keypad operates in two main modes: Programming Mode and User Mode.
4.1 Initial Setup and Master Code
- Power On: Connect the keypad to a 12V DC power supply. The keypad will emit a short beep.
- Default Master Code: The factory default master code is 123456.
- Enter Programming Mode: Press * then enter the default master code (123456), then press #. The indicator light will change, confirming entry into programming mode.
- Change Master Code (Recommended): In programming mode, press 0, then enter your new 6-digit master code, then press #. Re-enter the new master code and press # to confirm.
- Exit Programming Mode: Press * to exit programming mode.
4.2 Adding Users (Codes or RFID Cards)
The keypad supports up to 2000 users. Each user can be assigned a unique 4-6 digit code or an RFID card.
- Enter Programming Mode: Press *, enter your master code, then press #.
- Add User Code:
- Press 1.
- Enter a 3-digit user ID (e.g., 001-999), then press #.
- Enter the new 4-6 digit user code, then press #.
- Re-enter the user code and press # to confirm.
- Add RFID Card:
- Press 2.
- Enter a 3-digit user ID (e.g., 001-999), then press #.
- Present the RFID card to the keypad's reader area. The keypad will beep to confirm.
- Exit Programming Mode: Press *.

Figure 4: Close-up of the keypad interface for code entry.
4.3 Deleting Users
- Enter Programming Mode: Press *, enter your master code, then press #.
- Delete User by ID:
- Press 3.
- Enter the 3-digit user ID to delete, then press #.
- Delete All Users:
- Press 4. (Use with caution, this will remove all programmed user codes and cards).
- Confirm by pressing #.
- Exit Programming Mode: Press *.
4.4 Granting Access
- Using a User Code: Enter your 4-6 digit user code, then press #. The door will unlock for a preset duration.
- Using an RFID Card: Present your registered RFID card to the keypad's reader area. The door will unlock for a preset duration.
- Using an Exit Button: Press the external exit button connected to the BTN terminal. The door will unlock.
5. Maintenance
To ensure the longevity and optimal performance of your NCLTHS K88 keypad, follow these maintenance guidelines:
- Cleaning: Wipe the keypad surface with a soft, dry cloth. Avoid using abrasive cleaners, solvents, or excessive moisture, as these can damage the electronic components.
- Environmental Protection: While the keypad has a durable metal construction, protect it from extreme temperatures, direct prolonged sunlight, and heavy rain or snow.
- Wiring Inspection: Periodically check all wiring connections to ensure they are secure and free from corrosion or damage.
- Software Updates: This stand-alone unit typically does not require software updates. If issues arise, consult the manufacturer.
6. Troubleshooting
If you encounter issues with your NCLTHS K88 keypad, refer to the following troubleshooting steps:
| Problem | Possible Cause | Solution |
|---|---|---|
| Keypad does not power on. | No power supply; incorrect wiring; faulty power adapter. | Check 12V DC power supply connection. Verify wiring according to the diagram. Test power adapter. |
| Door does not unlock after valid code/card. | Incorrect lock wiring; lock malfunction; incorrect user programming; lock power issue. | Review wiring to the electric lock. Ensure the lock is receiving power. Re-program the user code/card. Test the lock independently. |
| Keypad beeps continuously or acts erratically. | Stuck button; internal fault; power fluctuation. | Check for any stuck buttons. Disconnect and reconnect power. If the issue persists, contact support. |
| Cannot enter programming mode. | Incorrect master code; incorrect sequence. | Ensure you are using the correct master code. Follow the sequence: * + Master Code + #. If master code is lost, a factory reset might be required (consult support). |
| RFID card not recognized. | Card not programmed; card type incompatibility; faulty card. | Ensure the RFID card has been correctly programmed. Verify the card is compatible with the keypad's RFID frequency. Try a different card. |
7. Specifications
| Feature | Detail |
|---|---|
| Brand | NCLTHS |
| Model Number | K88 |
| Color | Silver |
| Power Source | Corded Electric |
| Connectivity Technology | Wired |
| Installation Type | Screw-In |
| Alert Type | Motion Only |
| Item Weight | 1.21 Pounds |
| Voltage | 12 Volts |
| Control Method | Touch |
| Recommended Uses | Home Security, Motion Detection |
| Sensor Technology | RFID |
| User Capacity | Up to 2000 users |
| UPC | 716841008760 |
| Package Dimensions | 7.52 x 5.16 x 2.24 inches |
| Batteries Required | No |

Figure 5: Physical dimensions of the NCLTHS K88 keypad.
8. Warranty and Support
8.1 Warranty Information
For specific warranty details, please refer to the documentation provided at the time of purchase or contact the seller directly. Standard warranties typically cover manufacturing defects for a limited period.
8.2 Technical Support
If you require further assistance or encounter issues not covered in this manual, please contact NCLTHS customer support through their official website or the retailer from whom you purchased the product. Please have your model number (K88) and purchase information ready.
Ask a question about this manual
Ask about setup, troubleshooting, compatibility, parts, safety, or missing instructions. Manuals+ will review the question and use this page’s manual context to help answer it.