Introduction
Thank you for choosing the LUNYEE Mini Hold Down Clamp Kit. This manual provides essential information for the safe and effective use of your new clamps. Please read these instructions thoroughly before installation and operation. Keep this manual for future reference.
Product Overview
The LUNYEE Mini Hold Down Clamp Kit is designed for securing workpieces on CNC router machines, drill presses, and other workholding applications. Its compact design and robust construction ensure stable and precise clamping for both woodworking and metalworking tasks.
- Mini Body: Compact design ideal for use with T-slots and perforated one-piece grid worktops on benchtop CNC machines like the 3018 Series.
- Working Range: This clamp accommodates materials up to 1.77 inches (45mm) thick and features easy-tightening knobs for quick installation or removal of stock material.
- High Quality: Made of high-strength 6063 aluminum alloy, with good durability and wear resistance.
- Safety: The clamp is equipped with two protective covers on the front and rear, which can effectively prevent scratches on materials and worktable.
- Versatility: Provides superior clamping force for universal T-track system configurations and components. Ideal for workpiece clamping, positioning, and securing in various applications.

Image: Comparison illustrating the curved design of the LUNYEE clamp (left) which supports higher material thickness, versus a non-curved design (right) with limited thickness support.
Package Contents
Each LUNYEE Mini Hold Down Clamp Kit includes the following components:

Image: Exploded view showing all individual components of the clamp kit, including the hand twisting nut, main body with rubber cover, washers, brass rod, spring, stainless steel screw, and stainless steel base (T-nut).
- Hand twisting nut
- Main body with rubber cover
- Washers (x2)
- Brass rod
- Spring
- Stainless steel screw
- Stainless steel base (T-nut)

Image: Two LUNYEE Mini Hold Down Clamps securely packaged in a cardboard box with foam inserts.
Specifications
| Feature | Detail |
|---|---|
| Material | 6063 Aluminum Alloy |
| Clamp Dimensions (L x W x H) | 65mm x 20mm x 62mm (2.5" x 0.8" x 2.4") |
| Maximum Material Thickness | 45mm (1.77") |
| T-Nut Dimensions (L x W x H) | 16mm x 16mm x 8mm (0.6" x 0.6" x 0.3") |
| T-Nut Thread Size | M6 |
| Item Weight (per clamp) | Approximately 0.33 kg (11.6 ounces) |
| Compatibility | 3018 CNC Router Machine, 3018 Pro Max, 3018-Pro Ultra, and other T-slot systems. |

Image: Technical drawing showing the dimensions of the clamp, including length (65mm/2.5"), width (20mm/0.8"), and height (62mm/2.4").
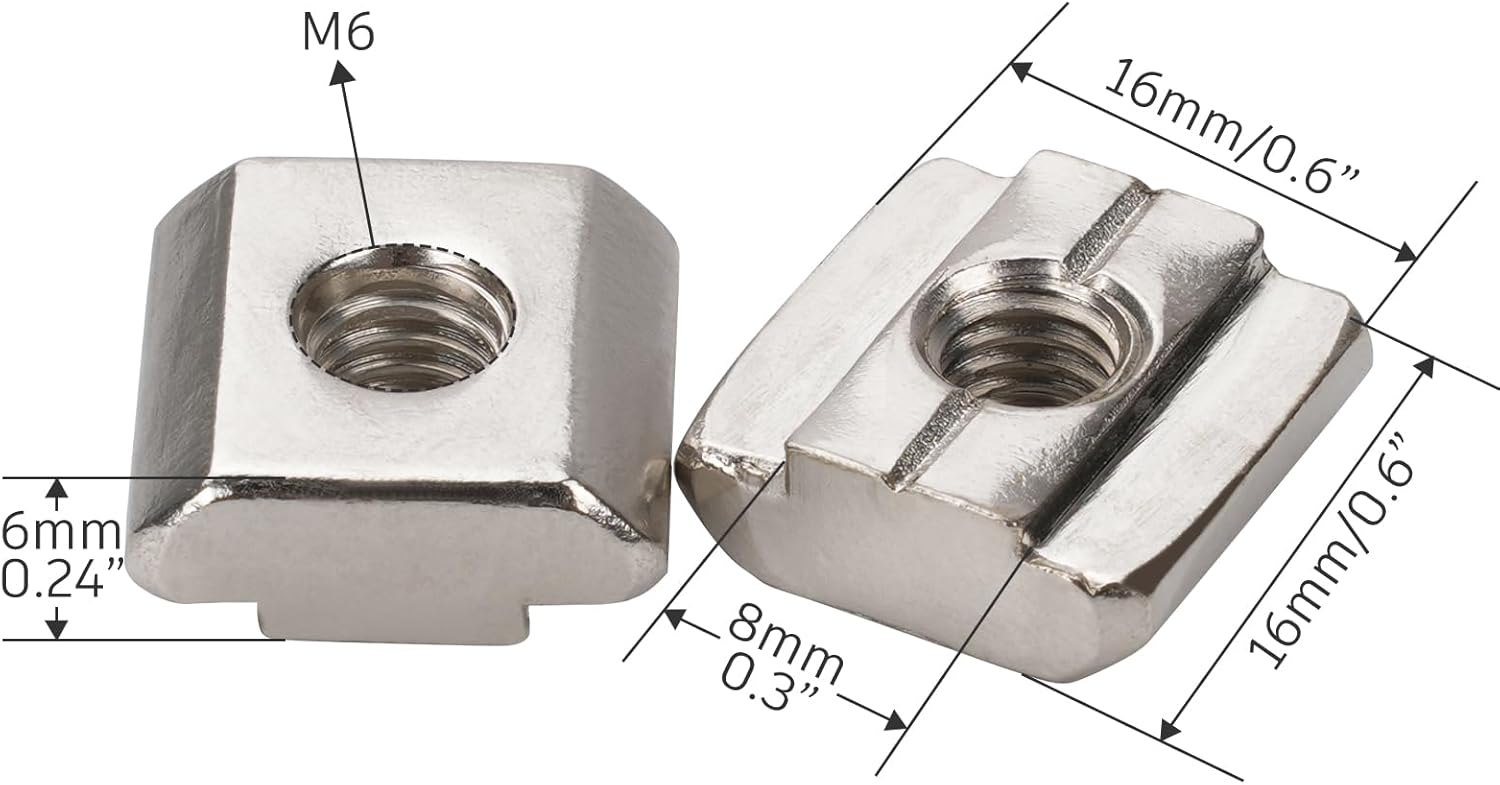
Image: Close-up view of the M6 T-nut, displaying its dimensions including length (16mm/0.6"), width (16mm/0.6"), and height (8mm/0.3").
Setup Instructions
- Assemble the Clamp: If disassembled, ensure all components (T-nut, spring, screw, brass rod, main clamp body, washers, and hand knob) are correctly assembled as shown in the "Package Contents" section. The spring should be positioned between the T-nut and the clamp body.
- Insert into T-Slot: Slide the T-nut into the T-slot of your CNC machine's worktable. Ensure the T-nut is properly seated within the slot.
- Position the Workpiece: Place your workpiece on the worktable. Position the clamp so that the rubber-covered end rests firmly on the workpiece, and the T-nut is aligned with the T-slot.
- Adjust Clamp Height: The clamp's design allows for adjustment to accommodate various material thicknesses. Ensure the clamp arm is angled appropriately to apply downward pressure.
- Secure the Clamp: Turn the hand twisting nut clockwise to tighten the clamp. The spring will provide upward tension, allowing the clamp to pivot and apply downward force on the workpiece. Tighten until the workpiece is securely held and cannot move during operation. Do not overtighten.

Image: A LUNYEE Mini Hold Down Clamp shown in use, securing a wooden workpiece to a T-slot worktable. The image highlights the clamp's ability to hold materials up to 45mm (1.77 inches) thick.
Operating Instructions
Proper operation of the hold down clamps is crucial for safety and precision during your projects.
- Workpiece Placement: Always ensure the workpiece is clean and free of debris before clamping. Position it centrally or as required for your machining operation.
- Multiple Clamps: For larger or irregularly shaped workpieces, use multiple clamps to distribute pressure evenly and prevent movement.
- Check Security: Before starting any machining process, always double-check that the workpiece is firmly secured and cannot shift. Gently attempt to move the workpiece by hand to confirm stability.
- Protective Covers: The integrated rubber covers protect both your workpiece from scratches and the worktable from damage. Ensure these covers are in place and properly aligned.
- Clearance: Verify that the clamps do not interfere with the tool path of your CNC router or drill bit. Adjust clamp positions as necessary to maintain adequate clearance.

Image: A CNC router machine with a wooden workpiece secured by multiple LUNYEE Mini Hold Down Clamps, demonstrating their application in a machining environment.
Maintenance
To ensure the longevity and optimal performance of your LUNYEE Mini Hold Down Clamps, follow these maintenance guidelines:
- Cleaning: After each use, wipe down the clamps with a clean, dry cloth to remove dust, chips, and debris. For stubborn grime, a mild cleaner can be used, followed by thorough drying.
- Lubrication: Periodically apply a small amount of light machine oil to the screw threads and the pivot points to ensure smooth operation of the hand knob and clamp arm.
- Inspection: Regularly inspect the clamps for any signs of wear, damage, or deformation, especially the rubber protective covers and the T-nut. Replace any damaged components immediately.
- Storage: Store the clamps in a clean, dry environment when not in use to prevent corrosion and damage.
Troubleshooting
If you encounter issues with your LUNYEE Mini Hold Down Clamps, refer to the following common problems and solutions:
| Problem | Possible Cause | Solution |
|---|---|---|
| Clamp does not hold workpiece securely. | Insufficient tightening; T-nut not properly seated; workpiece too thick; worn components. | Ensure hand knob is fully tightened. Verify T-nut is correctly positioned in the T-slot. Check if workpiece thickness is within the 1.77" limit. Inspect components for wear and replace if necessary. |
| Clamp is difficult to tighten or loosen. | Dirty or corroded screw threads; overtightening. | Clean and lubricate the screw threads. Avoid excessive force when tightening. |
| Workpiece gets scratched by the clamp. | Protective rubber covers are missing or damaged. | Ensure both front and rear protective rubber covers are in place. Replace damaged covers. |
| T-nut does not fit into the T-slot. | Incompatible T-slot size. | Verify your machine's T-slot dimensions against the clamp's T-nut specifications (16mm x 16mm x 8mm). Some T-slots may require minor filing of the T-nut for a perfect fit. |
Customer Support
For further assistance, technical support, or inquiries regarding your LUNYEE Mini Hold Down Clamp Kit, please contact LUNYEE customer service through the retailer where the product was purchased or visit the official LUNYEE brand store online.
LUNYEE Brand Store: Visit LUNYEE Store on Amazon
Official Product Videos
No official product videos from the seller were found for this item at this time.