1. Important Safeguards
Please read this user manual carefully before you use the appliance and save it for future reference. Always follow basic safety precautions when using electrical appliances.
- Electrical Safety: Ensure the voltage indicated on the appliance corresponds to your local mains voltage before connecting. Do not immerse the motor unit in water or any other liquid.
- Blade Safety: The blades are very sharp. Handle them with extreme care, especially when assembling, disassembling, emptying the jar, or cleaning.
- Supervision: This appliance shall not be used by children. Keep the appliance and its cord out of reach of children. Close supervision is necessary when any appliance is used near children.
- Operation: Never let the appliance run unattended. Do not operate the appliance if the cord, plug, or other parts are damaged.
- Cleaning: Always unplug the appliance before cleaning. Refer to the 'Cleaning and Maintenance' section for detailed instructions.
- Usage: Do not use the appliance for purposes other than those described in this manual. Do not fill the blender jar above the maximum level indication.
2. Product Overview
The Philips 5000 Series Blender (HR3041/00) is designed for efficient and versatile blending, featuring a powerful 1200W motor and ProBlend Plus technology.

Figure 2.1: The Philips 5000 Series Blender, showcasing the motor base, glass jar, lid, tamper, and the convenient blend-and-go tumbler.
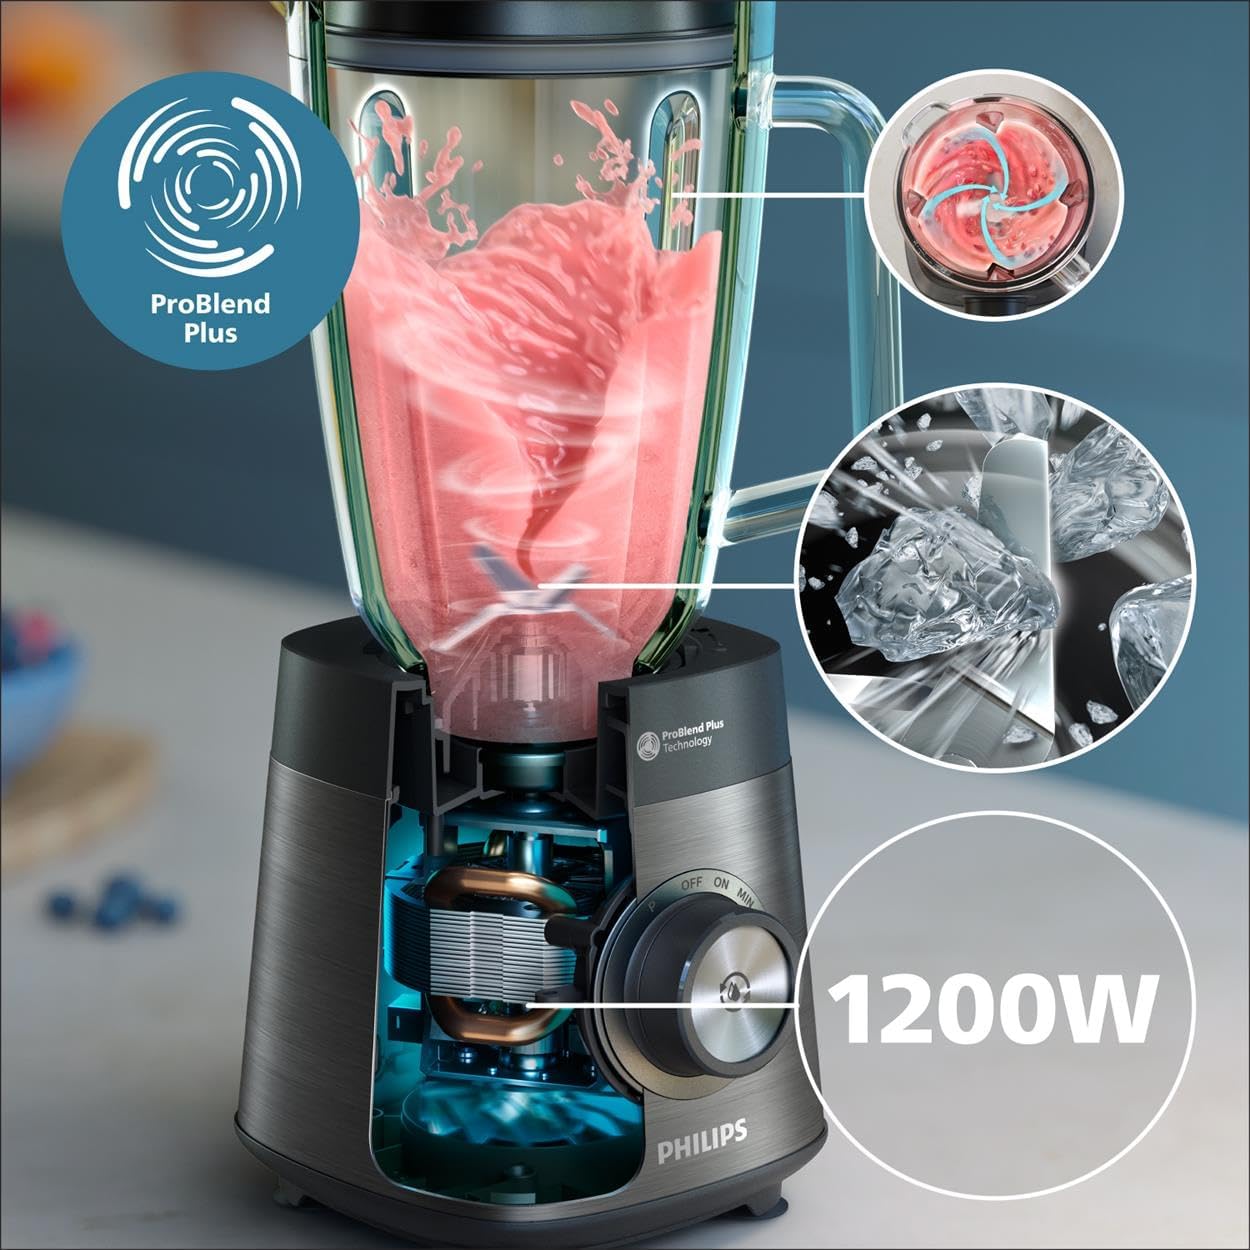
Figure 2.2: An internal view of the blender, illustrating the powerful 1200W motor and the ProBlend Plus technology for optimal blending performance.

Figure 2.3: The blender with the blend-and-go tumbler attached, ready for preparing single servings for on-the-go consumption.
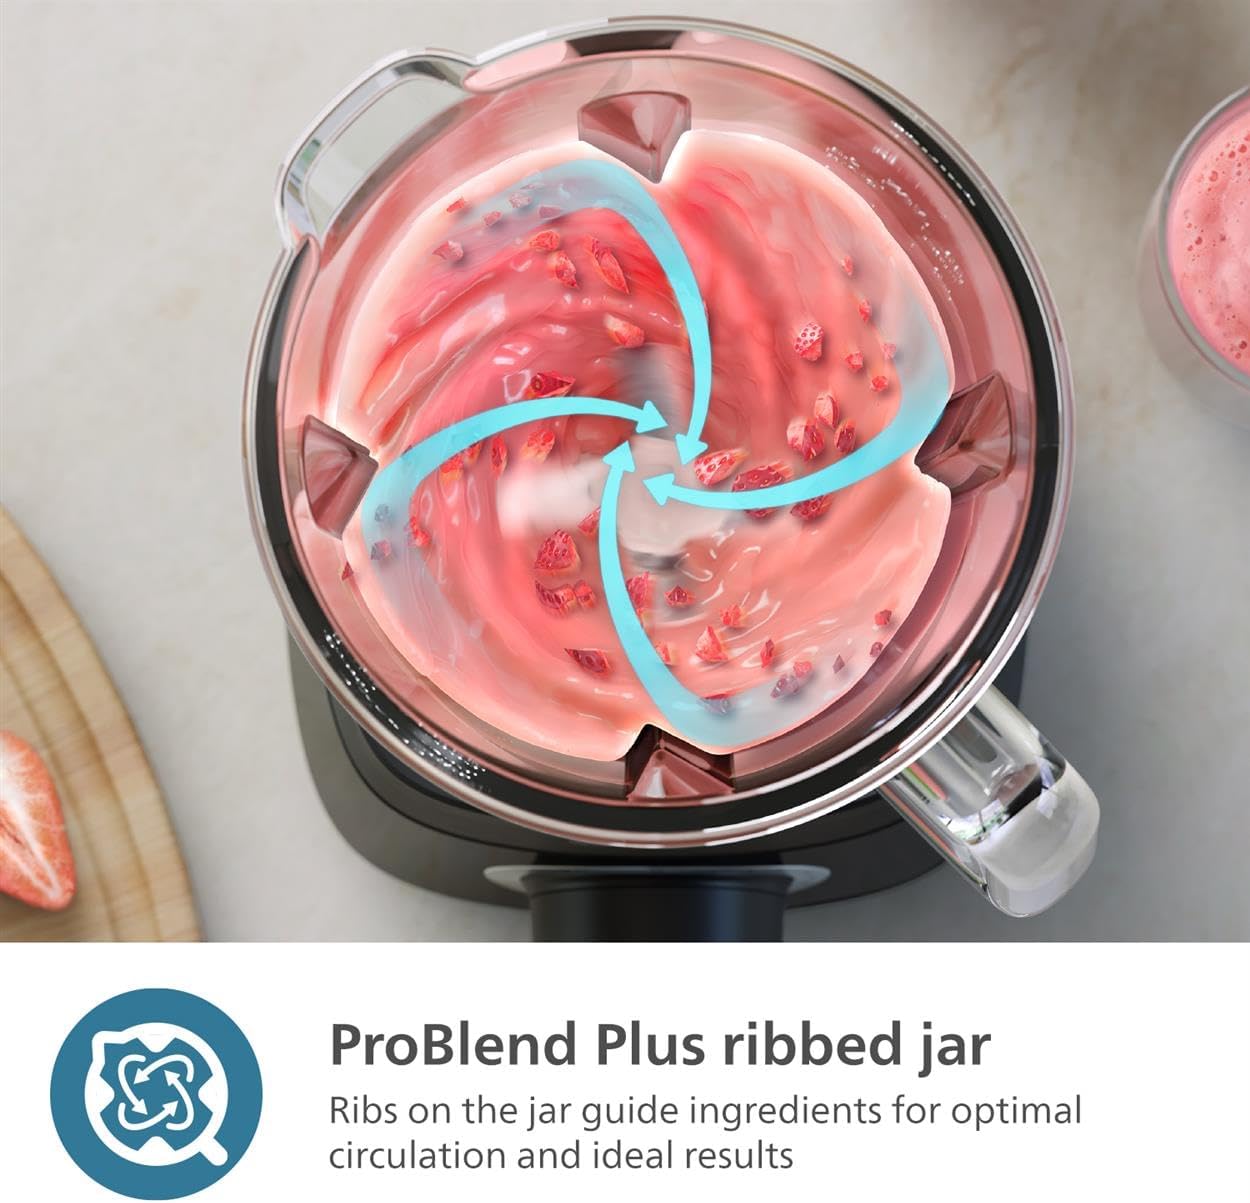
Figure 2.4: A detailed view of the ProBlend Plus stainless steel blades effectively crushing ice, demonstrating their robust performance.

Figure 2.5: The ribbed design of the blender jar, which guides ingredients for optimal circulation and ensures smooth, consistent blending results.

Figure 2.6: The control dial of the blender, highlighting the dedicated one-touch automatic cleaning program for effortless maintenance.
Components:
- Motor Base with Control Dial
- 2-Liter Glass Jar with ProBlend Plus Blades
- Lid with Removable Measuring Cup
- Tamper
- Blend-and-Go Tumbler (600ml)
3. Setup
- Unpack: Carefully remove all components from the packaging. Retain packaging for future storage or transport.
- Initial Cleaning: Before first use, wash all parts that will come into contact with food (jar, lid, tamper, blend-and-go tumbler, blades) in warm soapy water. Rinse thoroughly and dry. The jar and tumbler are dishwasher-safe.
- Assemble the Jar: Ensure the blade unit is securely attached to the bottom of the glass jar. Place the rubber sealing ring correctly to prevent leaks.
- Place on Stable Surface: Position the motor base on a clean, dry, and stable surface.
4. Operating Instructions
Using the Main Blender Jar:
- Add Ingredients: Place your ingredients into the glass jar. Do not exceed the maximum fill line indicated on the jar. For best results, add liquids first, then soft ingredients, followed by harder ingredients and ice.
- Secure Lid: Place the lid onto the jar and ensure it is securely closed. Insert the measuring cup into the lid opening.
- Attach Jar to Base: Place the assembled jar onto the motor base. Turn it clockwise until it locks into position.
- Connect Power: Plug the power cord into a suitable electrical outlet.
- Select Speed: Turn the control dial to your desired speed setting. The blender offers variable speed control from minimum (MIN) to maximum (MAX).
- Pulse Function: For short bursts of power or to achieve a coarser consistency, turn the dial to the 'P' (Pulse) setting and hold. Release to stop.
- Using the Tamper: For thick mixtures like frozen fruit smoothies or nut butters, use the tamper through the lid opening to push ingredients towards the blades. Only use the tamper when the blender is running and the lid is securely in place. Do not use other utensils.
- Stop Blending: Once desired consistency is reached, turn the control dial to the 'OFF' position. Unplug the appliance before removing the jar.
Using the Blend-and-Go Tumbler:
- Add Ingredients: Fill the blend-and-go tumbler with your ingredients. Do not exceed the MAX fill line.
- Attach Blade Unit: Screw the blade unit securely onto the open end of the tumbler.
- Attach to Base: Invert the tumbler and place it onto the motor base. Turn it clockwise until it locks.
- Blend: Plug in the appliance and select your desired speed or use the Pulse function.
- Remove and Enjoy: After blending, turn the dial to 'OFF', unplug, and remove the tumbler. Unscrew the blade unit and attach the drinking lid for on-the-go consumption.
5. Cleaning and Maintenance
Regular cleaning ensures optimal performance and extends the lifespan of your Philips Blender.
Automatic Cleaning Program:
- Prepare: Fill the blender jar with 750ml of warm water and add a few drops of dishwashing liquid.
- Activate: Place the jar on the motor base, secure the lid, and turn the control dial to the cleaning icon (often indicated by a water droplet symbol). The program will run automatically.
- Rinse: After the program finishes, empty the jar and rinse it thoroughly under running water.
Manual Cleaning:
- Motor Base: Wipe the motor base with a damp cloth. Never immerse it in water.
- Detachable Parts: The glass jar, lid, tamper, blend-and-go tumbler, and blade unit are dishwasher-safe. Alternatively, wash them in warm soapy water using a brush for the blades. Handle blades with extreme care.
- Drying: Ensure all parts are completely dry before reassembling or storing.
Storage:
Store the blender in a dry, clean place. You can store the jar assembled on the motor base or separately.
6. Troubleshooting
If you encounter issues with your blender, refer to the table below for common problems and solutions.
| Problem | Possible Cause | Solution |
|---|---|---|
| Blender does not start. | Appliance not plugged in. Jar not assembled correctly. Overload protection activated. | Check power connection. Ensure jar is locked onto the base. Unplug, remove some ingredients, wait 15 minutes, then restart. |
| Ingredients are not blending smoothly. | Too little liquid. Too many ingredients. Ingredients stuck. | Add more liquid. Reduce quantity of ingredients. Use the tamper or turn off and stir ingredients. |
| Blender leaks. | Sealing ring not correctly placed. Blade unit not tightened. | Check and reposition the sealing ring. Ensure the blade unit is securely tightened to the jar. |
| Unpleasant odor during use. | First use (normal). Overloading. | This is normal for first few uses. Reduce load and blending time. If odor persists, contact support. |
If the problem persists after trying these solutions, please contact Philips Customer Support.
7. Specifications
| Feature | Detail |
|---|---|
| Model Number | HR3041/00 |
| Power | 1200W |
| Capacity (Main Jar) | 2 Liters (1.5 Liters working capacity) |
| Capacity (Tumbler) | 600ml |
| Blade Material | Stainless Steel |
| Jar Material | Glass |
| Color | Black |
| Dimensions (Product) | 6.54"D x 12.01"W x 13.62"H |
| Weight | 6.86 pounds |
| Special Features | Detachable Attachment, Pulse Technology, Automated Cleaning Program |
| Material Type Free | BPA Free |
8. Warranty and Support
This Philips 5000 Series Blender comes with a limited warranty. Please refer to the warranty card included in your product packaging for specific terms and conditions, including the warranty period and coverage details.
For product support, troubleshooting assistance beyond this manual, or to inquire about warranty claims, please visit the official Philips website or contact Philips Customer Service directly. Contact information can typically be found on the Philips website or on the product packaging.
Online Support: www.philips.com/support


