1. Introduction
The OEMGMINER NerdMiner V2 is a compact, low-power USB device designed for solo Bitcoin mining. It offers an energy-efficient way to participate in the Bitcoin network, providing a chance to earn block rewards without the extensive hardware requirements of traditional ASIC miners. This device operates with a hashrate of approximately 300 KH/s and connects via WiFi for configuration and operation.
This manual provides essential information for setting up, operating, maintaining, and troubleshooting your NerdMiner V2 device.

Image 1.1: The OEMGMINER NerdMiner V2 USB device.
2. Package Contents
- 1x OEMGMINER NerdMiner V2 USB Device
- 1x USB-A to USB-C Cable (for power, if included)
- Instruction Leaflet
3. Setup Instructions
Follow these steps to set up your NerdMiner V2 device:
- Power Connection: Plug the NerdMiner V2 dongle into a standard USB-A port (e.g., on a computer, USB hub, or compatible power adapter). The device requires approximately 3W of power. Ensure the power source is stable.
- Initial Boot: After connecting to power, the device screen will automatically display information within 3-5 seconds.
- WiFi Configuration: The device uses a web interface for WiFi setup. You will need a mobile phone or computer to connect to the device's access point.
- On your phone or computer, search for available WiFi networks.
- Connect to the network named "LuckyMinerAP".
- Once connected, open a web browser and navigate to http://192.168.4.1. This will open the WiFiManager interface.
- Click "Configure WiFi". Select your home or office 2.4Ghz WiFi network (5Ghz networks are not supported). Enter your WiFi password.
- Mining Pool Configuration: Enter the pool URL and port for your chosen solo mining pool (e.g., pool.vkbit.com, port 3333).
- Bitcoin Address: Enter your Bitcoin (BTC) wallet address. This is where any potential block rewards will be sent.
- Time Zone: Adjust the time zone setting to your local time.
- Click "Save" to apply the settings. The device will attempt to connect to your WiFi network and start mining.

Image 3.1: The NerdMiner V2 can be powered via laptop, USB hub, PC, or charger.
Video 3.1: This video demonstrates the initial power connection and WiFi configuration process for a similar device, including connecting to the device's access point and entering network details.
4. Operating Instructions
Once configured, your NerdMiner V2 will continuously attempt to find a Bitcoin block. The device's screen displays real-time mining statistics.
4.1 Screen Display
The screen cycles through various information panels, including:
- Current Hashrate (KH/s)
- Block Templates
- Best Difficulty
- Valid Blocks Found
- Current Block Number
- Global Hashrate and Difficulty (from the mining pool)
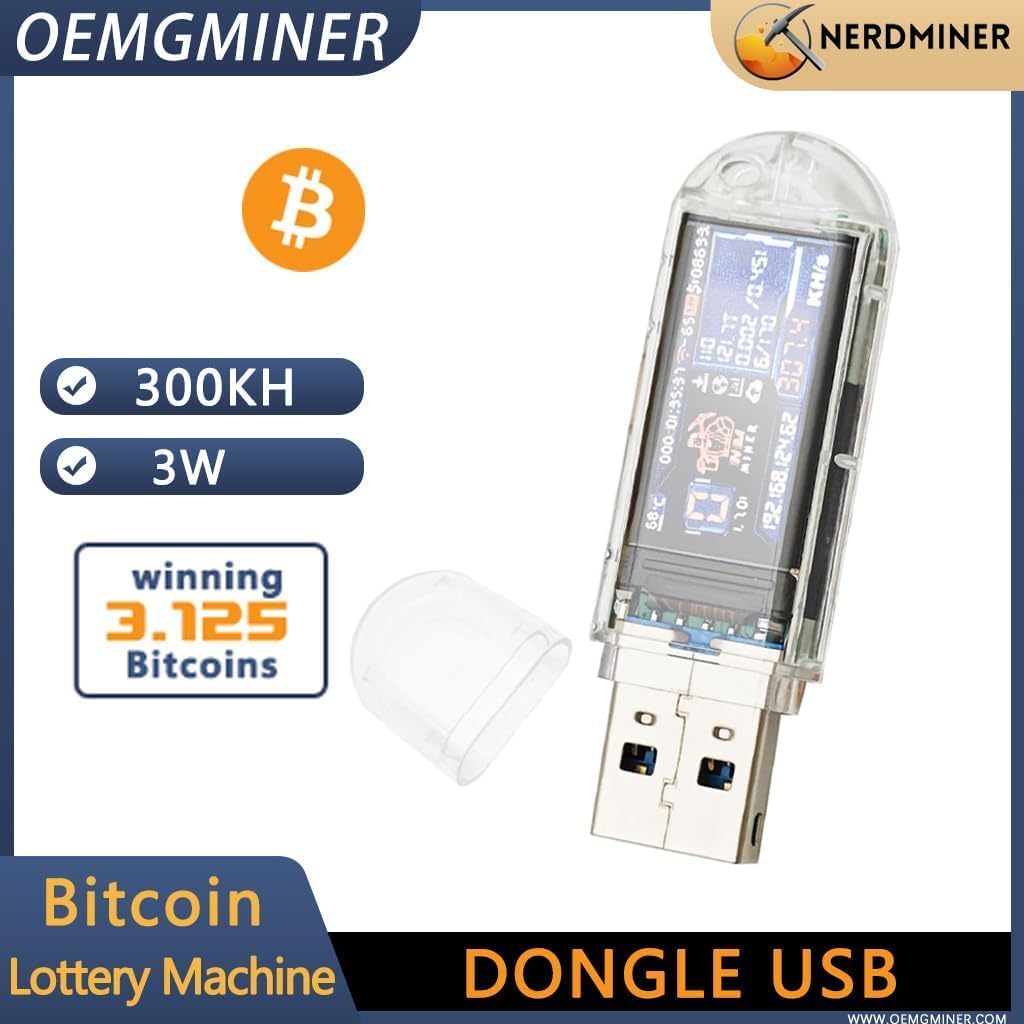
Image 4.1: The NerdMiner V2 screen showing current hashrate, IP address, and other mining data.
4.2 Button Functions
The device features buttons for basic interaction:
- Short Press (Upper Button): Switches between different screen display modes.
- Short Press (Lower Button): Turns the screen display off or on. The device continues mining even when the screen is off.
- Long Press (Upper Button for 7 seconds): Resets the device to factory settings, requiring re-configuration of WiFi and mining parameters.
Video 4.2: This video illustrates the screen display modes and button functionalities, including how to switch views and reset the device.
5. Maintenance
To ensure the longevity and optimal performance of your NerdMiner V2, observe the following maintenance guidelines:
- Cleaning: Gently wipe the device with a dry, soft cloth. Avoid using liquid cleaners or abrasive materials.
- Environment: Operate the device in a cool, dry, and well-ventilated area. Avoid direct sunlight, high humidity, and extreme temperatures.
- Storage: When not in use, store the device in a safe place away from dust and moisture.
- Handling: Handle the device with care to prevent physical damage.
6. Troubleshooting
If you encounter issues with your NerdMiner V2, refer to the following common troubleshooting steps:
- Device Not Powering On:
- Ensure the USB cable is securely connected to both the device and a functioning USB-A power source.
- Try a different USB port or power adapter.
- Unable to Connect to WiFi / "LuckyMinerAP" Not Found:
- Ensure the device is powered on.
- Restart the device by unplugging and re-plugging it.
- Verify your phone or computer's WiFi is enabled and scanning for networks.
- Ensure you are within range of the device's access point.
- Device Not Connecting to Home/Office WiFi:
- Double-check the WiFi network name (SSID) and password for accuracy.
- Confirm your WiFi network is operating on the 2.4Ghz band, as 5Ghz is not supported.
- Ensure the device is within range of your WiFi router.
- Try resetting the device (long press upper button for 7 seconds) and re-configuring the WiFi.
- Low Hashrate / No Mining Activity:
- Verify your internet connection is stable.
- Check the mining pool URL and port for correctness.
- Ensure your Bitcoin address is entered accurately.
- Mining difficulty can fluctuate; a low hashrate is normal for solo mining with this type of device.
7. Specifications
| Feature | Specification |
|---|---|
| Product Dimensions | 2.36 x 0.71 x 1.18 inches |
| Item Weight | 0.704 ounces (0.02 Kilograms) |
| Item Model Number | USB-73KH/s |
| Brand | OEMGMINER |
| Hardware Interface | USB |
| Color | Transparent |
| Data Link Protocol | USB |
| Data Transfer Rate | 480 Megabits Per Second |
| UPC | 717164776763 |
8. Warranty and Support
For warranty information and technical support, please refer to the documentation included with your purchase or contact OEMGMINER directly through their official channels. Keep your proof of purchase for any warranty claims.


