1. Introduction
This manual provides essential information for the safe and effective operation, maintenance, and troubleshooting of the Huskie Tools Robo Crimp 6 Ton Battery Powered Inline Latch Crimper, model ECO-EZ558. Please read this manual thoroughly before using the tool to ensure proper function and to prevent injury or damage.
The ECO-EZ558 is a 6-ton streamline battery-powered compression tool designed for crimping commonly used service entrance connectors, lugs, sleeves, H-taps, and C-taps. Its compact design and swivel head allow for use in limited access areas. The tool features a built-in, factory pre-set 6-ton bypass cartridge to ensure complete compression with every use. It accepts "W", "O" or "X" type dies, and "D3" nest dies are included as standard.
2. Safety Information
WARNING: Read all safety warnings, instructions, illustrations, and specifications provided with this power tool. Failure to follow all instructions listed below may result in electric shock, fire, and/or serious injury.
- Always wear appropriate personal protective equipment (PPE), including safety glasses, gloves, and protective clothing.
- Ensure the work area is clean and well-lit. Cluttered or dark areas invite accidents.
- Do not operate power tools in explosive atmospheres, such as in the presence of flammable liquids, gases, or dust.
- Keep children and bystanders away while operating a power tool. Distractions can cause you to lose control.
- Avoid unintentional starting. Ensure the switch is in the off-position before connecting to battery pack, picking up or carrying the tool.
- Use the correct tool for your application. Do not force the tool.
- Disconnect the battery pack from the tool before making any adjustments, changing accessories, or storing power tools.
- Maintain power tools and accessories. Check for misalignment or binding of moving parts, breakage of parts, and any other condition that may affect the power tool’s operation.
- Use the power tool, accessories, and tool bits in accordance with these instructions, taking into account the working conditions and the work to be performed.
- Only use battery packs and chargers specified by the manufacturer.
3. Package Contents
Verify that all items are present and undamaged upon unpacking:
- 1 x Huskie Tools Robo Crimp 6 Ton Battery Powered Inline Latch Crimper (ECO-EZ558)
- 2 x BP-82 Batteries
- 1 x Battery Charger
- 1 x Carrying Bag
- D3 Nest Dies (pre-installed or included separately)
4. Product Overview
Familiarize yourself with the components of your ECO-EZ558 crimper.

Figure 1: Huskie Tools ECO-EZ558 Robo Crimp 6 Ton Battery Powered Inline Latch Crimper. This image shows the full tool, highlighting its compact design, red housing, and the crimping head at the top.

Figure 2: Close-up view of the ECO-EZ558 crimping head. The image details the latching mechanism and the open jaws, ready for connector insertion. The head can rotate 180 degrees for optimal maneuverability.
Key Features:
- Latching Head: Features a 1.8-inch jaw opening for easy connector insertion and consistent, uniform crimps.
- 6 Ton Force: Provides powerful crimping capability.
- Die Compatibility: Accepts all "W", "X", and "O" type dies. Comes standard with D3 Nest Dies.
- Versatile Crimping: Capable of crimping #8 to 500 MCM Copper and #8 to 350 MCM Aluminum conductors.
- Application: Suitable for commonly used service entrance connectors, lugs, sleeves, H-taps, and C-taps.
- Bypass Cartridge: A built-in, factory pre-set 6-ton bypass cartridge ensures complete compression every time.
- Ergonomic Design: Lightweight and compact for one-handed operation and maneuverability in tight spaces.
5. Setup
5.1 Charging the Battery
- Connect the charger to a standard electrical outlet.
- Insert the BP-82 battery into the charger. Ensure it is seated correctly.
- Allow the battery to charge fully. Refer to the charger's indicator lights for charging status.
- Once charged, remove the battery from the charger.
5.2 Installing the Battery
- Ensure the tool's ON/OFF switch is in the OFF position.
- Align the charged battery pack with the battery slot at the base of the tool.
- Slide the battery into the slot until it clicks securely into place.
5.3 Installing/Changing Dies
The ECO-EZ558 accepts "W", "X", and "O" type dies. D3 Nest Dies come standard.
- Ensure the tool is powered off and the battery is removed.
- Open the latching head jaws.
- Carefully insert the appropriate crimping dies into their respective slots in the jaws. Ensure they are seated flush and securely.
- Close the latching head.
6. Operating Instructions
6.1 Preparing for Crimping
- Select the correct crimping dies for the conductor and connector size.
- Ensure the conductor is properly stripped to the recommended length for the connector.
- Insert the conductor into the connector.
6.2 Performing a Crimp
- With the battery installed and the correct dies in place, open the latching head jaws.
- Position the connector and conductor assembly within the crimping dies. Ensure the connector is centered and fully seated in the dies.
- Close the latching head securely around the connector. The 180-degree rotating head can be adjusted for optimal access in tight spaces.
- Press the trigger to initiate the crimping cycle. The tool will apply 6 tons of force.
- The built-in bypass cartridge will ensure a complete compression. The tool will automatically stop when the crimp is complete.
- Release the trigger and open the latching head jaws to remove the crimped connector.
- Inspect the crimp for proper formation and security.
Note: The tool is designed for one-handed operation due to its lightweight and ergonomic design.
7. Maintenance
Regular maintenance ensures the longevity and reliable performance of your crimper.
- Cleaning: After each use, clean the tool, especially the crimping head and dies, to remove any debris, dirt, or residue. Use a clean, dry cloth. Do not use harsh chemicals or solvents.
- Lubrication: Periodically apply a light coat of machine oil to the moving parts of the crimping head and die slots to ensure smooth operation.
- Battery Care: Store batteries in a cool, dry place. Do not expose them to extreme temperatures. Charge batteries regularly, even if not in use, to maintain their health.
- Inspection: Regularly inspect the tool for any signs of wear, damage, or loose components. Check the dies for wear or deformation. Replace damaged parts immediately.
- Storage: Store the tool and accessories in the provided carrying bag in a dry, secure location, away from moisture and direct sunlight.
8. Troubleshooting
| Problem | Possible Cause | Solution |
|---|---|---|
| Tool does not operate. | Battery not charged or improperly installed. | Ensure battery is fully charged and correctly inserted. |
| Tool stops mid-crimp. | Battery charge low. | Replace with a fully charged battery. |
| Crimp is incomplete or poor quality. | Incorrect dies used; dies worn; improper conductor/connector placement. | Verify correct dies for application. Inspect dies for wear and replace if necessary. Ensure proper placement of connector in dies. |
| Jaws do not open/close smoothly. | Debris in jaws; lack of lubrication. | Clean jaws thoroughly. Apply light machine oil to moving parts. |
9. Specifications
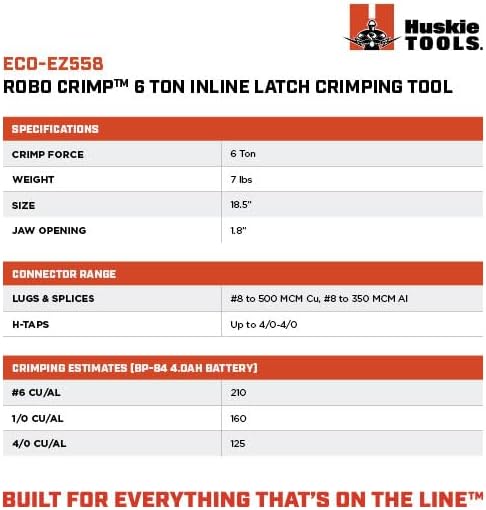
Figure 3: Detailed specifications for the Huskie Tools ECO-EZ558 Robo Crimp tool, including crimp force, weight, size, jaw opening, and connector ranges.
| Feature | Detail |
|---|---|
| Model Number | ECO-EZ558 |
| Crimp Force | 6 Tons |
| Weight | 7 lbs (3.18 kg) |
| Length | 18.5 inches (47 cm) |
| Jaw Opening | 1.8 inches (4.57 cm) |
| Compatible Dies | "W", "X", "O" type dies; D3 Nest Dies (standard) |
| Crimping Capacity (Copper) | #8 to 500 MCM Cu |
| Crimping Capacity (Aluminum) | #8 to 350 MCM Al |
| H-Taps Capacity | Up to 4/0-4/0 |
| Battery Type | BP-82 (Lithium-ion) |
| Material | Plastic, Metal |
| Color | Red |
10. Warranty and Support
For warranty information, technical support, or service inquiries, please contact Huskie Tools directly. Keep your purchase receipt as proof of purchase.
- Manufacturer: Huskie Tools
- Website: www.huskietools.com
- Contact Information: Refer to the official Huskie Tools website or product packaging for the most current contact details.
This product is from a small business brand. Support small businesses.
11. Disposal Information
Do not dispose of electrical appliances, batteries, or packaging materials with household waste. Please recycle where facilities exist. Check with your local authority for recycling advice.
- Batteries: Lithium-ion batteries should be recycled or disposed of according to local regulations. Do not incinerate.
- Tool: At the end of its service life, the tool should be returned to a designated collection point for the recycling of electrical and electronic equipment.


