
XinFuture M02
XinFuture Programmable Garden Hose Water Timer (Model M02) User Manual
Model: M02 | Brand: XinFuture
Introduction
Thank you for choosing the XinFuture Programmable Garden Hose Water Timer. This device is designed to automate your garden watering, ensuring efficient and consistent irrigation for your lawn, plants, and greenhouse systems. It features automatic, manual, and rain delay modes to accommodate various watering needs and weather conditions. Please read this manual carefully to ensure proper installation and operation.
Product Overview
The XinFuture Water Timer (Model M02) is a robust and user-friendly device for managing your watering schedule. Key components include:
- Large LCD Display: Clearly shows current time, watering schedule, and battery level.
- Control Dial: Used to navigate through settings (SET CLOCK, START TIME, HOW LONG, HOW OFTEN, ON, OFF).
- Buttons: '+', '-', 'OK/MANUAL', 'DELAY' for precise adjustments and mode selection.
- Water Inlet: Durable connection point with a pre-installed mesh filter to prevent clogging.
- Water Outlet: Connects to your garden hose or irrigation system.
- Battery Compartment: Secure, waterproof compartment for 2 x AAA 1.5V batteries (not included).
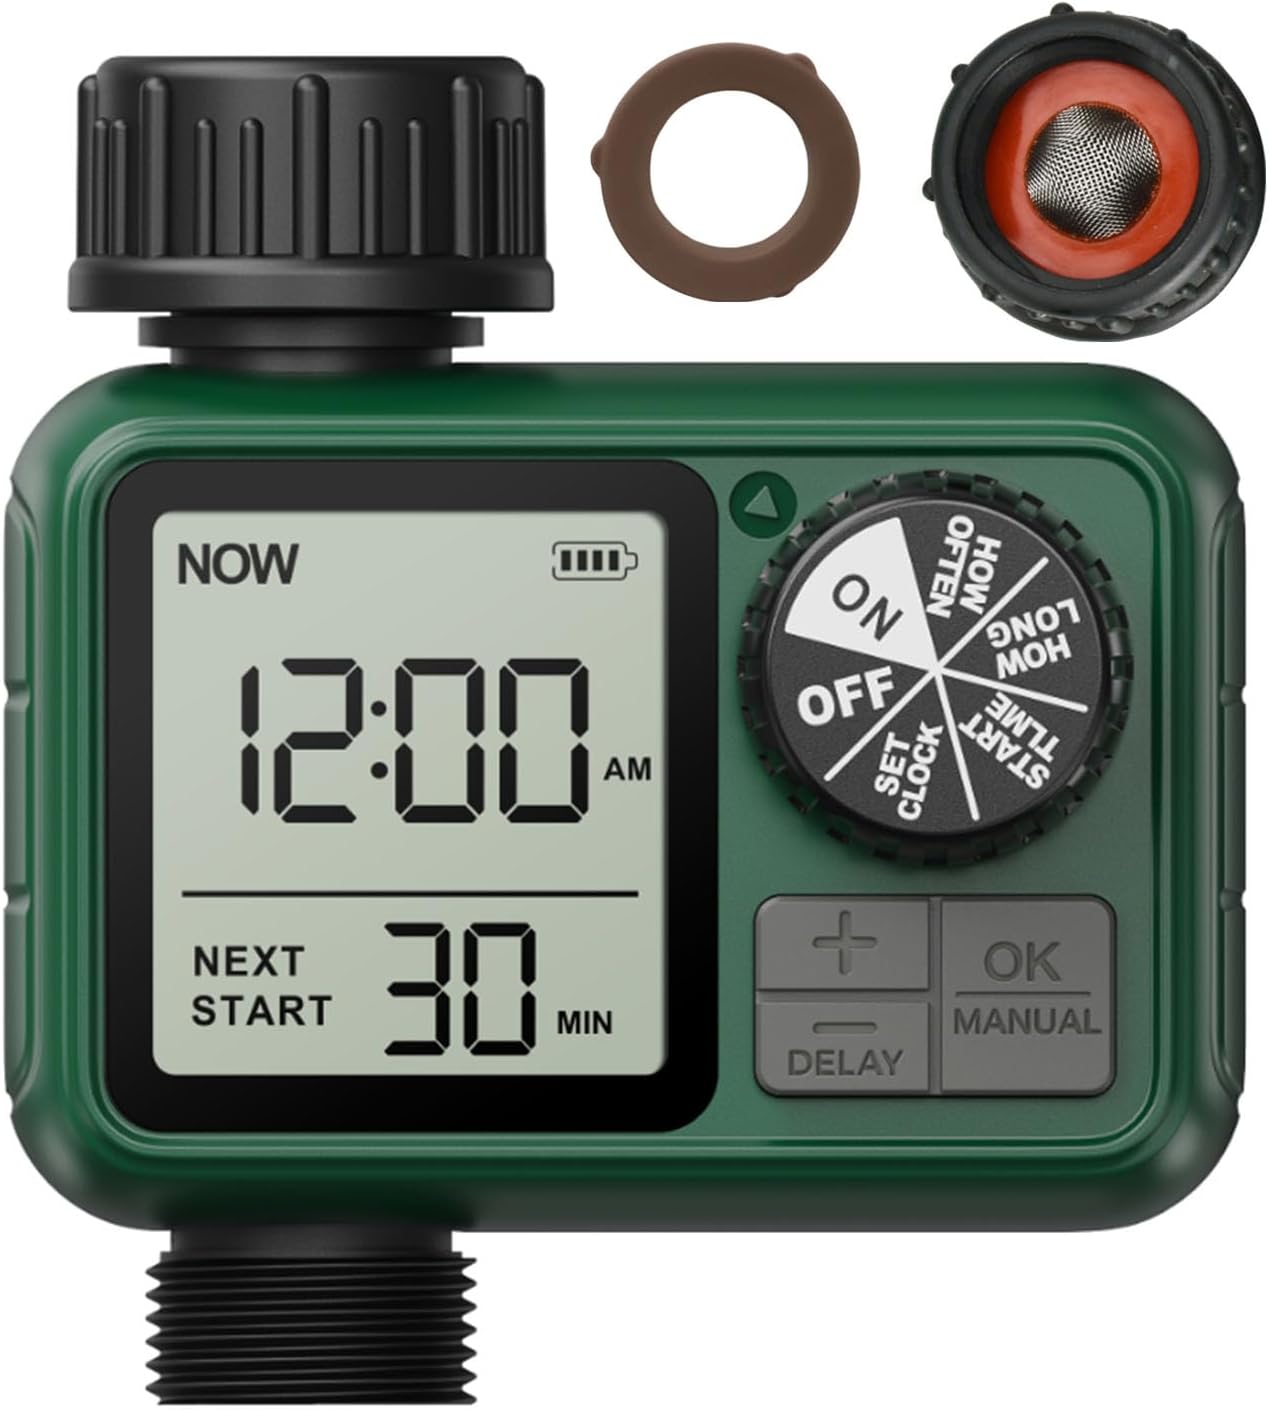
Figure 1: Front view of the XinFuture Water Timer, showing the LCD display, control dial, and buttons.
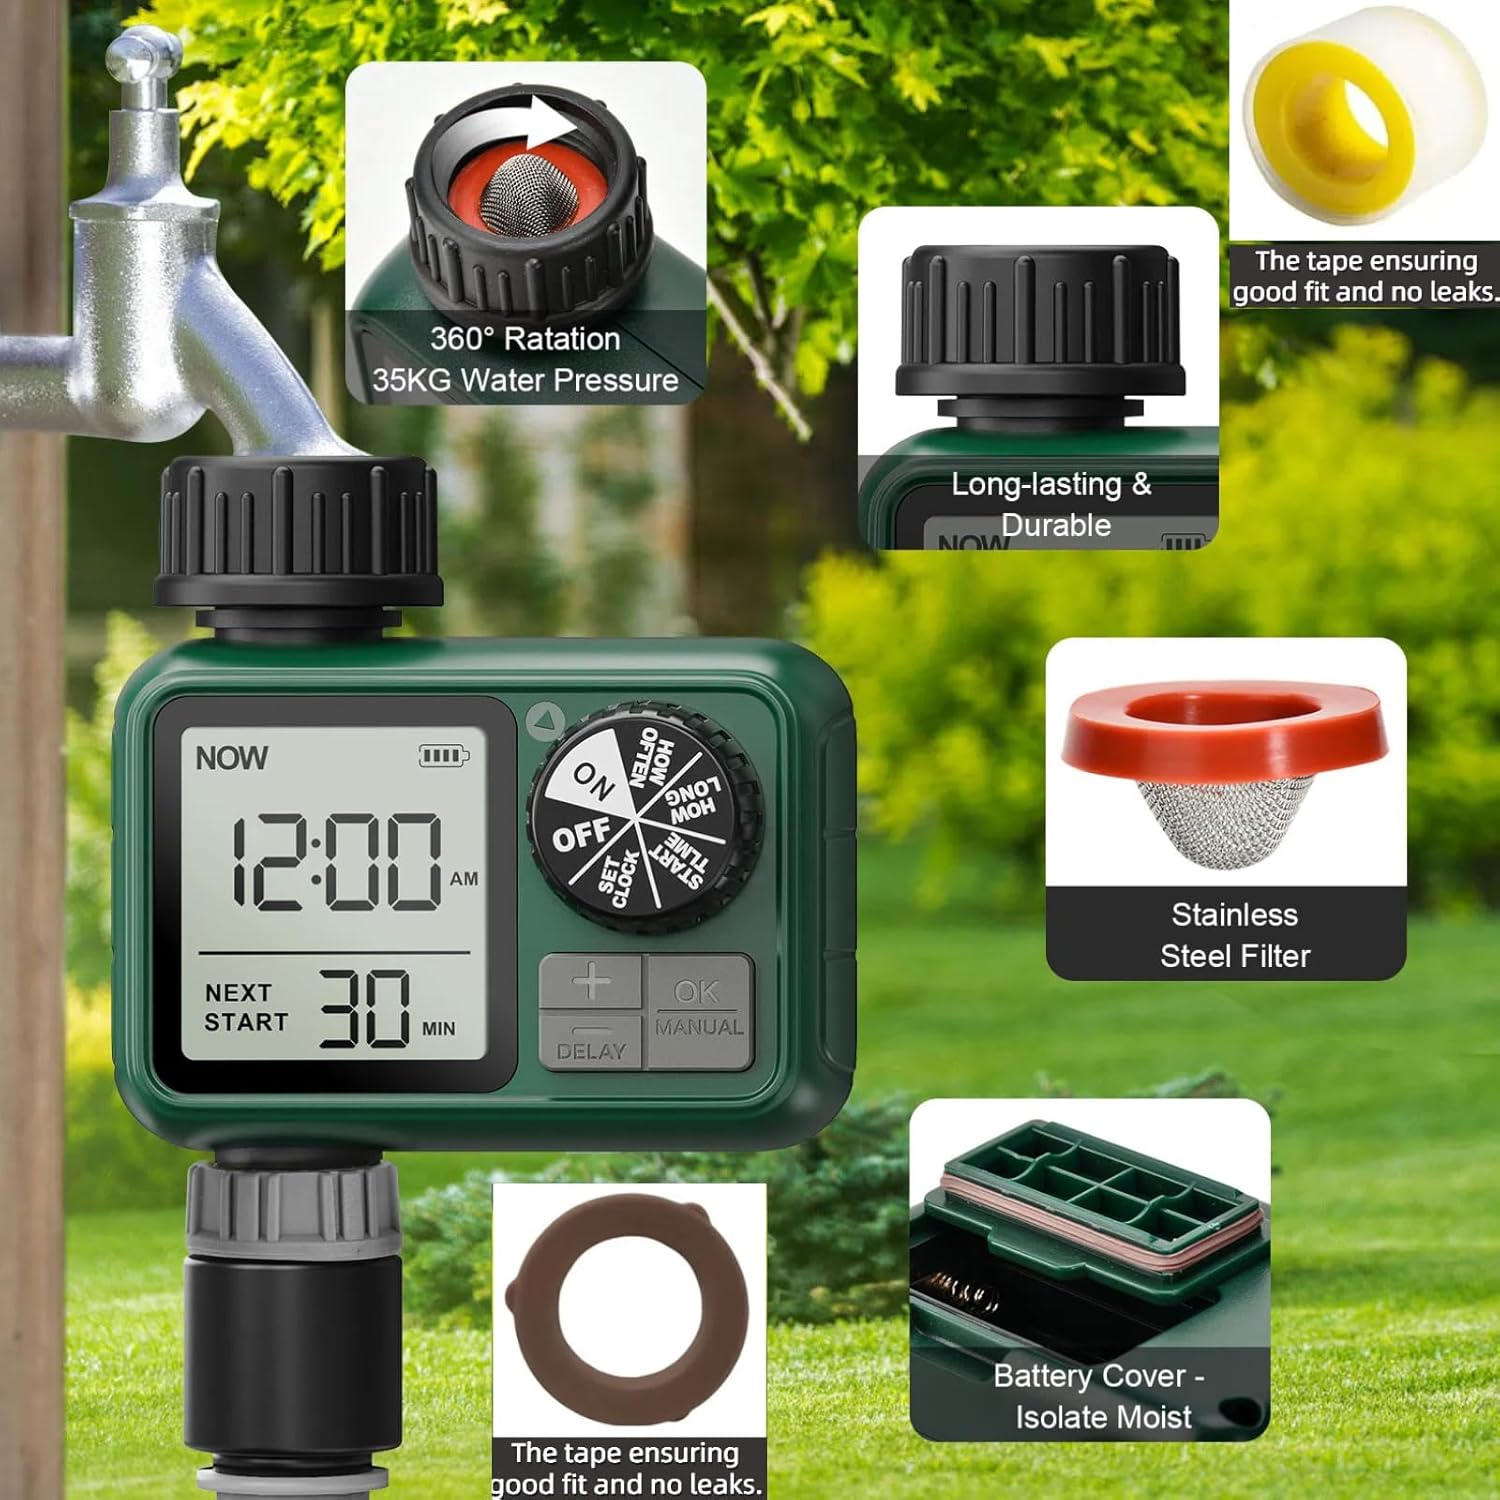
Figure 2: Detailed view of the water timer's components, including the stainless steel filter, battery cover, and sealing rings.
Setup Instructions
- Install Batteries:
Open the battery compartment on the back of the timer. Insert 2 new AAA 1.5V alkaline batteries (not included), ensuring correct polarity. Close the battery cover securely to maintain its waterproof seal.

Figure 3: Waterproof battery compartment for 2 x AAA batteries.
- Attach to Faucet:
Screw the water timer onto your outdoor faucet (3/4" garden hose thread). Ensure the pre-installed mesh filter is in place at the inlet. Hand-tighten the connection. If any leaking occurs, use the included O-ring gasket inside the inlet where the mesh filter is located.

Figure 4: The water timer connected to an outdoor faucet, highlighting its easy, tool-free installation.
- Connect Hose:
Attach your garden hose or irrigation system to the outlet of the water timer. Hand-tighten to secure the connection.
Operating Instructions
The XinFuture Water Timer offers three primary operating modes: Automatic, Manual, and Rain Delay.
1. Setting the Clock
- Rotate the control dial to SET CLOCK.
- Use the + and - buttons to adjust the current time.
- Press OK/MANUAL to confirm and move to the next setting (e.g., AM/PM).
- Repeat until the clock is set.
2. Programming Automatic Watering (Auto Mode)
The timer allows you to set a start time, duration, and frequency for automatic watering.
- Set Start Time:
- Rotate the control dial to START TIME.
- Use + and - buttons to set the desired start time for watering.
- Press OK/MANUAL to confirm.
- Set How Long (Watering Duration):
- Rotate the control dial to HOW LONG.
- Use + and - buttons to set the watering duration (from 1 minute to 240 minutes).
- Press OK/MANUAL to confirm.
- Set How Often (Watering Frequency):
- Rotate the control dial to HOW OFTEN.
- Use + and - buttons to set the frequency (e.g., every 1 hour to every 23 hours, or every 1 day to every 15 days).
- Press OK/MANUAL to confirm.
- Activate Program:
- Rotate the control dial to ON. Your programmed schedule will now run automatically.

Figure 5: Display illustrating options for setting watering duration (1-240 minutes) and frequency (hourly or daily).

Figure 6: Visual representation of the three operating modes: Auto, Manual, and Rain Delay.
3. Manual Watering
Manual watering allows for immediate, temporary watering without affecting your programmed schedule.
- With the dial set to ON or OFF, long-press the OK/MANUAL button for 2 seconds.
- Use + and - buttons to set the desired manual watering duration.
- Press OK/MANUAL again to start manual watering.
- To stop manual watering, long-press OK/MANUAL again or rotate the dial to OFF.

Figure 7: Demonstrates manual watering in progress, showing the timer connected to a hose and faucet.
4. Rain Delay Function
The rain delay function allows you to pause your watering schedule for a set period, conserving water during rainy weather.
- With the dial set to ON, long-press the DELAY button for 2 seconds.
- Use + and - buttons to select the desired delay duration (e.g., 24, 48, 72 hours).
- Press OK/MANUAL to confirm the delay. The timer will resume its schedule after the delay period.
- To cancel the rain delay, long-press the DELAY button for 2 seconds again.

Figure 8: The timer screen showing the rain delay feature activated, with options to set or cancel the delay.
5. Turning Off the Timer
To stop all automatic watering programs, rotate the control dial to OFF.
Maintenance
- Battery Replacement:
When the battery level indicator on the LCD screen shows low power (Figure 9), replace the batteries promptly. The valve will automatically close when the battery is too low to prevent continuous water flow. Always use new AAA 1.5V alkaline batteries.

Figure 9: The timer displaying a low battery icon, indicating the need for battery replacement.
- Filter Cleaning:
Periodically check and clean the mesh filter located at the water inlet to prevent debris from entering the timer and causing blockages or malfunctions. Remove the timer from the faucet, carefully extract the filter, rinse it under running water, and reinsert it.

Figure 10: Close-up of the stainless steel filter at the water inlet, designed to prevent clogging.
- Winter Storage:
Before the first frost, remove the water timer from the faucet, drain any remaining water, and store it indoors in a dry, frost-free location. Remove batteries before storage.
Troubleshooting
| Problem | Possible Cause | Solution |
|---|---|---|
| Timer does not turn on/LCD is blank. | Dead or incorrectly installed batteries. | Replace with new AAA 1.5V alkaline batteries, ensuring correct polarity. |
| Water is leaking from connections. | Loose connections, missing or damaged O-ring/washer. | Ensure all connections are hand-tight. Check for and replace any damaged O-rings or washers. Use the included O-ring gasket if needed. |
| Timer does not water at scheduled time. | Timer is set to OFF, rain delay is active, low battery, or incorrect program settings. | Rotate dial to ON. Check if rain delay is active and cancel if necessary. Replace batteries. Verify START TIME, HOW LONG, and HOW OFTEN settings. |
| Water flow is weak or inconsistent. | Clogged filter, low water pressure from faucet. | Clean the mesh filter at the water inlet. Ensure your faucet is fully open and check household water pressure. |
| Timer falls off faucet. | Connection not secure. | Ensure the timer is securely hand-tightened to the faucet. Avoid excessive force that could damage threads. |
Specifications
- Model: M02
- Material: Plastic
- Product Dimensions: 3.81"D x 2.24"W x 4.13"H
- Item Weight: 8.2 ounces (0.51 Pounds)
- Number of Settings: 3 (Auto, Manual, Rain Delay)
- Watering Duration: 1 minute to 240 minutes
- Watering Frequency: Every 1-23 hours or every 1-15 days
- Power Source: 2 x AAA 1.5V Alkaline Batteries (not included)
- Water Pressure: Up to 35KG
- Water Inlet Thread: 3/4" Garden Hose Thread
- Waterproof Rating: IPX5
Warranty and Support
XinFuture is committed to providing quality products and customer satisfaction. While specific warranty details are not provided in this manual, if you encounter any issues or have questions regarding your XinFuture Water Timer, please contact XinFuture customer support. You can often find contact information on the product packaging or through the retailer where the product was purchased. For general inquiries, you may visit the XinFuture Store on Amazon.
The manufacturer states: "Having Any Questions About Our Items When You Get, Please Communicate with Us, You Will Be Given a Solution What You Want."
Ask a question about this manual
Ask about setup, troubleshooting, compatibility, parts, safety, or missing instructions. Manuals+ will review the question and use this page’s manual context to help answer it.