Garvee greenhouse
Garvee 6x10 FT Greenhouse Instruction Manual
Model: Greenhouse
1. Introduction
This manual provides detailed instructions for the assembly, operation, and maintenance of your Garvee 6x10 FT Greenhouse. Please read this manual thoroughly before beginning assembly or use to ensure proper function and longevity of your greenhouse. This greenhouse is designed for outdoor use, providing a protected environment for plants.

Image 1.1: Full exterior view of the Garvee 6x10 FT Greenhouse.
2. Safety Information
Please observe the following safety precautions during assembly and use:
- Handle materials with care to avoid injury from sharp edges. Protective gloves are recommended during assembly.
- Ensure proper anchoring during installation to prevent damage or injury in windy conditions. The greenhouse must be securely fastened to the ground.
- Keep children and pets away from the assembly area.
- Do not climb on the greenhouse structure.
- Verify all connections are tight and secure after assembly and periodically during use.
3. Package Contents
The Garvee 6x10 FT Greenhouse arrives in two separate packages. Please verify all components are present before beginning assembly. If any parts are missing or damaged, contact customer support immediately.

Image 3.1: The greenhouse components are shipped in two distinct packages.
Expected components include:
- Aluminum frame profiles (various lengths and shapes)
- Polycarbonate panels
- Hardware kit (screws, nuts, bolts, rivets)
- Door assembly components
- Roof vent assembly components
- Integrated gutter system components
- Instruction manual
4. Setup and Installation
The Garvee greenhouse features a quick installation structure with a rivet system and sliding panel assembly. Follow the included detailed assembly instructions step-by-step.
4.1. Site Preparation
- Choose a level, well-drained site with adequate sunlight exposure.
- Clear the area of debris, rocks, and vegetation.
- Ensure sufficient space around the greenhouse for assembly and access.
4.2. Frame Assembly
Assemble the aluminum frame according to the provided diagrams. The frame is designed for durability and rust resistance.
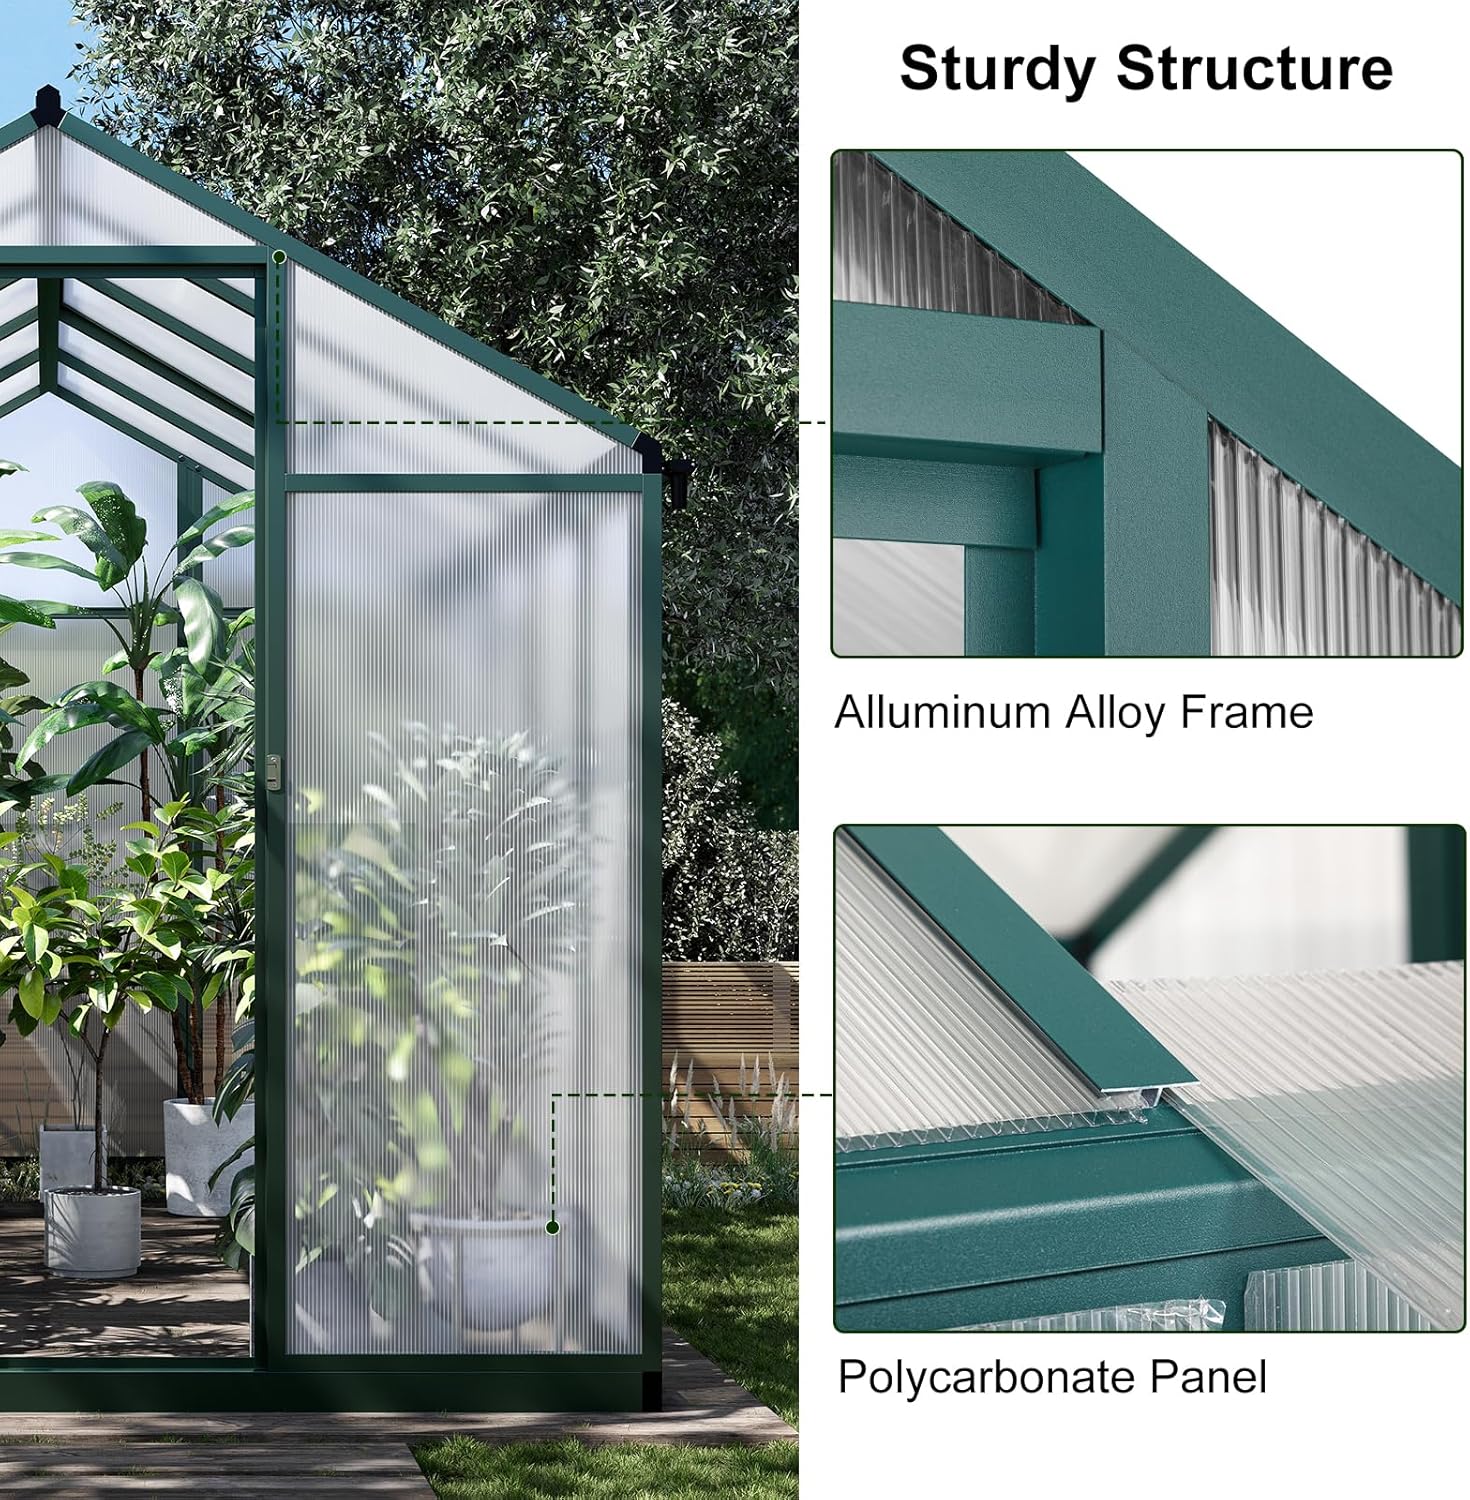
Image 4.1: Detail of the sturdy aluminum alloy frame and polycarbonate panel connection.
4.3. Panel Installation
Slide the polycarbonate panels into the designated frame channels. These panels offer 99.99% UV protection and insulation.
4.4. Door and Vent Installation
Install the door and roof vent assemblies. The door includes a security lock for controlled access.
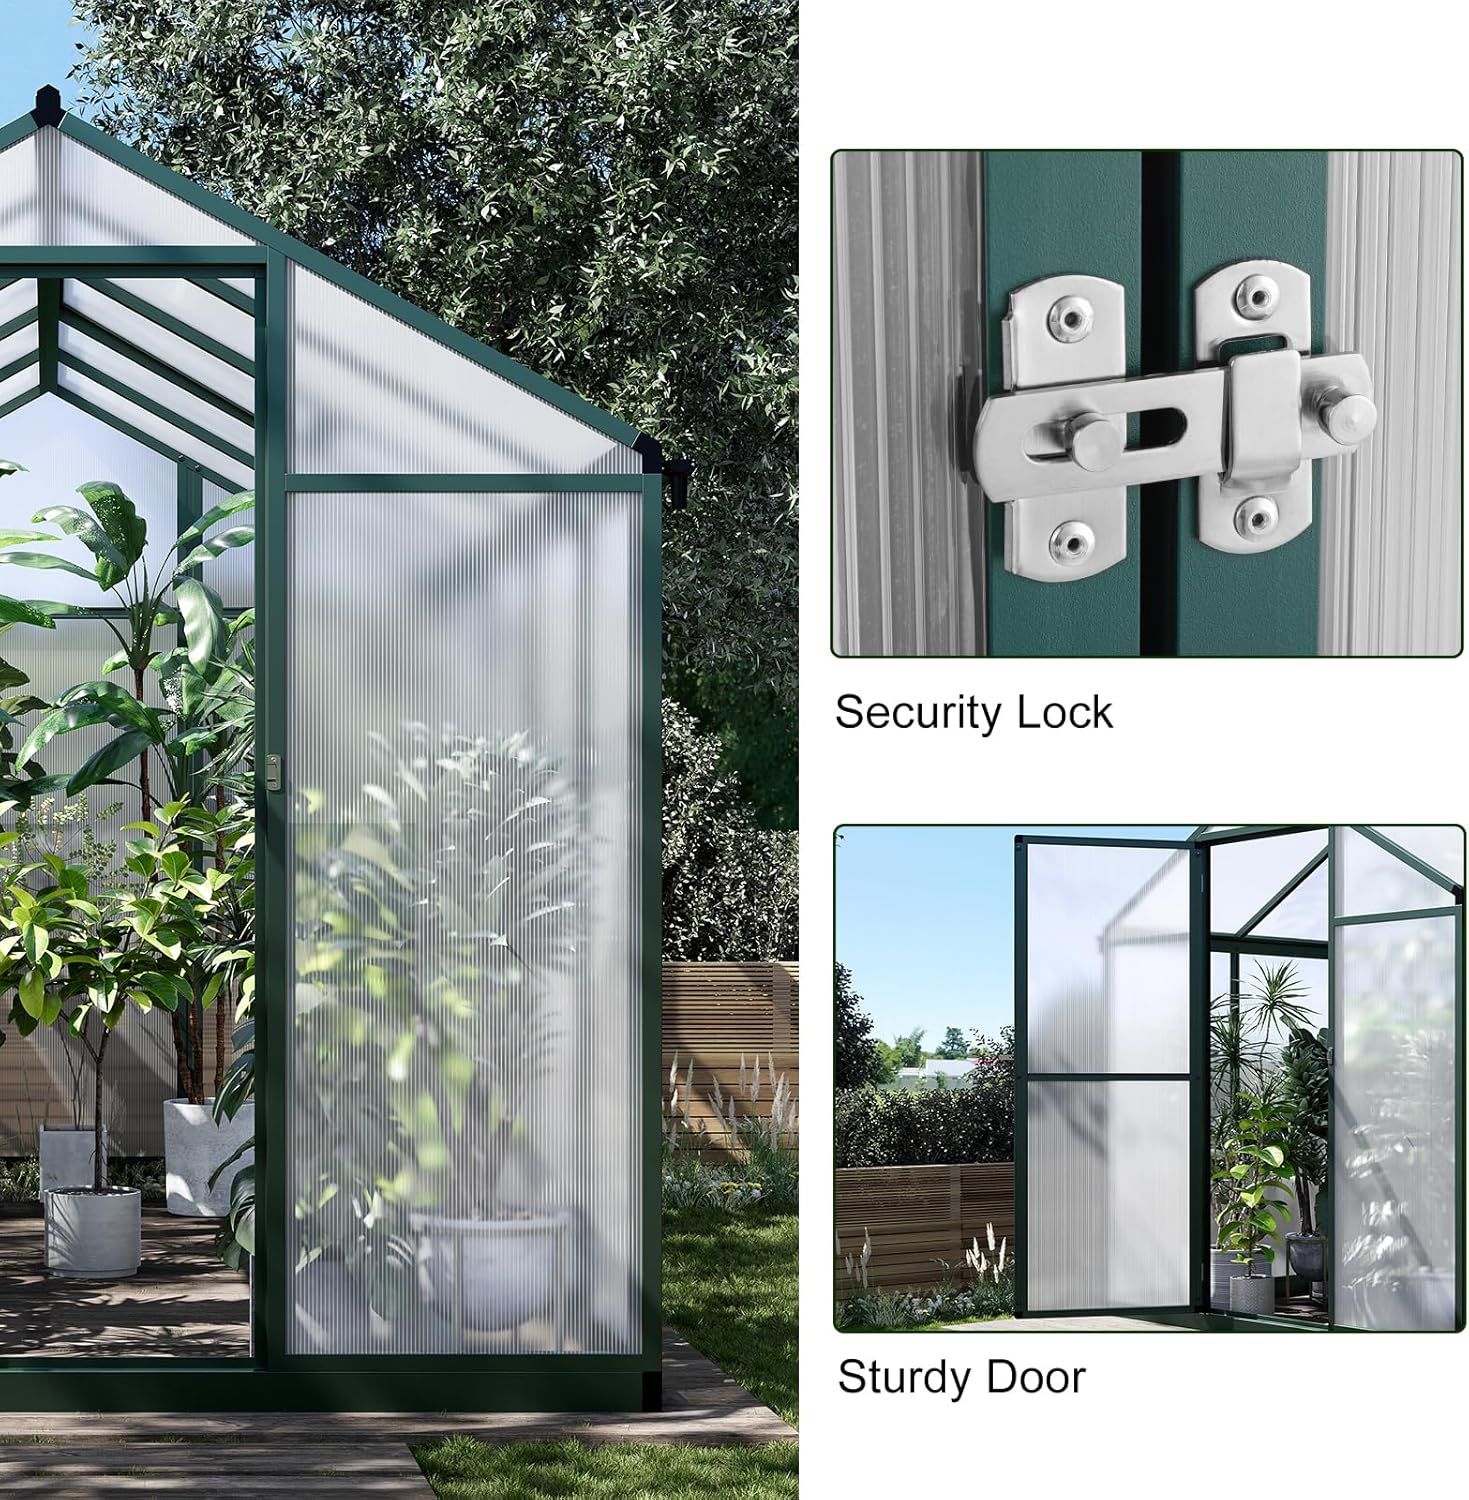
Image 4.2: Detail of the sturdy door and integrated security lock.
4.5. Anchoring
Securely anchor the greenhouse to the ground using appropriate methods for your soil type to prevent movement in high winds.
5. Operating Instructions
5.1. Ventilation
The hinged roof vent allows for air circulation, which is crucial for regulating temperature and humidity inside the greenhouse. Open the vent to release excess heat and humidity, and close it to retain warmth.

Image 5.1: Detail of the rooftop vent for air circulation and the integrated gutter system.
5.2. Water Management
The integrated gutter system effectively drains and collects rainwater. This water can be collected and reused for irrigation, promoting water conservation.
6. Maintenance
- Cleaning: Periodically clean the polycarbonate panels with mild soap and water to ensure maximum light transmission. Avoid abrasive cleaners.
- Frame Inspection: Regularly inspect the aluminum frame for any signs of damage or corrosion. Tighten any loose bolts or rivets.
- Vent and Door Check: Ensure the roof vent and door operate smoothly and latch securely. Lubricate hinges if necessary.
- Gutter Cleaning: Clear the integrated gutters of leaves and debris to ensure efficient water drainage.
7. Troubleshooting
- Missing Parts: If you find any parts missing upon delivery, refer to the package contents section and contact Garvee customer support with your purchase details.
- Structural Instability: Ensure the greenhouse is properly anchored to the ground. Re-check all frame connections and tighten any loose hardware.
- Poor Ventilation: Verify the roof vent is opening and closing correctly. Clear any obstructions that might be blocking airflow.
- Water Leakage: Inspect polycarbonate panel seals and frame connections for gaps. Apply silicone sealant if necessary to prevent leaks.
8. Specifications
| Feature | Specification |
|---|---|
| Brand | Garvee |
| Model Number | greenhouse |
| Product Dimensions (L x W x H) | 118.8" x 76.7" x 74.8" (302cm x 195cm x 190cm) |
| Item Weight | 57 pounds |
| Frame Material | Aluminum |
| Cover Material | Polycarbonate (PC) |
| UV Protection | 99.99% |
| Number of Doors | 1 |
| Number of Vents | 1 (Rooftop) |
| Special Feature | Quick Installation, Integrated Gutter |
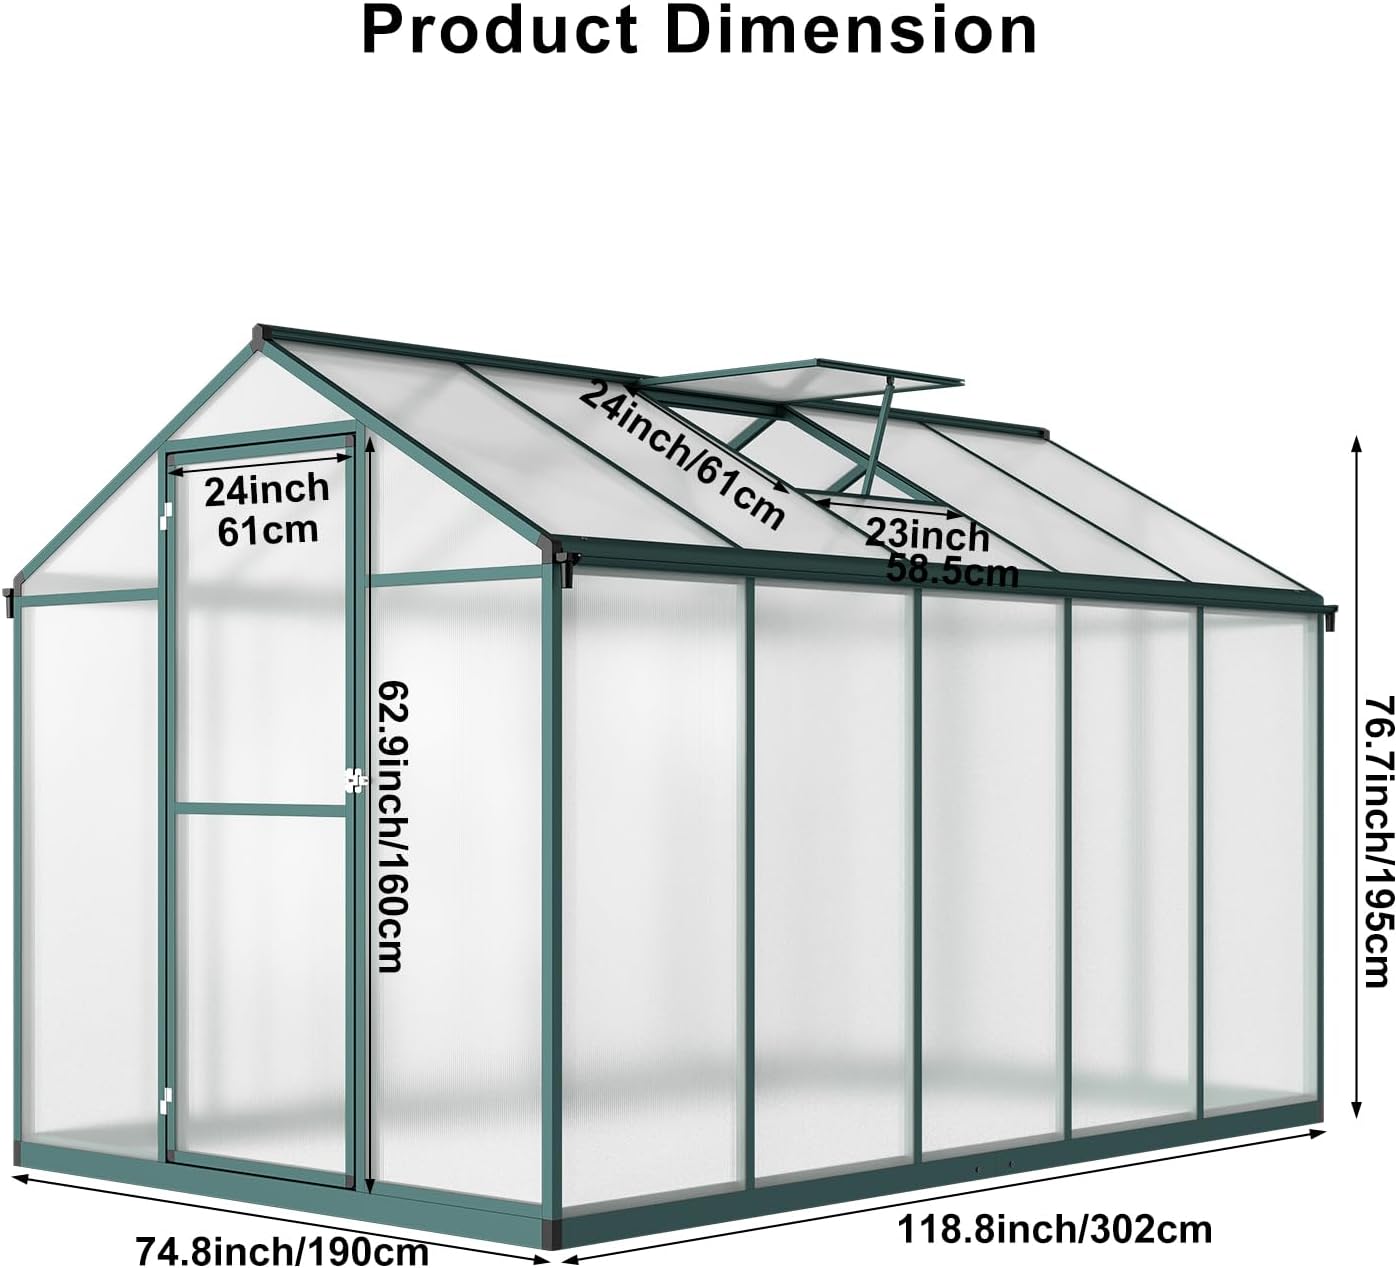
Image 8.1: Detailed product dimensions for the Garvee 6x10 FT Greenhouse.
9. Warranty and Support
For warranty information or customer support, please refer to your purchase documentation or contact Garvee directly through their official channels. Ensure you have your product model number and purchase date available when contacting support.