1. Introduction
Thank you for choosing the KEMIMOTO Motorcycle Rear Rack. This product is designed to enhance the cargo carrying capacity of your Yamaha XT250 motorcycle, model years 2008-2025. This manual provides essential information for proper installation, operation, and maintenance to ensure safe and effective use of your new rear rack.
2. Product Features
- Compatibility: Designed specifically for Yamaha XT250 motorcycles from 2008 to 2025. Note: Fuel tank is not included with this product.
- Durable Construction: Constructed from alloy steel for durability and stability, providing long-lasting performance.
- Scratch Resistance: Features a powder-coated finish for enhanced scratch resistance compared to standard spray paint.
- Versatile Attachment Points: The rack's design includes multiple attachment points for securing various types of cargo.
- Cargo Capacity: Optimized for carrying cargo, duffel bags, and backpacks securely.
3. Package Contents
Please verify that all components are present before beginning installation:
- Part A: Rack Main Body (x1)
- Part B: Left Support Arm (x1)
- Part C: Right Support Arm (x1)
- Sleeve (x6)
- M8*60 Screw (x2)
- M8*30 Screw (x6)
- M8 Washer (x8)
- M8 Nut (x4)

Figure 1: Included Parts and Dimensions
4. Setup and Installation
Follow these steps for proper installation of the KEMIMOTO Motorcycle Rear Rack. It is recommended to watch the official installation video for visual guidance.
- Prepare the Motorcycle: Remove the motorcycle seat, exhaust heat shield, and any existing OEM grab handles from the rear of the bike.
- Install Mounting Brackets: Attach the provided mounting brackets to the motorcycle frame. Ensure that the left ('L') and right ('R') brackets are placed on the correct sides. Secure them using the appropriate screws and washers.
- Attach Support Arms: Connect the support arms (Part B and Part C) to the installed mounting brackets using the M8*30 screws, sleeves, and washers. Do not fully tighten at this stage.
- Mount the Main Rack Body: Position the main rack body (Part A) onto the support arms. Align the holes and secure it with the M8*60 screws, washers, and nuts.
- Tighten All Fasteners: Once all components are in place and aligned, carefully tighten all screws and nuts. Ensure all connections are secure but avoid over-tightening, which could damage components.
- Reinstall Components: Reinstall the motorcycle seat and exhaust heat shield.
Video 1: KEMIMOTO Motorcycle XT250 Luggage Rack Installation Guide. This video demonstrates the step-by-step process for installing the rear rack on an XT250 motorcycle.

Figure 2: Exploded View of Rack Assembly

Figure 3: Installed Rear Rack on XT250
5. Operating Instructions
The KEMIMOTO Rear Rack provides a stable platform for transporting various items. Utilize the multiple attachment points to secure your cargo safely.
- Cargo Placement: Distribute weight evenly across the rack to maintain motorcycle balance.
- Securing Items: Use bungee cords, cargo nets, or straps through the rack's various slots and holes to firmly secure luggage, duffel bags, or other items. Ensure no items are loose or can interfere with the motorcycle's moving parts or rider's control.
- Weight Limit: Adhere to the motorcycle manufacturer's recommended maximum load capacity for the rear section of the bike. Overloading can affect handling and safety.
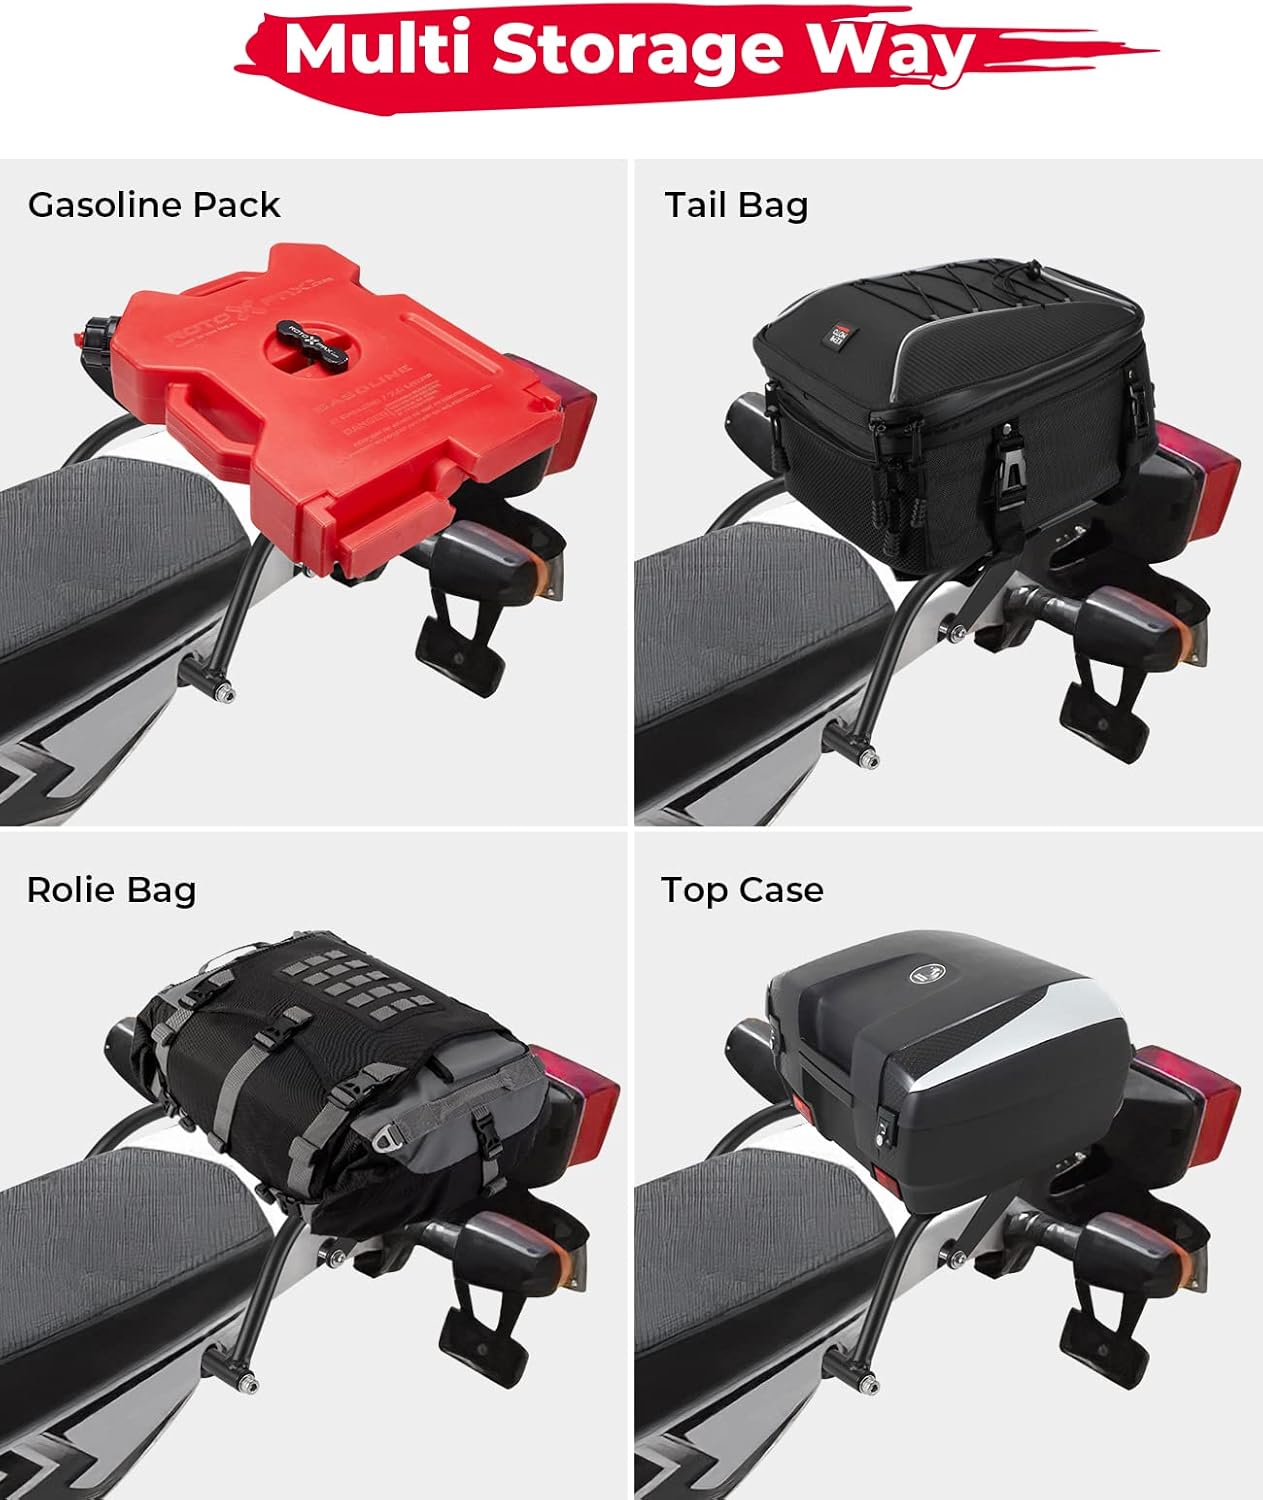
Figure 4: Multiple Storage Options
6. Maintenance
To ensure the longevity and performance of your KEMIMOTO Rear Rack, follow these maintenance guidelines:
- Regular Inspection: Periodically check all mounting bolts and nuts for tightness. Vibrations from riding can cause fasteners to loosen over time.
- Cleaning: Clean the rack with mild soap and water. Avoid abrasive cleaners or solvents that could damage the powder-coated finish.
- Damage Check: Inspect the rack for any signs of damage, cracks, or excessive wear, especially after off-road use or impacts. Replace if structural integrity is compromised.
- Corrosion Prevention: Although powder-coated for protection, regularly inspect for chips or scratches in the coating that could expose the alloy steel to moisture and lead to corrosion. Touch up as needed.
7. Troubleshooting
If you encounter issues during installation or use, consider the following:
- Fitment Issues: If the rack does not seem to align perfectly, ensure all OEM components (like grab handles) have been fully removed. Sometimes, slight manipulation or loosening all bolts before final tightening can help achieve proper alignment. Verify that the correct model year range (2008-2025 XT250) is being used.
- Loose Fasteners: If the rack feels unstable, re-check the tightness of all M8*60 and M8*30 screws and M8 nuts. Ensure washers are correctly placed.
- Rattling Noise: A rattling noise may indicate loose fasteners or improper installation. Re-inspect all connection points.
- Damaged Hardware: If any screws or nuts appear stripped or damaged during installation, replace them with equivalent or higher-grade hardware to ensure safety and stability.
8. Specifications
| Attribute | Specification |
|---|---|
| Model Number | KMF0365-00701 |
| Color | Black |
| Vehicle Service Type | XT250 |
| Material | Alloy Steel |
| Item Dimensions (L x W x H) | 17 x 11 x 4.33 inches |
| Item Weight | 2 Kilograms |
| Mounting Type | Easy Snap |
9. Warranty and Support
Specific warranty information for this product is not provided in the available details. For warranty claims, technical support, or further assistance, please contact KEMIMOTO customer service directly or refer to the seller's return and support policies.