1. Introduction
This manual provides instructions for the assembly, operation, and maintenance of your Cyclysio 47-inch Gaming Desk with Hutch. Please read this manual thoroughly before assembly and use to ensure proper function and safety.
2. Safety Information
WARNING: Failure to follow these safety instructions may result in injury or damage to the product.
- Always assemble the desk on a stable, level surface.
- Ensure all parts are securely fastened before use.
- For added stability, consider anchoring the desk to the wall, especially in homes with children or pets.
- Do not place heavy items on the desk that could cause it to tip over.
- Always follow the assembly instructions carefully to prevent injury.
- Do not exceed the maximum weight recommendation of 100 pounds.
3. Package Contents
Verify that all components are present before beginning assembly. If any parts are missing or damaged, please contact customer support.
- Desk Frame Components (metal)
- Desk Panels (wood)
- Hutch Components
- 5-Tier Storage Shelves
- LED Light Strips
- Power Outlets Unit (3 AC, 2 USB)
- Movable Monitor Stand
- Assembly Hardware (screws, bolts, tools)
- Instruction Manual
4. Specifications
| Feature | Detail |
|---|---|
| Brand | Cyclysio |
| Model | Gaming Desk |
| Dimensions (D x W x H) | 19.7" x 47.3" x 58.1" |
| Color | Black |
| Material | Wood (Top), Metal (Frame) |
| Max Weight Capacity | 100 Pounds |
| Power Outlets | 3 AC (125V/12A), 2 USB (5V/2A) |
| Power Cord Length | 6.6 Feet |
| LED Lights | RGB, Music Sync, Timer Function, Built-in Mic |
| Storage | Hutch, Reversible 5-tier adjustable shelves |
| Special Features | Movable Monitor Stand, Headphone Hooks |
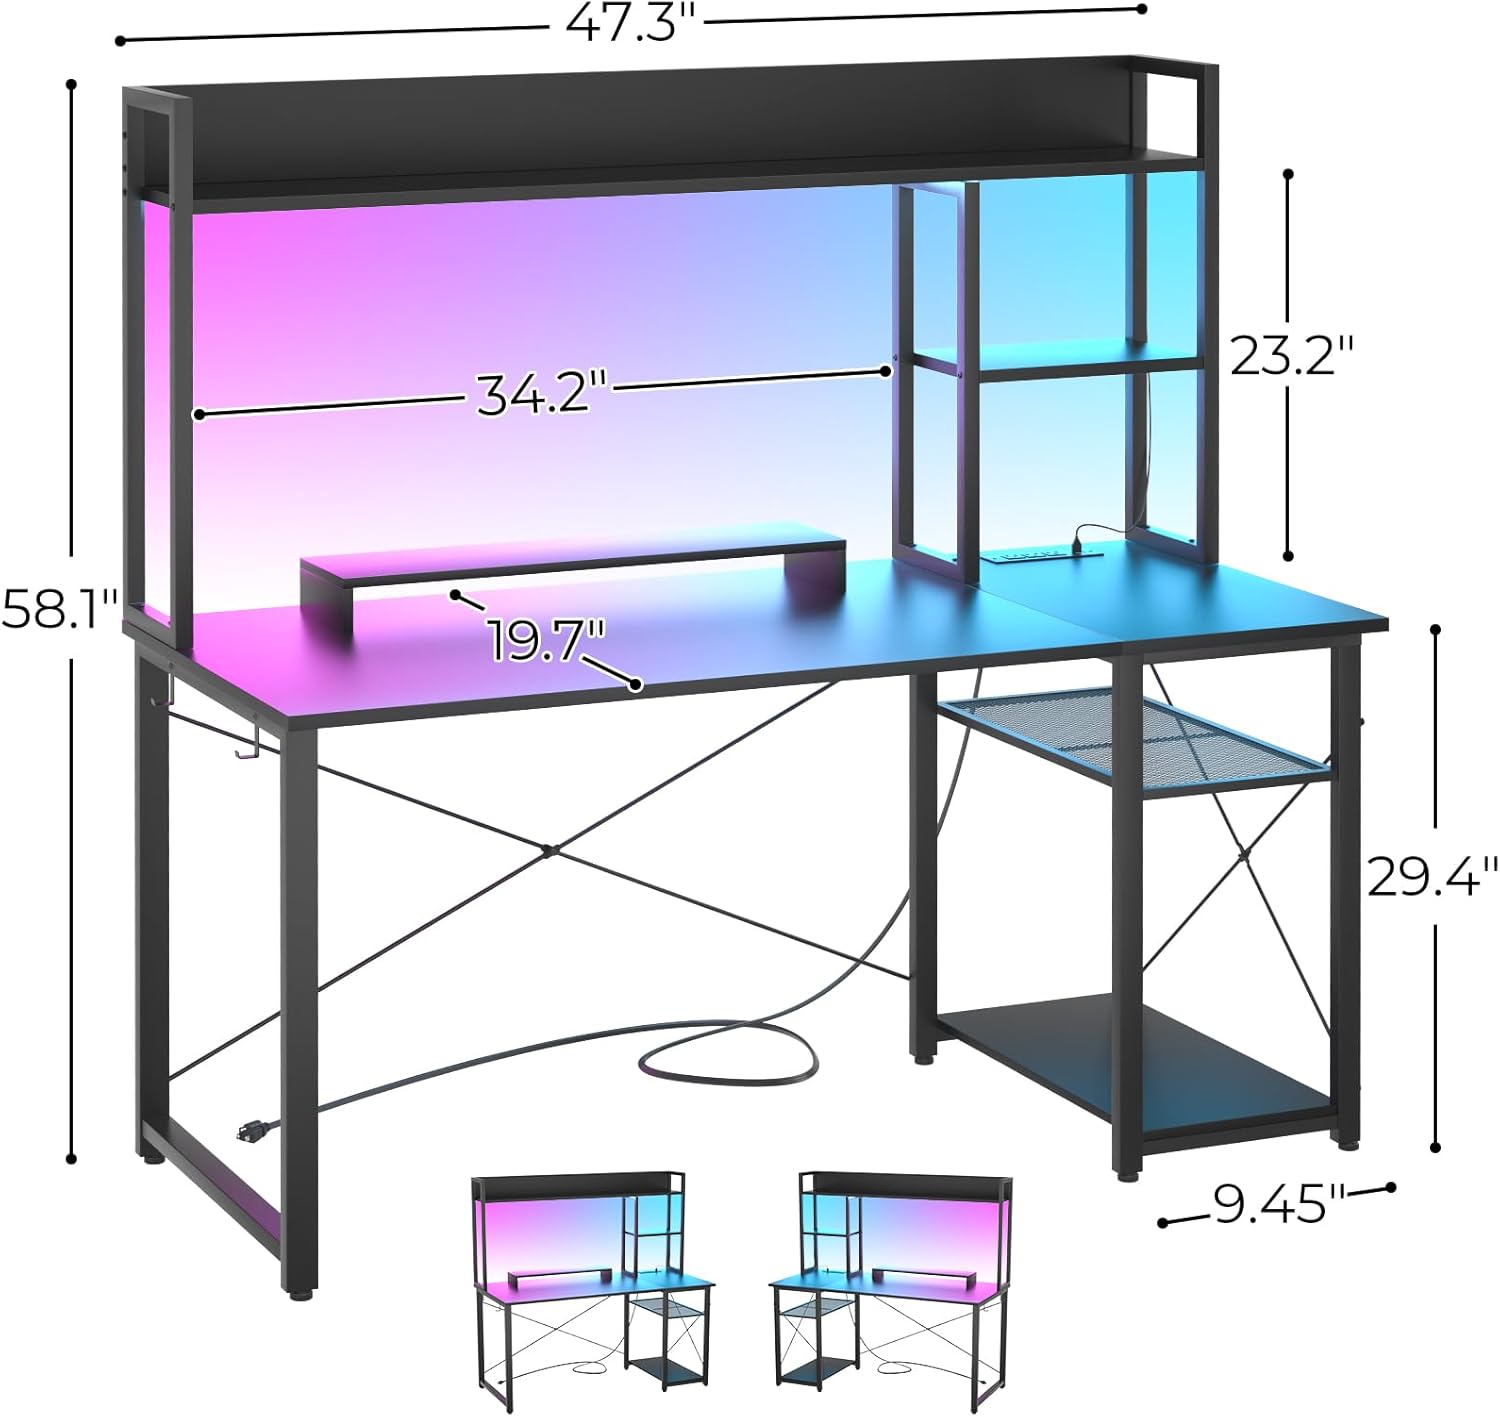
Image 1: Detailed dimensions of the Cyclysio 47-inch Gaming Desk with Hutch, showing height, width, and depth measurements for various sections.
5. Assembly Instructions
Assembly is required for this product. Please follow the step-by-step instructions provided in the included assembly manual. It is recommended to have two people for assembly to ensure stability and ease of construction.
- Unpack and Identify Parts: Lay out all components and hardware. Compare them with the parts list in your separate assembly guide to ensure everything is present.
- Assemble the Main Frame: Begin by connecting the metal frame components as per the diagrams. Ensure all screws are finger-tightened initially.
- Attach Desk Panels: Secure the main desktop and side panels to the frame.
- Install Storage Shelves: The 5-tier storage shelves can be installed on either the left or right side. Follow the instructions for your preferred configuration. The shelf height is adjustable.
- Mount the Hutch: Attach the top hutch structure to the main desk frame.
- Integrate Power Outlets: Install the power outlet unit into the designated slot on the desktop.
- Apply LED Light Strips: Adhere the LED light strips to the underside of the hutch or other desired locations. Connect them to the power source.
- Attach Accessories: Install headphone hooks and place the movable monitor stand as desired.
- Final Tightening: Once all components are in place, systematically tighten all screws and bolts using the provided tools. Do not overtighten.

Image 2: Illustration showing the reversible nature of the 5-tier storage shelves, which can be configured on either the left or right side of the desk.

Image 3: Close-up view highlighting the top hutch for display, the dedicated CPU stand area, convenient headphone hooks, and the adjustable height feature of the storage shelves.
6. Operating Instructions
6.1. LED Light Strips
The integrated LED light strips offer various customization options to enhance your environment.
- Power On/Off: Use the included remote control or app to turn the lights on or off.
- Color Selection: Choose from over 60,000 colors to match your preference.
- Music Sync Function: The built-in microphone allows the lights to react and dance to the rhythm of music. Activate this feature via the remote or app.
- Timer Function: Set a timer for the lights to automatically turn off after a specified duration.
- Brightness Adjustment: Adjust the intensity of the lights using the controls.

Image 4: The gaming desk illuminated by LED lights, showcasing the vibrant color options and indicating control via a mobile application.
6.2. Power Outlets
The desktop features a built-in power strip for convenient access to power for your devices.
- AC Outlets: Three 125V/12A AC outlets are available for standard electronics.
- USB Ports: Two 5V/2A USB ports are provided for charging mobile devices and other USB-powered accessories.
- Usage: Simply plug your devices into the appropriate outlets. Ensure the desk's main power cord is connected to a wall outlet.

Image 5: A close-up of the integrated power strip on the desk, featuring three AC outlets and two USB ports for charging and powering devices.
6.3. Monitor Stand
The movable monitor stand helps maintain an ergonomic posture by elevating your monitor to eye level.
- Placement: Position the monitor stand anywhere along the main desktop for optimal viewing.
- Ergonomics: Adjust your monitor height so the top of the screen is at or slightly below eye level to reduce neck and eye strain.

Image 6: An illustration demonstrating the benefit of the monitor stand in achieving a correct and healthy sitting posture, contrasting it with an incorrect posture.
7. Maintenance
- Cleaning: Wipe the desk surfaces with a damp cloth. Avoid harsh chemicals or abrasive cleaners that may damage the finish.
- Hardware Check: Periodically check all screws and bolts to ensure they remain tight. Retighten if necessary.
- Cable Management: Regularly organize cables to prevent tangles and potential hazards.
8. Troubleshooting
| Problem | Possible Cause | Solution |
|---|---|---|
| Desk wobbles after assembly. | Loose screws or uneven floor. | Ensure all screws are tightened. Adjust leveling feet if present, or place shims under legs on an uneven floor. |
| LED lights not working. | Power connection issue, remote battery dead, or light strip not properly connected. | Check if the LED power adapter is plugged in. Ensure the light strips are securely connected. Replace remote battery if applicable. |
| Power outlets not providing power. | Desk's main power cord not plugged in, or circuit breaker tripped. | Verify the desk's power cord is securely plugged into a functional wall outlet. Check your home's circuit breaker. |
| Missing parts during assembly. | Packaging error. | Contact Cyclysio customer support with your purchase details and the specific missing parts. |
9. Warranty and Support
Cyclysio products come with a limited warranty. For specific warranty details, please refer to the documentation included with your purchase or visit the official Cyclysio website. If you encounter any issues, require replacement parts, or have questions, please contact Cyclysio customer support.
Contact information can typically be found on the product packaging or the brand's official website: Cyclysio Store on Amazon