1. Important Safety Instructions
Please read all instructions carefully before using the appliance. Retain this manual for future reference.
- Always disconnect the appliance from the power supply before assembly, disassembly, or cleaning.
- Keep hands and utensils away from moving parts during operation to prevent injury.
- Never push food with your hands. Always use the food pusher provided.
- Ensure all parts are correctly assembled before switching on the appliance.
- Do not operate the appliance with a damaged cord or plug. Contact authorized service personnel for repairs.
- This appliance is intended for household use only. Do not use outdoors.
- Children should be supervised to ensure they do not play with the appliance.
- Avoid processing bones, nuts, or other hard items that could damage the grinding mechanism.
2. Product Overview
The Bosch MultiPower Series 4 MFWS420W is a versatile meat grinder designed for efficient processing of meat, fish, and vegetables. It features a powerful motor and robust construction for consistent performance.
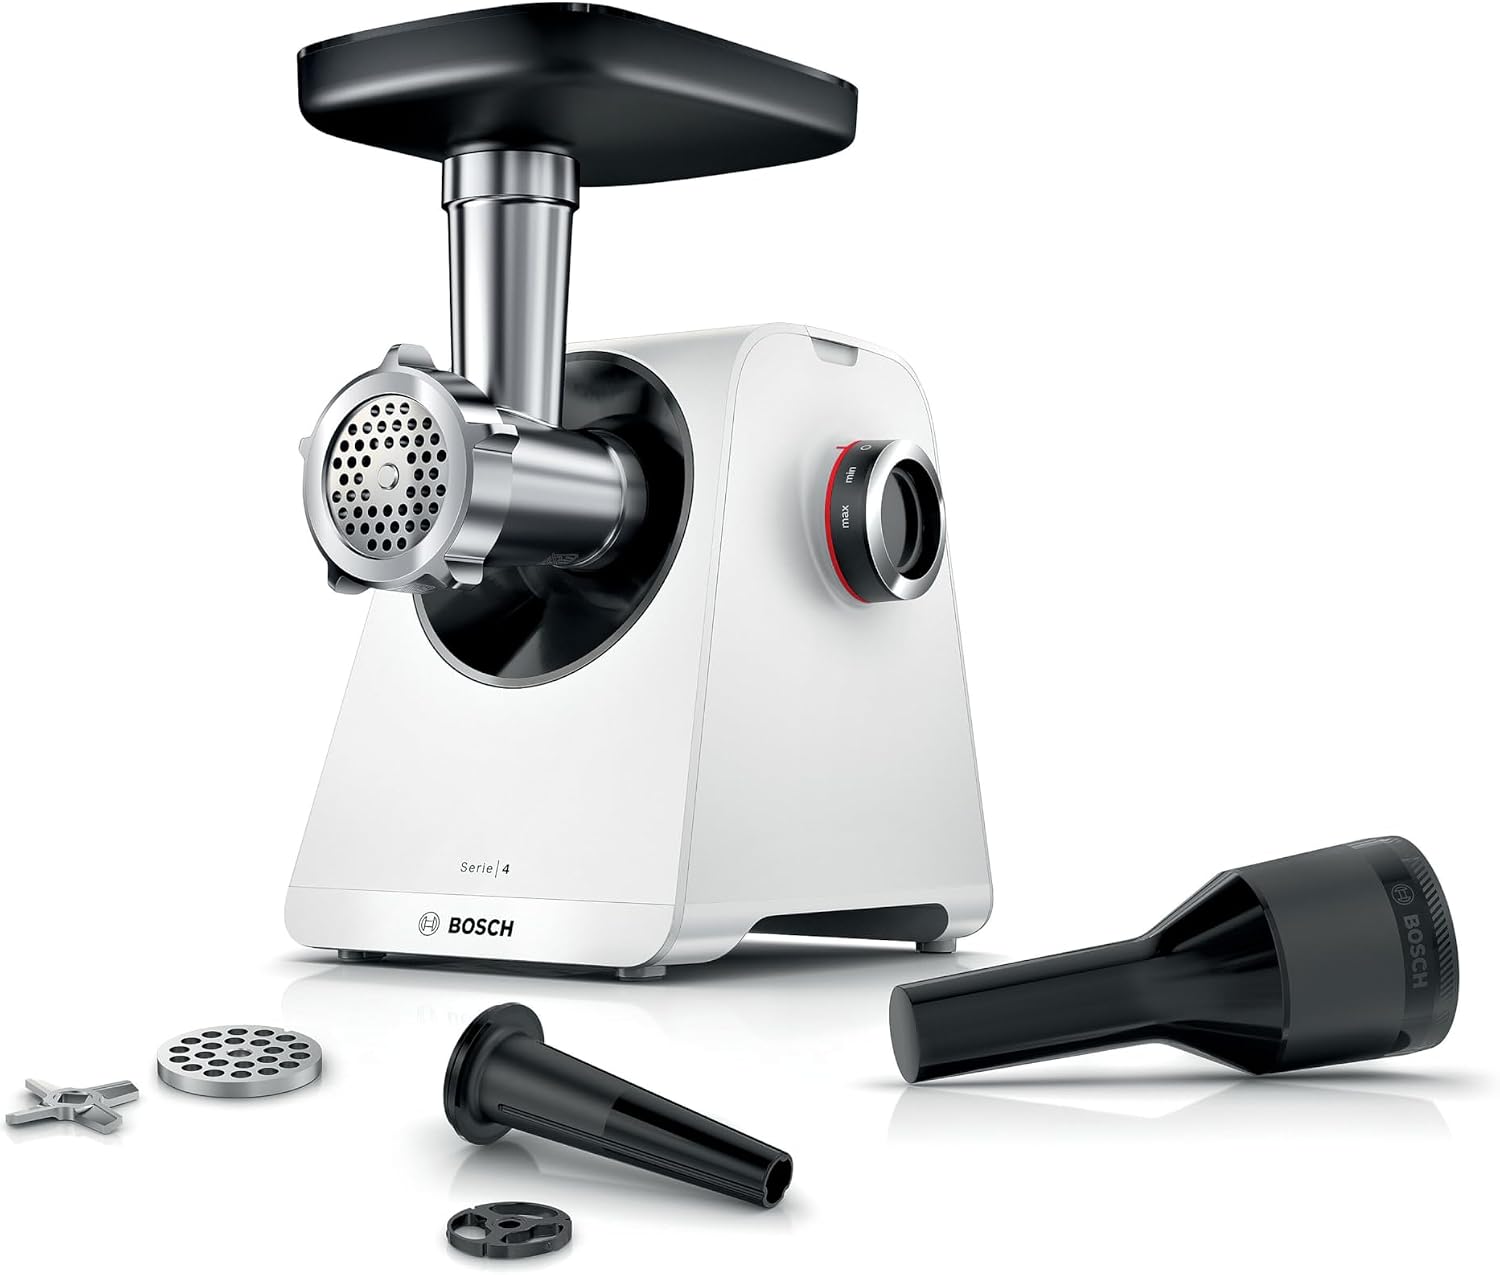
Figure 2.1: The Bosch MultiPower Series 4 MFWS420W Meat Grinder shown with its various accessories, including grinding plates, blade, and food pusher.
2.1 Components and Accessories
- Motor Unit (Main Body)
- Grinding Head (Metal)
- Feeding Tray
- Food Pusher
- Double-edged Blade
- Grinding Discs (e.g., 3mm fine, 8mm coarse)
- Sausage Stuffer Attachment

Figure 2.2: Product dimensions of the Bosch MultiPower Series 4 MFWS420W Meat Grinder: 175mm (width) x 230mm (depth) x 340mm (height).

Figure 2.3: Key internal features include a robust metal gear, a double-edged blade for efficient grinding, and a powerful 1900W motor for high performance.
3. Setup and Assembly
Before first use, ensure all packaging materials are removed and clean all removable parts according to the cleaning instructions.
3.1 Assembling the Grinding Head
- Insert the feed screw into the grinding head.
- Place the double-edged blade onto the feed screw, ensuring the sharp edges face outwards towards the grinding disc.
- Select the desired grinding disc (e.g., 3mm for fine, 8mm for coarse) and place it over the blade.
- Screw the locking ring onto the grinding head until it is securely tightened.
- Attach the assembled grinding head to the motor unit by aligning the tabs and rotating until it locks into place.
- Place the feeding tray onto the top of the grinding head.

Figure 3.1: Illustration of the simple assembly process for the grinding head components, including the feed screw, blade, grinding disc, and locking ring.
4. Operation
Ensure the appliance is placed on a stable, flat surface before operation.
4.1 Preparing Ingredients
- Cut meat into pieces that fit easily into the feeding tube (approximately 2-3 cm cubes).
- Remove any bones, gristle, or tough tendons from meat to prevent damage to the appliance.
- For best results, chill meat slightly before grinding.
4.2 Grinding Process
- Plug the appliance into a suitable power outlet.
- Place a bowl or container under the outlet of the grinding head to collect the ground food.
- Turn the control knob to the desired speed setting (Min or Max).
- Place prepared food into the feeding tray and gently push it down the feeding tube using the food pusher. Never use your hands.
- After grinding, turn the control knob to 'Stop/Off' and unplug the appliance.

Figure 4.1: The intuitive control knob allows for effortless speed adjustment (Min to Max) and includes a reverse function to clear blockages, along with a Stop/Off position.
4.3 Using Different Grinding Discs
The appliance comes with different grinding discs to achieve various textures:
- 3mm Disc: Ideal for fine grinding, suitable for pâtés, baby food, or finely ground meat.
- 8mm Disc: Suitable for coarse grinding, perfect for sausages, chili, or coarser ground meat.

Figure 4.2: The meat grinder operating with a 3mm disc for fine grinding (left) and an 8mm disc for coarse grinding (right), demonstrating the versatility for different food preparations.
4.4 Using the Sausage Stuffer
To make sausages, replace the grinding disc and blade with the sausage stuffer attachment. Prepare your sausage mixture and casings, then feed the mixture through the grinder while guiding the casing onto the stuffer nozzle.

Figure 4.3: The sausage stuffer attachment in use, demonstrating how to prepare homemade sausages with the appliance.
4.5 Using the Food Pusher
The food pusher is essential for safely guiding ingredients into the grinding mechanism. Always use it to push food down the feeding tube, never your fingers or other utensils.

Figure 4.4: The food pusher being used to safely guide ingredients into the meat grinder, ensuring hands are kept away from moving parts.
5. Maintenance and Cleaning
Regular cleaning ensures the longevity and hygienic operation of your meat grinder.
5.1 Disassembly for Cleaning
- Unplug the appliance from the power outlet.
- Remove the feeding tray.
- Unlock and detach the grinding head from the motor unit.
- Unscrew the locking ring and carefully remove the grinding disc, blade, and feed screw.
5.2 Cleaning Instructions
- Motor Unit: Wipe the motor unit with a damp cloth. Never immerse it in water or other liquids.
- Removable Parts: The grinding head, feeding tray, food pusher, blade, and grinding discs are generally dishwasher-safe. Refer to the product markings for specific dishwasher compatibility. For hand washing, use warm soapy water and a brush to remove any food residue. Rinse thoroughly and dry immediately to prevent rust, especially for metal parts.

Figure 5.1: Illustration showing the ease of cleaning, with some parts suitable for dishwasher cleaning and others being hand-washed under running water.
5.3 Storage
Store the clean and dry appliance and its accessories in a safe place. The Bosch MultiPower Series 4 MFWS420W features integrated storage solutions for convenience.

Figure 5.2: The appliance offers practical storage for grinding discs and other small accessories directly within the unit, keeping them organized and easily accessible.

Figure 5.3: The integrated cord storage compartment on the back of the motor unit allows for neat and easy storage of the power cable.
6. Troubleshooting
If you encounter issues with your meat grinder, refer to the following table for common problems and solutions.
| Problem | Possible Cause | Solution |
|---|---|---|
| Appliance does not start. | Not plugged in; power outage; incorrect assembly. | Check power connection; verify power supply; ensure grinding head is correctly attached. |
| Food is not grinding or is grinding slowly. | Feeding tube overloaded; blade or disc blocked; incorrect assembly of blade/disc. | Reduce amount of food; use reverse function to clear blockage; disassemble and reassemble blade/disc correctly. |
| Unusual noise during operation. | Hard object in grinder; loose parts; motor issue. | Immediately switch off and unplug. Disassemble and check for foreign objects. If problem persists, contact customer service. |
| Meat is mushy, not ground. | Meat is too warm; blade is dull or incorrectly installed. | Chill meat before grinding; check blade orientation; consider replacing blade if dull. |
7. Specifications
Detailed technical specifications for the Bosch MultiPower Series 4 MFWS420W Meat Grinder.
| Feature | Specification |
|---|---|
| Model Number | MFWS420W |
| Brand | Bosch |
| Power (Rated) | 900 Watts |
| Blocking Power | 1900 Watts |
| Voltage | 230 Volts |
| Capacity | Up to 2.5 kg/minute |
| Dimensions (L x W x H) | 17.5 x 23 x 34 cm |
| Weight | 3.8 Kilograms |
| Material | Plastic, Metal |
| Color | White |
8. Warranty and Support
Bosch stands by the quality of its products. This appliance comes with a comprehensive warranty.
8.1 Warranty Information
The Bosch MultiPower Series 4 MFWS420W Meat Grinder is covered by a 10-year warranty. This warranty covers manufacturing defects and ensures reliable performance under normal household use. Please retain your proof of purchase for warranty claims.
Figure 8.1: The 10-year warranty badge, indicating extended coverage for the product.
8.2 Customer Support
For technical assistance, spare parts, or warranty claims, please contact Bosch customer service. You can find contact details on the official Bosch website or in the product packaging.
Online Resources: Visit the official Bosch website for FAQs, product registration, and additional support materials.
9. Environmental Protection
Bosch is committed to sustainability. This product and its packaging are designed with environmental considerations.
- Inner packaging made from 100% recycled paper.
- Outer packaging made from >90% recycled paper.
- Instruction manual printed on 100% recycled paper.