VELOCAVA Lift Up Storage King
VELOCAVA King Size Upholstered Lift-Up Storage Bed Instruction Manual
Model: Lift Up Storage King
Brand: VELOCAVA
Important Safety Information
Please read and understand all instructions before assembly and use. Failure to follow these instructions may result in injury or damage to the product.
- Always follow assembly instructions carefully to prevent instability or collapse.
- Do not exceed the maximum weight limit of 900 lbs for the bed frame.
- Be cautious when using the lift-up mechanism to avoid injury. Ensure hands and fingers are clear of moving parts.
- Ensure the mattress is placed on the frame before attempting to close the hydraulic lift mechanism, as the weight of the mattress is required for proper operation.
Package Contents
Before beginning assembly, verify that all components listed below are present and undamaged. If any parts are missing or damaged, please contact customer service.
- Headboard (Upholstered Vertical Panel)
- Side Rails (Upholstered)
- Footboard (Upholstered)
- Hydraulic Lift Mechanism (Pre-assembled on frame sections)
- Wooden Slats (14 plywood slats)
- Dustproof Fabric Cover (for under-bed storage base)
- Hardware Kit (screws, bolts, washers, hex key)
- Center Support Beam with Legs
Note: An electric drill or powered screwdriver with appropriate hex bit is highly recommended for faster assembly.
Setup and Assembly Instructions
Assembly typically requires two people and may take approximately 1.5 to 2 hours. Follow the numbered steps carefully.
Step 1: Assemble the Bed Frame Base
Connect the upholstered side rails and footboard to form the rectangular base. Ensure all connections are secure using the provided hardware.
Description: This image displays the partially assembled bed frame, showing the headboard connected to the side rails, forming the main structure of the bed. The internal metal frame is visible, indicating the initial stages of assembly.
Step 2: Attach the Headboard
Securely attach the headboard to the assembled bed frame using the designated bolts and washers from the hardware kit. Ensure a tight fit for stability.

Description: This image shows the headboard fully attached to the bed frame, highlighting the vertical panel design and the beige linen-look fabric. The bed frame is now complete in its basic structure.
Step 3: Install the Center Support Beam
Position the metal center support beam with its legs in the middle of the bed frame. Fasten it securely to the frame using the appropriate screws and washers. This beam provides crucial support for the slats and mattress.

Description: This image illustrates the robust metal structure of the bed frame, including the center support beam, designed for heavy weight capacity and stability.
Step 4: Attach the Hydraulic Lift Mechanism
The hydraulic lift mechanism is typically pre-assembled on sections of the frame. Attach these sections to the main bed frame. Ensure all bolts are tightened for safe and smooth operation.
Description: This video demonstrates the installation process for the hydraulic pump mechanism, showing how to secure it to the bed frame. It highlights the components and steps involved in setting up the lift system.
Step 5: Install the Wooden Slats
Place the 14 plywood slats across the bed frame, ensuring they are evenly spaced and secured. The slats are often connected by straps for quick assembly and to reduce movement and noise.

Description: This image details the sturdy wooden slats, highlighting their dimensions (width: 1.77", thickness: 0.6", spacing: 3.74") and their role in providing strong mattress support without the need for a box spring.
Step 6: Attach the Dustproof Fabric Cover
Secure the dustproof fabric cover to the base of the under-bed storage area. This cover helps keep stored items clean and organized.

Description: This image contrasts a storage bed with a dustproof base (left) against one with an open design (right), emphasizing how the dustproof cover protects stored items from dust.
Step 7: Final Assembly Check
Double-check all screws and bolts to ensure they are securely tightened. Confirm that the hydraulic lift mechanism operates smoothly before placing the mattress.
Description: This video provides a comprehensive product installation guide, visually detailing each step of assembling the bed frame and hydraulic lift mechanism.
Operating Instructions
Using the Hydraulic Lift Storage
- To Lift: Locate the hand lifting strap, usually positioned at the foot of the bed. Gently pull the strap upwards. The hydraulic mechanism will assist in lifting the mattress platform smoothly.
- To Access Storage: Once the platform is fully raised, the spacious under-bed storage area is accessible. A metal stopper at the head of the frame helps prevent mattress sliding.
- To Lower: Apply gentle downward pressure on the mattress platform. The hydraulic system will allow it to lower slowly and safely back into place. Ensure hands and fingers are clear of the closing mechanism.

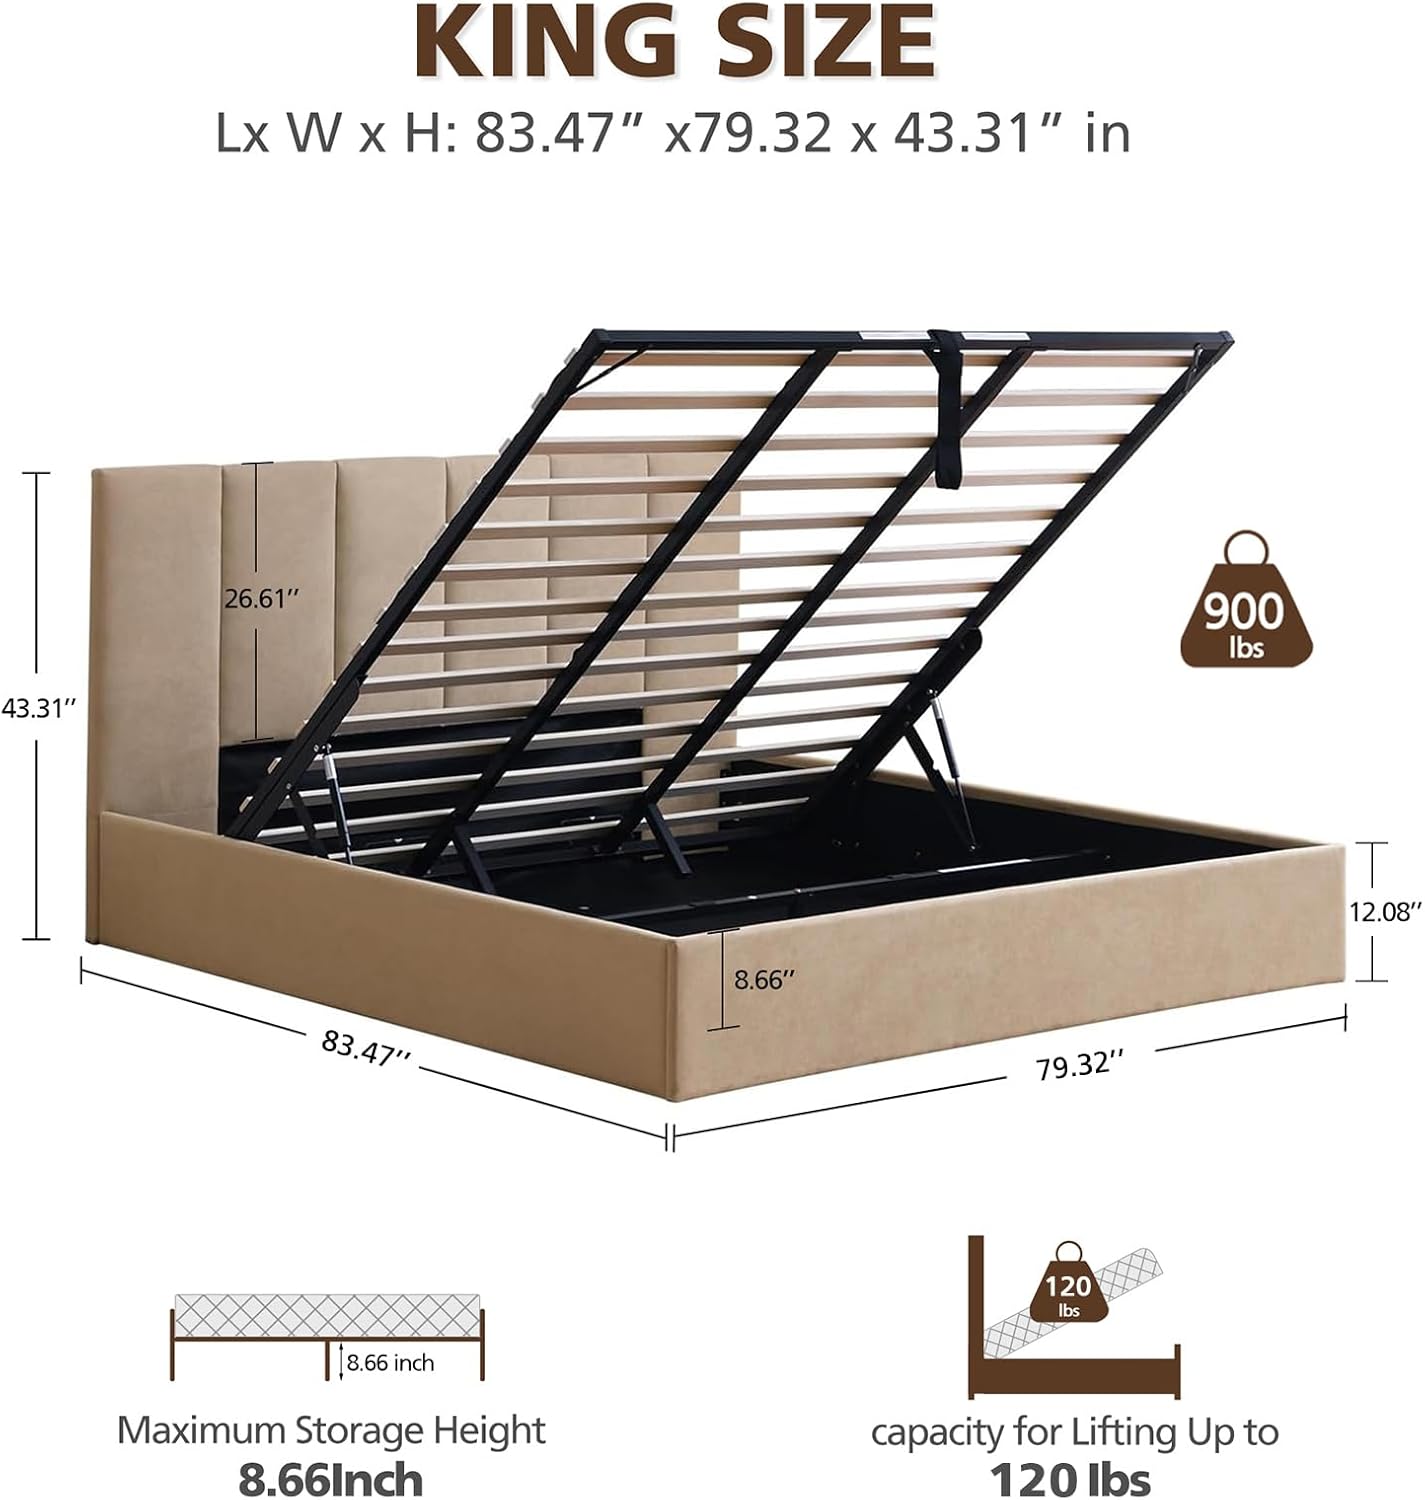
Description: This image shows the King Size Upholstered Lift-Up Storage Bed with its hydraulic mechanism fully open, showcasing the ample storage space beneath the mattress platform. The beige linen-look fabric and vertical panel headboard are also visible.

Description: This image visually compares the ample storage space provided by the lift-up bed to the capacity of a typical wardrobe, suggesting it can hold luggage, shoes, t-shirts, and quilts.
Maintenance
- Fabric Care: The linen-look fabric is designed to be skin-friendly, wear-resistant, and not prone to fading. For general cleaning, gently vacuum or brush to remove dust. For spills, blot immediately with a clean, damp cloth. Avoid harsh chemicals.
- Hardware Check: Periodically check all bolts and screws to ensure they remain tight. Re-tighten if necessary to maintain the bed's stability.
- Hydraulic Mechanism: The durable hydraulic lift is tested for longevity. No specific maintenance is typically required for the hydraulic pistons themselves, but keep the mechanism free of obstructions.

Description: This close-up image focuses on the bed's skin-friendly fabric and the vertical panel headboard, illustrating its easy-to-clean, wear-resistant, and fade-resistant qualities.
Troubleshooting
- Hydraulic Lift Does Not Stay Down / Is Hard to Close: This is normal if the mattress is not yet placed on the frame. The hydraulic mechanism is designed to work with the weight of a mattress. Once a mattress (within the recommended weight range) is on the frame, it should operate smoothly.
- Mattress Sliding: The bed features an embedded design and a metal stopper at the head of the frame to prevent mattress sliding. Ensure the mattress is properly seated within the frame.
- Noise from Slats: The wooden slats are secured with straps to help reduce movement and noise. Ensure all slats are correctly positioned and the straps are intact.
Specifications
| Feature | Detail |
|---|---|
| Size | King |
| Product Dimensions (L x W x H) | 83.46" x 79.32" x 43.31" |
| Color | Beige Linen |
| Special Features | Hydraulic Lift Storage, No Box Spring Needed, Plywood Slat Support Structure, Underbed Storage with Dustproof Cover |
| Included Components | Hardware Kit, Headboard, Hydraulic Lift Mechanism, Slats |
| Compatible Mattress Size | King |
| Item Weight | 132.9 pounds |
| Assembly Required | Yes |
| Recommended Mattress Weight (King) | ≤ 121 lbs (for smooth hydraulic lift operation) |
Customer Service & Support
VELOCAVA is committed to providing helpful and dedicated customer service. If you have any questions during assembly or use, or encounter any issues with your product, please do not hesitate to contact us. Our team is ready to provide clear guidance and practical assistance to ensure your experience is smooth and pleasant.
For support, please refer to the contact information provided with your purchase documentation or visit the official VELOCAVA website.
Ask a question about this manual
Ask about setup, troubleshooting, compatibility, parts, safety, or missing instructions. Manuals+ will review the question and use this page’s manual context to help answer it.