1. Introduction
Thank you for choosing the OLTEANP 2500W Pure Sine Wave Power Inverter. This device is engineered to convert 12V DC power from your vehicle's battery into stable 230V AC power, making it ideal for powering a wide range of electronic devices and home appliances on the go. With a continuous output of 2500W and a peak power of 5000W, it provides reliable electricity for RVs, road trips, van life, and various off-grid applications. Please read this manual thoroughly before installation and operation to ensure safe and efficient use.
2. Safety Instructions
Always observe the following safety precautions to prevent injury or damage to the inverter and connected devices:
- Proper Ventilation: Ensure the inverter is installed in a well-ventilated area. Do not block the cooling fans or vents.
- Dry Environment: Keep the inverter away from water, moisture, and any liquids.
- Avoid Flammable Materials: Do not operate the inverter near flammable gases, liquids, or materials.
- Correct Connections: Always connect the inverter to the battery with the correct polarity (positive to positive, negative to negative). Incorrect connections can cause severe damage.
- Load Capacity: Do not exceed the inverter's rated continuous power output (2500W) or peak power (5000W). Overloading can damage the inverter and connected appliances.
- Spark Protection: This inverter is equipped with a professional spark protection circuit. Ensure proper connection to prevent sparks during initial hook-up.
- Children and Pets: Keep the inverter out of reach of children and pets.
- Qualified Personnel: Only qualified personnel should perform maintenance or repairs.
3. Product Features & Components
Familiarize yourself with the various parts and features of your OLTEANP Power Inverter.
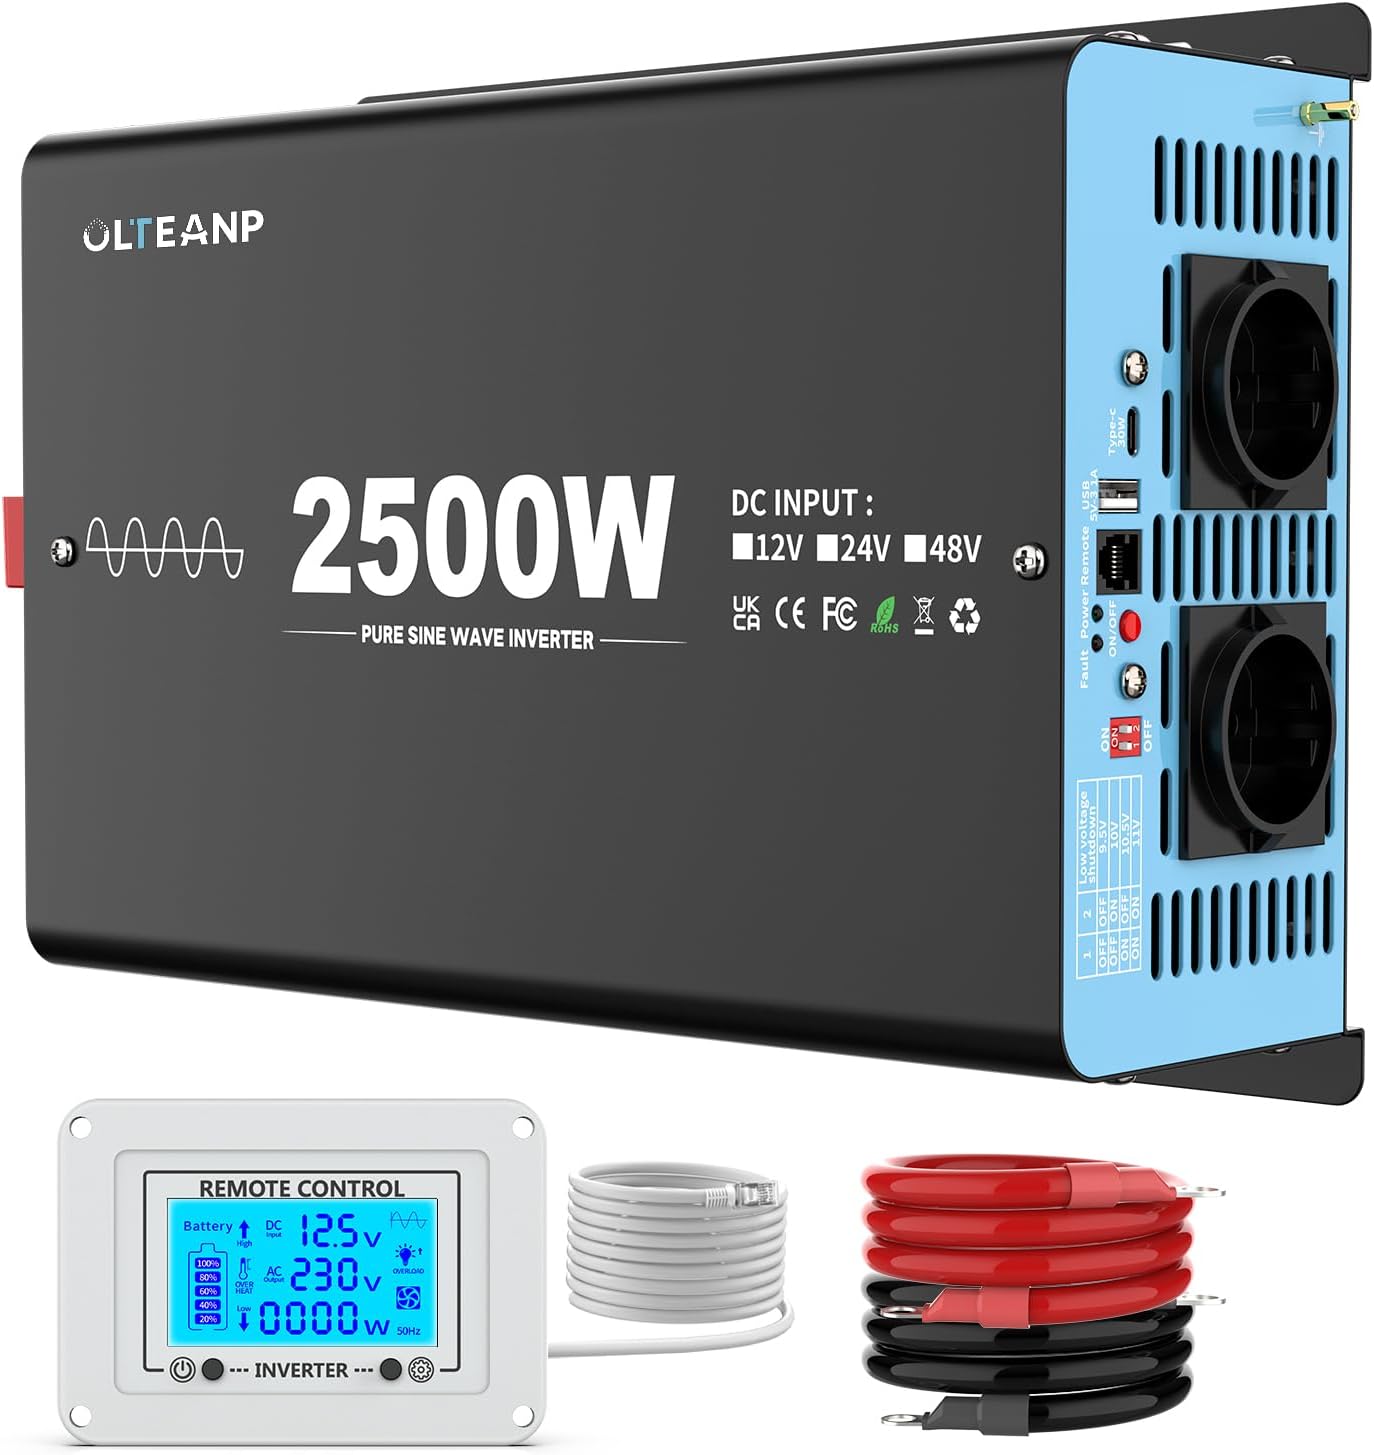
Figure 3.1: Overview of the OLTEANP 2500W Pure Sine Wave Power Inverter, showing the main unit, remote control with LCD display, and included battery cables.
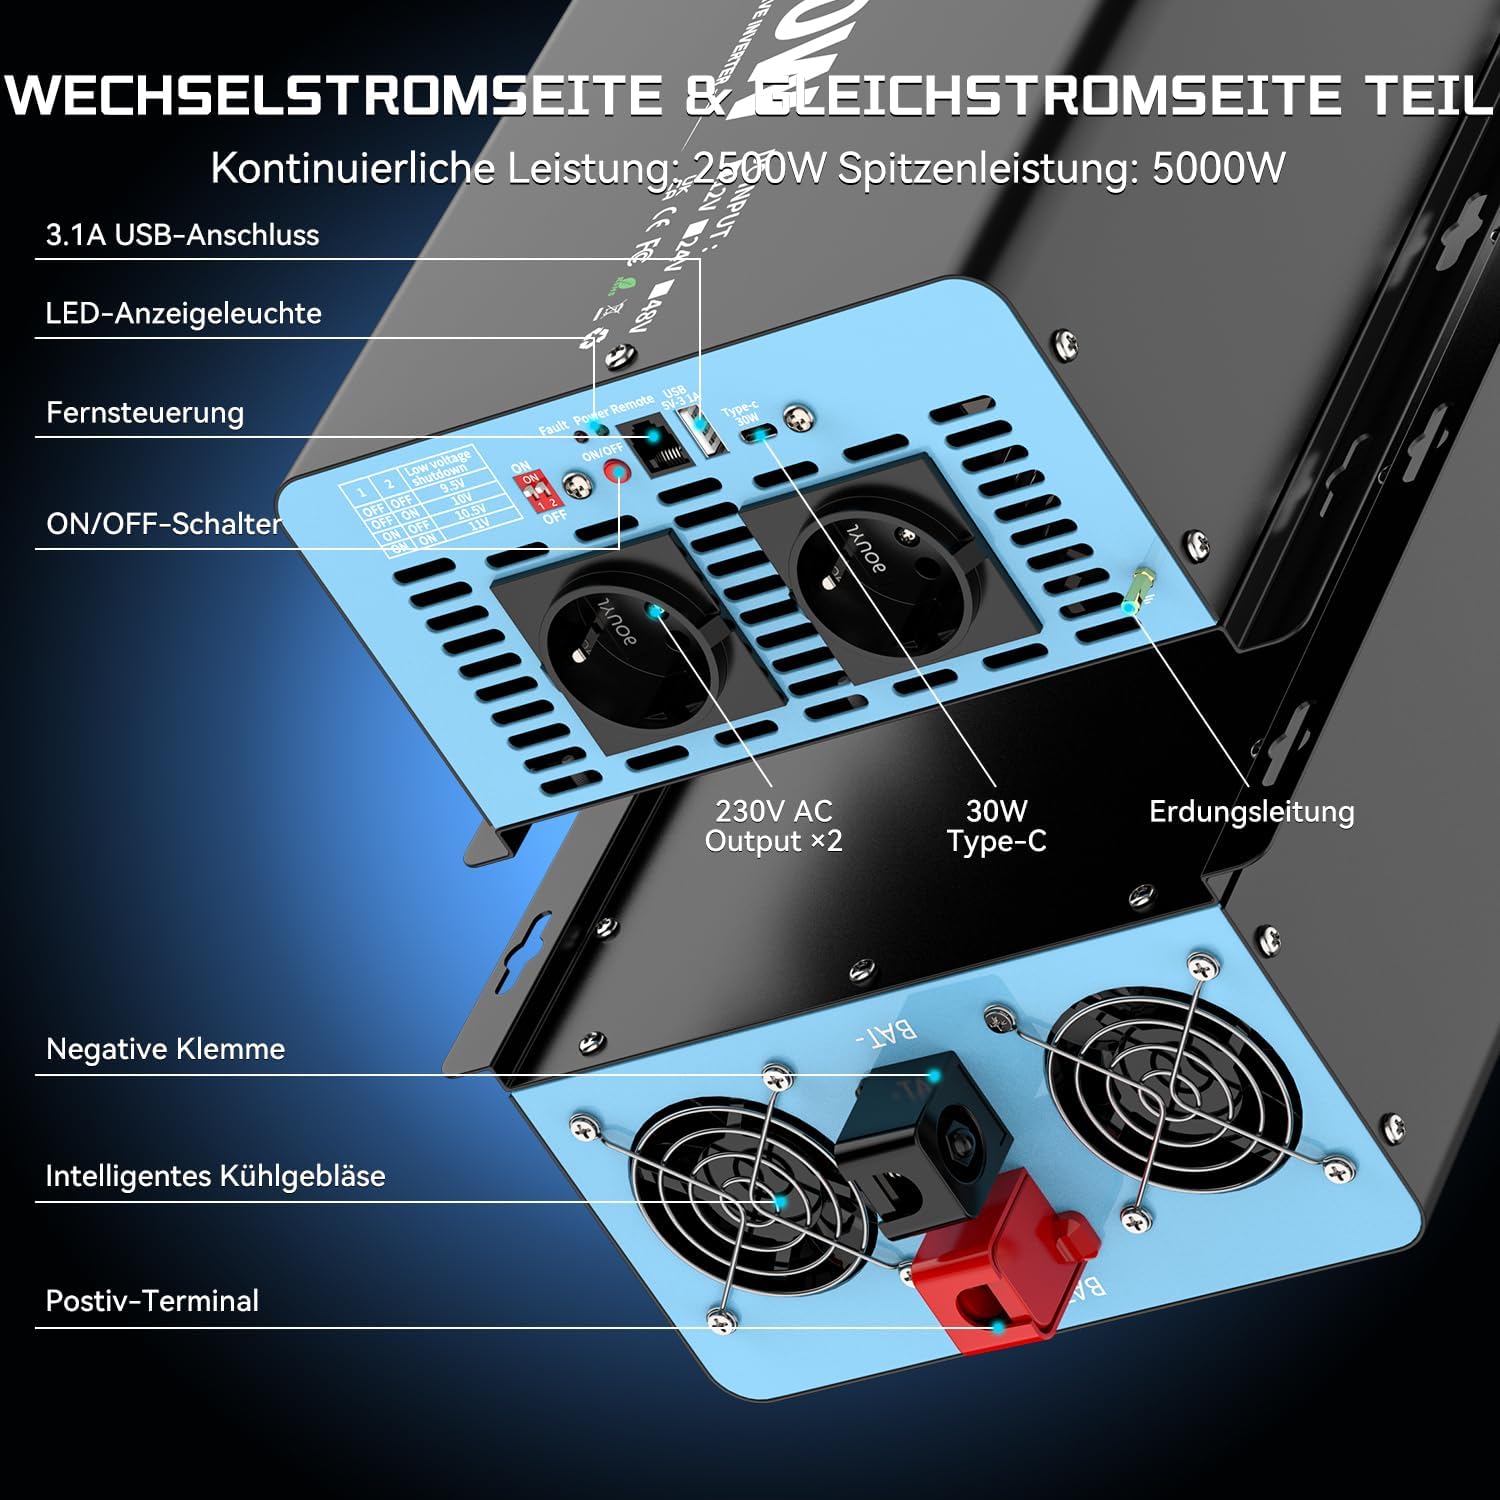
Figure 3.2: Detailed view of the inverter's input and output terminals. The AC side features two 230V AC outlets, a 3.1A USB port, and a 30W Type-C port. It also includes an ON/OFF switch, remote control port, LED indicator light, and fault/power indicator lights. The DC side shows the positive and negative terminals for battery connection, intelligent cooling fans, and an earthing terminal.

Figure 3.3: The remote control with its LCD screen. This display provides real-time information on battery status, DC input voltage, AC output voltage, current power consumption (in Watts), and indicators for overheat or overload conditions. Flashing icons on the LCD directly communicate any issues, aiding in troubleshooting and parameter adjustment.

Figure 3.4: The adjustable input voltage function, compatible with various battery types including GEL, SLA, LI (Lithium), FLD, AGM, CLA, and USER-defined settings. The table illustrates how to set the low voltage shutdown threshold using DIP switches (1 and 2) to protect battery health and extend its lifespan. Important: Adjust the voltage only when the inverter is turned OFF.

Figure 3.5: Examples of typical applications for the 2500W Pure Sine Wave Inverter. It can power a wide range of devices such as electric ovens, cameras, laptops, coffee machines, hair dryers, LED lights, TVs, and electric drills, provided their combined power consumption does not exceed 2500 Watts.
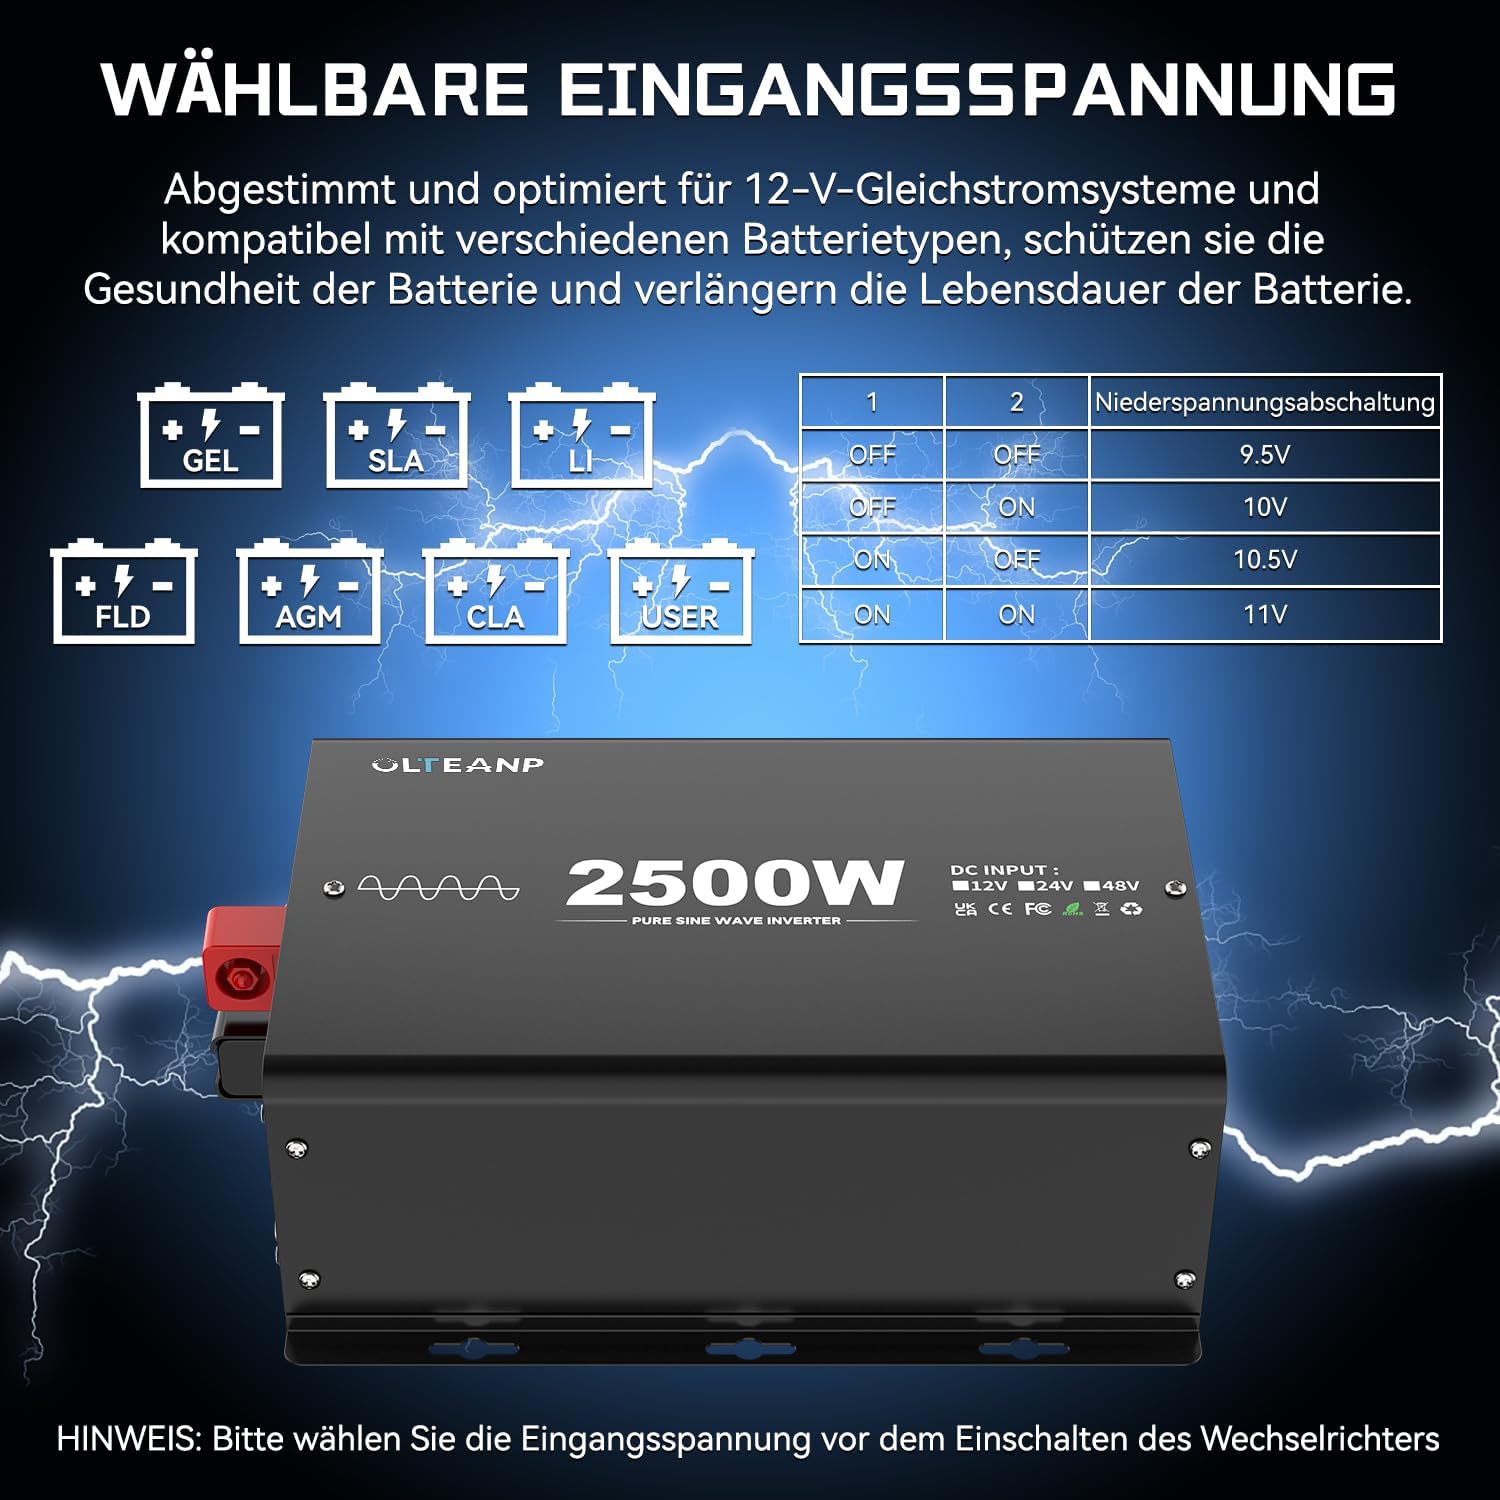
Figure 3.6: Dimensions of the OLTEANP 2500W Inverter (approximately 11.88 inches / 302mm in length, 7.91 inches / 201mm in width, and 4.4 inches / 113mm in height). The image also shows the included accessories: the remote control and 80cm battery cables (red for positive, black for negative).
4. Installation & Setup
Follow these steps for proper installation:
- Choose a Location: Select a cool, dry, and well-ventilated area for the inverter. Ensure there is sufficient space around the unit for airflow.
- Connect Battery Cables:
- Connect the red (positive) battery cable to the positive (+) terminal of the inverter.
- Connect the black (negative) battery cable to the negative (-) terminal of the inverter.
- Connect the other end of the red cable to the positive (+) terminal of your 12V battery.
- Connect the other end of the black cable to the negative (-) terminal of your 12V battery.
- Connect Remote Control (Optional): Plug the remote control cable into the designated port on the inverter.
- Adjust Input Voltage (if necessary): If you are using a lithium battery or wish to customize the low voltage shutdown, refer to Section 3.4 and adjust the DIP switches on the inverter while it is OFF.
- Grounding: Connect the grounding terminal on the inverter to a proper earth ground.
5. Operation
Once installed, operating the inverter is straightforward:
- Power On: Press the ON/OFF switch on the inverter or the remote control. The LED indicator light will illuminate, and the LCD screen on the remote control will activate.
- Monitor Status: The LCD display on the remote control provides real-time information:
- Battery Icon: Shows approximate battery charge level.
- DC Input Voltage: Displays the current voltage from your 12V battery.
- AC Output Voltage: Shows the 230V AC output.
- Power Consumption (W): Indicates the real-time power draw of connected appliances.
- Overheat/Overload Icons: These icons will flash if the inverter detects an overheat or overload condition, indicating a potential issue.
- Connect Appliances: Plug your 230V AC appliances into the AC outlets. For charging mobile devices, use the 5V/3.1A USB port or the 30W Type-C port.
- Power Off: When finished, disconnect appliances and press the ON/OFF switch on the inverter or remote control to turn off the unit.
6. Maintenance
Regular maintenance helps ensure the longevity and optimal performance of your inverter:
- Keep Clean: Periodically wipe the exterior of the inverter with a dry, soft cloth. Do not use liquid cleaners.
- Check Connections: Regularly inspect battery cable connections to ensure they are tight and free from corrosion.
- Ensure Ventilation: Make sure the cooling fans and vents are free from dust and obstructions. Clean them gently if necessary.
- Storage: If storing the inverter for an extended period, disconnect it from the battery and store it in a cool, dry place.
7. Troubleshooting
If you encounter issues with your inverter, refer to the following common problems and solutions:
| Problem | Possible Cause | Solution |
|---|---|---|
| No power output / Inverter not turning on | Loose battery connections Low battery voltage Inverter switch is OFF Blown fuse (internal) | Check and tighten battery cables Recharge or replace battery Turn ON the inverter switch Contact support (do not attempt to replace internal fuses) |
| Overload warning (LCD icon flashing) | Connected appliance(s) exceed 2500W continuous power | Reduce the total load by unplugging some appliances. Restart the inverter. |
| Overheat warning (LCD icon flashing) | Poor ventilation High ambient temperature Continuous high load | Ensure clear airflow around the inverter. Move to a cooler environment. Reduce load. Allow inverter to cool down. |
| Low voltage shutdown | Battery voltage dropped below set threshold | Recharge the battery. Check battery health. Adjust low voltage shutdown setting if using lithium batteries (refer to Section 3.4). |
| No AC output, but inverter is ON | Short circuit in connected appliance Internal fault | Disconnect all appliances and restart. If issue persists, contact support. |
For any issues not covered here, or if troubleshooting steps do not resolve the problem, please contact OLTEANP customer support.
8. Technical Specifications
| Feature | Specification |
|---|---|
| Continuous Power | 2500 Watts |
| Peak Power | 5000 Watts |
| DC Input Voltage | 12V DC (Adjustable range: 9.5V - 16V) |
| AC Output Voltage | 230V AC |
| Output Waveform | Pure Sine Wave |
| AC Outlets | 2 |
| USB Port | 5V / 3.1A |
| Type-C Port | 30W |
| Protection Features | Spark protection, Overload, Overheat, Low/High Voltage, Short Circuit |
| Cooling | Intelligent Cooling Fan |
| Remote Control | Yes, with LCD Display |
9. Warranty & Support
For warranty information, technical support, or service inquiries, please refer to the product packaging or contact OLTEANP customer service directly through the retailer where the product was purchased. Please have your product model and purchase details ready when contacting support.