Jennov JK7059
Jennov 5MP PTZ WiFi Outdoor Surveillance Camera Kit
Model: JK7059 | Brand: Jennov
Product Overview
The Jennov 5MP PTZ WiFi Outdoor Surveillance Camera Kit is a comprehensive security solution designed for both residential and commercial outdoor environments. This system includes a 10-inch monitor, a 10-channel 5MP NVR with a pre-installed 1TB HDD, and four 5MP HD IP cameras. It features advanced functionalities such as color night vision, AI human detection with sound and light alarms, 360-degree auto-tracking, continuous 24/7 recording, and two-way audio communication. The system is designed for easy installation and offers convenient remote access from your smartphone, tablet, or computer.
Important Safety Information
Please read all instructions carefully before installation and operation. Keep this manual for future reference.
- Ensure all power connections are secure and correct to prevent electrical hazards.
- Do not expose the NVR or cameras to extreme temperatures, humidity, or direct water immersion (unless specified as waterproof).
- Use only the power adapters provided with the system.
- Avoid placing the NVR in poorly ventilated areas.
- Handle the hard drive with care to prevent data loss.
- For outdoor cameras, ensure proper mounting to prevent falling and damage.
Package Contents
Verify that all items listed below are included in your package:
- 1 x 1TB HDD (Pre-installed in NVR)
- 4 x 5MP PTZ IP Cameras
- 1 x 10-inch NVR Monitor
- 1 x USB Mouse
- Power Adapters for NVR and Cameras
- Mounting Screws and Plugs
- User Manual (This document)

Image: Overview of the Jennov 5MP PTZ WiFi Outdoor Surveillance Camera Kit, showing the NVR monitor, four cameras, and a 1TB HDD.
Product Components and Diagram
Familiarize yourself with the main components of the Jennov PTZ camera and NVR system.

Image: Detailed diagram showing the components of the Jennov PTZ camera (Bracket, Antenna, Waterproof Case, IR LEDs, LED Light, Wide-Angle Lens, Dual-light Sensor, Power Port, Speaker) and the NVR ports (Power, USB, LAN, HDMI).
Camera Features:
- Bracket: For secure mounting.
- Antenna: For WiFi connectivity.
- Waterproof Case: Ensures durability for outdoor use (IP66 rated).
- IR LEDs: For infrared night vision.
- LED Light: For full-color night vision and deterrence.
- Wide-Angle Lens: Provides broad surveillance coverage.
- Dual-light Sensor: Manages night vision modes.
- Power Port: For connecting the power adapter.
- Speaker: For two-way audio communication and alarms.
NVR Ports:
- Power: For connecting the NVR power adapter.
- USB: For connecting the mouse or external storage.
- LAN: For wired network connection.
- HDMI: For connecting to an external display (if not using the integrated monitor).
Setup Guide
1. Initial Connection (Plug and Play)
The Jennov system is designed for easy plug-and-play setup. The cameras are pre-paired with the NVR, allowing for immediate viewing upon power-up.
- Connect the NVR to a power outlet using the provided power adapter.
- Connect the USB mouse to the NVR's USB port.
- Power on the NVR. The integrated 10-inch monitor will display the camera feeds.
- Connect each camera to a power outlet using its respective power adapter. The cameras will automatically connect to the NVR.

Image: Illustration of the simple plug-and-play setup, showing the NVR connected to power and the cameras wirelessly transmitting video to the NVR.
2. Camera Mounting
Choose suitable locations for your cameras, ensuring they have a clear field of view and are within WiFi range of the NVR. The cameras are designed for both outdoor and indoor use.
- Mark the drilling points using the camera bracket as a template.
- Drill holes and insert the provided wall plugs.
- Secure the camera bracket to the wall with screws.
- Adjust the camera angle as needed.
Image: Examples of camera placement for outdoor and indoor surveillance, including a camera mounted on a wall near a garage and another overlooking a yard.
3. Network Connection (Optional for Remote Access)
To enable remote viewing and receive notifications, connect the NVR to your home network.
- Connect an Ethernet cable from the NVR's LAN port to your router.
- Follow the on-screen instructions on the NVR monitor to configure network settings.
4. Remote Access Setup
Download the dedicated mobile application (e.g., EseeCloud) on your smartphone or tablet, or use the PC client software for remote viewing.
- Scan the QR code on the NVR or in the manual to download the app.
- Register an account and add your NVR device by scanning its QR code or entering its ID.
- You can now view live feeds, playback recordings, and configure settings remotely.
Image: Demonstrates the ease of setting up remote access via a smartphone application, showing the app icon and a user viewing live camera feeds on their phone.
Operating Instructions
1. Live View and Playback
- On the NVR Monitor: Use the included mouse to navigate the NVR interface. You can view live feeds from all connected cameras simultaneously or select a single camera for a larger view.
- Remote Access: Open the mobile app or PC client. Select the desired camera to view its live feed. Access recorded footage from the playback menu.
2. PTZ Control (Pan, Tilt, Zoom)
The PTZ cameras offer extensive movement capabilities to cover a wide area.
- Pan: Rotate the camera horizontally up to 355 degrees.
- Tilt: Adjust the camera vertically up to 90 degrees.
- Zoom: Digitally zoom in on specific areas (digital zoom only).
Control PTZ functions via the NVR interface or the remote access application.

Image: Illustrates the camera's 355-degree pan and 90-degree tilt capabilities, showing how the camera can cover a wide area.
3. AI Human Detection & Auto Tracking
The system uses advanced AI to distinguish human shapes from other moving objects, reducing false alarms. When a human is detected, the camera can automatically track their movement.
- Human Detection: Receive alerts only when a human is identified in the surveillance area.
- Auto Tracking: The camera will automatically follow the detected human, keeping them in the frame.
- Sound-Light Alarm: Upon detection, the camera can activate a sound alarm and flashing lights to deter intruders.

Image: Depicts the AI human detection and auto-tracking feature, showing a person being detected and tracked by the camera, with a notification appearing on a smartphone.
4. Night Vision Modes
The cameras offer three distinct night vision modes to suit different lighting conditions and security needs.
- Infrared Mode: Provides clear black and white images in complete darkness using IR LEDs.
- Full Color Mode: Activates the built-in LED light to provide full-color video even at night.
- Sound-Light Mode: Combines infrared vision with the activation of LED lights and an audible alarm upon detection of movement, deterring potential threats.

Image: Comparison of the three night vision modes: Sound-Light Mode (with flashing lights and alarm), Infrared Mode (black and white), and Full Color Mode (with LED illumination).
5. Recording Modes
The NVR supports various recording options to optimize storage and capture important events.
- 24/7 Continuous Recording: Records video continuously, ensuring no moment is missed. The 1TB HDD provides ample storage.
- Event Recording: Records only when motion or human detection is triggered, saving storage space and making event review easier.
- Scheduled Recording: Set specific times for recording, allowing for customized surveillance schedules.
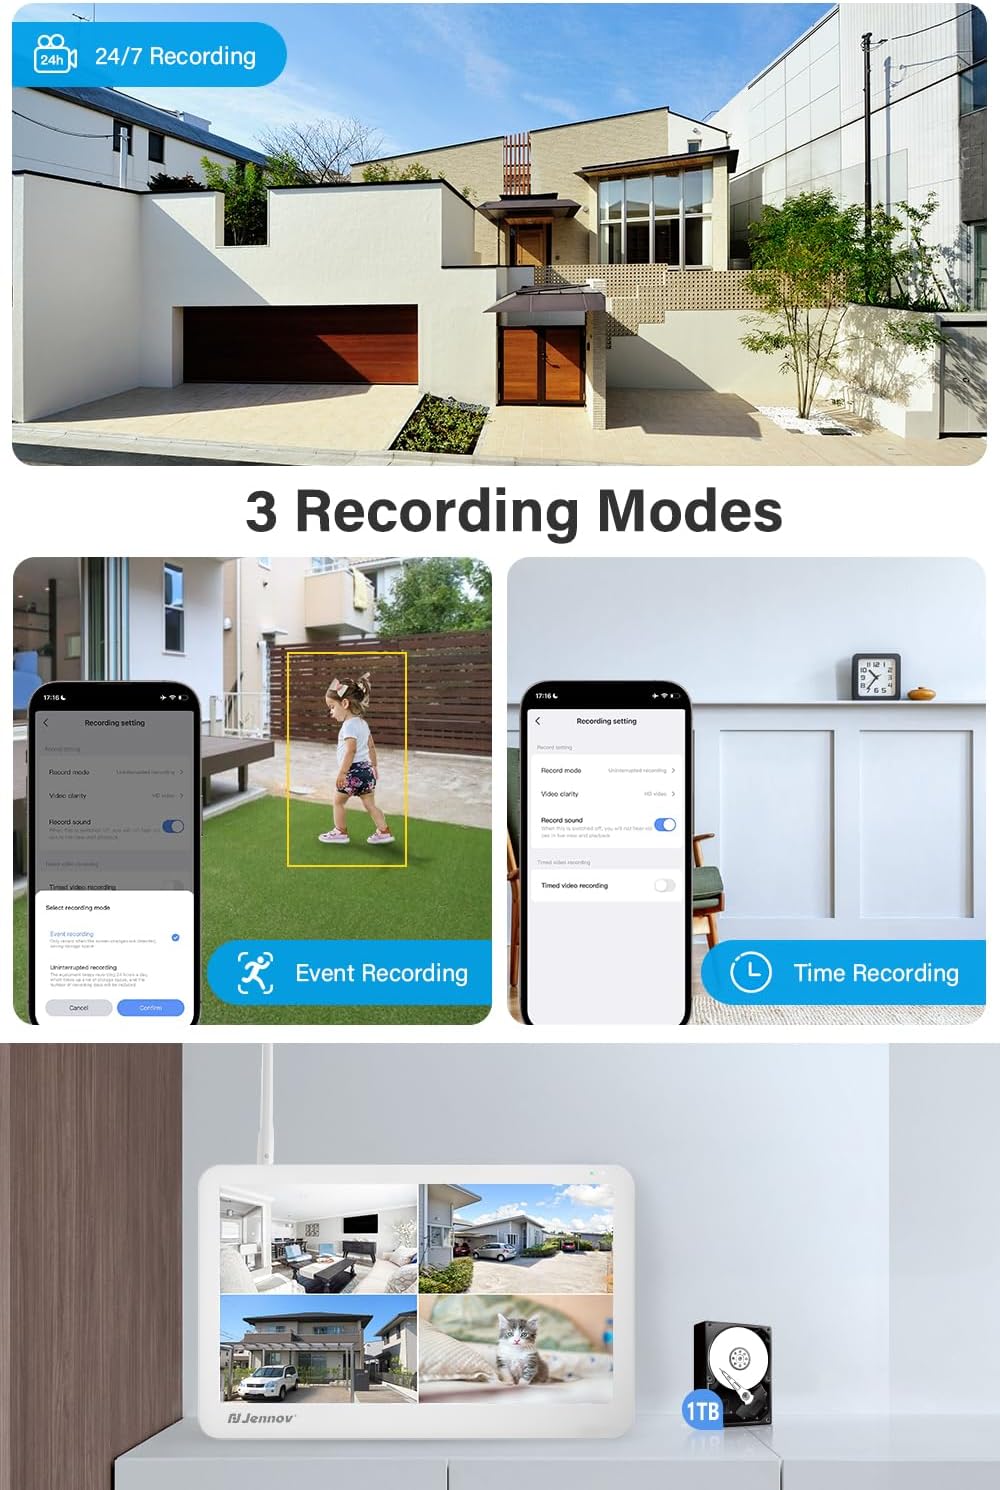
Image: Illustrates the 24/7 recording capability and two specific recording modes: Event Recording (triggered by motion/human detection) and Time Recording (scheduled recording).
6. Two-Way Audio
Each camera is equipped with a built-in microphone and speaker, enabling real-time two-way communication.
- Speak through the camera to communicate with visitors or deter intruders.
- Listen to audio from the camera's vicinity.
This feature is accessible via the NVR interface or the remote access application.

Image: Demonstrates the two-way audio feature, showing scenarios where users can speak and listen through the camera, such as communicating with a child or deterring a suspicious person.
7. System Expansion
The 10-channel NVR allows you to expand your surveillance system by adding up to 6 more cameras, for a total of 10 cameras.

Image: Diagram illustrating how the system can be expanded to include up to 10 cameras, showing camera placement throughout a house layout.
Maintenance
- Camera Cleaning: Periodically clean the camera lenses with a soft, damp cloth to ensure clear image quality. Do not use harsh chemicals.
- NVR Ventilation: Ensure the NVR is placed in a well-ventilated area to prevent overheating. Keep vents clear of dust and obstructions.
- Firmware Updates: Check the manufacturer's website or the mobile application for available firmware updates. Regularly updating firmware can improve system performance and security.
- Data Backup: Regularly back up important recordings from the NVR to an external storage device if needed.
Troubleshooting
| Problem | Possible Cause | Solution |
|---|---|---|
| No image on NVR monitor. | NVR not powered on; HDMI/VGA cable loose (if external monitor); camera not powered or connected. | Check NVR power adapter and power button. Ensure all camera power adapters are connected. If using an external monitor, check cable connections. |
| Cameras not connecting to NVR. | Cameras out of range; interference; cameras not paired. | Move cameras closer to the NVR. Reduce interference from other wireless devices. Re-pair cameras to the NVR if necessary (refer to NVR settings). |
| No remote access. | NVR not connected to network; incorrect app settings; internet connection issues. | Ensure NVR is connected to your router via Ethernet. Check network settings on NVR. Verify app login details and device ID. Check your internet connection. |
| Poor image quality. | Dirty lens; low light; camera resolution settings. | Clean camera lens. Ensure sufficient lighting for color night vision. Check camera resolution settings in the NVR or app. |
| No audio or poor audio quality. | Microphone/speaker blocked; audio settings; environmental noise. | Ensure microphone and speaker are not obstructed. Check audio settings in the NVR or app. Reduce background noise if possible. |
Technical Specifications
| Feature | Detail |
|---|---|
| Brand | Jennov |
| Model Number | JK7059 |
| Product Dimensions (L x W x H) | 20 x 15 x 30 cm; 3.52 kilograms |
| Color | 5MP 4 Cameras + Monitor + 1TB |
| Voltage | 12 Volts |
| Power | 24 Watts |
| Number of Items | 1 |
| Mounting Type | Wall Mount |
| Special Features | 10-inch monitor and color night vision, AI human recognition and sound alarm, 360° auto tracking and display, 24/7 recording and two-way audio, easy installation and remote access |
| Included Components | 1TB HDD x 1, Camera x 4, NVR x 1, Mouse x 1 |
| Batteries Included | No |
| Batteries Required | No |
| Weight | 3.52 Kilograms |
| Connectivity Technology | Wireless |
| Video Recording Resolution | 1920p |
| Number of Channels | 10 |
| Memory Storage Capacity | 1 TB |
| Recommended Uses | Outdoor |
| Compatible Devices | Tablets, Smartphones, Personal Computers |
Warranty and Support
For warranty information and technical support, please refer to the contact details provided on the product packaging or the official Jennov website. Keep your purchase receipt as proof of purchase.
While specific spare parts availability information is not provided, Jennov is committed to customer satisfaction. For any issues or inquiries, please contact Jennov customer service.
Online Support: Visit the official Jennov website for FAQs, troubleshooting guides, and contact forms.
Email Support: Refer to your product documentation for the customer support email address.
Related Documents - JK7059
 |
Jennov C Series Wireless Security Camera Quick Start Guide | Installation & Setup This document provides a quick start guide for the Jennov C Series wireless security cameras. It details product features, what's included in the package, installation steps for both the camera and solar panel, connection tips, CloudEdge app setup, frequently asked questions, and warranty information. Designed for home security, these battery-powered WiFi cameras offer features like 2K resolution, IP66 waterproofing, color night vision, two-way talk, and AI human detection with SD/cloud storage options. |
 |
Jennov J Series Quick Guide: Installation, Setup, and Features A concise guide to installing, setting up, and using Jennov J Series surveillance cameras, covering app installation, connection methods, video settings, alarm features, and troubleshooting. |
 |
Jennov HD WiFi Security Camera Quick Start Guide A comprehensive quick start guide for the Jennov HD WiFi Security Camera, detailing setup, installation, app configuration, features, troubleshooting, and safety information. |
 |
Jennov J Series Wireless Security Camera System User Manual | Setup & Operation Guide Comprehensive user manual for the Jennov J Series Wireless Security Camera System. Learn how to install, configure, and operate your NVR, cameras, and mobile app for effective surveillance. Includes troubleshooting and support information. |
 |
Jennov J Series Camera Quick Guide: Setup, Installation, and FAQ A quick guide from Jennov for the J Series Camera, detailing app download and registration, device setup via Bluetooth or QR code, Wi-Fi connection, installation best practices, and common troubleshooting steps. Includes warranty activation information. |
 |
Wireless Wi-Fi Security Camera Quick Guide - J Series by Jennov A concise guide to setting up and using the Jennov Wireless Wi-Fi Security Camera (J Series). Covers package contents, app installation, device pairing via Bluetooth or QR code, NVR connection, recording settings, alarm configurations, troubleshooting, and warranty activation. |
Ask a question about this manual
Ask about setup, troubleshooting, compatibility, parts, safety, or missing instructions. Manuals+ will review the question and use this page’s manual context to help answer it.