1. Introduction
This manual provides essential information for the safe and efficient operation, setup, and maintenance of your YESWELDER CUT-55DS PRO Plasma Cutter. Please read this manual thoroughly before operating the equipment to ensure proper use and to prevent injury or damage.

Image 1.1: The YESWELDER CUT-55DS PRO Plasma Cutter with its torch and accessories.
2. Safety Information
Operating plasma cutting equipment involves inherent risks. Adhere to all safety precautions to prevent electric shock, burns, fire, and other potential hazards.
- Electrical Safety: Ensure proper grounding. Do not operate in wet conditions. Always disconnect power before servicing.
- Eye and Face Protection: Always wear appropriate welding helmets with suitable shade lenses and safety glasses with side shields.
- Body Protection: Wear flame-resistant clothing, gloves, and protective footwear.
- Ventilation: Ensure adequate ventilation to remove fumes and gases produced during cutting.
- Fire Prevention: Keep flammable materials away from the cutting area. Have a fire extinguisher readily available.
- Non-High Frequency System: The "blow-back" start system minimizes electrical interference and is safer for operators and surrounding electrical machinery.
- Built-in Safeguards: The unit features IP21 water rating protection, and robust protections against overload and overheating for enhanced user safety and device longevity.

Image 2.1: Illustration of the non-high frequency system benefits, including safety for electrical equipment, low noise, human health, and low signal interference.
3. Package Contents
Verify that all components are present and undamaged upon unpacking.
- YESWELDER CUT-55DS PRO Plasma Cutter Unit
- Ground Clamp (10ft)
- Air Compressor Filter
- Power Adapter
- Gas Hose
- IPT40 Cutting Torch

Image 3.1: Visual representation of the included accessories: the CUT-55DS PRO unit, ground clamp, air compressor filter, adapter, gas hose, and IPT40 cutting torch.
4. Setup
Follow these steps to set up your plasma cutter for operation.
- Power Connection: Connect the plasma cutter to a suitable 110V or 220V power supply. The unit supports dual voltage operation.
- Air Supply Connection: Connect an external air compressor to the built-in air pressure regulator on the plasma cutter using the provided gas hose. Ensure the air pressure is set according to the cutting requirements.
- Torch Connection: Securely connect the IPT40 cutting torch to the designated port on the front panel of the machine.
- Ground Clamp Connection: Attach the ground clamp to the workpiece or a clean, bare metal surface connected to the workpiece. Ensure a good electrical connection.

Image 4.1: The rear of the plasma cutter illustrating the connection point for an external air compressor to the built-in air pressure regulator.
5. Operating Instructions
Familiarize yourself with the controls and functions before beginning cutting operations.
5.1. Digital Display and Controls
The large LED digital display provides real-time information on air pressure, voltage, and current. An error code system will display on the screen if a problem occurs with the machine.
- Gas Pressure Display: Shows the current air pressure (PSI/MPa).
- Current Value Display: Indicates the cutting current (Amps).
- Voltage Display: Shows the operating voltage.
- 2T/4T Display: Indicates the selected trigger mode.
- Center Knob: Used for adjusting parameters.
- Unit Change: Button to switch between units (e.g., PSI to MPa).
- Post Time Set: Adjusts the post-flow time.

Image 5.1: The intelligent digital screen display showing air pressure, voltage, and current readings, along with mode indicators.

Image 5.2: Detailed panel introduction highlighting the various display elements and controls on the CUT-55DS PRO.
5.2. Non-Touch Pilot Arc
The IPT40 torch features non-touch pilot arc technology, allowing you to cut without the torch tip contacting the metal. This improves cutting quality and extends consumable life, especially on rough, painted, or rusty surfaces.

Image 5.3: The IPT40 plasma cutting torch demonstrating its non-touch pilot arc capability, providing better performance and efficient cutting.
5.3. 2T/4T Function
The unit offers two trigger control modes:
- 2T (Two-Touch): A semi-automatic cutting control suitable for accurate, short-duration cuts. Press and hold the trigger to cut, release to stop.
- 4T (Four-Touch): An automatic cutting control ideal for long-term continuous cutting. Press and release the trigger to start cutting, press and release again to stop. This reduces operator fatigue.

Image 5.4: Visual explanation of the 2T and 4T trigger functions, detailing their suitability for different cutting tasks.
5.4. Post Flow Time Function
The post-flow time function is adjustable from 5 to 20 seconds. This feature allows for a controlled flow of air after the arc is extinguished, cooling the torch and extending the life of consumables. A recommended cooling time is typically 5-8 seconds.
5.5. Cutting Capacity
The CUT-55DS PRO offers powerful cutting capabilities:
- Clean Cut: 1/3 inch at 110V, 1/2 inch at 220V
- Max Cut: 1/2 inch at 110V, 4/5 inch at 220V

Image 5.5: Diagram illustrating the clean cut and max cut thicknesses achievable with the plasma cutter at both 110V and 220V.
6. Maintenance
Regular maintenance ensures optimal performance and extends the lifespan of your plasma cutter.
- Consumables: Regularly inspect the torch consumables (electrode, nozzle, shield cup) for wear and replace them as needed. Worn consumables can negatively affect cut quality and torch life.
- Air Filter: Check and clean or replace the air compressor filter periodically to ensure clean, dry air supply to the unit. Moisture and contaminants in the air can damage the torch and internal components.
- Cleaning: Keep the unit clean and free of dust and debris. Use compressed air to blow out internal components if necessary, ensuring the unit is unplugged.
- Cables and Connections: Inspect all cables and connections for damage or loose fittings before each use.
7. Troubleshooting
This section provides solutions to common issues. For problems not listed, contact customer support.
| Problem | Possible Cause | Solution |
|---|---|---|
| No Arc / Arc Fails to Start |
|
|
| Poor Cut Quality |
|
|
| Overheat Protection Activated |
|
|
| Error Code on Display | Internal fault | Refer to the specific error code in the full manual (if available) or contact YESWELDER customer support. |
8. Specifications
Technical specifications for the YESWELDER CUT-55DS PRO Plasma Cutter.
| Feature | Detail |
|---|---|
| Model | CUT-55DS PRO |
| Part Number | CUT-55DS Pro NEW1 |
| Input Voltage | 110V/220V Dual Voltage |
| Max Current | 55 Amp |
| Clean Cut (110V) | 1/3 inch |
| Clean Cut (220V) | 1/2 inch |
| Max Cut (110V) | 1/2 inch |
| Max Cut (220V) | 4/5 inch |
| Pilot Arc Type | Non-Touch Pilot Arc |
| Frequency | Non-High Frequency |
| Display | Large LED Digital Display |
| Weight | Approx. Unit Weight: 11.1 lbs (Item Weight: 18.35 lbs) |
| Package Dimensions | 16.65 x 13.78 x 11.5 inches |
| IP Rating | IP21 |
| Cooling Mode | Fan Cooling |
| Insulation Grade | F |
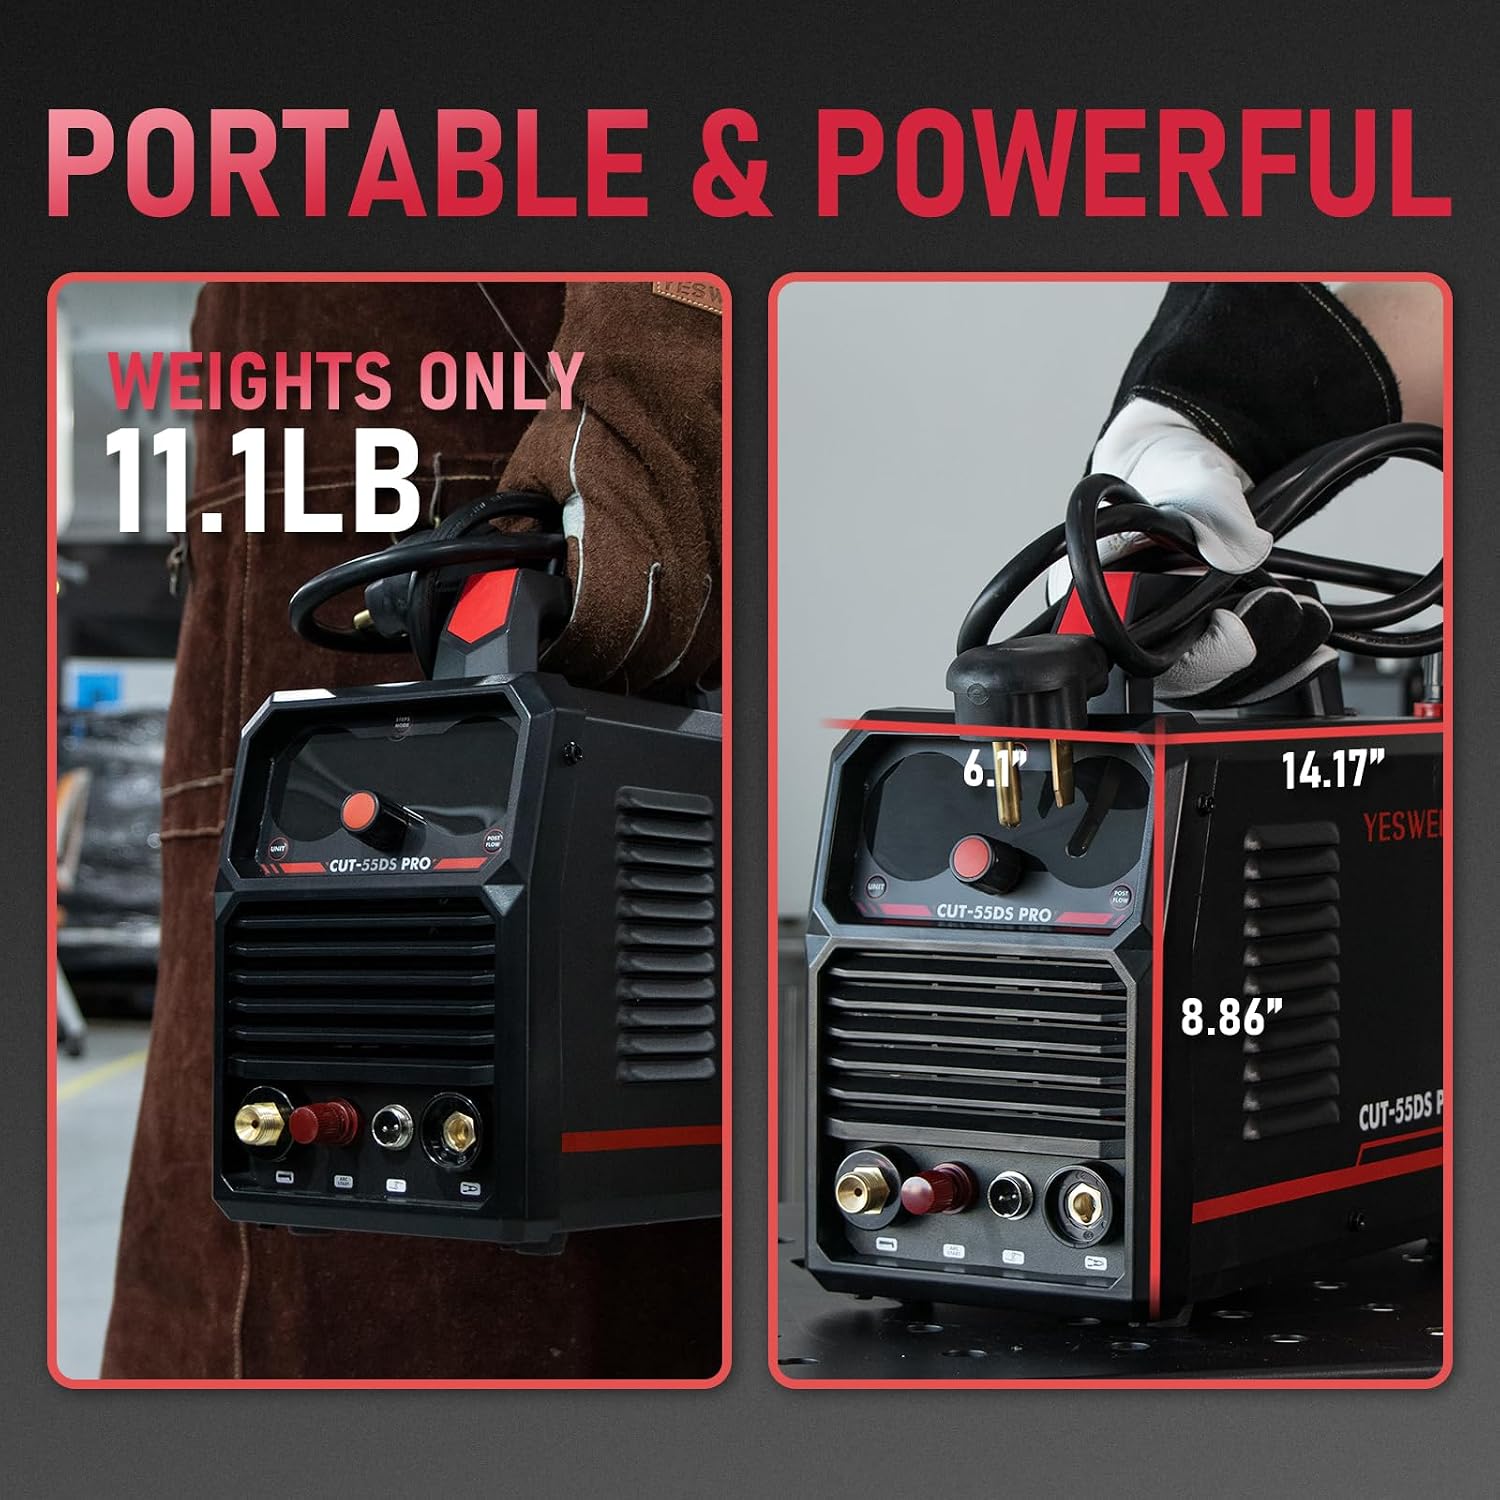
Image 8.1: The compact and portable design of the CUT-55DS PRO, highlighting its unit weight of 11.1 lbs and dimensions.

Image 8.2: A comprehensive specification table for the YESWELDER CUT-55DS PRO, including electrical parameters and standards.
9. Warranty and Support
For warranty information, technical support, or service inquiries, please refer to the official YESWELDER website or contact their customer service directly. Keep your purchase receipt as proof of purchase for warranty claims.
Official YESWELDER Website: www.yeswelder.com