1. Introduction
This manual provides detailed instructions for the safe installation, operation, and maintenance of your ANTLUX 8FT LED Shop Light Fixture. This fixture is designed to provide high-performance, energy-efficient lighting for various indoor applications such as garages, warehouses, workshops, and commercial spaces. It features integrated LED strips, a durable aluminum housing, and a frosted diffuser for uniform illumination.
2. Safety Information
Please read all instructions carefully before installation and use. Failure to follow these instructions may result in electric shock, fire, or other hazards.
- WARNING: Risk of electric shock. Disconnect power at the fuse or circuit breaker before installation or servicing.
- This product must be installed in accordance with the applicable installation code by a person familiar with the construction and operation of the product and the hazards involved.
- Ensure the supply voltage is compatible with the fixture's requirements (120V AC).
- Do not install near heat sources or in areas with excessive moisture.
- This fixture is intended for indoor use only.
- Do not attempt to modify or disassemble the fixture. There are no user-serviceable parts inside.
- Wear safety glasses and gloves during installation.
3. Package Contents
Verify that all components are present before beginning installation:
- ANTLUX 8FT LED Shop Light Fixture (with integrated LED strips)
- Wire Nuts (5 pieces)
- Wall Anchors (4 pieces)
- Large Screws (4 pieces)
- Ceiling Hooks (2 pieces)
- Steel Wires (2 pieces)
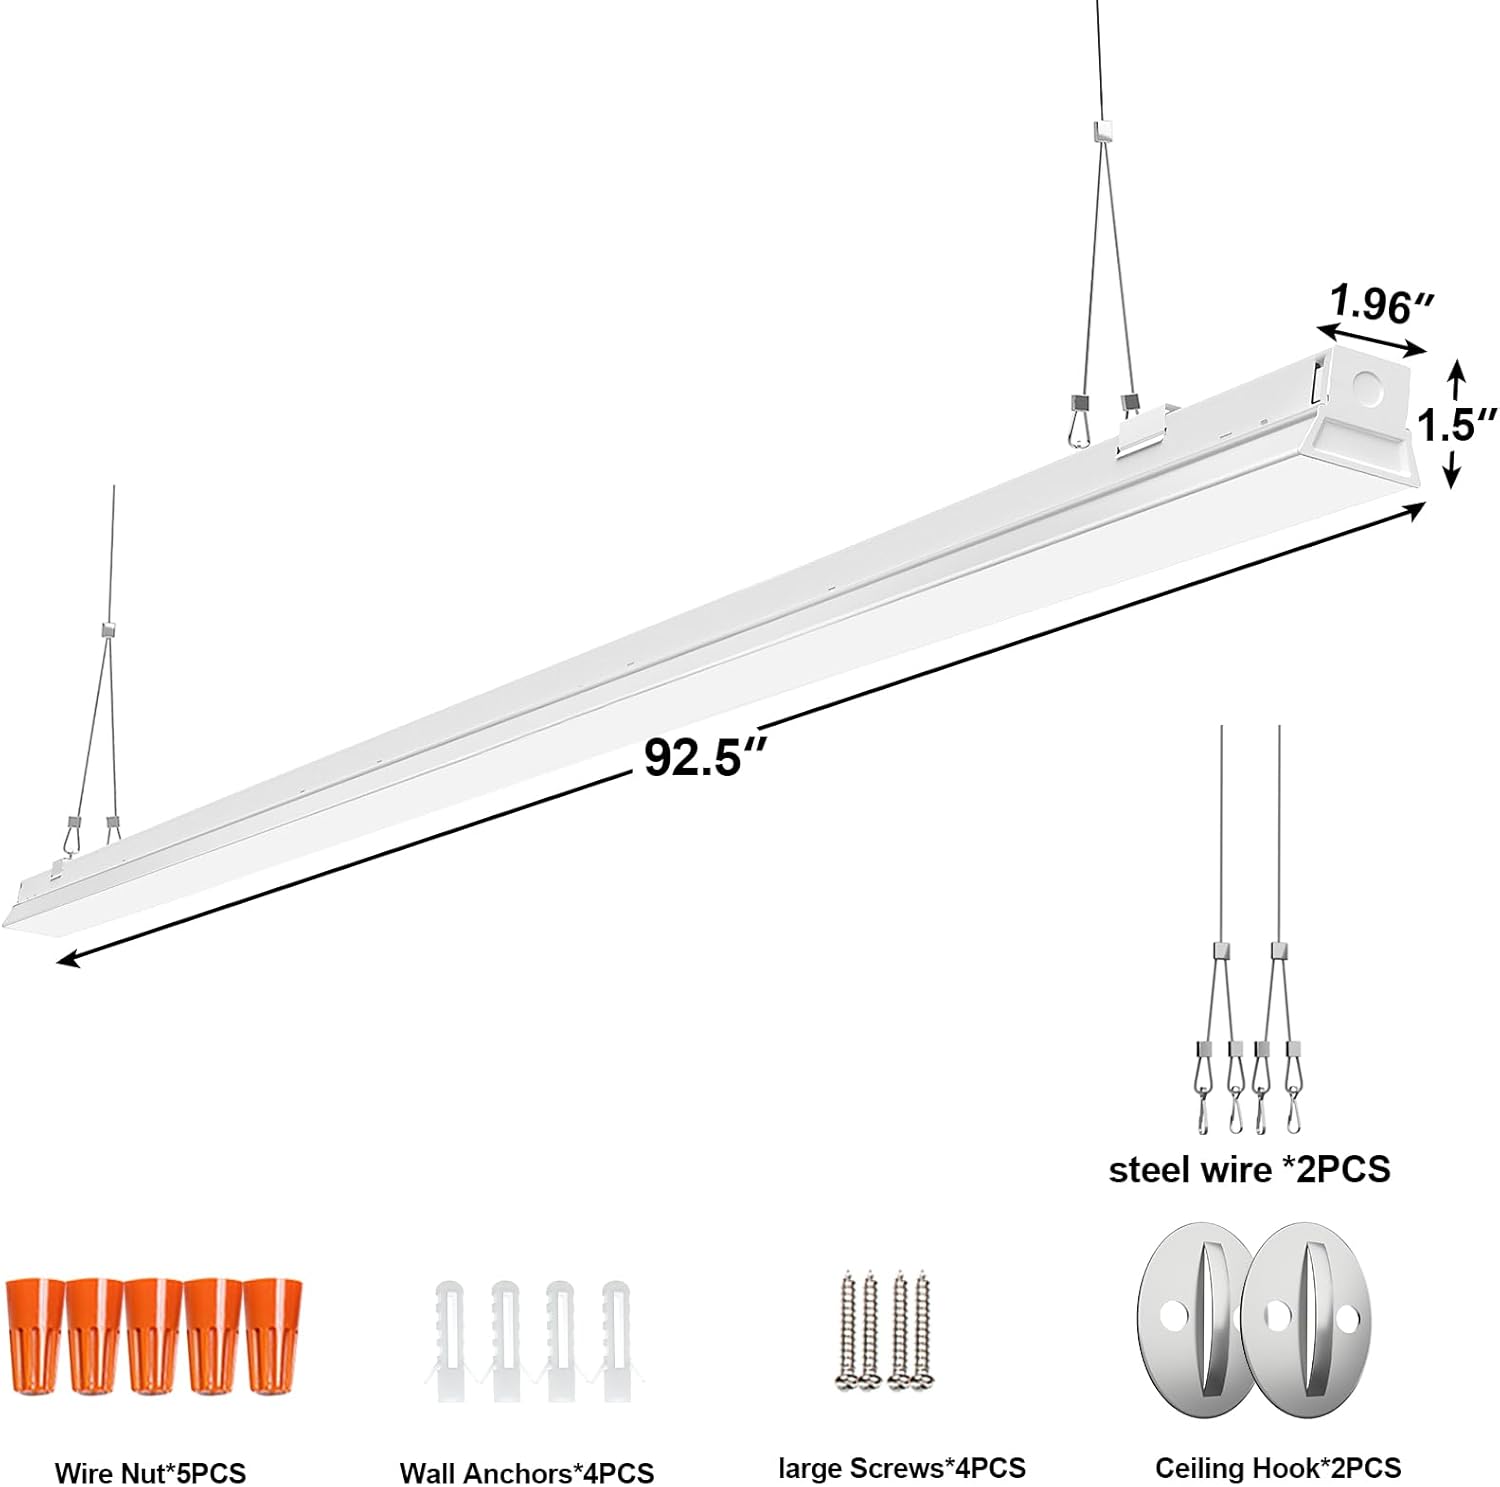
Figure 3.1: Included components and fixture dimensions (92.5"L x 1.96"W x 1.5"H).
4. Specifications
| Brand | ANTLUX |
| Model Number | AL-LS8FT-8 |
| Wattage | 110W |
| Brightness | 12200 Lumens |
| Color Temperature | 6000K (Cool White) |
| Operating Voltage | 120V AC |
| Product Dimensions | 92.5"L x 1.96"W x 1.5"H |
| Material | Aluminum and Frosted Diffuser |
| Average Lifespan | 50,000 Hours |
| Installation Type | Surface Mount, Suspended Mount |
| Special Feature | Linkable |
| Indoor/Outdoor Usage | Indoor Only |
5. Setup and Installation
The ANTLUX 8FT LED Shop Light Fixture supports both surface mount and suspended mount installations. It can also be linked with other fixtures.
Pre-Installation
- Ensure power is disconnected at the circuit breaker before starting.
- Unpack the fixture and all components. Inspect for any damage.
- Gather necessary tools: drill, screwdriver, wire strippers, measuring tape, pencil.
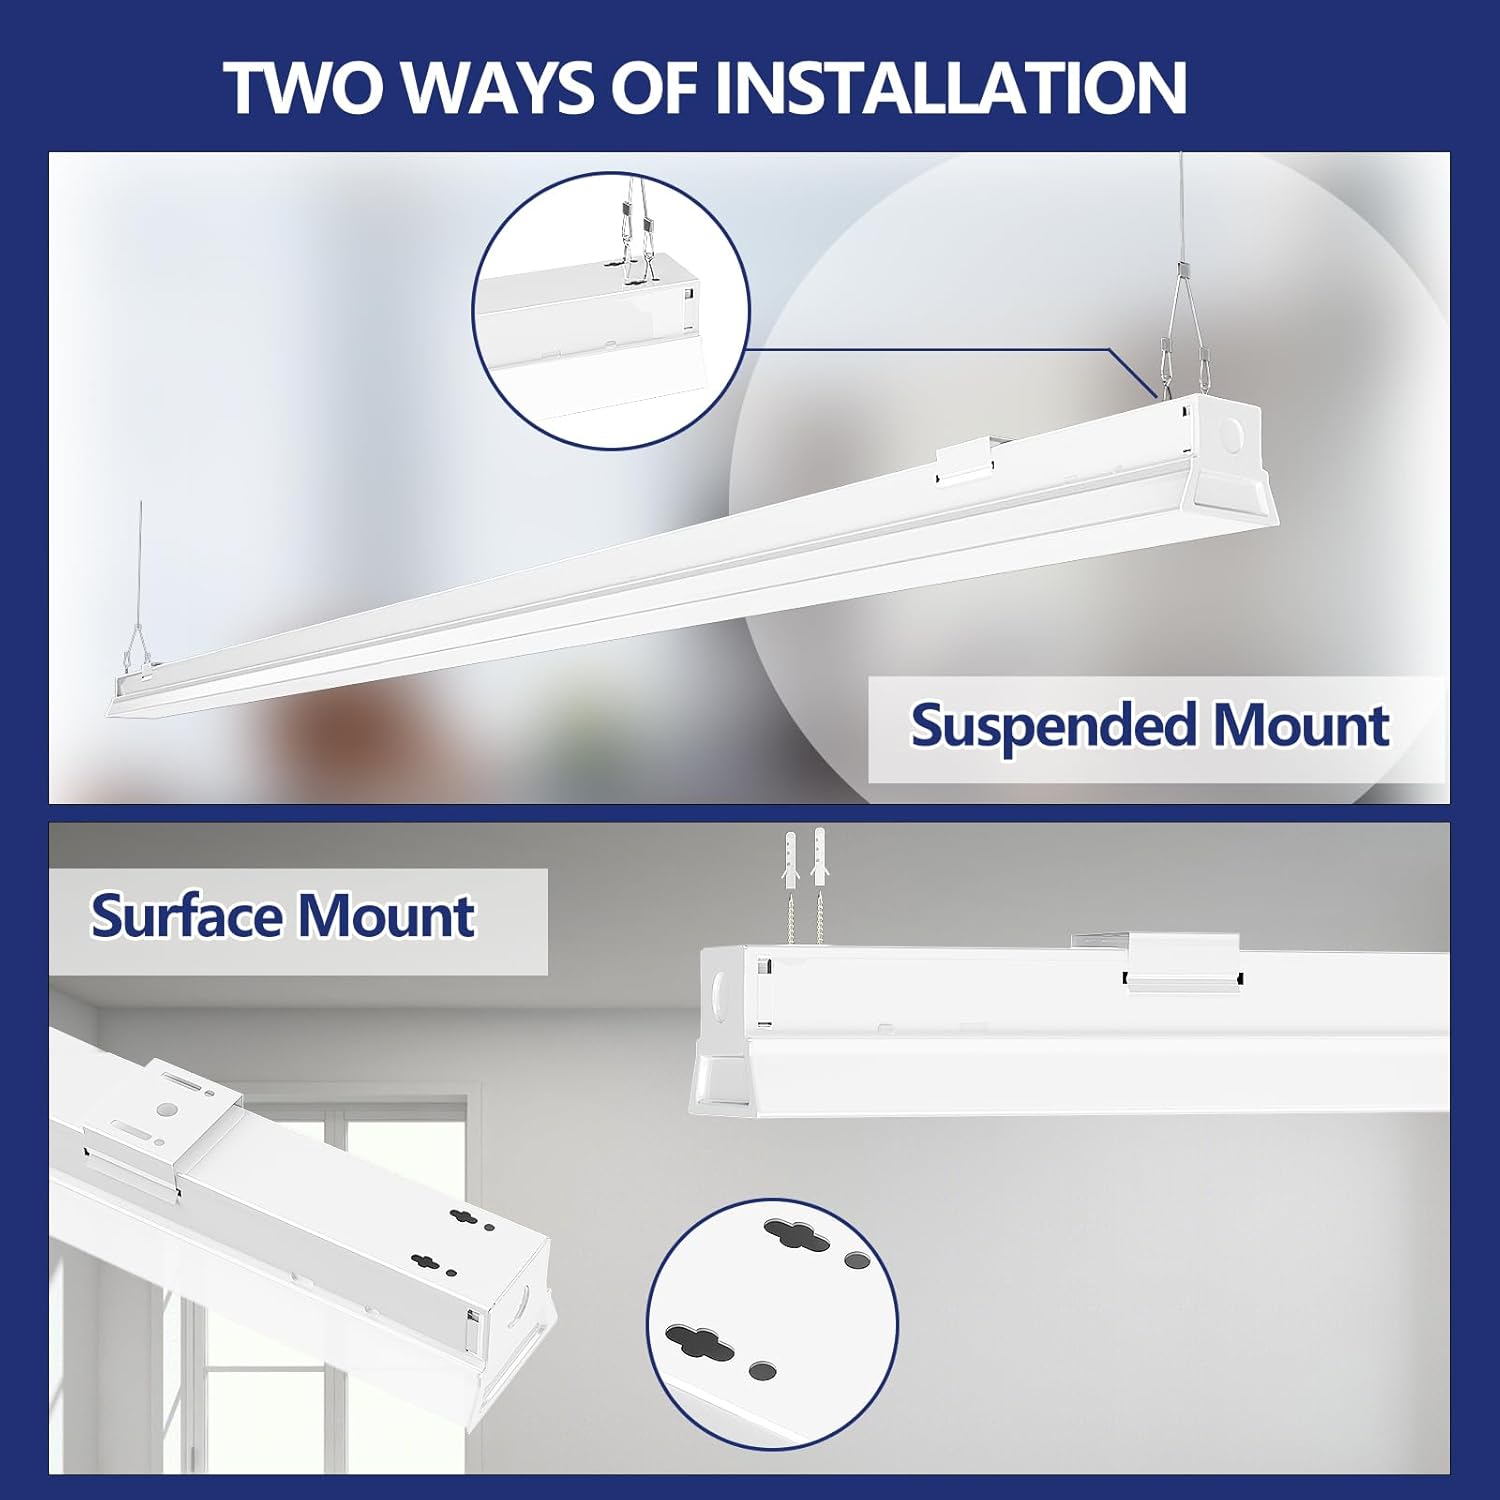
Figure 5.1: Two primary installation methods: Suspended Mount and Surface Mount.
5.1 Surface Mount Installation
- Mark the desired mounting locations on the ceiling or wall using the fixture as a template.
- Drill pilot holes at the marked locations. If mounting into drywall, insert the wall anchors.
- Secure the fixture directly to the surface using the provided large screws.
- Connect the electrical wiring (live, neutral, ground) from the power supply to the fixture's wiring using the provided wire nuts. Ensure all connections are secure and insulated.
5.2 Suspended Mount Installation
- Mark and drill holes for the ceiling hooks. Securely fasten the ceiling hooks into the ceiling structure.
- Attach the steel wires to the ceiling hooks and then to the mounting points on the fixture. Adjust the wire length to achieve the desired hanging height.
- Connect the electrical wiring (live, neutral, ground) from the power supply to the fixture's wiring using the provided wire nuts. Ensure all connections are secure and insulated.
5.3 Linking Multiple Fixtures
This fixture is designed to be linkable, allowing multiple units to be connected end-to-end for continuous lighting runs.
- Before linking, ensure the total wattage of all linked fixtures does not exceed the circuit's capacity.
- Remove the knock-out plates on the ends of the fixtures where they will connect.
- Align the fixtures and use appropriate connectors (not always included, may require separate purchase depending on linking method) to join them mechanically and electrically.
- Ensure all electrical connections between linked fixtures are secure and properly insulated.

Figure 5.2: Key features including the linkable design and integrated LED strips.
6. Operating Instructions
Once the ANTLUX 8FT LED Shop Light Fixture is correctly installed and wired, operation is straightforward:
- Restore power to the circuit at the breaker.
- Turn on the light using the wall switch connected to the fixture.
- To turn off the light, use the same wall switch.
- Note: While the specifications mention 'App' as a control method, this fixture primarily operates via a standard wall switch. Any advanced 'App' control functionality would require additional smart home integration components not included with this product.
7. Maintenance
The ANTLUX 8FT LED Shop Light Fixture is designed for minimal maintenance.
- Cleaning: Ensure the power is disconnected before cleaning. Use a soft, dry, or slightly damp cloth to wipe the exterior of the fixture. Do not use abrasive cleaners, solvents, or harsh chemicals, as these can damage the finish or diffuser.
- LED Strips: The LED strips are integrated and not user-replaceable. The fixture has a long lifespan of 50,000 hours, reducing the need for frequent replacement.
- Inspection: Periodically inspect the fixture and wiring for any signs of damage or wear. If any issues are found, disconnect power and contact a qualified electrician or customer support.
8. Troubleshooting
If you encounter issues with your ANTLUX LED Shop Light Fixture, refer to the following common troubleshooting steps:
- Light does not turn on:
- Check if the power supply is connected and the wall switch is in the 'ON' position.
- Verify that the circuit breaker has not tripped.
- Ensure all electrical connections are secure and properly wired.
- Light flickers:
- Confirm that the fixture is receiving stable voltage (120V AC).
- Check for loose wiring connections.
- Ensure the fixture is not connected to a dimmer switch unless explicitly rated for dimming (this model is not specified as dimmable).
- Partial illumination (some LEDs not working):
- This indicates a potential internal component failure. Contact customer support for assistance. Do not attempt to repair.
If these steps do not resolve the issue, please contact ANTLUX customer support.
9. Warranty and Support
ANTLUX is committed to providing quality products and customer satisfaction. While specific warranty duration details are not provided in this manual, the manufacturer offers professional after-sales support to address any concerns or issues you may encounter.
For technical assistance, troubleshooting beyond this guide, or warranty inquiries, please contact ANTLUX customer support through the retailer where the product was purchased or visit the official ANTLUX website for contact information.
Please have your model number (AL-LS8FT-8) and purchase information ready when contacting support.