PILSAMAS CF101W
PILSAMAS WiFi Caregiver Call Button CF101W Instruction Manual
Model: CF101W | Brand: PILSAMAS
1. Introduction
This manual provides detailed instructions for the setup, operation, and maintenance of your PILSAMAS WiFi Caregiver Call Button (Model CF101W). This device is designed to provide a reliable alert system for individuals requiring care, enabling real-time notifications to caregivers via a smartphone application.
The system offers independence for the user while providing peace of mind for family members and caregivers.
2. Product Overview
The PILSAMAS WiFi Caregiver Call Button is a compact, wireless device that connects to your home's 2.4G Wi-Fi network. When activated, it sends an immediate notification to linked smartphones.

Image: The PILSAMAS WiFi Caregiver Call Button, shown with a smartphone displaying an SOS notification, and an elderly person in the background.
2.1 Key Features
- WiFi Connectivity: Direct connection to 2.4G Wi-Fi for real-time app notifications.
- Real-time App Notifications: Receive instant alerts on your smartphone when the button is pressed.
- Multi-user Sharing: Share access with multiple family members or caregivers.
- Versatile Installation: Can be worn with a lanyard or attached to a wall using double-sided tape.
- Long Standby Time: Up to 6 months operating time on a single charge.
- Type-C Fast Charging: Convenient and quick recharging.
2.2 Package Contents
Please ensure all items are present:
- PILSAMAS WiFi Caregiver Call Button (Model CF101W)
- Lanyard
- USB Type-C Charging Cable
- Double-sided Tape
- User Manual (this document)
3. Setup Instructions
Follow these steps to set up your PILSAMAS WiFi Caregiver Call Button and connect it to your smartphone.
3.1 Device Components

Image: A diagram illustrating the physical components of the call button, including the call button itself, LED indicator, charging port, and lanyard attachment point.
- Lanyard: For wearing the button around the neck.
- Call Button: The main button to press for alerts.
- LED Indicator Light: Shows device status (e.g., pairing, charging).
- Charging Indicator Light: Indicates charging status.
- USB Charging Port: Type-C port for recharging the device.
3.2 App Download and Account Creation
- Download the App: Scan one of the QR codes below or search for "Tuya Smart" or "Smart Life" in your smartphone's app store. Both apps offer similar functionality; choose one.
Image: QR codes for downloading the Tuya Smart and Smart Life applications.
- Create an Account: Open the chosen app and follow the on-screen instructions to register a new account or log in if you already have one.
3.3 Connecting to Wi-Fi and Pairing the Device
Important Notes:
- The call button only supports 2.4G Wi-Fi networks. It is not compatible with 5G Wi-Fi.
- Ensure the call button is within 15 meters (approximately 49 feet) of your Wi-Fi router for optimal connection stability.
- Prepare your Phone: Connect your smartphone to your 2.4G Wi-Fi network and ensure Bluetooth is turned on.

Image: A smartphone screen demonstrating how to enable Wi-Fi (2.4G) and Bluetooth for device pairing.
- Enter Configuration Network State: Press and hold the call button on the device for 10 seconds. The LED indicator light will slowly flash, indicating it's in configuration mode. The duration for this state is 2 minutes.
- Add Device in App: Open the Tuya Smart or Smart Life app.
- Tap on "Add Device" or the "+" icon.
- The app should automatically discover the device. If not, select "Add Manually" and search for "SOS Button" or "Panic Button" under the relevant category (e.g., "Security & Video Surveillance" or "Sensors").
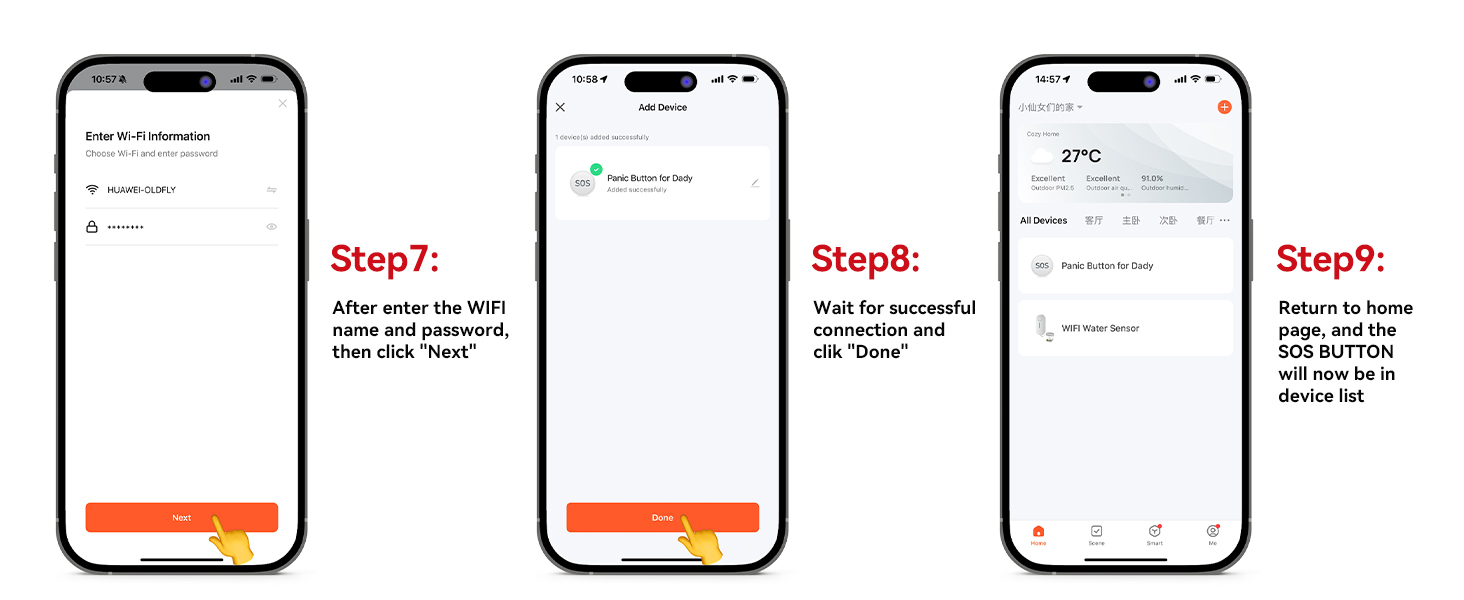
- Enter Wi-Fi Information: When prompted, enter your 2.4G Wi-Fi network name (SSID) and password.
- Complete Pairing: Wait for the app to successfully connect the device. Once connected, tap "Done" or "Finish". The SOS button will now appear in your device list within the app.
4. Operating Instructions
4.1 Sending an Alert
To send an alert, simply press the CALL button on the device. The LED indicator light will flash quickly to confirm the alert has been sent.

Image: An elderly person on the floor pressing the call button, illustrating how an alert is triggered, with a smartphone displaying the resulting SOS notification.
4.2 Receiving Notifications
Once the button is pressed, all linked smartphones will receive a real-time app notification. This notification will appear on your phone regardless of your location, as long as your phone has internet access.

Image: A world map illustrating that the smart panic button can send alerts to a smartphone anywhere globally, provided the button is within 15 meters of its home router.
Note on Subscription Services:
- App notifications are free and do not require a monthly fee.
- SMS, phone call, or email alerts may require a separate subscription service, if offered by the app provider.
4.3 Multi-User Sharing
The app allows you to share access to the device with other family members or caregivers. This ensures that multiple individuals receive alerts simultaneously.
- In the app, navigate to the device settings for your PILSAMAS Call Button.
- Look for a "Share Device" or "Multi-person Sharing" option.
- Follow the prompts to add other users by their app account details. Once shared, they will also receive alarm messages.

Image: A smartphone screen demonstrating the multi-user sharing function within the app, allowing multiple individuals to receive alarm messages.
4.4 Installation Methods
The call button can be installed in two primary ways:
- Wearable: Use the included lanyard to wear the button around the neck.
- Wall-Mounted: Use the provided double-sided tape to attach the button to a wall or other flat surface. This is ideal for locations like bathrooms, kitchens, or near a bed.

Image: Two panels showing the versatility of the call button: one mounted on a bathroom wall, and another worn around an elderly person's neck with the lanyard.
5. Maintenance
5.1 Charging the Device
The PILSAMAS Call Button features a built-in Lithium Polymer battery. When the battery level is low, the app will typically notify you. Use the provided USB Type-C cable to charge the device.
- Charging Time: Approximately 1 hour for a full charge.
- Operating Time: Up to 6 months on a full charge, depending on usage.
- Battery Type: 1 Lithium Polymer battery (included), 3.7 Volts.

Image: The PILSAMAS Call Button connected to a Type-C charging cable, alongside graphics indicating 1-hour charging time, 1µA standby current, and 6 months operating time.
5.2 Cleaning
Wipe the device with a soft, dry cloth. Do not use abrasive cleaners or immerse the device in water.
The device has an IP55 waterproof rating, meaning it is protected against dust and low-pressure water jets from any direction. It is not designed for submersion.
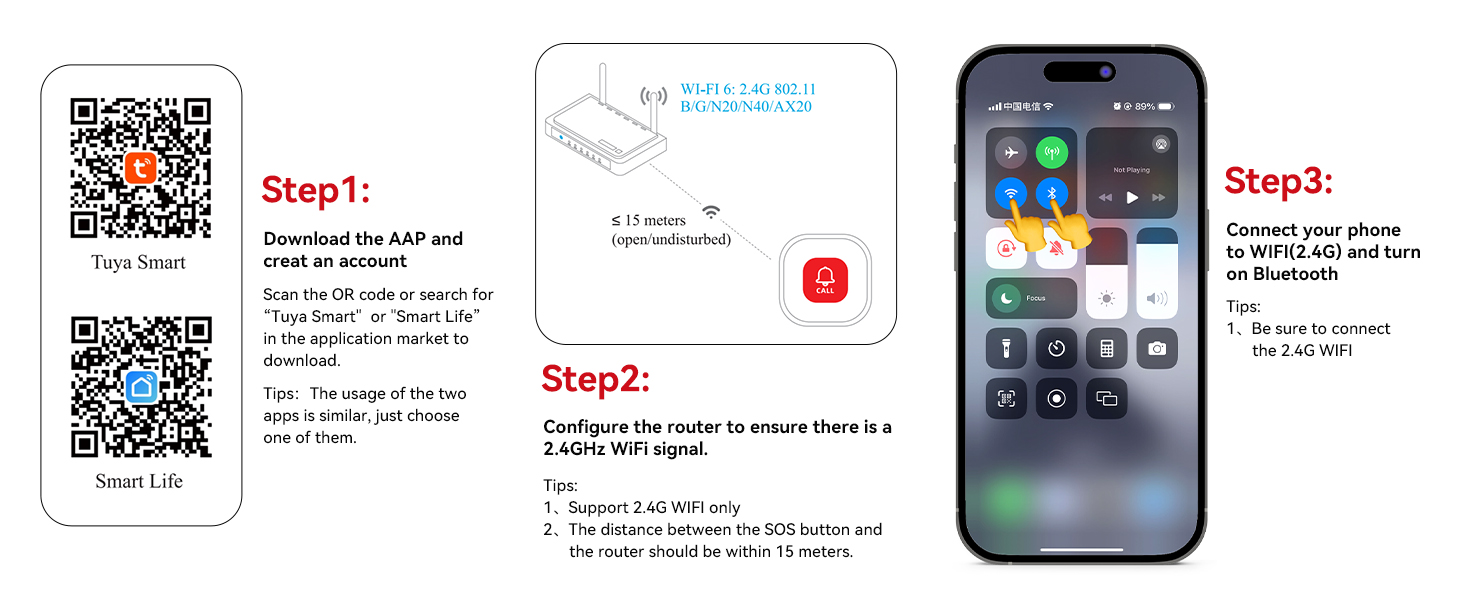
Image: The PILSAMAS Call Button shown with icons indicating its IP55 waterproof rating and operating temperature range (-20°C to 50°C).
6. Troubleshooting
| Problem | Possible Cause | Solution |
|---|---|---|
| Device not connecting to Wi-Fi / App |
|
|
| No app notifications received |
|
|
| Shared users not receiving alerts |
|
|
7. Specifications
| Feature | Detail |
|---|---|
| Model Number | CF101W |
| Brand | PILSAMAS |
| Power Source | Battery Powered (1 Lithium Polymer battery included) |
| Battery Voltage | 3.7 Volts |
| Battery Cell Type | Polymer (Lithium-Ion) |
| Charging Port | USB Type-C |
| Charging Time | Approx. 1 hour |
| Operating Time | Up to 6 months (standby) |
| Control Method | Touch (button press) |
| Wireless Connectivity | 2.4G Wi-Fi (802.11 b/g/n) |
| Maximum Wi-Fi Range | 15 meters (from router) |
| Mounting Type | Wall Mount (adhesive) or Wearable (lanyard) |
| Product Dimensions | 1.97 x 0.63 x 1.97 inches (50 x 16 x 50 mm) |
| Item Weight | 1.76 ounces |
| Color | White |
| Operating Temperature | -20°C to 50°C (-4°F to 122°F) |
| Waterproof Rating | IP55 |
| Compatible Devices | Smartphone (via Tuya Smart or Smart Life app) |
8. Warranty Information
The PILSAMAS WiFi Caregiver Call Button (Model CF101W) comes with a 2-year warranty from the date of purchase. This warranty covers manufacturing defects and malfunctions under normal use.
Please retain your proof of purchase for warranty claims. The warranty does not cover damage caused by misuse, accidents, unauthorized modifications, or failure to follow the instructions in this manual.
9. Support
For technical support, troubleshooting assistance, or warranty inquiries, please refer to the following resources:
- App Support: Consult the help sections within the Tuya Smart or Smart Life applications for common issues and FAQs.
- Online Resources: Visit the official website of PILSAMAS or the app providers (Tuya Smart, Smart Life) for updated information and support.
- Contact Retailer: If purchased from a retailer, contact their customer service for assistance.
Related Documents - CF101W
 |
PLM-X1S Glof Portable Waterproof Speaker User Manual User manual for the PLM-X1S Glof portable waterproof speaker, covering parameters, connectivity, button functions, service, safety precautions, and production information. |
 |
PILSAMAS PLM-X3S, CYB-X3S Outdoor Wireless Speaker User Manual User manual for the PILSAMAS PLM-X3S and CYB-X3S outdoor wireless speaker, detailing features, operation, connectivity, and specifications. Includes FCC warning information. |
Ask a question about this manual
Ask about setup, troubleshooting, compatibility, parts, safety, or missing instructions. Manuals+ will review the question and use this page’s manual context to help answer it.