1. Introduction
This manual provides comprehensive instructions for the installation, operation, and maintenance of your Loddery 9.7-inch Car Radio Stereo. Please read this manual thoroughly before using the product to ensure proper function and safety. Keep this manual for future reference.

Image 1.1: Loddery 9.7-inch Car Radio Stereo main unit.
2. Safety Information
- Ensure the vehicle is turned off and the battery is disconnected before installation to prevent electrical shorts or damage.
- Professional installation is recommended for optimal performance and safety.
- Do not operate the device in a way that distracts you from driving. Always prioritize road safety.
- Avoid exposing the unit to extreme temperatures, direct sunlight for prolonged periods, or moisture.
- Use only specified accessories and wiring provided with the unit.
3. Package Contents
Verify that all items listed below are present in your package:
- Main Head Unit (9.7-inch Car Radio Stereo)
- Power Cable
- RCA Input/Output Cables
- USB Cables (2)
- Camera Input Cable
- Radio Adapter Cable
- GPS Antenna
- Instruction Manual
- USB Adapter Cable
- Microphone (Wheat head)
- Canbus Box

Image 3.1: Included components with the Loddery Car Radio Stereo.
4. Compatibility
This Loddery 9.7-inch Car Radio Stereo is specifically designed for the following vehicle models:
- Dodge Ram 1500 (Years: 2013, 2014, 2015, 2016, 2017, 2018)
- Dodge Ram 2500 (Years: 2013, 2014, 2015, 2016, 2017, 2018)
- Dodge Ram 3500 (Years: 2013, 2014, 2015, 2016, 2017, 2018)
Important Note: This unit is only compatible with vehicles equipped with Manual Air Conditioning (AC) controls. It is not compatible with vehicles that have Automatic AC controls.

Image 4.1: Visual guide for vehicle compatibility, highlighting manual AC requirement.
5. Setup and Installation
Installation of the Loddery Car Radio Stereo involves replacing the factory head unit. While the unit is designed for a plug-and-play experience in compatible vehicles, professional installation is highly recommended.
5.1 Pre-Installation Steps
- Disconnect Battery: Before beginning any electrical work, disconnect the negative terminal of your vehicle's battery to prevent electrical shorts.
- Remove Factory Unit: Carefully remove the existing factory radio and trim panels according to your vehicle's service manual.
- Inspect Wiring: Familiarize yourself with the vehicle's wiring harness and the provided wiring for the new unit.
5.2 Wiring Connections
Connect the provided cables to the corresponding ports:
- Power Cable: Connect the main power harness to the vehicle's wiring. Ensure all connections are secure.
- Canbus Box: Connect the Canbus box as instructed to ensure proper communication with vehicle systems (e.g., steering wheel controls).
- GPS Antenna: Mount the GPS antenna in a location with a clear view of the sky, typically on the dashboard or under the windshield.
- USB Cables: Connect the USB cables for external devices and Carplay/Android Auto functionality.
- Camera Input: If installing a rear view camera, connect its video output to the camera input cable.
- Microphone: Connect the external microphone for improved call quality and voice commands.
- Radio Adapter: Connect the radio antenna adapter.
- RCA Cables: Connect RCA input/output cables for external amplifiers or video sources if applicable.
5.3 Post-Installation
- Secure Unit: Carefully install the new head unit into the dashboard opening.
- Reconnect Battery: Reconnect the negative terminal of the vehicle's battery.
- Initial Power On: Turn on the vehicle's ignition and power on the stereo.
- Touch Screen Calibration: Upon first startup, you may see a crosshair with numbers. Touch each number in sequence to calibrate the touchscreen.
- Test Functions: Verify all functions (radio, audio, touchscreen, steering wheel controls, GPS, Bluetooth, Carplay/Android Auto) are working correctly.
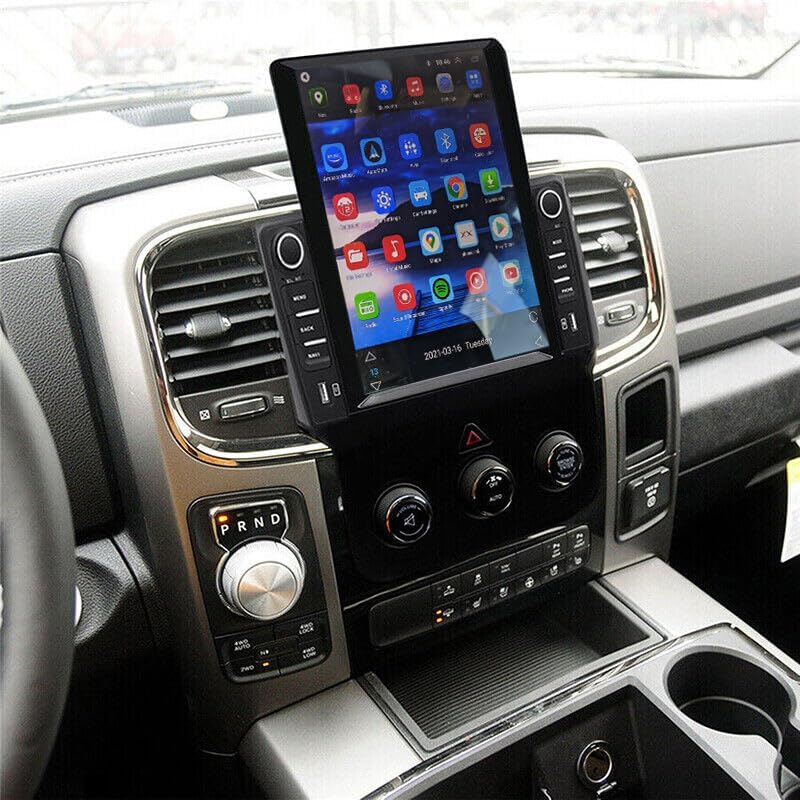
Image 5.1: Example of the Loddery Car Radio Stereo installed in a compatible vehicle.
6. Operating Instructions
6.1 Basic Operation
- Power On/Off: Press and hold the power button (usually a knob or dedicated button) to turn the unit on or off. A short press may mute/unmute audio.
- Volume Control: Rotate the volume knob or use the touchscreen controls to adjust audio levels.
- Touchscreen Interface: Navigate through menus and applications by tapping, swiping, and dragging on the 9.7-inch display.
- Steering Wheel Controls: If properly connected via the Canbus, your vehicle's steering wheel controls for volume, track change, and mode selection should function.
6.2 CarPlay and Android Auto
The unit supports both wired and wireless Apple CarPlay and Android Auto, integrating your smartphone's features directly into the stereo display.
6.2.1 Apple CarPlay (for iOS devices)
- Wireless Connection: Enable Bluetooth on your iPhone and pair it with the car stereo. Once paired, open the "ZLINK" application on the stereo to initiate CarPlay.
- Wired Connection: Connect your iPhone to one of the USB ports using a certified USB cable. Open the "ZLINK" application if it doesn't launch automatically.
- Features: Access navigation, make calls, send/receive messages, listen to music, and use Siri voice assistant.
6.2.2 Android Auto (for Android devices)
- Wireless Connection: Ensure Android Auto is installed on your Android phone. Enable Bluetooth and pair your phone with the car stereo. Open the Android Auto application on the stereo.
- Wired Connection: Connect your Android phone to one of the USB ports using a certified USB cable. The Android Auto application on the stereo should launch automatically.
- Features: Access navigation, make calls, send/receive messages, listen to music, and use Google Assistant voice commands.

Image 6.1: Overview of CarPlay and Android Auto functionality.

Image 6.2: User interfaces for Apple CarPlay and Android Auto.
6.3 GPS Navigation and WiFi
The unit features built-in GPS for navigation and WiFi connectivity for online services.
- GPS Navigation: Access pre-installed offline maps or use online navigation applications after connecting to WiFi. The GPS antenna ensures accurate positioning.
- WiFi Connection: Connect the stereo to a mobile hotspot or a local WiFi network to access online maps, stream content, and download applications.

Image 6.3: GPS navigation and WiFi connectivity options.
6.4 Bluetooth Functionality
Bluetooth 5.0 allows for hands-free calling, music streaming, and phonebook synchronization.
- Pairing: Go to the Bluetooth settings on the stereo and your phone. Search for available devices and select the stereo's name to pair.
- Hands-Free Calling: Once paired, you can make and receive calls directly through the stereo, utilizing the built-in or external microphone.
- Music Playback: Stream audio from your paired device to the stereo.
- Phonebook: The stereo can automatically download your phone's contacts for easy access.

Image 6.4: Bluetooth interface for calls and music.
6.5 Additional Features
- FM RDS Radio: Tune into FM radio stations with RDS (Radio Data System) support for station information.
- 1080P HD Video Playback: Play high-definition video files from connected USB devices.
- Split Screen: Utilize the split-screen function to run two applications simultaneously (e.g., navigation and music player).
- AHD Rear View Camera Support: Connect a compatible AHD rear view camera for enhanced parking assistance. The display will automatically switch to the camera feed when reversing.
- ADAS DVR Support (Optional): If an optional ADAS DVR is connected, the system can provide anti-collision warnings, front vehicle distance prediction, and lane departure warnings.
- Tire Pressure Detection (Optional): With an optional TPMS sensor kit, the unit can display real-time tire pressure and temperature data.
- Bluetooth OBD II (Optional): Connect an optional Bluetooth OBD II scanner to retrieve real-time vehicle data and diagnostic trouble codes.

Image 6.5: ADAS DVR functionality for driving safety.

Image 6.6: Overview of optional auxiliary systems.
7. Maintenance
- Screen Cleaning: Use a soft, lint-free cloth to gently wipe the touchscreen. For stubborn smudges, slightly dampen the cloth with water or a screen-safe cleaner. Avoid harsh chemicals.
- Software Updates: Periodically check for software updates from the manufacturer to ensure optimal performance and access to new features.
- General Care: Keep the unit free from dust and debris. Avoid placing heavy objects on the unit or exposing it to excessive force.
8. Troubleshooting
This section addresses common issues you might encounter. For problems not listed here, please contact customer support.
| Problem | Possible Cause | Solution |
|---|---|---|
| Unit does not power on. | Incorrect wiring; Blown fuse; Vehicle battery disconnected. | Check power connections and fuses. Ensure vehicle battery is connected. |
| No audio output. | Volume too low; Mute function active; Speaker wiring issue. | Increase volume. Check if mute is active. Verify speaker connections. |
| CarPlay/Android Auto not connecting or unstable. | Incorrect app (ZLINK for CarPlay); Bluetooth not paired; Faulty USB cable; Phone settings. | Ensure correct app is open (ZLINK for iOS, Android Auto for Android). Verify Bluetooth pairing. Try a different USB cable. Check phone's Carplay/Android Auto settings. Restart phone and stereo. |
| GPS signal weak or inaccurate. | GPS antenna obstructed or improperly installed. | Ensure GPS antenna has a clear view of the sky and is securely connected. |
| Touchscreen unresponsive or inaccurate. | Calibration needed; Software glitch. | Perform touchscreen calibration (if prompted on startup). Restart the unit. If a reset button is available (often a small pinhole), use it. |
| Screen washed out in bright daylight. | High ambient light conditions. | Adjust brightness/contrast settings in the display menu. Consider anti-glare screen protectors or vehicle window tinting for severe cases. |
9. Specifications
| Feature | Detail |
|---|---|
| Brand | Loddery |
| Model Name | 9.7 inch Car Radio Stereo for Dodge Ram 1500 2500 3500 2013 2014 2015 2016 2017 2018 |
| Item Model Number | QA1572X-5974-1417104221 |
| Display Size | 9.7 Inches |
| Product Dimensions | 14.96 x 12.2 x 6.69 inches |
| Item Weight | 4.13 pounds |
| Connectivity Technology | Bluetooth, Ethernet, USB, Wi-Fi |
| Special Feature | Wireless & Wired Carplay, Wireless & Wired Android Auto, Built-in GPS, WiFi, DSP, Camera Input, Microphone, Steering Wheel Control, 1080P HD Video Playback, Split Screen, Dual USB Input, FM RDS Radio |
| Audio Output Mode | Stereo |
| Mounting Type | Dashboard Mount |
| Included Components | Car compass (Note: This refers to the digital compass feature, not a physical compass) |
| Vehicle Service Type | Car (Dodge Ram 1500/2500/3500, 2013-2018, Manual AC) |
10. Warranty and Support
For any questions or concerns regarding your Loddery Car Radio Stereo, please contact customer support. The manufacturer provides support for product inquiries.
Warranty: If you have any questions, please feel free to contact the manufacturer.
For technical assistance or warranty claims, refer to the contact information provided with your purchase documentation or visit the official Loddery support website.