Goshyda Goshydaet5di2n8rc-12
Goshyda Smart Digital Camera User Manual
Model: Goshydaet5di2n8rc-12
1. Introduction
Thank you for choosing the Goshyda Smart Digital Camera. This manual provides essential information for the proper setup, operation, and maintenance of your camera. Please read it thoroughly before use to ensure optimal performance and longevity of your device.

Figure 1: Front view of the Goshyda Smart Digital Camera.
2. Package Contents
Please verify that all items listed below are included in your package:
- 1 x Goshyda Smart Digital Camera
- 1 x Camera Storage Bag
- 1 x Wide Angle Lens
- 1 x Professional Lens
- 1 x Cleaning Cloth
- 1 x Shoulder Strap
- 1 x Instructional Manual (this document)
- 1 x Charging Cable (Type-C)
- 2 x Conversion Interface
- 1 x OTG Card Reader

Figure 2: Included accessories with the Goshyda Smart Digital Camera.
3. Camera Components and Controls
Familiarize yourself with the camera's various parts and controls:
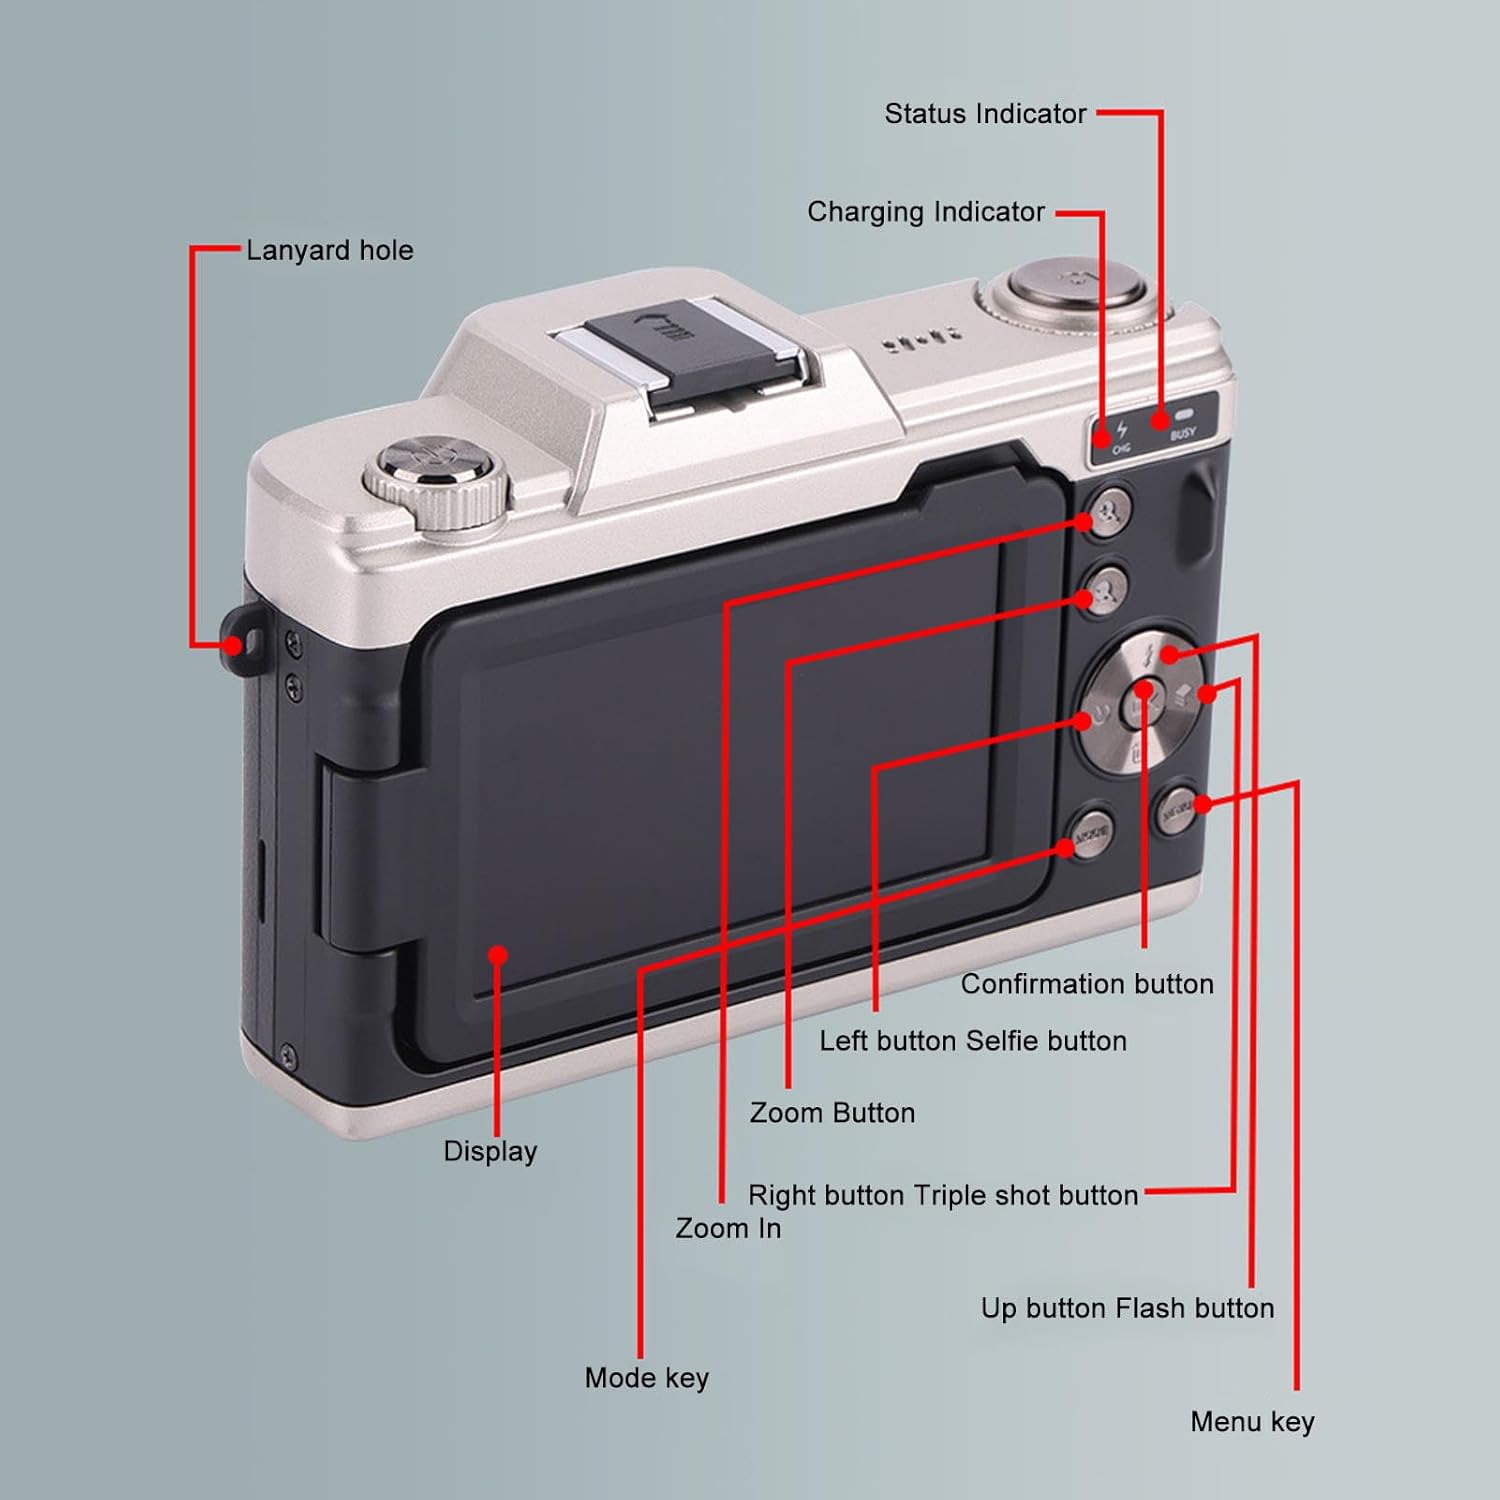
Figure 3: Rear view and control layout of the Goshyda Smart Digital Camera.
- Display: 3.0 Inch 16:9 screen, supports 180° flip.
- Lanyard Hole: For attaching a wrist strap or neck strap.
- Status Indicator: Shows camera operational status.
- Charging Indicator: Illuminates during charging.
- Mode Key: Switches between different camera modes (e.g., Photo, Video).
- Menu Key: Accesses camera settings and options.
- Confirmation Button: Confirms selections in menus.
- Directional Buttons (Left/Right/Up/Down): Navigate menus and control specific functions (e.g., Selfie, Triple Shot, Flash).
- Zoom Button: Controls 20x digital zoom.
- Hot Shoe: For external flash or accessories.
- USB Port (Type-C): For charging and data transfer.
- 1/4 Inch Standard Screw Hole: For tripod mounting.
4. Setup
4.1 Battery Installation and Charging
- Locate the battery compartment cover on the camera.
- Open the cover and insert the NP-45 Lithium Ion Battery (1200mAh) according to the polarity indicators.
- Close the battery compartment cover securely.
- Connect the camera to a power source using the provided Type-C charging cable. The Charging Indicator will illuminate.
- Charge the battery fully before first use. A full charge ensures optimal performance.

Figure 4: Battery charge indication.
4.2 Memory Card Installation
The camera supports up to a 128GB small memory card (not included).
- Locate the memory card slot, usually near the battery compartment.
- Insert the memory card with the gold contacts facing the correct direction until it clicks into place.
- To remove, gently push the card in until it springs out.
4.3 Attaching Lenses
The camera supports 52mm threaded lenses, including the provided wide-angle and professional lenses.
- Align the threads of the desired lens with the lens interface on the camera.
- Gently rotate the lens clockwise until it is securely attached.
- To remove, rotate counter-clockwise.
5. Operating Instructions
5.1 Powering On/Off
Press and hold the power button (typically located on the top or side of the camera) to turn the camera on or off.
5.2 Basic Photography
- Mode Selection: Use the Mode Key to select 'Photo' mode.
- Image Resolution: In the menu, navigate to 'Image Resolution' to select desired settings (e.g., 68M, 48M, 30M, 20M, 16M, 12M, 8M).
- Image Ratio: Set the image aspect ratio to 16:9 via the menu.
- Zoom: Use the Zoom Button to digitally zoom in or out (up to 20x).
- Beauty Function: Enable or disable the beauty function through the menu for enhanced portraits.
- White Balance: Adjust white balance settings (Auto, Manual) in the menu to ensure accurate color representation.
- Auto Focus: The camera supports auto focus. Ensure your subject is within the focus area.
- Taking a Photo: Press the shutter button fully to capture an image.
5.3 Video Recording
- Mode Selection: Use the Mode Key to select 'Video' mode.
- Video Resolution: In the menu, select your preferred video resolution (e.g., 4K, 2.7K, Full HD).
- Zoom: The 20x digital zoom is also available during video recording.
- Starting/Stopping Recording: Press the shutter button to start recording. Press it again to stop.
5.4 Using the 180° Flip Screen
The 3.0-inch display can be flipped 180° for convenient self-portraits or vlogging.
- Gently pull the screen outwards from the camera body.
- Rotate the screen up to 180° to face forward.
- The display will automatically adjust to show the live view for easy framing of selfies or video blogs.

Figure 5: The 180° flip screen in action.
5.5 Advanced Features
- Fill Light: The camera includes a built-in fill light. Activate it via the menu or a dedicated button (refer to Figure 3).
- Hot Shoe Expansion: Attach external flash units or other compatible accessories to the hot shoe mount for enhanced lighting or functionality.
6. Maintenance
Proper care ensures the longevity and performance of your camera.
- Cleaning the Camera Body: Use a soft, dry cloth to wipe the camera body. Avoid abrasive cleaners or solvents.
- Cleaning Lenses: Use the provided cleaning cloth or a specialized lens cleaning solution and cloth. Gently wipe the lens surface in a circular motion. Avoid touching the lens glass with your fingers.
- Battery Care: Store the battery in a cool, dry place when not in use. Avoid extreme temperatures. Do not disassemble or short-circuit the battery.
- Storage: When not in use for extended periods, store the camera in its storage bag in a dry, dust-free environment. Remove the battery if storing for several months.
7. Troubleshooting
If you encounter issues with your camera, refer to the following common solutions:
- Camera Not Turning On: Ensure the battery is fully charged and correctly inserted. Try charging the battery for at least 30 minutes.
- Memory Card Error: Ensure the memory card is inserted correctly. Try formatting the card (this will erase all data) via the camera's menu. If the issue persists, try a different compatible memory card.
- Poor Image Quality: Check that the lens is clean and free from smudges. Ensure sufficient lighting. Adjust ISO or exposure settings if necessary.
- Screen Not Displaying: Check if the screen is properly flipped out and connected. Restart the camera.
- Camera Freezes: Remove and reinsert the battery to perform a hard reset.
If the problem persists after trying these steps, please contact Goshyda customer support.
8. Specifications
| Feature | Specification |
|---|---|
| Item Type | Smart Digital Camera |
| Material | ABS, Optical Glass |
| File Format | JEPG, AVI |
| Image Resolution | 68M, 48M, 30M, 20M, 16M, 12M, 8M |
| Video Resolution | 4K, 2.7K, Full HD |
| Image Ratio | 16:9 |
| Beauty Function | Support |
| Zoom Magnification | 20x Digital Zoom |
| White Balance | Auto, Manual |
| Aperture | F/2.4mm |
| Focal Length | F=5.04mm |
| Auto Focus | Support |
| Lens Expansion | Supports 52mm Threaded Lens |
| Battery Type | Lithium Ion Battery (NP-45) |
| Battery Capacity | 1200mAh (Built-In) |
| Storage Support | Up To 128G Small Memory Card (Excluded) |
| Connection | USB 2.0 (Type-C Charging Port) |
| Fill Light | Support |
| Hot Shoe Expansion | Support |
| Display Screen | 3.0 Inch 16:9 Screen (180° Flip) |
| Bottom Connector | 1/4 Inch Standard Screw Hole |
| Item Weight | 1.98 pounds (Approx. 900g) |
| Package Dimensions | 8.27 x 5.51 x 4.33 inches |
| Manufacturer | Goshyda |
| Model Number | Goshydaet5di2n8rc-12 |
| ASIN | B0CW9Q97YM |
9. Warranty and Support
For warranty information or technical support, please refer to the official Goshyda website or contact their customer service directly. Keep your purchase receipt as proof of purchase.