1. Safety Information
Please read all safety instructions carefully before using the Opqpq ODM702 Flex Digital Microscope. Failure to follow these instructions may result in electric shock, fire, or serious injury.
- Do not expose the device to water or excessive humidity.
- Avoid direct exposure to sunlight or high temperatures.
- Keep the device away from strong magnetic fields.
- Do not attempt to disassemble or modify the microscope. Refer all servicing to qualified personnel.
- Use only the provided power adapter and accessories.
- Ensure proper ventilation around the device during operation.
- When cleaning, disconnect the power and use a soft, dry cloth.
2. Package Contents
Verify that all items are present in your package:
- 1 x Opqpq ODM702 Flex 10-inch LCD Screen
- 1 x Flexible Boom Arm
- 1 x Ring Light
- 1 x Soldering Mat
- 1 x Controller
3. Product Overview
The Opqpq ODM702 Flex is a versatile digital microscope designed for detailed inspection and repair tasks. It features a 10-inch LCD screen for clear viewing, a flexible boom arm for precise positioning, and a powerful ring light for optimal illumination. It supports up to 1300x magnification, 12MP photo capture, and 1080P video recording.

Figure 3.1: Opqpq ODM702 Flex Digital Microscope main components.
Key features include:
- 10-inch LCD Display: Provides a large, clear, and bright image for comfortable viewing.
- Flexible Boom Arm: A four-joint heavy-duty arm allows for extensive movement and stable positioning over various workpieces.
- Adjustable Ring Light: Ensures bright, even illumination of the working area with adjustable brightness to prevent glare.
- High Magnification: Up to 1300x magnification for examining intricate details.
- Photo and Video Capture: Records 12MP photos and 1080P videos, stored on an included 32GB SD card.
- PC Connectivity: USB interface for PC monitoring, photo retrieval, and sharing.
- Soldering Mat: A 13.8" x 9.8" silicone mat with a scale ruler, part boxes, magnetic zones, and screw positions for an organized workspace.
4. Setup Instructions
Follow these steps to assemble your ODM702 Flex Digital Microscope:
- Prepare the C-clamp: Remove the screw from the bottom of the main pole.
- Assemble the C-clamp: Insert the cover into the C-clamp, then connect the main pole to the C-clamp and tighten the screw.
- Attach to Desktop: Secure the C-clamp to your desktop by tightening the clamp screw. Ensure it is stable.
- Attach Monitor Arm: Attach the monitor arm to the main pole and secure it by tightening its screw.
- Install Microscope Bracket: Screw the microscope bracket to the arm hole and fix it securely with the provided nut.
- Mount Microscope: Install the microscope unit into the bracket and tighten the two small screws to fix it in place.
- Install Ring Light: Carefully install the ring light around the microscope lens, ensuring it does not obstruct the focus knob.
- Cable Management: Use the provided cable clips to manage and organize all connecting cables along the flexible arm and pole.
For a visual guide, please refer to the installation video below:
Video 4.1: How to install the Opqpq ODM702 Flex Digital Microscope. This video demonstrates the step-by-step assembly process of the microscope, including attaching the C-clamp, flexible arm, microscope unit, and ring light.
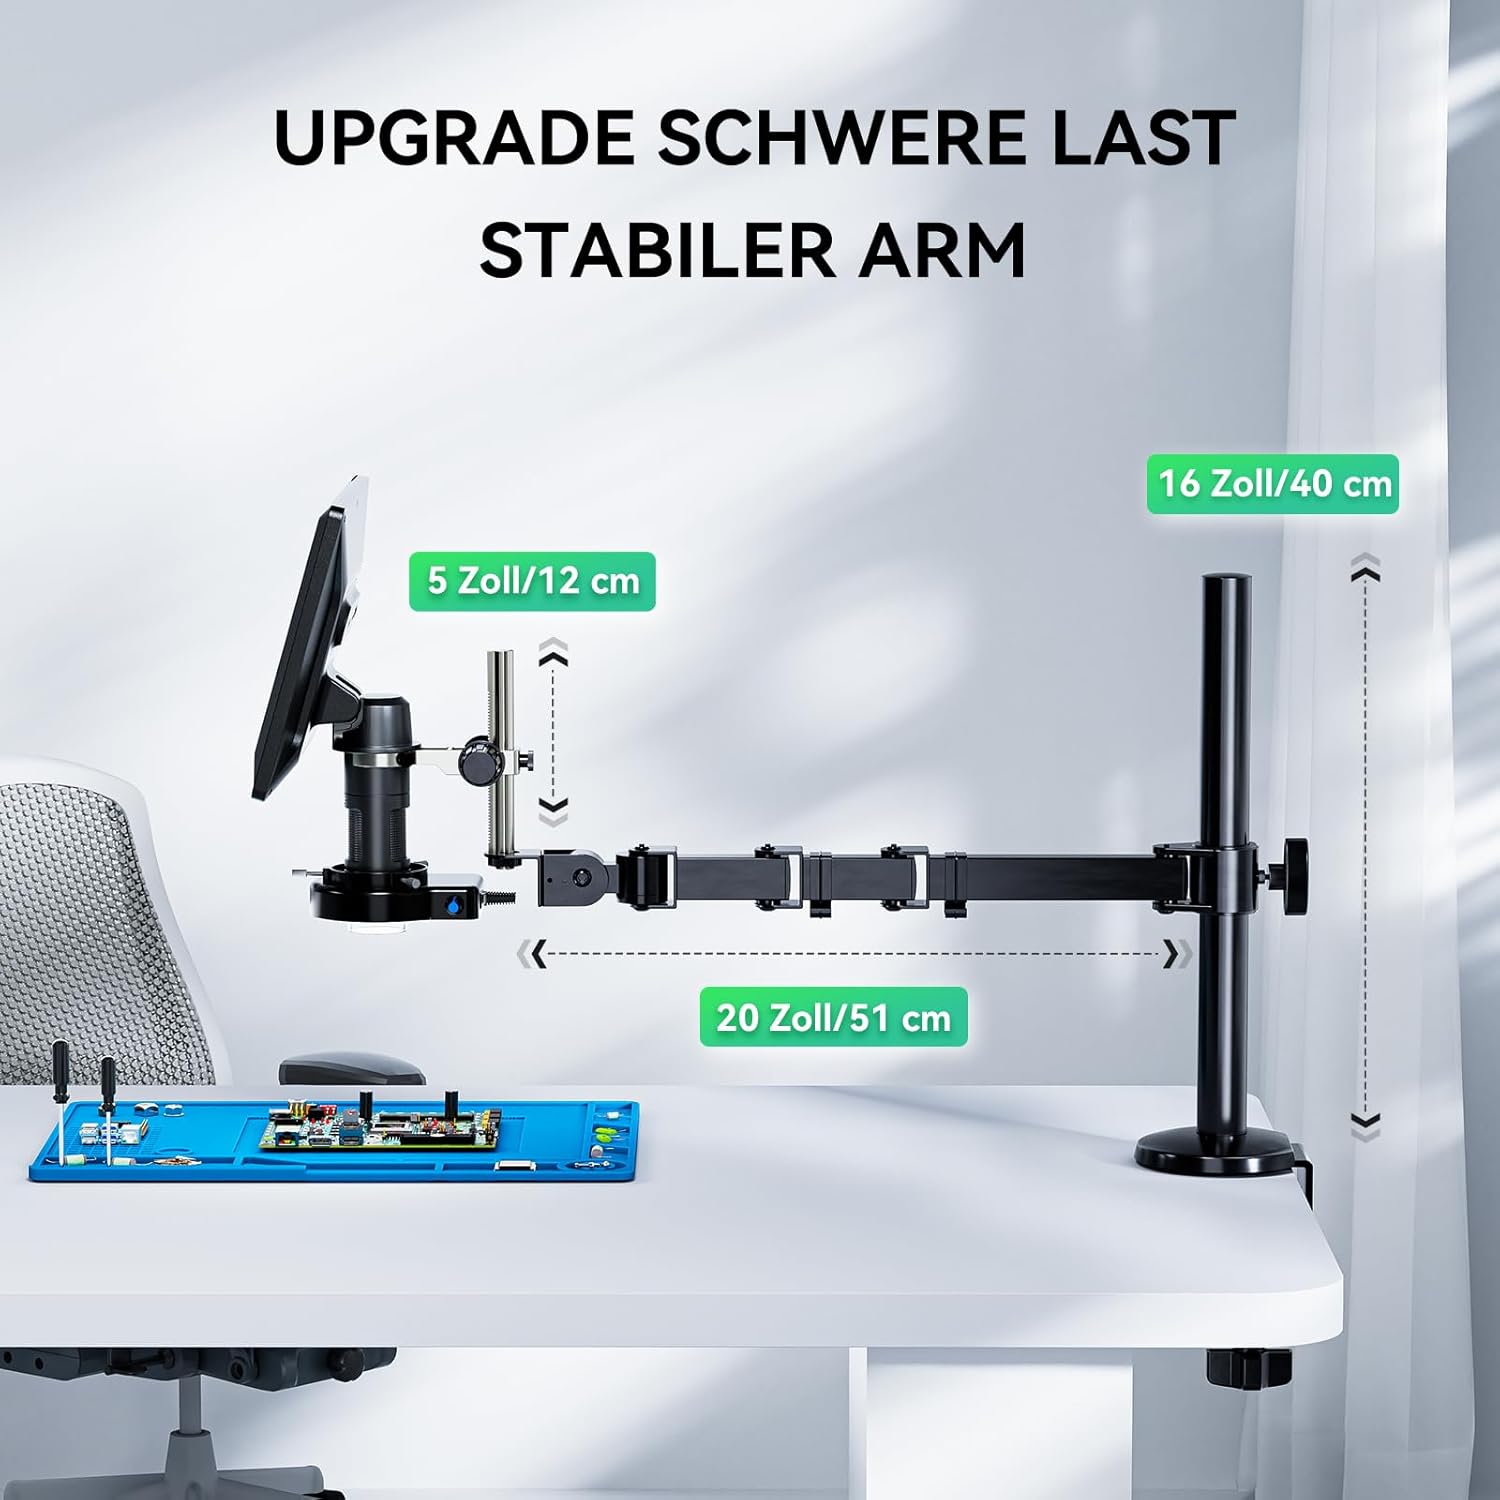
Figure 4.2: Upgraded Heavy-Duty Stable Arm with dimensions.

Figure 4.3: Advanced Cable Management.
5. Operating Instructions
This section details how to use your ODM702 Flex Digital Microscope for various applications.
5.1 Powering On/Off
Press and hold the power button on the microscope unit or controller to turn the device on or off. The 10-inch LCD screen will illuminate upon startup.
5.2 Adjusting Magnification and Focus
Rotate the focus knob on the microscope unit to achieve a clear image. The ODM702 Flex offers up to 1300x magnification. Adjust the height of the microscope using the bracket on the flexible arm for larger objects or to change the working distance.
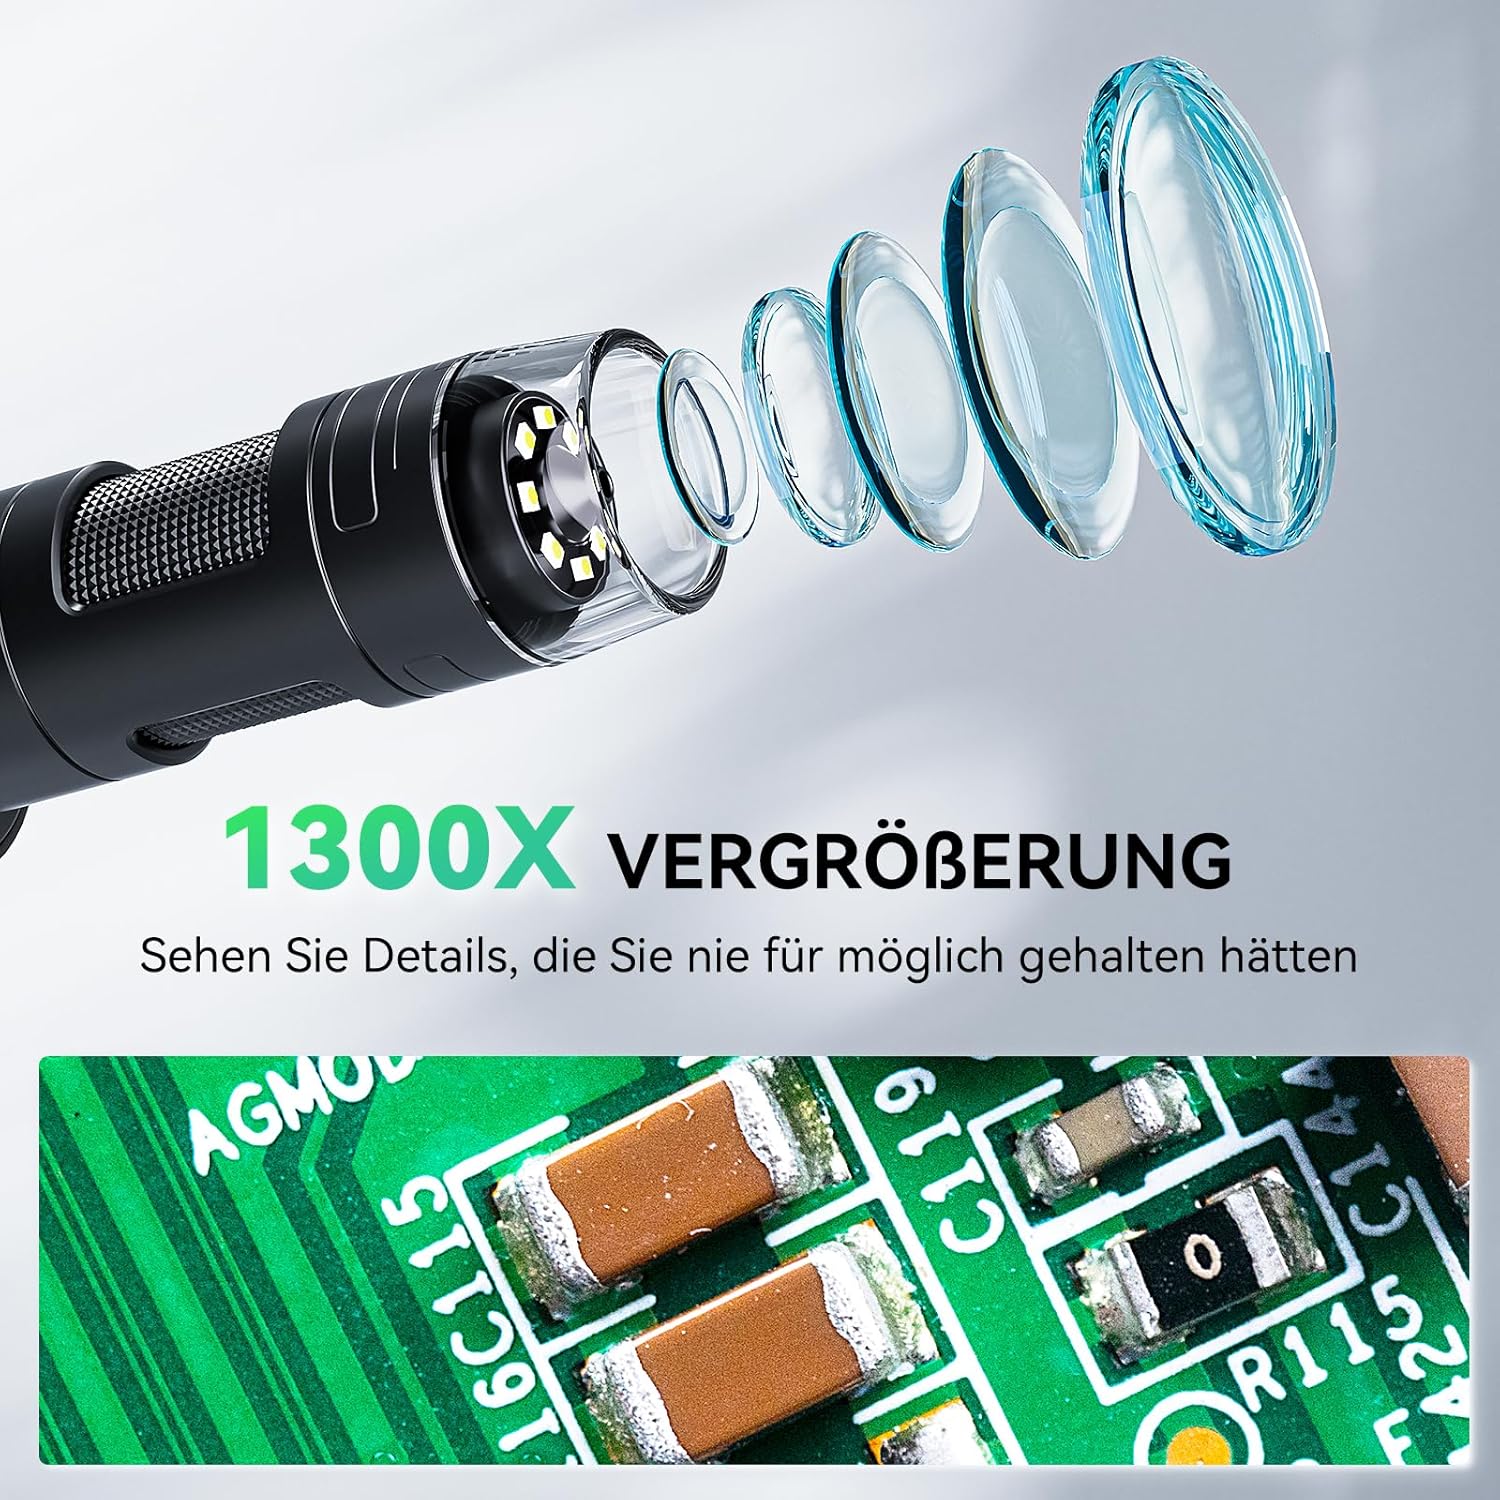
Figure 5.1: 1300X Magnification showing intricate details on a circuit board.
5.3 Using the Ring Light
The integrated ring light provides essential illumination. Use the brightness adjustment knob on the ring light to control the intensity. Adjust the brightness to prevent overexposure or glare on reflective surfaces.

Figure 5.2: Ring Light adjustment for optimal illumination.
5.4 Capturing Photos and Videos
Use the included controller to capture 12MP photos and 1080P videos. The captured media is saved to the 32GB SD card. The controller allows for easy adjustment of settings and stable image capture.

Figure 5.3: Capturing Discoveries with the microscope.
5.5 PC Monitoring and Sharing
Connect the microscope to a computer via the USB interface for a larger viewing experience. This feature enables easy photo retrieval, editing, and online sharing of your observations.

Figure 5.4: Transmit and Share feature via USB connection to a PC.
5.6 Flexible Arm Usage
The flexible boom arm allows for precise positioning of the microscope. Adjust the multiple joints to achieve the desired angle and height for inspecting various objects, including large circuit boards or coins. The arm provides ample working space.

Figure 5.5: More Joints, More Flexible arm for versatile positioning.

Figure 5.6: Improve Soldering Accessories - ample space for tools.
5.7 Coin Inspection
The microscope is ideal for coin collecting, featuring a 16"+5" stand post for capturing full views of coins, from dimes to large silver dollars. The wide field of view and increased working space enhance inspection flexibility.

Figure 5.7: Effortlessly Observe Larger Coins.
Video 5.8: Opqpq ODM702 Flex 10-inch LCD Digital Soldering Microscope overview. This video showcases the microscope's features, flexibility, and various applications, including soldering and coin inspection.
6. Maintenance
Proper maintenance ensures the longevity and optimal performance of your microscope.
- Cleaning the Lens and Screen: Use a soft, lint-free cloth specifically designed for optical surfaces to clean the lens and screen. For stubborn smudges, a small amount of lens cleaning solution can be applied to the cloth (not directly to the lens/screen).
- General Cleaning: Wipe the body of the microscope and the flexible arm with a soft, dry cloth. Avoid abrasive cleaners or solvents.
- Storage: When not in use, store the microscope in a clean, dry environment, away from dust and extreme temperatures.
- Battery Care: If using battery power, ensure the device is charged regularly. For long-term storage, charge the battery to about 50% to prolong its lifespan.
7. Troubleshooting
If you encounter issues with your ODM702 Flex Digital Microscope, refer to the following common problems and solutions:
- No Power: Ensure the power adapter is securely connected and the outlet is functional. If using battery, check if it is charged.
- Blurry Image: Adjust the focus knob carefully. Ensure the object is within the working distance of the microscope. Clean the lens if necessary.
- No Image on Screen: Check all cable connections, especially between the microscope unit and the screen. Ensure the device is powered on.
- PC Connection Issues: Verify the USB cable is correctly connected to both the microscope and the computer. Ensure any necessary drivers are installed on your computer. Refer to the Opqpq support website for driver downloads and further assistance.
- Ring Light Not Working: Check the power connection to the ring light. Adjust the brightness knob to ensure it's not set to minimum.
If the problem persists, please contact Opqpq customer support for further assistance.
8. Specifications
| Feature | Specification |
|---|---|
| Model Name | ODM702 Flex |
| Light Source Type | LED |
| Material | 10" Large LCD Screen + Flex Boom Arm + Ring Light + Soldering Mat |
| Color | Silver |
| Real Angle of View | 178 Degrees |
| Magnification Maximum | 1300 x |
| Item Weight | 4.65 Kilograms |
| Voltage | 5 Volts |
| Brand | Opqpq |
| Compatible Devices | Laptop, Personal Computer |
| Power Source | AC & Battery |
| Manufacturer | Opqpq |
| Manufacturer Part Number | ODM702 Flex |
| Model Number | ODM702 Flex |
9. Warranty and Support
The Opqpq ODM702 Flex Digital Microscope comes with a 1-year warranty from the date of purchase.
For warranty claims, technical support, or any questions regarding your product, please contact Opqpq customer service through their official website or the retailer where the product was purchased. Please have your model number and purchase information ready when contacting support.